

Window Privacy Film DIY: A Practical UK Guide
You're standing in a ground-floor Victorian flat, looking at a bathroom window that lines up almost perfectly with the pavement. By late afternoon in November, the streetlamp seems to come on just as you're trying to relax, and the net curtain that promised privacy mainly softens the view while catching every bit of glare.
That's where window privacy film DIY earns its place. It can change the sightline without replacing the glazing, but the successful installation starts before you pick up a squeegee. You need the right film for the room, the right approach for the glass, and, if you're renting, a removal plan that won't create an argument over the deposit. UK suppliers describe domestic fitting kits containing film, a squeegee, a spray bottle and instructions, with DIY material costs typically around £10–£50, depending on size and quality. Professional fitting for more complex work is placed at about £60–£200 per window by the same UK guidance, which explains why this is generally treated as an accessible home-improvement project rather than a specialist glazing upgrade. UK privacy window film installation guidance
Why Window Privacy Film Works for UK Homes
Privacy film is a thin vinyl or PET layer applied to the inside surface of glass. Frosted and patterned finishes scatter incoming light, breaking up the direct sightline so someone outside sees brightness, shapes or texture rather than a clear view into the room. You still get daylight, but the pane stops behaving like an unfiltered picture window.
That makes it useful in overlooked kitchens, street-facing lounges, internal bathroom glazing and patio doors in tightly spaced new-build estates. It also works well on front-door sidelights, where a curtain can feel awkward and a clear pane can expose the hallway. The category is widely sold in the UK as a low-cost domestic fitting option, and guidance says DIY installation is feasible on flat, standard-sized panes. Small bubbles can usually clear within 48–72 hours, provided the film was applied correctly and the moisture has somewhere to evaporate. Practical UK advice on domestic privacy film
What the film can and cannot do
Frosted film usually gives more dependable privacy than a net curtain because it works directly across the glass. It diffuses the view while avoiding the fabric folds, dust and movement that can make lightweight curtains less effective at certain angles. Some films also offer secondary benefits such as reducing solar heat entering through bright glazing and helping limit UV-related fading of furnishings, but privacy should remain the primary reason for choosing the product.
It isn't a security film. It won't stop a determined intruder, strengthen the glass or replace a proper lock, laminated pane or security measure. It also won't make every window private in every lighting condition. A mirrored film can reflect the outside view during the day when the exterior is brighter, but that effect can reverse at night when lights are on indoors.
Fitter's rule: decide whether you need privacy, glare control, decoration or removability before choosing a finish. A film that looks right in a product photograph can be the wrong solution for the room.
For a useful visual comparison of finishes and applications, see this guide to the best window film for privacy. If renovation work has left you between homes, advice on temporary housing during a Norwich renovation can also help you plan improvements around a short-term move rather than rushing a permanent fitting.
Choosing the Right Film for Each Room
Start with the sightline, not the colour. A bathroom window facing a pavement needs a different solution from a hallway transom where you only want to soften the view. The three common families are frosted, one-way mirrored and patterned or decorative film, and each behaves differently once daylight, room lighting and viewing distance enter the equation.
Frosted products are the safest default for bathrooms, WC cloakrooms and street-facing sidelights. One UK retail listing describes certain frosted films as providing 95% or more privacy at a distance of 1 metre, while UK product guidance also describes mirrored film at 80% reflectivity. Those are product-specific claims, so check the exact specification for the roll you're buying rather than assuming every frosted or mirrored film performs identically. UK privacy film product guidance and performance examples
| Film type | Privacy level | Light transmission | Best room match | Backing |
|---|---|---|---|---|
| Frosted | High, with some products claiming 95% or more at 1 metre | Diffused daylight | Bathrooms, WCs, overlooked sidelights | Adhesive or static-cling |
| One-way mirror | Directional and dependent on lighting | Daylight remains available, but the reflective face changes the view | Bright daytime street-facing rooms | Usually adhesive |
| Patterned or decorative | Partial, depending on pattern and coverage | Usually good, softened daylight | Front doors, internal panels, hallway glazing | Adhesive or static-cling |
Match privacy to the room
Use full privacy where people may be changing, bathing or using the toilet. A full-height frosted panel is more reliable than a decorative stripe placed only across the centre, especially if the window is low or overlooked from a higher pavement.
Kitchens and lounges often suit partial privacy. A band of frosted film, a reeded pattern or a lower-panel treatment can obscure the most exposed part of the glazing while preserving a sense of outlook above it. Decorative film is best where the view doesn't need to disappear completely, such as a hallway transom or internal glazed door.
One-way mirror film deserves caution. It depends on a light differential, so it can work during a bright day with a darker room but fail to provide the same privacy after dark. If you choose it for a lounge or bedroom, plan to pair it with blinds or curtains for night-time use.
Adhesive film generally makes more sense for a long-term installation on suitable uPVC glazing. Static-cling film is the better match for short-term lets, rentals and rooms where you expect to change the design, because it can be repositioned and removed without committing the pane to a sticky backing.
Measuring, Cutting and Applying the Film
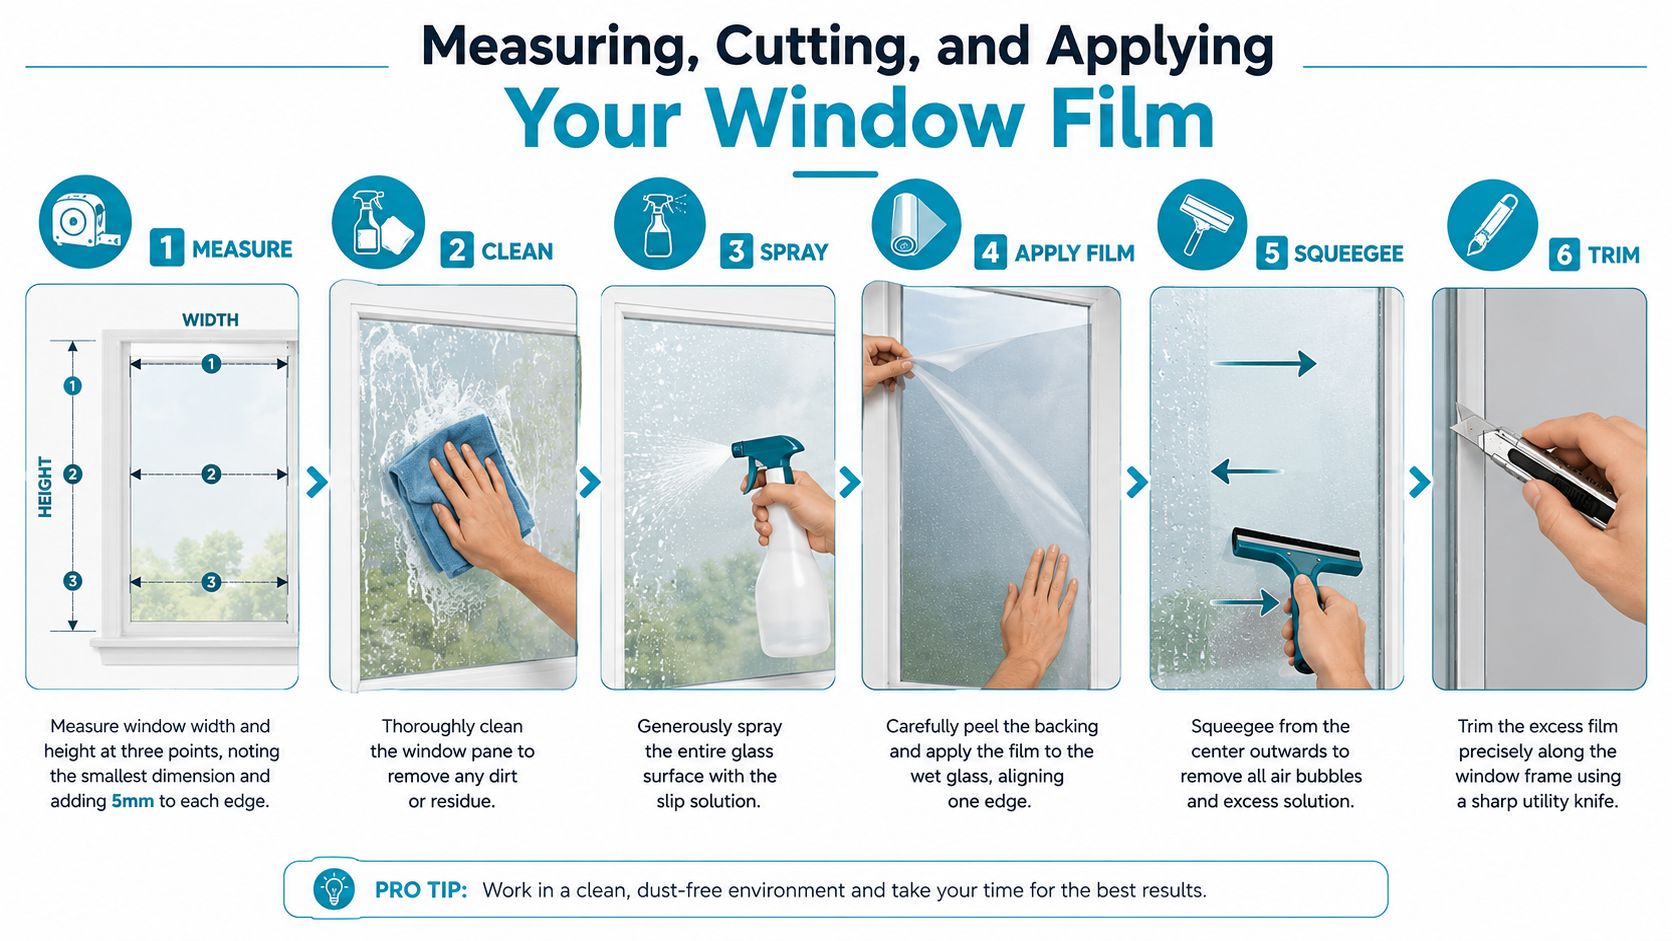
Good fitting begins with accurate glass measurements. Measure the visible pane, not the overall frame, at three points across the width and three points down the height. Record the smallest width and height, then cut the film oversized by 5 mm on every edge so you can align it properly and make a clean final trim. If the glazing sits inside a deep beaded frame, allow for that recess rather than forcing the film tightly into a corner.
A flat work surface, a steel ruler and a fresh snap-off blade make a bigger difference than an expensive kit. Keep the backing attached while cutting, place the film face-up, and use long, controlled strokes against the ruler. UK fitting instructions recommend cutting oversized first, with one guide specifying about 1 inch or 25 mm extra on each dimension before final trimming. DIY window film fitting instructions
Prepare the glass and slip solution
Clean the pane until your cloth comes away clean, paying particular attention to the corners and the strip beside the gasket or bead. A tiny grit particle becomes a permanent raised spot under the film. Spray the glass generously with a weak slip solution made from roughly 500 ml of water and two or three drops of baby shampoo, or a single drop of washing-up liquid. Too much soap makes the film skate around and prevents it from settling.
Peel back around 10–15 cm of the liner, keeping the rest protected. Align the exposed top edge against the glazing bead, then press that short section onto the wet glass. Spray the exposed face of the film with the same solution. The wet surface lets the squeegee slide without scuffing the film.
Hold the squeegee at roughly 45 degrees and work from the centre towards the nearest edge with firm, overlapping strokes. Don't jab at individual bubbles randomly. Each stroke should push water and air into a clear escape route. Re-wet the film face whenever the squeegee starts dragging, and gradually pull the liner away as the installed area grows.
Once the sheet is flat, trim around the perimeter with the blade held flat against the frame. Keep your fingers away from the cutting path and replace the blade if it starts pulling the film. Finish with a dry pass along all four edges, using enough pressure to seat the border without cutting into the gasket. For another practical walkthrough, compare these instructions with how to apply privacy window film.
Renter-Safe Choices and Landlord Approval
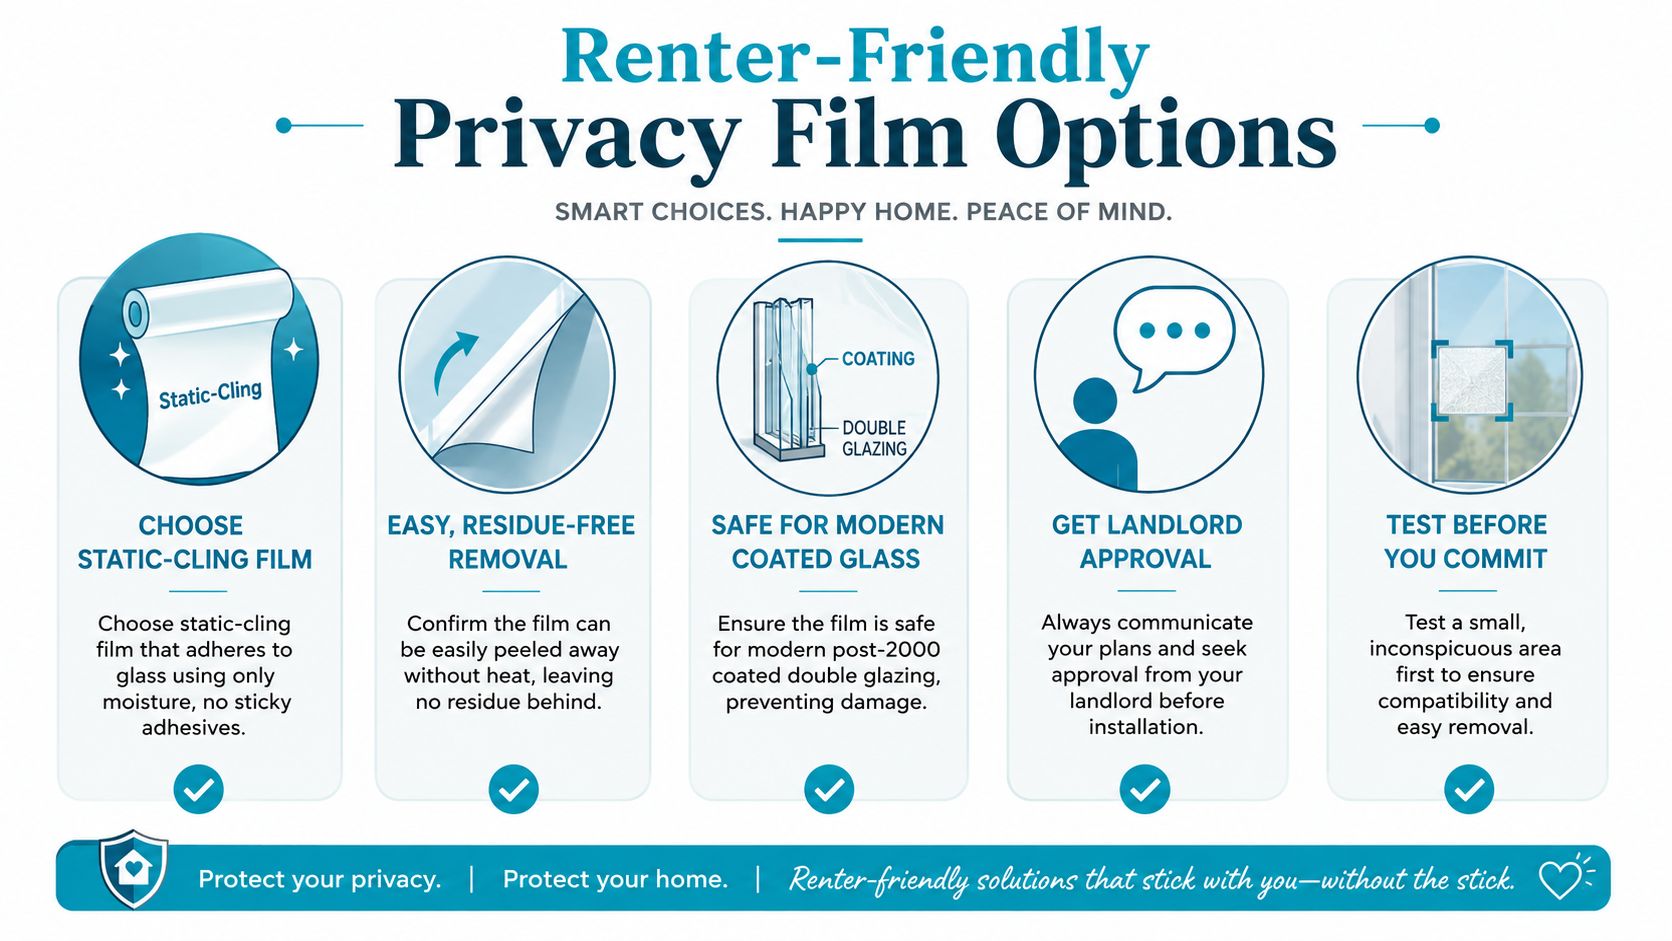
Renters often ask whether privacy film is removable, but “removable” on the packaging isn't a complete answer. The important distinction is between static-cling film, which grips through moisture and surface contact, and adhesive film, which relies on a sticky layer that can leave residue or interact poorly with specialist glazing coatings.
Static-cling is normally the safer starting point for a rental. It can be peeled away without heat and is less likely to leave a ghosted adhesive outline, including on modern coated double glazing. Adhesive film may provide a longer-term bond on suitable uPVC, but it carries more risk at checkout, particularly if the product isn't explicitly described as removable. Some coatings can be damaged or altered by unsuitable films, so don't assume that a clean-looking pane is automatically compatible.
England's private rented sector contained 4.6 million privately renting households in 2023–24, which makes clear, compliant advice especially important for tenants who need privacy without risking a deposit dispute. UK renter-focused window film guidance
A landlord-safe checklist
Before ordering, send the landlord or agent the product specification and a photograph of the window. Ask for written approval, particularly if the film changes the external appearance or covers a door or escape window.
- Choose the right label: Look for “static” or “removable”, not merely “easy to apply”.
- Explain the method: Confirm that you'll use no screws, trims, brackets or permanent fixings.
- Address the glazing: Ask whether the pane has a specialist coating and check the film maker's compatibility advice.
- Protect the record: Photograph the glass, frame, seals and surrounding paint before fitting.
- Keep the evidence: Store the packaging, product sheet and an off-cut for the end-of-tenancy inspection.
Avoid mirrored one-way film on a street-facing elevation unless permission is clear. Even when it performs well inside, the reflective exterior can change how the property looks from outside. A plain frosted or lightly patterned static-cling product usually creates fewer objections and gives you a simpler removal process.
For a non-adhesive option, see this explanation of window privacy film without adhesive.
Troubleshooting Bubbles, Edges and Peeling
Most failed installations don't fail because the film is defective. They fail because the glass wasn't clean, the solution was too soapy, or the installer stopped squeegeeing while water was still trapped underneath. The repair depends on what you can see and where the problem starts.
Fix the visible faults
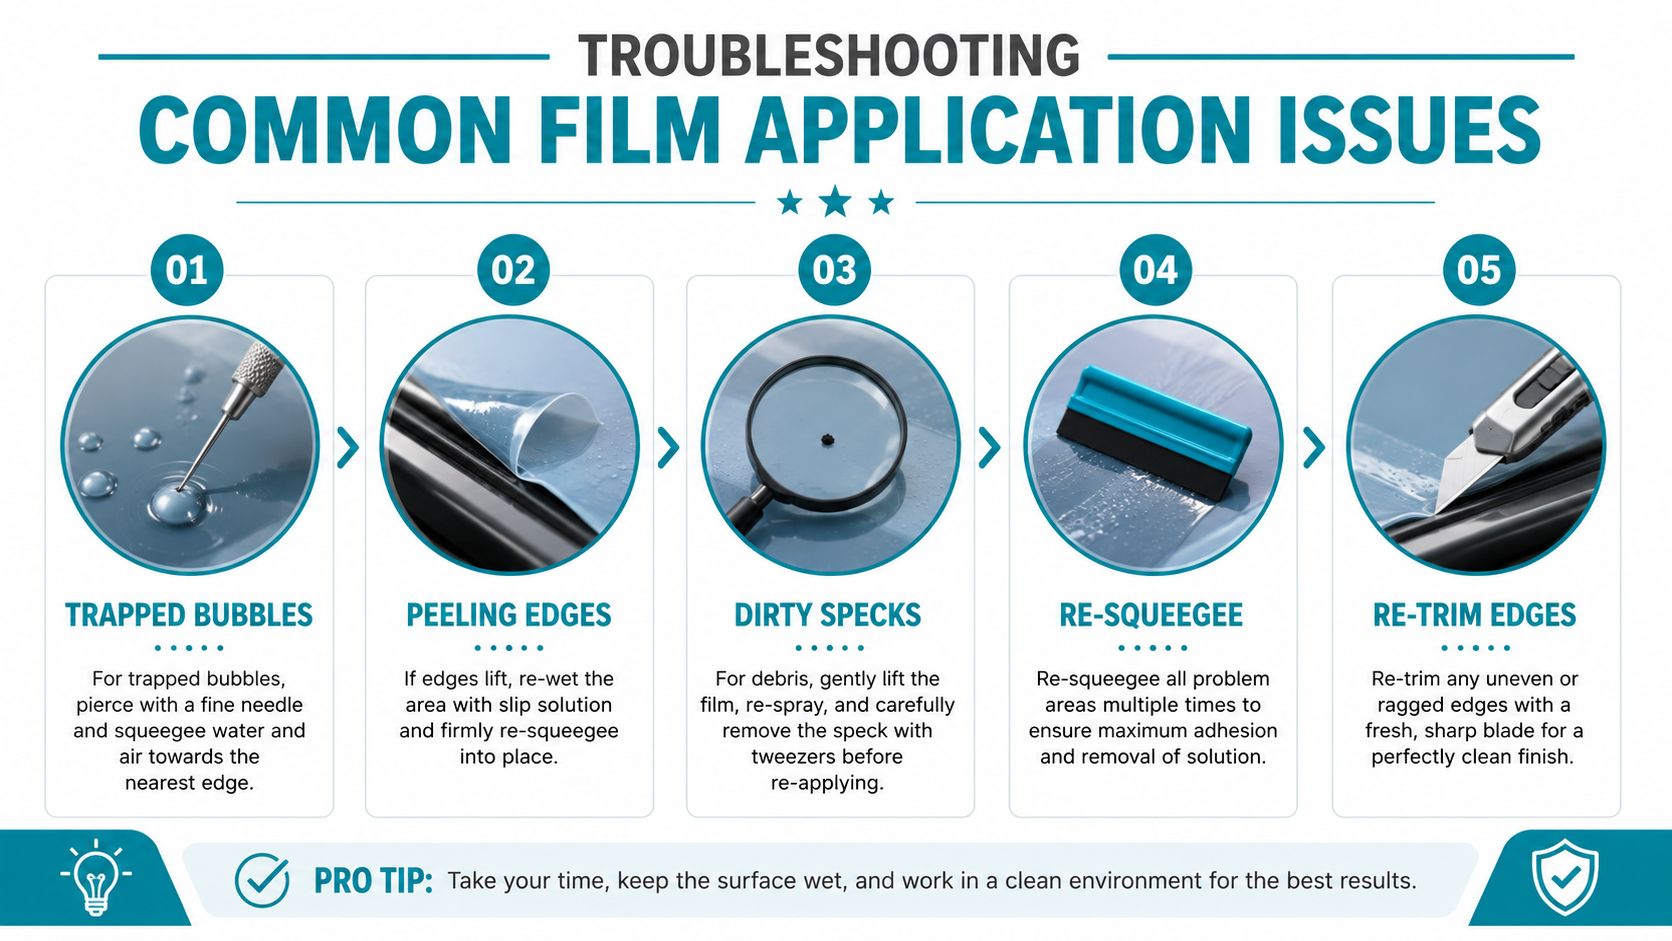
Trapped bubbles contain air or excess slip solution. Pierce each bubble with a fine needle, using the smallest opening possible, then push the contents towards the nearest edge with the squeegee. Don't slice a cross into the film, as those cuts remain visible and can spread.
Dust specks need more patience. Lift the nearest corner or edge, mist the exposed adhesive or glass with slip solution, and remove the particle with the tip of a credit card wrapped in a lint-free cloth. A sharp metal tool can scratch the film or the pane, so keep the contact gentle.
Edge lift usually begins where water remains at the perimeter or where the cut is ragged. Re-wet the lifted section, press it back from the centre towards the edge, then run a dry squeegee along the border. If the product uses adhesive, give the edge firm, even pressure rather than repeatedly lifting it.
Pressure matters: use firm overlapping strokes, but don't bend the squeegee into the glass. Excess force at a dry edge can mark the film instead of improving the bond.
Peeling corners often point to contamination from greasy fingers or an edge that hasn't cured. Warm the lifted section with a hairdryer on medium heat, clean the area with isopropyl alcohol on a cloth, and let the alcohol flash off completely. Re-seat the corner and hold firm pressure for thirty seconds, then leave it alone.
A cloudy appearance can be normal while moisture escapes, but a line of dirt around the perimeter won't disappear by itself. If the cut is uneven, re-trim with a fresh blade once the film is stable. Keep the blade flat and follow the frame rather than trying to correct a wavy edge freehand.
Curing, Cleaning and Removing the Film
Adhesive film needs 7–14 days before its first clean so the adhesive can cure. UK product guidance recommends waiting through that period, and small water bubbles may remain while moisture evaporates through the film. Don't press the edges repeatedly, pick at cloudy spots or wash the glass during the curing window. Those actions can lift a border that would otherwise settle.
After curing, use a soft microfibre cloth and a mild washing-up-liquid solution in water. Avoid ammonia-based sprays, white spirits and abrasive pads. They can cloud the surface, weaken the finish or encourage the edges to lift. Spray the cloth rather than flooding the perimeter, then wipe with light overlapping passes.
Removal depends on the film type and the glazing. Static-cling can generally be lifted from a corner and peeled away slowly, which is why it remains the sensible choice where the tenancy or the pane's coating makes permanent adhesive undesirable. Adhesive film needs more care. Warm a corner with a hairdryer on medium heat and peel back at a shallow 45-degree angle, keeping the adhesive soft rather than pulling sharply away from the glass.
For stubborn residue, dab isopropyl alcohol onto a cloth and work a small area at a time. Never attack coated double glazing with a metal scraper or razor blade. Once the adhesive has gone, wipe the pane with vinegar-water to help dissolve the remaining film residue, then dry the glass and inspect the seals, beads and corners.
The cleanest rental handover is planned before installation. Keep the original photographs, retain the product packaging and remove the film slowly enough that you can stop if the coating or surface behaves unexpectedly.
Quote My Wall offers DIY window privacy films, including frosted films and window privacy clings, with application guidance covering measuring, cutting, positioning and smoothing bubbles. Visit Quote My Wall to compare removable and adhesive options before choosing the finish that suits your room and tenancy.