

Vinyl Wrap for Cabinets: A Complete UK Homeowner Guide
You've got a kitchen that still works, but it looks tired every time you walk in. The doors are sound, the carcasses are fine, and the thought of ripping everything out just because the colour feels dated is hard to justify. That's exactly where vinyl wrap for cabinets earns its place, but only if you match the film to the right substrate and stop pretending every cabinet face behaves the same.
Why UK Homeowners Are Wrapping Their Cabinets
A typical UK homeowner reaches this point after one too many side-eye glances at a dated kitchen. The layout still functions, the units aren't falling apart, and yet the room feels stuck in another decade. A full replacement looks dramatic on paper, but in real life it means more mess, more downtime, and a bigger hit to the budget than many want to take on for a room that already has decent bones.
Wrapping sits in the middle, and that's why it's popular. It keeps the existing carcasses in service, changes the look fast, and avoids the upheaval of new doors, new hinges, and a full refit. Industry guidance commonly cites 7 to 15 years for professional-grade wrap when installed and cared for properly, while lower-cost DIY films tend to last 3 to 5 years before peeling or discolouration becomes noticeable, which is a big reason the option makes sense for homeowners planning to stay put for a while Armor Kitchen Wrap.
Who it suits, and who should skip it
Wrapping suits renters with permission, homeowners staging a sale, and families who want a cleaner look without signing up for a full kitchen project. It also suits people who already like the cabinet layout and only want to change colour or finish. If the doors are swollen, the hinges are failing, or the boxes are badly damaged, wrap is the wrong answer. You're dressing a sound kitchen, not rescuing a broken one.
Practical rule: if the kitchen is structurally fine but visually tired, wrapping is sensible. If the kitchen has failed at the substrate level, spend the money elsewhere.
Shaker and flat-panel kitchens are the safest candidates because the geometry is straightforward and the finish reads cleanly. High-gloss fronts can be wrapped, but they punish sloppy prep and show edge defects faster, so they need a fitter who knows what they're doing. For older UK homes with painted timber or mixed finishes, wrapping can still work, but only if you accept that the prep decision matters more than the colour choice.
What Cabinet Vinyl Wrap Actually Is
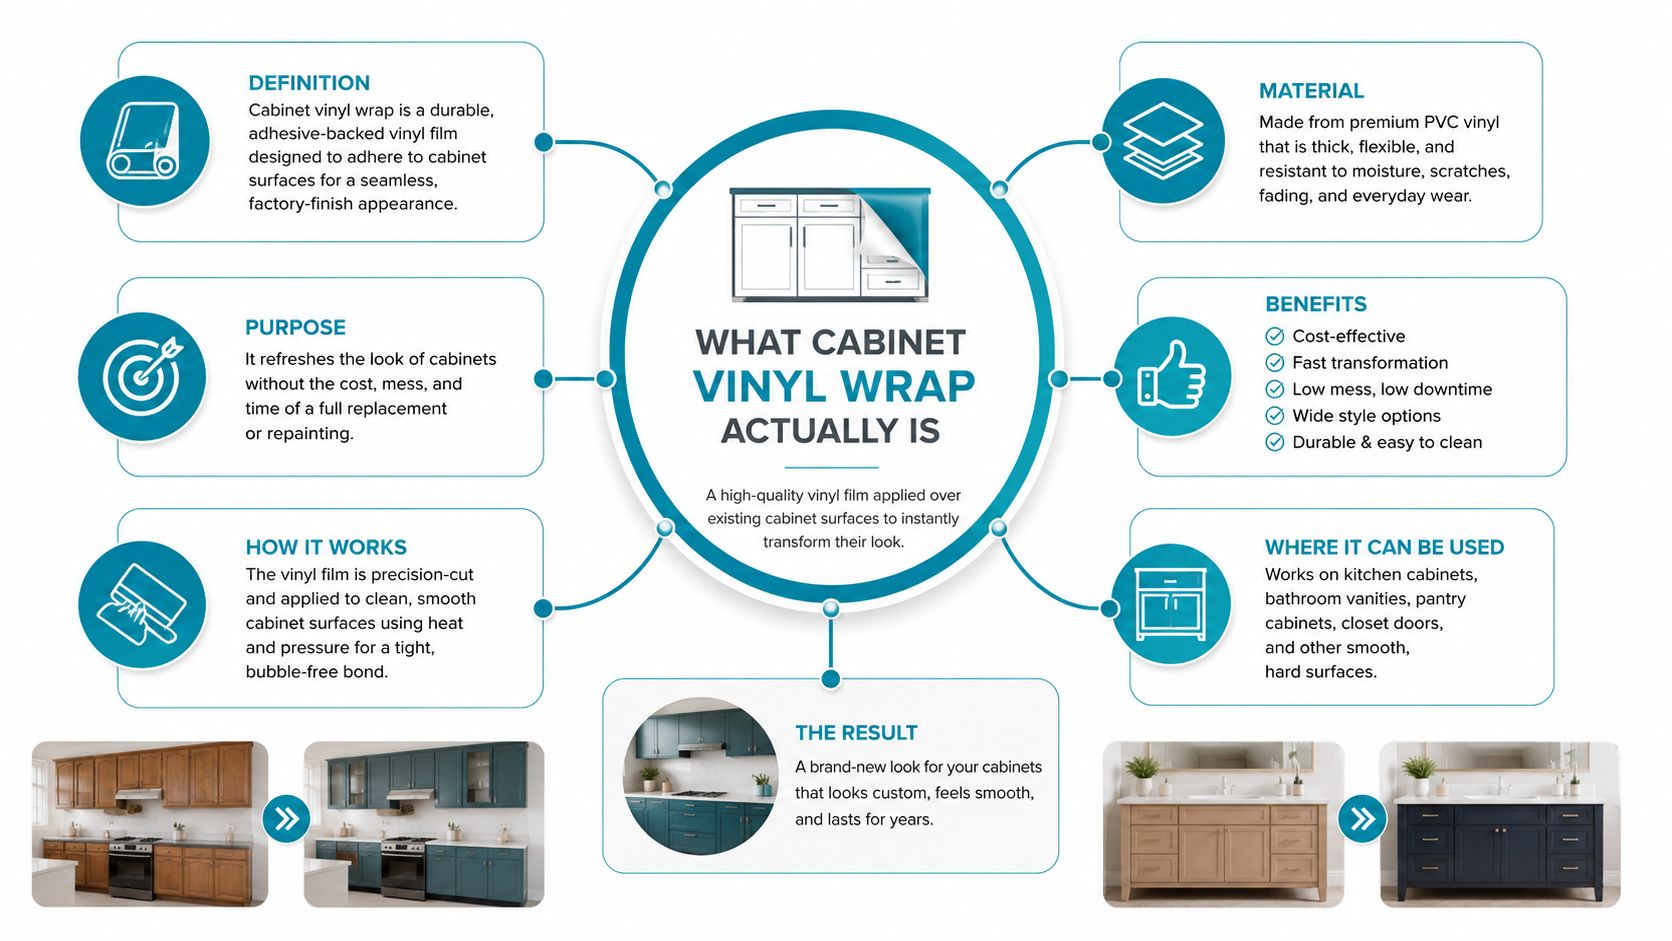
A cabinet wrap is not a sticker. It is a second skin that sits over the door, follows the shape, and finishes the surface without replacing the structure underneath. The film does the visual work, the adhesive does the bonding, and the substrate below has to be clean, sound, and compatible enough to hold that bond over time.
Film, adhesive and finish
The better cabinet films use pressure-sensitive acrylic adhesive, which bonds properly once the film is pressed, aligned, and worked into place. That is a different product from cheap contact-paper-style coverings that depend on weak adhesive and a forgiving homeowner. Quality kitchen film is also specified with a useful thickness, often around 8 to 10 mil for cabinet use, and it is chosen for a finish that can handle fingerprints, heat and repeated cleaning SmartBuy Alibaba.
Kitchen-grade films behave differently from decorative vinyls used elsewhere because cabinets live near steam, grease and heat, not just decoration. Finish matters as much as colour. A matte or satin face hides daily smudges better than a shiny one, while a better film gives you more predictable edge behaviour and less early shrinkage.
If you want a useful comparison point, look at the way people discuss floors that look like real hardwood. The value is not that the product is “fake”, it is that the right surface gives you the look you want while the underlying structure does the practical heavy lifting. Cabinet wrap works on the same principle, provided the substrate is worth covering.
Why precision matters
Wrapping is a prep-and-precision trade. Technical guidance still calls for doors to be removed, cleaned, and cut with an extra 2 to 3 cm margin on every side so edges can be wrapped properly and visible gaps stay out of sight Quote My Wall's guide to vinyl wrap for furniture in the UK.
The substrate ultimately determines the result. MDF usually gives the cleanest result if it is intact and properly sealed. Melamine and laminate can work well too, but they need more attention because glossy or contaminated surfaces resist adhesion. Painted timber can also be wrapped, but only if the paint is sound and fully cured, because any flaking or soft finish will come back through the film. For a surface that already has a stable coating, the wrap has something sensible to grip.
A wrap is only as good as the person applying it. If the film cannot be positioned cleanly, heated into the corners and sealed at the edges, you do not have a durable finish, you have a future lift point. That is why the same job can look sharp on one kitchen and tired within months on another, even when the material looks identical on paper.
Materials, Finishes and Style Options
The finishing choice is where most homeowners start, but it shouldn't be. Start with the cabinet surface, then choose the finish that suits how the kitchen is used. A busy family kitchen with constant handling needs a different wrap from a guest kitchen or a showpiece flat.
What the finishes actually do
Matte and satin are the sensible options for most UK homes because they calm fingerprints and soften the look of older cabinetry. High gloss gives a sharper, more modern surface, but it also shows every smear and every small application flaw. Wood-grain foils are useful when you want warmth without repainting the whole room, while textured metallics and soft-touch films suit feature panels rather than every door in the room.
If you're browsing product ranges, the practical comparison on modern kitchen cabinet wraps is a reminder that the finish should follow the room, not the other way round. A dark glossy wrap can look impressive in a photo and exhausting in a real kitchen. A restrained matte finish usually ages better.
Matching film to the substrate
This is the part most guides skip, and it's the part that decides whether the wrap lasts. MDF usually gives the cleanest result if it's intact and properly sealed. Melamine and laminate can work well too, but they need more attention because glossy or contaminated surfaces resist adhesion. Previously painted timber can be excellent if the paint is sound, but it's risky if the coating is soft, flaky or greasy.
Light abrasion on glossy faces helps the adhesive key in. Degreasing is essential. A film can look perfect in the roll and still fail on the door if the substrate is contaminated, too polished, or already lifting at the edges.
| Finish vs Substrate Compatibility at a Glance | Best for | Avoid on |
|---|---|---|
| Matte solid colour | MDF, sealed timber, older kitchens that need a softer look | Damaged chipboard edges and badly swollen panels |
| Satin wood grain | Laminate, melamine, painted timber with sound prep | Flaking paint and deep scratches that telegraph through |
| High gloss | Flat MDF doors, modern kitchens with good fitting tolerances | Glossy, scratched, or poorly aligned shaker fronts |
| Textured metallic or soft-touch | Feature panels, modern accents, low-touch areas | High-rub doors, steam-heavy zones, messy prep surfaces |
For a practical UK buying reference, the furniture-wrapping advice on Quote My Wall's vinyl wrap for furniture guide is useful because it reinforces the same point, surface condition decides the outcome more than the print does.
Use this rule: if the cabinet face feels stable, clean and dull enough to key, wrap is plausible. If it's glossy, contaminated or unstable, prep gets harder and the result gets less forgiving.
Vinyl Wrap Versus Paint and Refacing
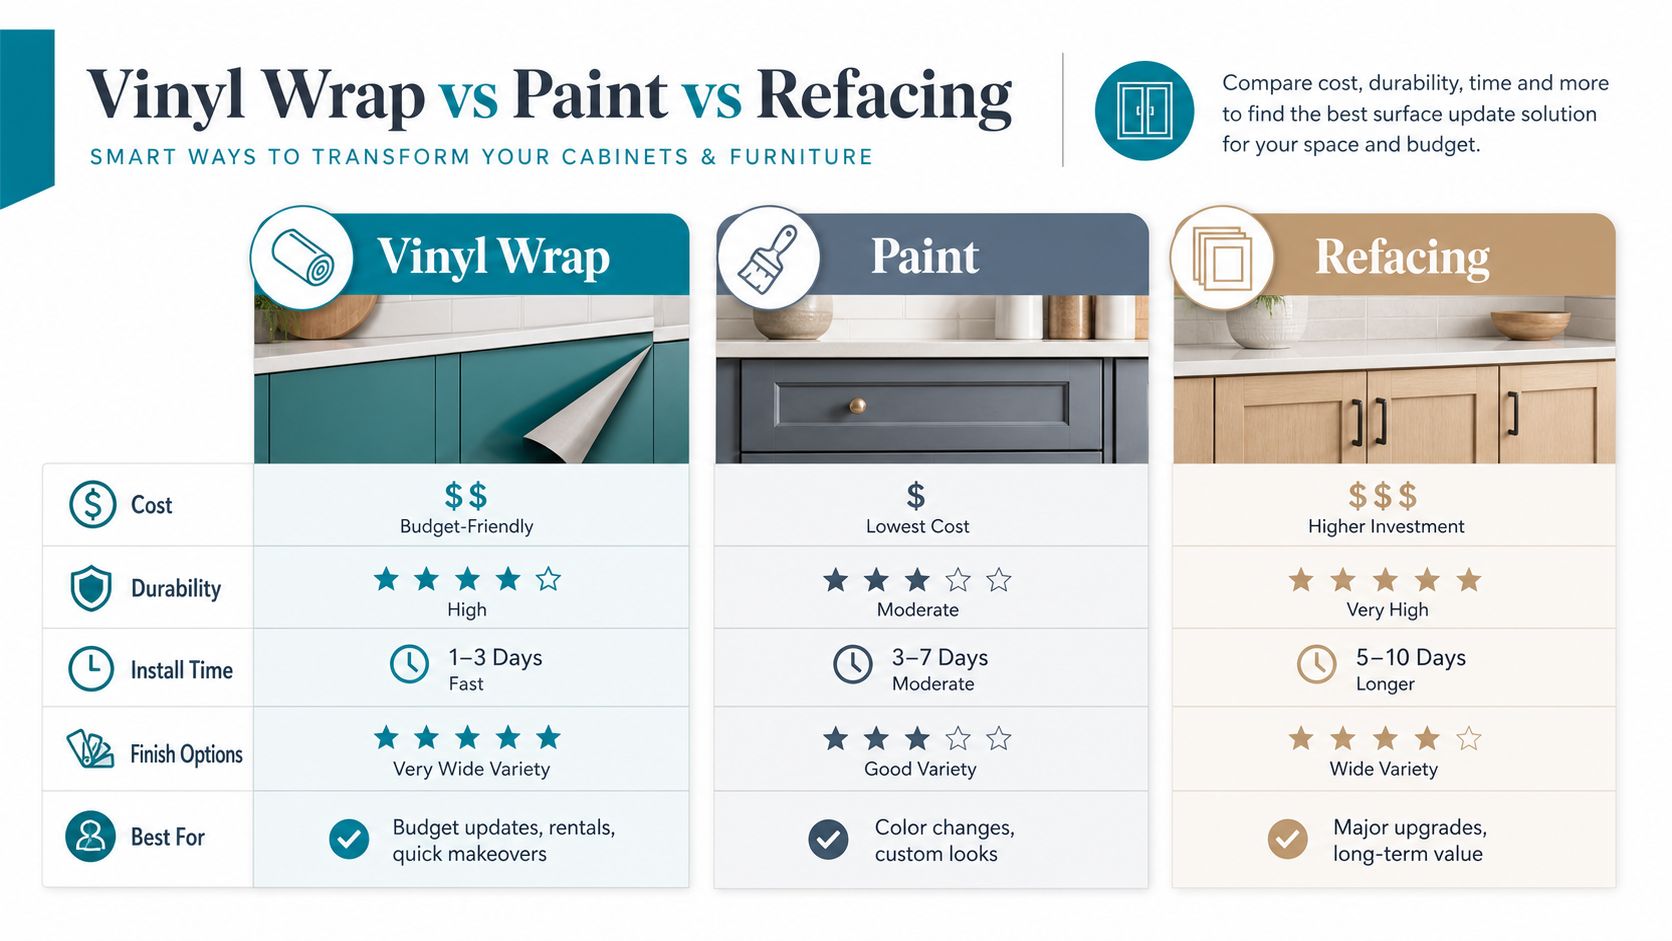
These three options do not compete on the same terms. Wrap wins on speed and reversibility. Paint wins on tactile authenticity and the ability to touch in small defects. Refacing wins when the cabinet structure itself is the problem and you need new doors, new fronts, or a refresh that deals with worn carcasses as well as the finish.
What each option is good at
Wrap gives you the cleanest transformation with the least disruption, especially on flat doors and straightforward shaker fronts. Paint suits people who want a more traditional hand-finished feel and don't mind a longer job with more drying time. Refacing is the honest choice when the hardware, the edges or the cabinet boxes themselves are failing, because then the finish is only one part of the problem.
For a deeper DIY-versus-pro perspective, the guidance on Professional painting for London homes is relevant because it highlights what homeowners usually underestimate, surface prep is the primary labour. The same rule applies here. If the prep is extensive, any apparent saving shrinks quickly.
The decision rule that actually works
Use wrap when the units are structurally decent and you want a visual reset without a refit. Use paint when you're happy to live with a more traditional finish and you're prepared to accept touch-up work later. Use refacing when the doors are beyond decent, the hinges are tired, or the cabinet carcasses need more than cosmetic cover.
The common mistake is assuming wrap is always the cheapest route. It isn't, once you factor in door repairs, patching, cleaning, sanding and the time needed to make damaged surfaces stable enough for film. That's why the internal walkthrough on how to cover kitchen cabinets is worth reading before you commit, because the prep list is where budgets are won or lost.
How to Prep and Apply Cabinet Wrap
The job starts with the substrate, not the film. MDF, melamine, laminate and painted timber all behave differently, and that difference decides whether the wrap will hold or lift. Remove the doors, take off handles, clean every face properly, then inspect the edges, joints and corners before you cut a single panel.
Surface condition comes first
Glossy doors need light abrasion so the adhesive has something to grip. Grease needs proper degreasing, not a quick wipe with a damp cloth. If the kitchen has old cooking residue, steam staining or silicone contamination, the wrap will fail at the corners long before the middle of the door looks tired.
Do this before you buy film: test one hidden patch first. If the surface will not hold a small piece cleanly, the full door will not improve on its own.
Temperature matters more than some might consider. Installation guidance points to an ambient window of about 18 to 24°C, with the surface above 15°C Alibaba LifeTips. Cold rooms slow adhesive flow and make trapped micro-bubbles more likely. Overly warm rooms shorten working time and leave you fighting the material while trying to align a full panel. In a typical UK kitchen, that means you need steady room conditions, not a cold morning with the window open and the radiator off.
Where DIY breaks down
Flat slab doors are the easiest. Simple shaker doors are still manageable if you are neat and patient. Raised panels, deep grooves and inside corners are where inexperienced hands get exposed, because the film has to be persuaded around shape changes without starving the edge or overstretching the face. If the door profile is awkward, the wrap job turns into a fitting job very quickly.
The practical cutting rule is simple, leave the 2 to 3 cm margin on every side, then trim once the film is aligned. That extra allowance gives you space to fold the film over the edge cleanly and avoid visible gaps. If a fitter starts cutting flush from the outset, they are gambling on perfection.
For a clear step-by-step reference, the internal guide on how to apply vinyl wrap follows the right sequence. The part that matters most is not the order of steps. It is judging which doors are sound enough for wrap and which ones should be painted, repaired or left alone. If the edges are damaged or the profile is too complex, stop there and save yourself the redo.
How Long Cabinet Wrap Lasts in a Real UK Kitchen
A lived-in UK kitchen is hard on any finish. Kettles sit under wall units, dishwashers push out heat and humidity, sinks create repeated moisture, and cooking spreads vapour through the room every day. Wrapped cabinets do not fail at random. They usually give up first at the stress points.
Substrate matters more than most guides admit. MDF, melamine, laminate, and painted timber all behave differently under vinyl, and that changes how long the wrap holds. Sound, sealed surfaces give the adhesive something to bite into. Swollen MDF edges, slick melamine that has not been properly keyed, old laminate with weak corners, and flaky painted timber all shorten the life of the job. The film can only perform as well as the board behind it.
Where the wear shows up
The first signs are usually edge lift, seam opening, surface discolouration, and adhesive creep near heat sources. Areas around hobs, kettle stations, and sink bases take the worst punishment. Upper units above steam-heavy zones age faster too, because the underside sees heat and moisture before the face does.
Heat resistance matters, and it should be judged properly rather than through vague “waterproof” language. Cabinet-grade films are commonly specified for continuous exposure of roughly 70 to 93°C near ovens or hob-adjacent faces SmartBuy Alibaba. That does not mean you should treat them like cooker splash zones. It means the film has a realistic tolerance before repeated thermal cycling starts to weaken the bond.
Edge failure tells you more than a glossy brochure ever will. If the door profile is sharp, the board is porous, or the fitting was rushed, the wrap will start to lift at corners long before the main face looks tired.
What extends life in practice
The maintenance routine is boring, and that is why it works.
Use soft cloths and mild cleaning products. Microfibre is fine, abrasive pads are not. Harsh chemicals cut the life of the finish down quickly.
Re-press lifted edges before they spread. A soft roller or firm fingertip pressure can catch small lifts early, and once the adhesive starts to open at a corner, it usually keeps going.
Control the heat load. Keep splashbacks behind hobs and use extraction when cooking. Wipe under-sink areas and kettle zones quickly, because standing damp is harder on edges than most homeowners expect.
Professional-grade wraps commonly land in that 7 to 15 year lifespan band when they are installed properly and maintained correctly Armor Kitchen Wrap. In a lived-in UK kitchen, treat that as the outer range, not a promise. A sensible room with decent prep can give you a long service life. A hot, damp, heavily used kitchen can wear through much sooner.
Substrate choice decides whether you get the longer end of that range. Fresh, stable boards wrapped neatly will hold up far better than tired doors with hidden moisture damage or poor edge sealing. If the surface is wrong, the wrap is not the fix. Paint or replacement makes more sense.
Design Ideas and Product Picks From Quote My Wall
A cabinet refresh works best when the colour choice fits the room rather than chasing a trend. Soft sage matte can lift a north-facing kitchen that feels cold. Warm oak foil helps tie together mismatched doors in an older property. Soft-touch grey suits a 90s shaker layout that needs modernising without looking stark.

Quote My Wall's vinyl wraps for furniture are one option for cabinet-facing upcycling projects, and its wall decals can help the refreshed kitchen feel connected to the rest of the home. That matters if you're updating a kitchen-living space and don't want the cabinets to look disconnected from the room.
Before you order anything, do three things. Measure carefully, test adhesion on a hidden spot, and check the finish against the way you clean your kitchen. If you use strong cleaners or scrub frequently, choose a finish that can take that routine without looking battered.
Quote My Wall carries vinyl wraps for furniture, wall decals, and other home vinyl products that fit this kind of refresh. If your cabinets are sound and you want a cleaner look without a full refit, visit Quote My Wall to compare finishes, check samples, and choose a wrap that matches your substrate, your cleaning habits, and the way you use the kitchen.