
How to Apply Vinyl Wrap for a Flawless DIY Finish
Applying a vinyl wrap boils down to three distinct stages: first, you’ve got to prep the surface like a pro; second, you apply the film with a steady hand; and finally, you finish the job by trimming and post-heating to lock it all in. Get these stages right, and you're on your way to a perfect, bubble-free finish, whether you're tackling a tired-looking wardrobe or adding some flair to your car. Let's break down exactly how to do it.
Understanding the Foundations of a Great Vinyl Wrap
Vinyl wrapping has exploded in popularity here in the UK, and for good reason. It’s a fantastic way for homeowners and DIYers to put a personal stamp on their space without breaking the bank. You can completely change the look of kitchen cabinets, old furniture, or even glass partitions, all without the faff and fumes of paint. But here’s the thing: a successful project hinges entirely on getting the fundamentals right before you even think about peeling off the backing paper.
A truly flawless finish isn't just about how you handle the squeegee. It’s a complete process, where every step directly impacts the next.
Key Phases of Application
- Preparation: Honestly, this is where the magic happens. A perfectly clean, smooth surface is the only way you'll get the vinyl to stick properly.
- Application: This is the hands-on bit. It’s all about precision, patience, and using your tools—like a good squeegee and a heat gun—effectively.
- Finishing & Curing: These are the final, crucial touches. A neat trim and a proper post-heat are what make the wrap look sharp and last for years.
If you cut corners on any of these, you’re just asking for trouble. We're talking peeling edges, frustrating air bubbles, and a finish that screams "DIY disaster." On a related note, for anyone interested in other automotive film options, the principles of careful prep and application are just as vital. This ultimate guide to Paint Protection Film (PPF) is a great read that covers similar ground.
Here's a tip from experience: Spend 80% of your effort on preparation. Getting this part wrong is the single biggest mistake I see beginners make. If you rush the prep, you'll be fighting the vinyl every step of the way.
My goal here is to give you more than just the basic instructions. I want to share the kind of detailed, practical advice that will give you the confidence to get a professional result. We'll dive deep into each phase, so you understand not just what to do, but why it's so important.
Gathering Your Essential Tools and Materials
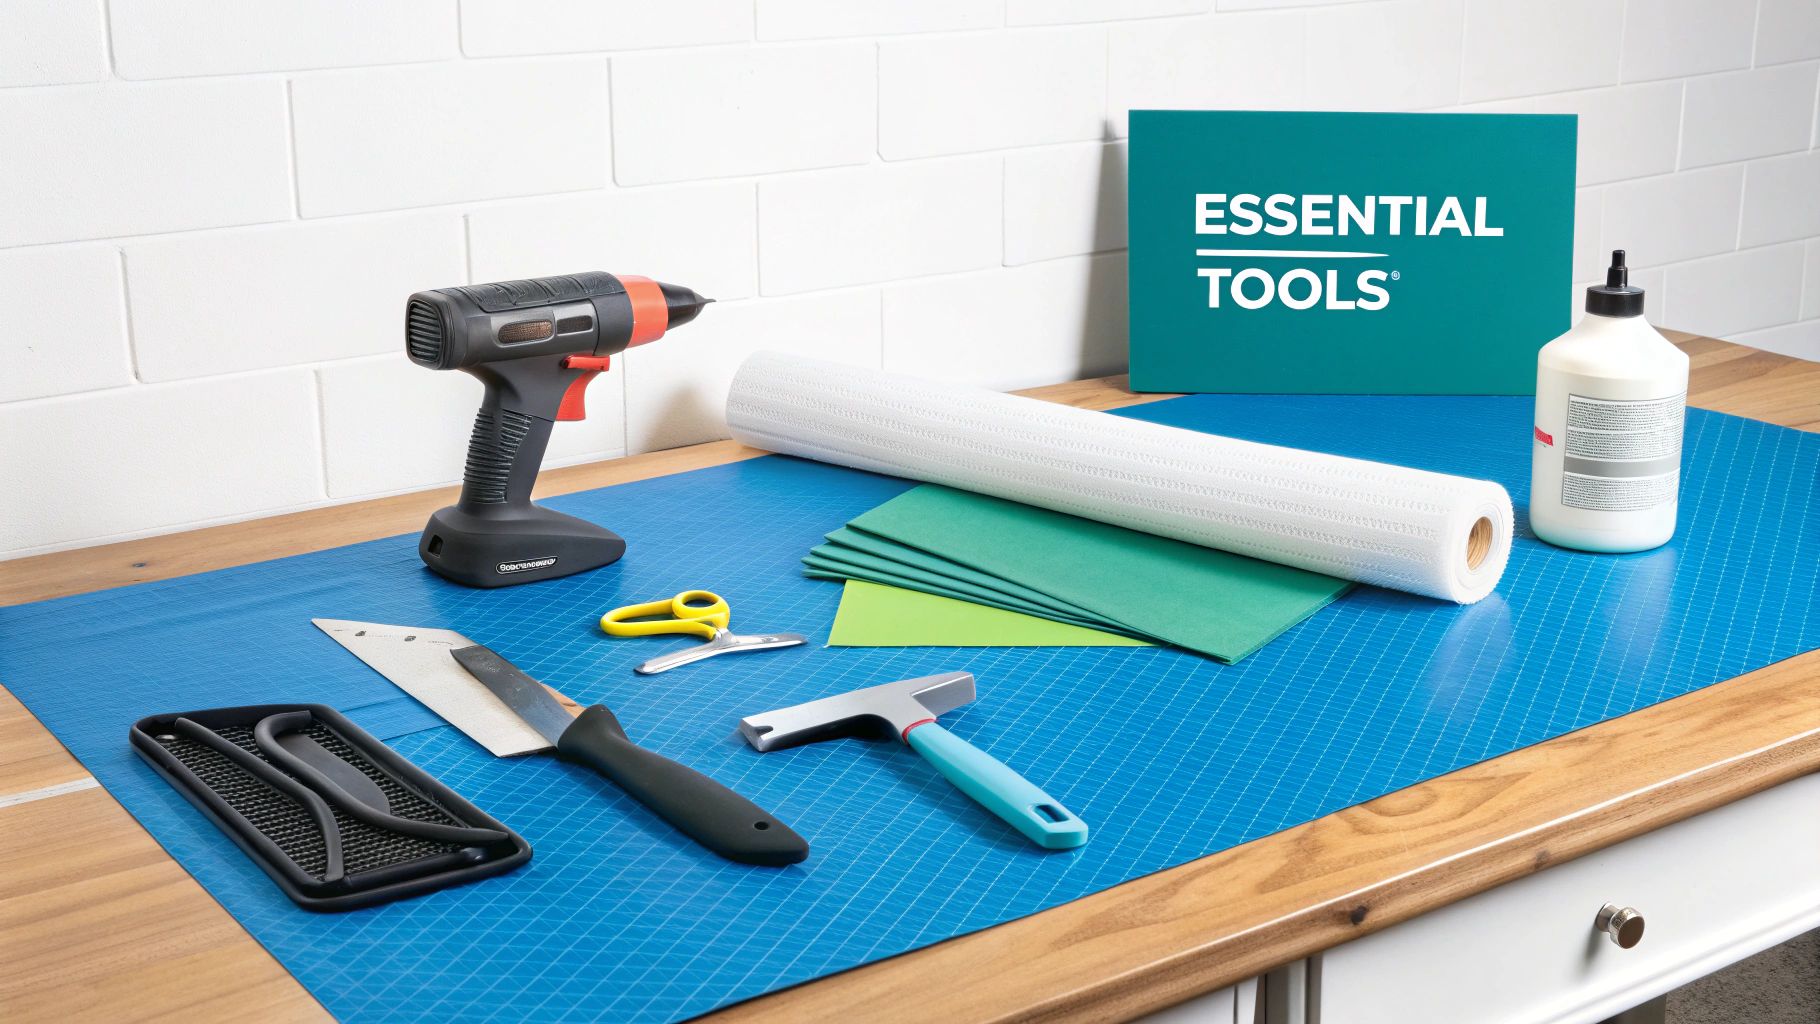
Getting a flawless, professional-looking wrap finish has less to do with luck and more to do with preparation. And that preparation starts with having the right tools on hand before you even think about peeling the backing paper off your vinyl.
Trying to tackle a wrap project without the proper kit is a recipe for frustration. It's the difference between a smooth, satisfying job and one riddled with bubbles, creases, and scratches. Trust me, the right tools make all the difference.
Choosing Your Vinyl and Core Tools
First things first, let's talk about the star of the show: the vinyl itself. If you're new to this, do yourself a huge favour and choose a quality film with air-release channels. These tiny, invisible channels in the adhesive let trapped air escape, which dramatically reduces the chances of getting those dreaded bubbles.
If you're upgrading your kitchen, for instance, there's a lot to consider. You can find some great guidance on choosing the best vinyl wrap for kitchen cabinets to ensure you get a durable, great-looking finish.
Once you’ve got your vinyl sorted, it’s time to build your toolkit. Having the right gear ready to go will make the entire process smoother and more enjoyable.
Here’s a breakdown of the essentials you'll need to get started.
Your Vinyl Wrap Application Toolkit
| Tool/Material | Primary Use | Pro Tip |
|---|---|---|
| High-Quality Vinyl | The wrapping material itself. | Look for films with air-release technology. It’s a lifesaver for avoiding bubbles. |
| Felt-Edged Squeegee | Applying firm, even pressure to smooth the vinyl onto the surface. | The felt edge is critical! It prevents scratches that a plain plastic squeegee would cause. |
| Heat Gun | Making the vinyl pliable to conform around curves and complex shapes. | Use it sparingly and keep it moving. You want to warm the vinyl, not cook it. |
| Craft Knife / Scalpel | Trimming excess vinyl for clean, precise edges. | A sharp blade is non-negotiable. Change your blades often, as a dull one will tear the film. |
| Degreaser & Isopropyl Alcohol | Cleaning the surface thoroughly to ensure proper adhesion. | Use isopropyl alcohol (at least 70%) as the final wipe-down. It evaporates without residue. |
| Measuring Tape & Ruler | Ensuring accurate measurements and straight cuts. | A metal ruler works best as a guide for your knife, preventing slips and wonky cuts. |
| Lint-Free Gloves | Handling the vinyl without leaving fingerprints or oils on the adhesive. | This small step makes a big difference in how well the edges stick down long-term. |
| Masking Tape | Temporarily holding the vinyl in place to create a 'hinge' for application. | This is my go-to trick for positioning large panels perfectly before I commit to sticking them down. |
Having these items ready will set you up for success and help you avoid the common mistakes that catch so many people out.
If there's one piece of advice I can give, it's this: don't cheap out on your tools. I've seen more projects ruined by a blunt blade or a shoddy, all-plastic squeegee than by anything else. Investing in quality gear pays for itself in the final finish.
Getting the Surface Ready for a Flawless Finish
The real secret to a stunning, bubble-free vinyl wrap has very little to do with the final application. It's all about what you do beforehand. Honestly, meticulous surface preparation is the foundation of a professional-looking job, and rushing this stage is the number one reason DIY projects go wrong.
Think of it like painting a room. You wouldn't just slap a new colour over dusty, cracked walls and hope for the best, would you? The same logic applies here. Every single speck of dust, grease, or wax has got to go. Any of that stuff left behind will stop the vinyl's adhesive from getting a proper grip.
The Cleaning and Repair Game Plan
First things first, give the surface a really thorough clean with a good quality degreaser. This is absolutely non-negotiable for things like greasy kitchen cabinets or grubby old furniture. Your standard household spray-and-wipe cleaners just won't cut it; many of them contain silicones or oils that leave behind an invisible film, which is a total nightmare for adhesion.
After that initial clean, it's time for the most critical step: a final wipe-down using isopropyl alcohol (IPA) with at least a 70% concentration. IPA is brilliant because it evaporates in a flash and leaves absolutely nothing behind, creating the perfect, sterile canvas for your wrap.
With the surface clean, it's time to play detective. Get up close and inspect every inch, because any imperfection, no matter how small, will almost certainly show through the vinyl.
- Minor Scratches: Got a few small gouges or deep scratches? Fill them with a suitable wood or multi-purpose filler and sand it smooth.
- Rough Spots: If you're dealing with rough patches or a very glossy finish, give it a light scuff with fine-grit sandpaper (around 180-220 grit). This creates a subtle 'key' that helps the adhesive bite.
- Dust Control: After any sanding, you absolutely must clean the surface again. Finish with another careful IPA wipe to get rid of every last dust particle.
Take it from me, getting the prep work right is everything. A recent DIY report actually highlighted that proper surface prep, especially a light sanding for adhesion, can boost the success rate of furniture wrapping projects by up to 50%.
Different Surfaces, Different Prep
While the core principle of 'clean and smooth' always holds true, different materials do need slightly different handling to get them ready for vinyl.
Raw, unsealed wood, for instance, is far too porous. It will just suck the life out of the adhesive, so you need to prime and seal it before you can even think about applying the wrap. A metal filing cabinet, on the other hand, might just need a really good clean with IPA. You can find some excellent advice on using sticky back plastic for furniture, which dives into many of these material-specific challenges.
This level of detail has become even more important as the UK's customisation market has boomed. People are wrapping furniture all the time now, not just cars. We've seen that for more complex jobs like wardrobes, premium cast vinyl often outsells the cheaper calendered types simply because it has a zero-shrinkage characteristic. But for that to matter, the surface has to be perfect.
Ultimately, the time you put in now pays off massively in the quality and longevity of your project. A perfectly smooth, immaculately clean surface is your best guarantee of a wrap that looks fantastic and stays put for years to come.
Applying Vinyl Wrap Like a Pro
Right, the prep work is done, and your surface is looking pristine. This is the moment where all that effort pays off as you start to bring your project to life. Applying the vinyl itself is where technique and a bit of patience really shine through. Don’t stress about getting it flawless on your first go; even seasoned installers had to learn these core methods.
For large pieces of vinyl, one of the most reliable techniques you can learn is the hinge method. It sounds simple, but it's a game-changer. Just lay your vinyl sheet over the surface and get it positioned exactly where you want it. Once it’s perfect, run a strip of masking tape right down the middle, securing the vinyl to the surface below. This tape now acts as a 'hinge', letting you handle one half at a time without the whole thing slipping.
Putting the Hinge Method to Work
With your hinge in place, the process becomes much more manageable. Peel the backing paper from one side of the vinyl, right up to the tape hinge, and snip it off. Now, grab your felt-edged squeegee.
Start applying the vinyl from the centre hinge and work your way outwards. The trick is to use firm, overlapping strokes at about a 45-degree angle. This method is brilliant because it systematically pushes any trapped air out towards the edges, dramatically cutting down the chances of getting those annoying bubbles. Once the first half is down, you can peel off the masking tape and do the exact same thing on the other side.
It’s so much more controlled than just trying to place a huge, sticky sheet by eye, which almost always ends in frustration.
Of course, none of this works without a solid foundation. Getting the surface preparation right is what allows the vinyl to adhere properly in the first place.

This really drives home the point: cleaning, repairing, and sanding aren't optional. They're the difference between a professional finish and a peeling mess.
Taming Curves with a Bit of Heat
Flat surfaces are straightforward enough, but corners, curves, and complex shapes can look a bit daunting. This is where a heat gun becomes your best friend. A little bit of gentle heat makes the vinyl pliable and stretchy, allowing it to mould beautifully around tricky shapes without creasing.
The key is to heat the film just enough so it feels soft and flexible—you’re aiming for around 60-80°C. Be careful not to overdo it, as too much heat can scorch the finish or even melt the material. As you gently stretch the warmed vinyl over a curve, use your gloved hand or squeegee to smooth it into place, making sure it gets full contact. This technique is also crucial for getting crisp, seamless edges on things like window frames. For more on that, take a look at our guide on how to install window privacy film.
The automotive wrap market in the UK has exploded, which is great news for home DIYers because it means the quality and technology of available vinyls have improved massively. UK hobbyists have a high success rate when using premium films with built-in air-release channels, which can easily last for 5 years or more indoors.
Pro Tip: When joining two pieces of vinyl, overlap them by just 1-2mm. This creates a practically invisible seam and can cut your material waste by up to 25% by letting you use offcuts more effectively.
To Wet or Not to Wet: Dry vs Wet Application
For most interior projects, especially when you're using modern vinyl with air-release technology, a dry application is the way to go. It's faster, and the adhesive creates a much stronger initial bond. It's the standard method for a reason.
However, a wet application can be an absolute lifesaver, particularly for beginners or if you're working with older vinyl that doesn't have air-release channels. It involves lightly misting both the surface and the sticky side of the vinyl with a solution of water and a single, tiny drop of washing-up liquid.
This slippery film of water allows you to slide the vinyl around and get it into the perfect position before you start squeegeeing the liquid out from the centre. The big trade-off? The curing time is much, much longer. You have to be patient and wait for every last bit of moisture to evaporate before the adhesive can fully bond.
Finishing Touches and Post-Application Care
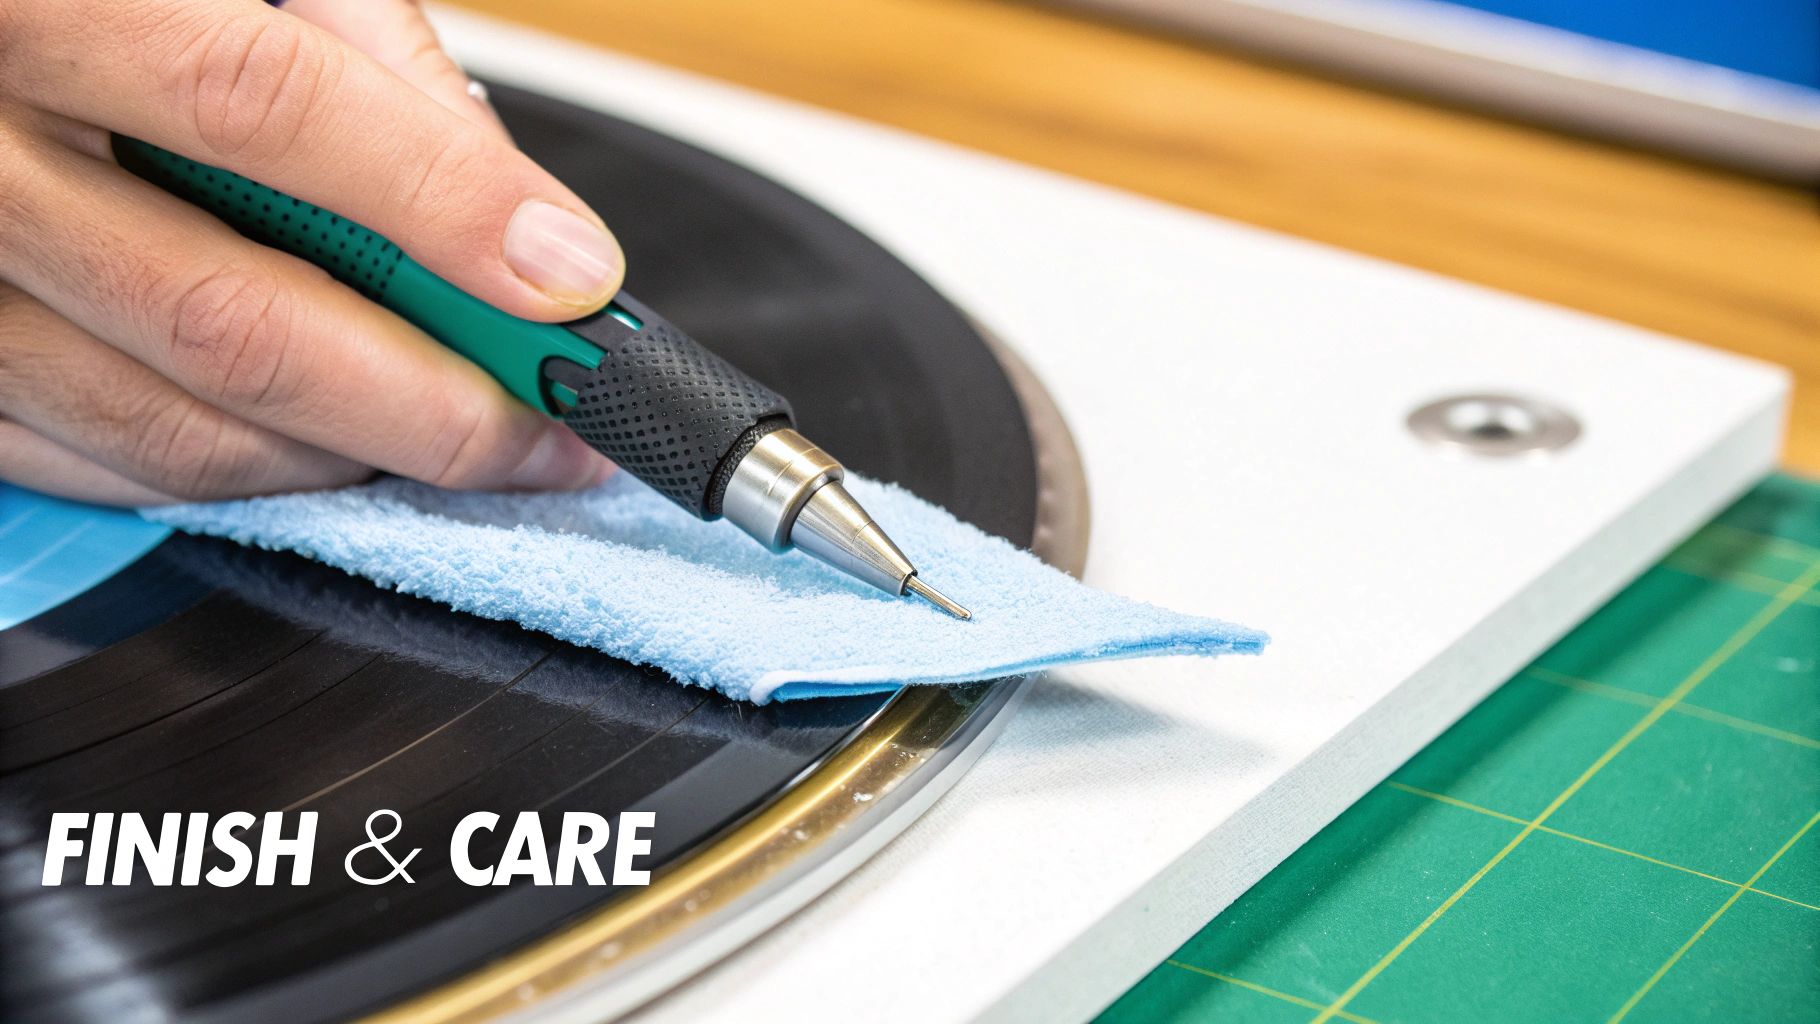
You’ve carefully laid the vinyl, worked out every last bubble, and wrestled with all the tricky curves. It might look like the job’s done, but a few final steps are what truly lock in that professional finish and make sure your hard work lasts. Honestly, these finishing touches are what separate a good wrap from a great one.
The All-Important Post-Heat
The single most critical step after application is post-heating. This means going back over the entire wrapped surface with your heat gun, paying extra attention to the edges, any seams, and especially the areas you stretched over curves. This process is what fully activates the pressure-sensitive adhesive, creating a rock-solid bond and helping the vinyl ‘memorise’ its new shape.
Skip this, and you’ll likely see the vinyl start to lift at the edges over time. It’s a simple action that makes a massive difference to the wrap's durability.
Trimming for Those Perfect Edges
Once the wrap is fully bonded, it’s time to trim the excess material for those perfectly clean lines. A sharp craft knife or scalpel is non-negotiable here; a dull blade will only drag and tear the vinyl, ruining your clean edges.
With a steady hand and a light touch, slice away the surplus film. If you're trimming an inside edge, like on a cabinet door, you can often gently press the blade into the groove and just follow the line for a flawless cut. Getting this right is a final, crucial part of knowing how to apply vinyl wrap properly.
A common mistake I see is people trimming too close or leaving too much overlap. The sweet spot is to tuck the vinyl just around the edge by about 3-5mm where you can, and then trim. This gives you a secure, clean finish that’s far less likely to catch or peel later on.
Looking After Your Wrap for the Long Haul
With the application complete, keeping your wrap looking pristine is all about proper care. Just like any quality finish, it needs a bit of TLC. A few simple maintenance habits will protect your investment and keep the colours looking sharp.
Here’s what you need to remember:
- Clean Gently: Always use a soft microfibre cloth with a mild, soapy water solution. Steer clear of harsh chemicals, abrasive cleaners, or pressure washers—they can easily damage the vinyl's surface and weaken the glue.
- Wipe Up Spills ASAP: Some things, like fuel or strong solvents, can stain or even eat into the vinyl. Clean them up straight away to prevent permanent damage.
- Avoid Scratches: Be mindful of placing sharp or heavy objects on the wrapped surface. It’s worth noting that some modern furniture vinyls now have self-healing properties, which can repair minor scuffs with a bit of gentle heat, showing just how tough this material has become.
The straightforward application and care is a big reason the market has grown so much, especially when vinyl gives such a fantastic return on investment for branding. You can find more insights on the power of vehicle branding, which often relies on the very same vinyl technology. A simple aftercare routine like this is all it takes to keep your project looking brand new.
Got Questions? We've Got Answers
Even with the best instructions, you're bound to run into a few head-scratchers during your first few wrapping projects. That’s just part of the learning curve. Getting a feel for how to handle these common situations is what separates a decent job from a brilliant one. Let's tackle some of the questions we hear all the time.
Can I Wrap Over Painted or Varnished Surfaces?
Yes, you can, but there's a huge "if" attached: the surface has to be rock solid. Vinyl adhesive is designed to stick, and if the paint or varnish underneath is weak, flaky, or peeling, the wrap will simply pull it away. You might not notice it during application, but you certainly will when you try to remove it later on.
For a professional finish, the surface needs to be smooth, sound, and immaculately clean. If you're dealing with a glossy finish, gently scuffing it with fine-grit sandpaper can really help the vinyl get a good grip. Just be absolutely sure to wipe away every last particle of dust with isopropyl alcohol before you start.
What's the Best Way to Get Rid of Bubbles?
If you've bought a decent quality vinyl with air-release channels, most small bubbles are nothing to worry about. You can just use your squeegee to gently guide the trapped air towards the nearest edge of the vinyl, and it’ll disappear right through the channels. Easy.
For a more stubborn bubble, you can gently lift that part of the film, pulling it back towards yourself. A quick blast of warmth from your heat gun will help release its grip. Then, just lay it back down smoothly with your squeegee. As a last resort on vinyl that doesn't have air-release, you can prick the very centre of the bubble with a pin and press the air out. Try to avoid this, though, as it can leave a tiny mark.
The pin trick is an old-school solution from before air-release technology was the norm. While it works in a pinch, it's always better to lift and re-lay the vinyl if you can. A clean lift leaves no trace, while a pinhole is permanent.
How Do I Remove a Wrap Without Wrecking the Surface?
Taking vinyl wrap off is surprisingly straightforward if you use a bit of heat. Grab your heat gun (or even a hairdryer on its hottest setting will do) and start warming up one corner of the vinyl. This softens the adhesive and makes the whole process much less of a fight.
Once you’ve got a corner lifted, pull the vinyl back on itself at a shallow angle—think less than 45 degrees. Keep applying gentle heat just ahead of the peel line as you go. Good quality vinyl is made for clean removal, but if you do spot any sticky residue left behind, a quick wipe with a cloth and some isopropyl alcohol will sort it out.
Is Vinyl Wrap a Good Idea for Kitchens and Bathrooms?
Absolutely. Modern, high-quality vinyl wraps are built to be tough, water-resistant, and can handle a fair amount of heat. This makes them a brilliant and cost-effective way to give a kitchen or bathroom a facelift without the chaos of a full renovation.
The key to making it last in these humid, high-traffic areas is all in the edges. You have to make sure every edge is perfectly sealed to stop any moisture from creeping underneath, especially around sinks, hobs, and showers. And while the material is heat-resistant, it’s not completely heatproof, so never place a hot pan directly on it—always use a trivet.
Ready to start your own transformation? Quote My Wall has a huge range of premium vinyl wraps perfect for any project, from furniture upcycling to feature walls. Explore our stunning designs and find everything you need at https://www.quotemywall.co.uk.