
Vinyl Wrap for Furniture UK Your Complete DIY Makeover Guide
Giving your furniture a fresh look doesn't have to mean breaking the bank or spending a weekend sanding and painting. Using a vinyl wrap for furniture in the UK is a genuinely brilliant way to upcycle tired or dated pieces, transforming them from drab to fab in just a few hours. It’s a durable, self-adhesive film that lets you breathe new life into everything, from that common IKEA flat-pack to a much-loved (but slightly scuffed) family heirloom.
Why Vinyl Wrap Is Your Secret Weapon for Upcycling
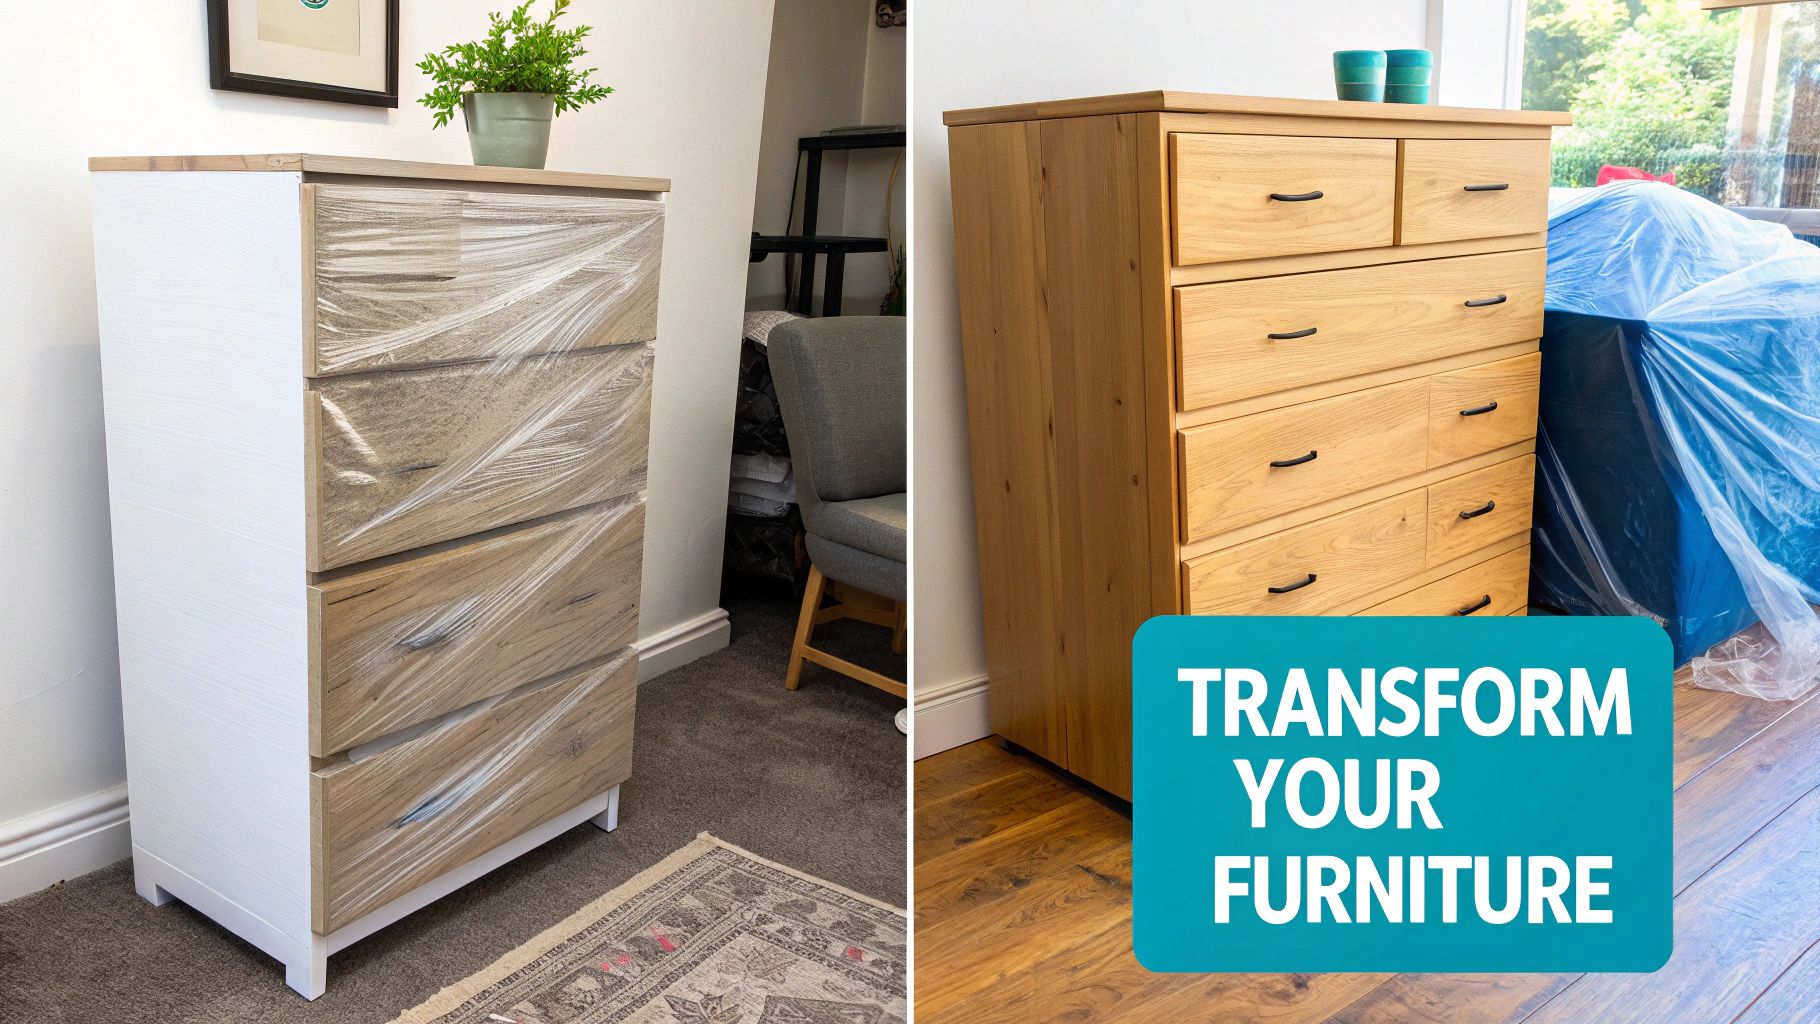
Let's be honest, we've all got that one piece of furniture that's seen better days. Maybe it’s a plain chest of drawers or some kitchen cabinets that feel a bit dated. Instead of the hassle and expense of replacing them, you can give them a completely new identity for less than £100. That’s the real magic of vinyl wrapping – it’s a total makeover that puts you firmly in control of your home’s style.
For anyone in the UK, the appeal is obvious. Homeowners can modernise their space without a huge financial outlay, while renters get a fantastic, damage-free way to personalise a temporary home. When it's time to move, you can simply peel it off.
A Modern Approach to Furniture Restoration
In the past, giving furniture a facelift meant a lot of hard work: sanding, priming, painting, and dealing with all the mess that comes with it. Vinyl wrapping skips all that. You can get a perfect, professional-looking finish in a single afternoon, and the choice of textures and colours is vast. Fancy turning a standard wardrobe into a sophisticated, dark wood piece? Or giving a tired coffee table a chic, white marble finish? It’s all possible.
This isn’t just a niche hobby anymore; it’s a huge trend in home improvement. The UK market for self-adhesive vinyl films, which includes these furniture wraps, was valued at USD 2096.46 million in 2023. This boom is driven by a love for DIY upcycling, with more and more of us looking for clever, cost-effective ways to refresh our homes.
The Benefits for UK Homes
The advantages of using vinyl wrap on furniture are perfectly suited to modern life here in the UK.
- It’s Budget-Friendly: Get the look of brand-new furniture for a tiny fraction of the price.
- So Many Style Options: From realistic wood grains and sleek matte colours to luxurious marble and metallic effects, the design possibilities are virtually endless.
- Anyone Can Do It: You don't need to be a pro. With a quality vinyl, achieving a great finish is well within reach for any DIY enthusiast. Our guide on how to upcycle furniture has even more tips to get you going.
- It Protects Your Furniture: A good-quality vinyl adds a durable layer that helps guard surfaces against everyday scratches, scuffs, and minor spills.
While vinyl wrap is a fantastic modern solution, it's interesting to consider the rationale behind furniture restoration in a broader sense. It taps into the same sustainable mindset of preserving and adapting what you already own, rather than simply buying new.
Choosing the Right Vinyl for Your UK Home
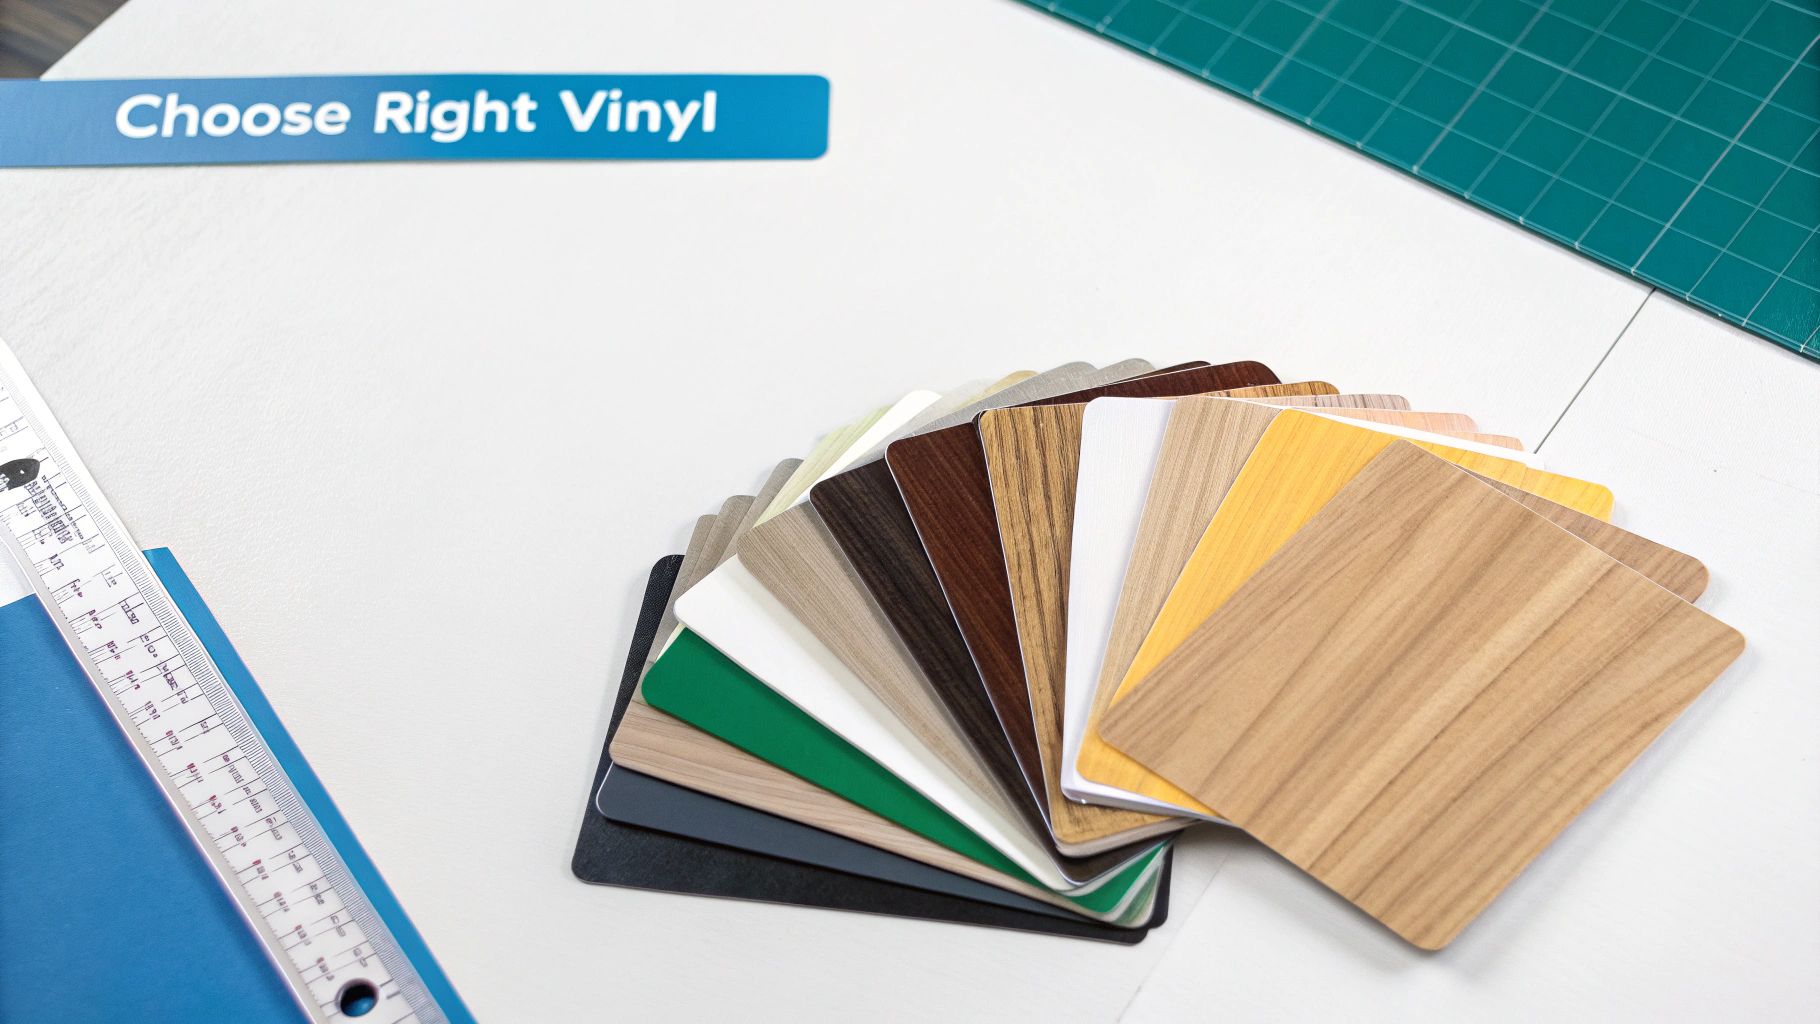
Picking the perfect vinyl wrap for furniture in the UK is about more than just finding a pattern you love. Getting the technical details right is what really makes the difference between a project that looks okay and one that looks professionally finished. It's the key to making sure your upcycled piece not only looks brilliant but can handle everyday life.
First things first, let’s talk types. You'll mainly come across two kinds of vinyl: monomeric and polymeric. For most home furniture projects, monomeric is your best bet. It’s designed for flat, simple surfaces, which makes it perfect for transforming things like flat-pack wardrobes, drawer fronts, or the top of a basic desk.
This type of vinyl is actually a huge part of the UK's decorative market, which generated a massive USD 460.6 million in 2024. Its flexibility and suitability for custom furniture designs are a big reason why it holds over half the market share. If you're interested in the market trends, you can dive deeper in this detailed report on Grand View Research.
Finding the Perfect Finish
Once you've settled on the type of vinyl, it's time for the fun part: choosing a finish. This decision affects not just the final look but also how practical your furniture will be.
- Matte Finish: This is my go-to recommendation for beginners or for older pieces of furniture. Its non-reflective surface is incredibly forgiving and does a brilliant job of hiding small dents, scratches, or other minor imperfections on the original surface.
- Gloss Finish: If you’re after that sleek, modern, almost high-end kitchen look, a gloss finish is the way to go. It’s also very durable and a breeze to wipe clean, making it a fantastic choice for kitchen cabinets, bathroom units, or a console table in a busy hallway.
- Textured Finishes: This is where you can get really creative. Finishes that mimic wood grain, stone, or even leather can add incredible depth and realism. A good quality textured wood grain can make a cheap laminate cabinet look like a solid oak masterpiece, adding real character to a room.
Pro Tip: I can't stress this enough: always order samples before buying a full roll. Colours and textures look completely different on a screen than they do in your home, especially under the UK’s notoriously changeable natural light. Seeing a sample in the actual room, at different times of day, will save you a lot of potential disappointment.
Vinyl Wrap Finishes Compared for UK Homes
To make things a bit clearer, here’s a quick comparison of the most popular finishes and where they work best in a typical British home.
| Finish Type | Best For | Durability | Cleaning & Maintenance |
|---|---|---|---|
| Matte | Living room furniture, bedrooms, home offices. Great for hiding minor surface flaws on older pieces. | Good | Very easy; fingerprints and smudges are less visible. Use a soft, damp cloth. |
| Gloss | Kitchen cabinets, bathroom units, modern sideboards, and high-traffic areas. | High | Very easy to wipe clean, but shows fingerprints and smudges more readily. |
| Satin/Semi-Gloss | A versatile choice for almost any room. Offers a subtle sheen without being highly reflective. | Very Good | A great middle ground; easy to clean without showing every single mark. |
| Textured (Wood/Stone) | Feature pieces like media units, headboards, or worktops to add a premium, realistic feel. | Varies by texture, but generally very good. | Can require a bit more care. Use a soft brush for deeper grooves to remove dust. |
This table should help you match the right finish to your project's needs, ensuring your revamped furniture looks great and lasts for years.
A Quick Word on Thickness and Durability
The last technical point to consider is the vinyl's thickness, which is measured in microns. For something that gets a lot of use, like a dining table or a child's desk, you’ll want a thicker, more robust vinyl that can stand up to scratches and daily knocks. For a more decorative item that won't be touched often, like a display shelf or the side of a wardrobe, a standard thickness will do the job just fine.
Nailing these details will help you choose the best material for your project. If you want to explore similar materials, our article on the uses of sticky back plastic for furniture is packed with extra tips. By making a properly informed choice now, you're setting yourself up for a flawless finish you can be proud of.
Getting Your Furniture Ready for a Flawless Finish
The real secret to a professional-looking vinyl wrap for furniture in the UK isn't in the wrapping itself. It's all in the prep work. Success is almost entirely down to how well you prepare the surface beforehand, creating the perfect canvas for your vinyl.
Honestly, skipping these crucial steps is the number one reason I see DIY projects go wrong. Any speck of dust, bit of grease, or tiny imperfection you leave behind will almost certainly show through the vinyl. This is what causes those frustrating bubbles, lifting edges, or a bumpy, uneven finish. Think of it like painting a wall – you wouldn’t just slap a new coat over dirt and cracks, would you? The same principle applies here.
Think of this stage as your pre-flight check. Get it right, and your vinyl will adhere perfectly and look fantastic for years.
Measure Twice, Cut Once
Before you even think about cleaning, grab a measuring tape. A flexible one is best for getting into all the nooks and crannies. Measure every single surface you plan to wrap, making sure to include the sides and any edges you want to cover.
Once you’ve got your numbers, add a bit extra.
- My Golden Rule: Always add at least 5cm (about 2 inches) of excess vinyl to every side of your measurement.
- Why this is a lifesaver: This extra material gives you some much-needed wiggle room when you're applying the wrap. Trust me, it’s far easier to trim away a small amount of excess for a perfect edge than to realise you’ve cut the piece just a fraction too short.
Taking a moment to do this will save you the gut-wrenching feeling of a perfectly applied sheet that just misses the edge, forcing you to start all over again.
The Deep Clean Your Furniture Desperately Needs
Your furniture might look clean on the surface, but years of accumulated oils, furniture polish, and general household grime can form a barrier that stops the vinyl's adhesive from getting a proper grip. A thorough clean is absolutely non-negotiable.
Start simple. Wipe the entire piece down with a basic solution of warm water and a mild detergent (washing-up liquid works a treat). For more stubborn grease, which you often find on kitchen cabinets or dining tables, a dedicated degreasing cleaner is a brilliant investment.
After cleaning, there's one final, critical step. Grab a lint-free cloth and lightly dampen it with isopropyl alcohol (often sold as rubbing alcohol). Wipe down every surface one last time. This blitzes any lingering residue and leaves the surface perfectly prepped for adhesion.
Don’t underestimate how important this is. I’ve seen projects fail because of a single fingerprint. The natural oils on your skin are enough to compromise the adhesive, which can lead to bubbles or peeling down the line. It’s worth spending the extra time here.
Smoothing Out Imperfections for a Perfect Surface
Vinyl is amazing stuff, but it's not magic. It follows the exact contour of the surface it's applied to, which means any deep scratches, dents, or chips will be perfectly highlighted by the film. Now is the time to sort them out.
For minor dings on laminate or wood, a good quality wood filler is your best friend. Apply a small amount with a putty knife, smoothing it as level as you can, and then let it dry completely. Once it’s fully cured, give it a very light sanding with fine-grit sandpaper (220-grit or higher) until it's perfectly flush with the rest of the surface.
Your goal is to create a completely smooth, uniform canvas. When you run your hand over the repaired area, you shouldn't be able to feel any difference at all. This is the kind of meticulous detail that separates a 'that'll do' DIY job from a truly professional finish.
Your Guide to Applying Vinyl Wrap Like a Pro
Right, this is where the magic happens. All that careful prep work is about to pay off, and you'll get to see your vision come to life. With a few tried-and-tested techniques, you can get a finish so smooth and seamless that people will think it's a brand-new piece of furniture.
For big, flat surfaces like a tabletop or wardrobe door, the ‘hinge’ method is your best friend. Honestly, it’s a game-changer for getting perfect alignment and takes all the stress out of the initial placement. You simply lay your cut vinyl piece over the surface and get it positioned just right before you even think about peeling off the backing.
Once you’re happy with where it is, run a strip of masking tape across the middle of the vinyl, securing it to the furniture. This creates a hinge. Now you can lift one half of the vinyl, peel the backing paper away right up to the tape, and snip it off. Just like that, you have one side ready to stick while the other half stays perfectly in place.
Mastering the Squeegee
With one side exposed, it's time to grab your squeegee. This little tool is crucial for getting that bubble-free, professional finish. You'll want to hold it at a firm 45-degree angle to the surface.
Starting from your taped centre line, press down and push outwards towards the edge. Use smooth, deliberate strokes that overlap slightly each time. The idea is to methodically push any trapped air out as you go. Resist the urge to just slap the vinyl down and hope for the best; working in small, controlled sections is the key. Once the first half is down, you can peel off the tape, remove the rest of the backing, and do it all again, working from the centre outwards.
Remember, the groundwork you do before even unrolling the vinyl is what makes all the difference.
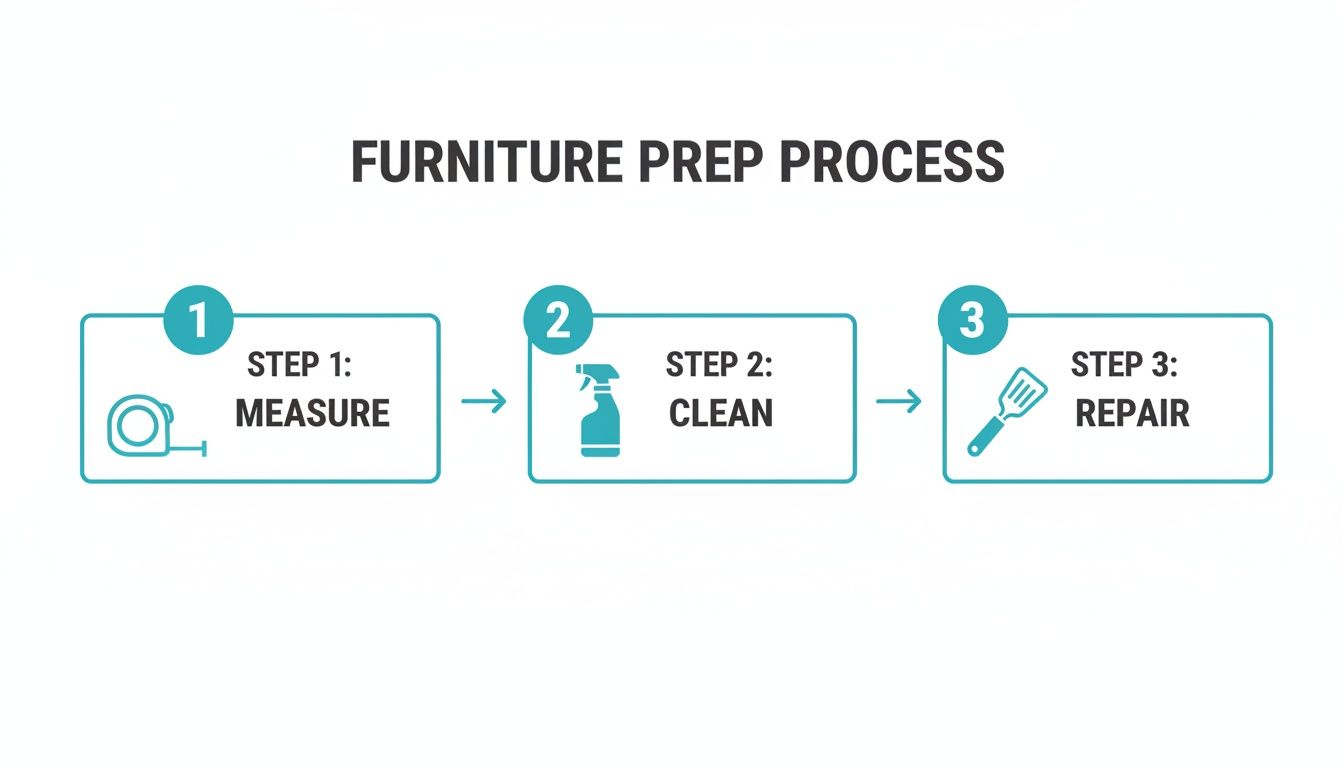
Getting these three things right—measuring, cleaning, and repairing—is the foundation for a flawless wrap. It’s what ensures the vinyl has the best possible surface to stick to.
Taming Tricky Corners and Edges
Corners and curves can seem daunting, but a bit of gentle heat makes them surprisingly manageable. Your humble hairdryer is the secret weapon here. Applying a little warmth makes the vinyl wrap for furniture UK products much more pliable.
As you get to a corner, gently warm the vinyl. You'll literally feel it soften up. Then, using your fingers or the soft-felt edge of your squeegee, carefully stretch and mould the vinyl around the shape, smoothing it down as you go. The heat not only makes it flexible but also helps activate the adhesive for a really solid bond, letting the material conform to complex shapes without creasing.
Insider Tip: If a stubborn air bubble pops up and just won't squeegee out, don't panic. Take a very fine pin or the sharp tip of a craft knife and make a tiny prick right in the middle of the bubble. You can then gently press the air out through the hole with your finger. The vinyl is self-healing, so the pinprick will be virtually invisible once the air is out.
Quick Troubleshooting on the Fly
Even the most seasoned pros run into little hitches. Here’s how to deal with them calmly:
- A Small Crease Appears: Stop what you're doing. Gently lift the vinyl back to where the crease started, give it a quick blast of heat from the hairdryer to relax the material, and then re-apply it carefully with your squeegee.
- Slight Misalignment: Noticed it's going on a bit wonky? If you catch it early, you can usually lift the vinyl and reposition it. Good quality vinyl has a forgiving adhesive that allows for this, but try not to do it too many times or it might start to lose its stickiness.
If you fancy a more detailed walkthrough, our complete guide on how to apply vinyl wrap has even more tips and visuals to help you get started. Just remember to take your time—patience is just as important as your squeegee
Finishing Touches and Long-Term Vinyl Care
Right, the vinyl is on, and it's looking pretty good. But don't pack up your tools just yet. These final steps are what will take your project from looking like a decent DIY job to a truly professional finish.
It all comes down to how you trim those edges.
Nailing the Perfect Trim
For this, you absolutely need a sharp craft knife with a brand-new blade. I can't stress this enough – a dull blade will catch and tear the vinyl, undoing all your careful work in a split second.
Grab a metal ruler or another straight edge and line it up precisely with the edge of the furniture. Then, with steady pressure, guide your knife along it. This little trick is the secret to getting that flawlessly crisp line that looks like it was done in a workshop.
Keeping Your Upcycled Furniture Looking New
With the hard part over, you'll want to make sure your masterpiece stays looking fantastic. The good news is that long-term care is dead simple, but it's the key to making your vinyl wrap for furniture UK project last for years.
A few small habits will make all the difference:
- Coasters and Placemats are Your Friends: This is a big one for tables, desks, or any surface where you'll be putting things down. They’ll shield the vinyl from the heat of your morning cuppa and stop mugs and plates from leaving little scratches.
- Keep it Cool: Never, ever put a hot pan or dish straight onto the vinyl. The intense heat can easily warp the material or, even worse, cause the adhesive to bubble up and fail.
- Watch Out for Sharp Edges: While modern vinyl is surprisingly tough, it's not invincible. Try not to drag sharp or heavy objects across the surface, as this can cause deep gouges that are difficult to fix.
Simple Cleaning for a Lasting Finish
Keeping your newly wrapped furniture clean is incredibly easy. Forget about specialist cleaners; you almost certainly have everything you need already.
Honestly, the best approach is just a soft microfibre cloth, some warm water, and a drop of mild washing-up liquid. That's it. This gentle combination is perfect for wiping away fingerprints and spills without harming the vinyl's finish or weakening the adhesive.
Crucial Care Tip: Whatever you do, stay well away from abrasive sponges, scouring pads, and harsh chemical cleaners. Anything with solvents or bleach is a definite no-go. These will strip the colour, dull the finish, and can even eat away at the vinyl itself, causing it to peel long before its time. A little bit of gentle care goes a very long way.
Common Questions About Wrapping Furniture
Diving into your first furniture wrapping project is exciting, but it's natural to have a few questions buzzing around. Getting these sorted before you start is the key to feeling confident and making sure your project goes smoothly from the moment you peel back that first corner.
Can I Vinyl Wrap Any Type of Furniture?
This is probably the number one question I get asked, and the answer is… nearly! A good quality vinyl wrap for furniture in the UK thrives on smooth, non-porous surfaces. Think about things like laminate, MDF, melamine, metal, or even glass. These are the ideal candidates because they give the vinyl’s adhesive a perfect, even surface to grab onto for a lasting bond.
So, what about trickier materials like wood?
- Painted or Varnished Wood: Yes, absolutely. As long as the paint or varnish is in good nick and not flaking off, you're good to go. Just give it a light sand to key the surface, a good clean, and you're ready.
- Raw or Untreated Wood: This one needs a bit more prep. Raw wood is porous, meaning the vinyl adhesive won't get a proper grip and will likely fail over time. The trick is to seal it first. A couple of coats of primer will create that smooth, sealed surface the vinyl needs to stick to properly.
The only things I'd steer clear of are heavily textured surfaces or anything crumbling and unstable. The wrap will just mould to those imperfections and won't look its best.
How Durable Is Vinyl on High-Use Surfaces?
It’s smart to wonder how vinyl holds up on something like a kitchen worktop or a well-used dining table. The good news is that modern, premium vinyl is surprisingly tough stuff, built to handle the chaos of daily life. It creates a durable, wipe-clean surface that's great at resisting scuffs, stains, and moisture.
That said, it's important to keep expectations in check. While it's resilient, it's not bulletproof.
For really high-traffic areas, I always recommend choosing a thicker, more robust vinyl – you’ll often see them marketed as scratch-resistant. And common sense still applies. Keep using chopping boards for your food prep and pop a placemat down for hot pans. Treat it like any nice new surface, and it’ll look great for years.
Is Vinyl Wrap Renter-Friendly and Easy to Remove?
One hundred percent. This is genuinely one of its best features, especially for renters in the UK. Good quality vinyl is made to be removed without a fuss. When it's time for a change or you're moving out, the process is simple.
Just grab a hairdryer and gently warm the surface. This softens the adhesive, letting you peel the vinyl away slowly and carefully. Most of the time, it comes off cleanly, leaving the original surface underneath exactly as you found it, with no sticky mess. It's the ideal way to put your own stamp on a place without saying goodbye to your deposit.
Ready to kick off your own furniture transformation? Quote My Wall has a huge range of premium vinyl wraps perfect for any project. Explore our collection and find your perfect finish at https://www.quotemywall.co.uk.