
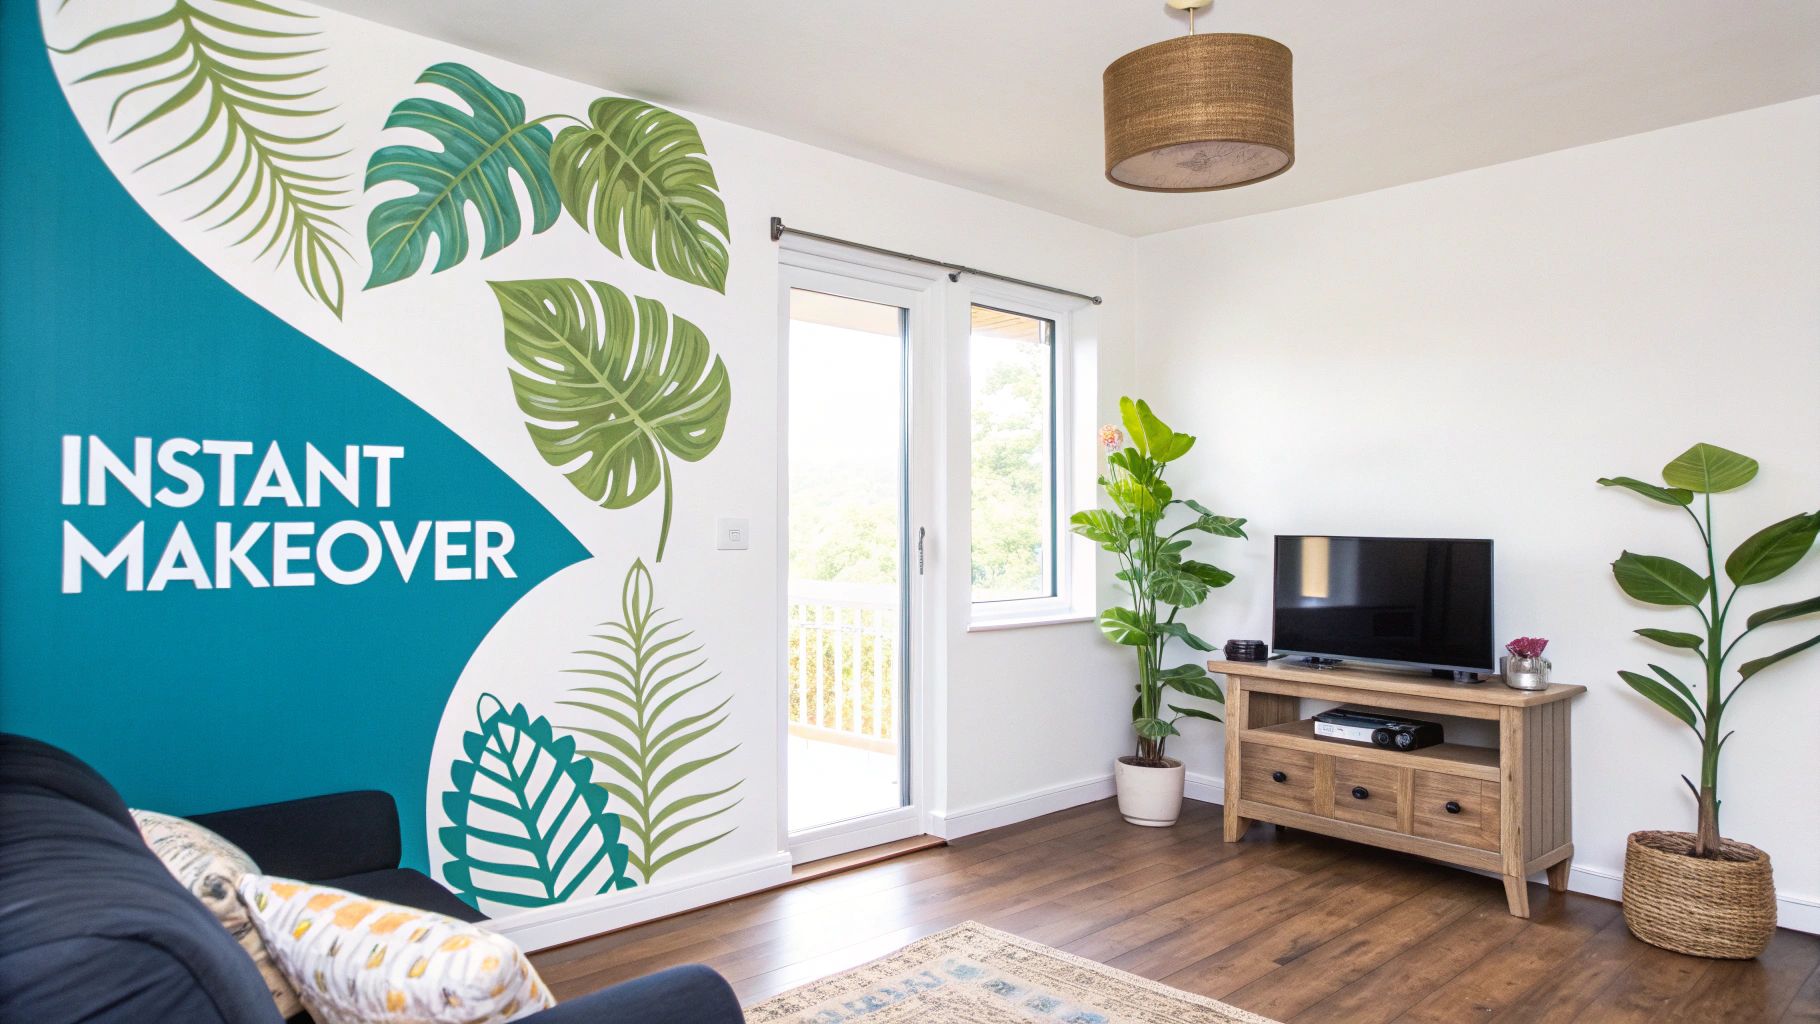
A Practical Guide to Using Vinyl Wall Decors
If you’re looking for a quick, affordable, and completely reversible way to give a room a facelift, vinyl wall decor is your answer. Forget the hassle of paint or the commitment of traditional wallpaper. These are essentially high-quality, self-adhesive stickers crafted from durable vinyl that come in every design imaginable—from elegant patterns and personalised quotes to stunning, room-spanning murals.
They're a dream come true for renters and DIY fans, offering an instant style injection for walls, furniture, and just about any smooth surface you can think of.
Why Vinyl Wall Decors Are Your Secret Decorating Weapon
Tired of staring at boring walls but dreading the thought of a permanent, messy redecoration project? Vinyl wall decor is the clever, creative solution you've been waiting for. It perfectly fills the gap between temporary decorations and a full-blown renovation, giving you the power to personalise your space exactly how you want.
Unlike painting—with its fumes, endless prep, and long drying times—you can have a vinyl decal up on the wall in minutes. This makes it perfect for a weekend project or a quick spruce-up before you have people over. And their versatility is what really makes them shine. You can create a dramatic feature wall in the living room or give an old, unloved chest of drawers a completely new lease of life.
The Modern Alternative for UK Homes
It's no surprise that vinyl's popularity is soaring across the UK. The wider wall covering market, where vinyl is a major player, was valued at USD 105.5 million in 2023 and is expected to hit over USD 167.5 million by 2033. People are catching on to vinyl's incredible qualities. It’s usually made from tough polyvinyl chloride (PVC), which means it holds up brilliantly against moisture and stains.
This is a real game-changer for the 4.6 million households renting in the UK. Finally, a way to make a place truly feel like your own without worrying about losing your security deposit. When it's time to move on, a good quality decal will peel away cleanly, leaving no sticky mess or damage behind.
Key Takeaway: Vinyl decor gives you the freedom to play with trends, colours, and styles. You can update a kid's room as their tastes change or switch up your living room vibe with the seasons, all without any lasting commitment.
But it’s not just about looks. Vinyl wall decor solves practical problems, too. For example, if you're looking for clever ways of adding color to your home without painting, these decals are an instant, high-impact fix. You can dive deeper into the different types of wall vinyl decals to see how they can work for your specific project. This incredible adaptability makes them a smart and stylish choice for any modern home.
Choosing the Right Vinyl Design and Material
This is where the fun really begins. With a whole world of designs out there, picking the perfect vinyl wall decor can feel a bit overwhelming. But don't worry—by focusing on a few key things like the design, scale, and the finish of the material, you’ll be able to choose something that not only looks incredible but also fits your space and lifestyle perfectly.
Gloss or Matte: What's the Right Finish for You?
The first decision you'll likely face is the finish of the vinyl itself. The two big players are matte and gloss, and they create totally different vibes.
A matte finish is your go-to for a subtle, sophisticated look. Because it absorbs light instead of reflecting it, the decal looks like it's been painted right onto the wall. This makes it a fantastic choice for living rooms, bedrooms, and nurseries where you want the design to feel like a seamless part of the decor.
On the other hand, a gloss finish is all about making an impact. It has a shiny, reflective surface that catches the light and immediately draws your eye. This finish is brilliant for high-impact designs, vibrant colours, or even for practical uses like kitchen backsplashes or furniture wraps where you need a durable, wipe-clean surface. Think of it as adding a touch of polish and energy.
Matching the Design to Your Decor
Once you’ve got a finish in mind, it's time to find a design that works with your existing style. This isn't just about picking a pattern you love; it's about creating a cohesive look. You need to think about the scale of the decal in relation to your room and furniture. A small, delicate design might get lost on a huge, empty wall, while an oversized mural could completely swamp a cosy room.
Top Tip: Before you commit, grab some masking tape and outline the dimensions of the decal on your wall. It’s a simple trick, but it’s the best way to visualise how it will look and make sure the proportions are spot on.
For example, a sprawling botanical print can create a stunning feature wall behind a sofa, whereas a tall, narrow quote decal can add a pop of personality to an otherwise forgotten hallway.
If you're looking for ideas, a great starting point is to browse through some of the best online home decor stores to see what’s out there and gather some inspiration.
Why Quality and Material Matter So Much
Let's be clear: not all vinyl is created equal. The quality of the material is probably the most important factor of all. Premium, high-grade vinyl gives you much better colour vibrancy and durability. Crucially, it also guarantees a clean removal.
This is an absolute must for renters or anyone who enjoys changing up their decor on a whim. Cheaper vinyls can leave behind a horrible sticky residue or, even worse, peel the paint right off the wall when you try to take them down.
Investing in a quality product means your vinyl wall decor will last for years without fading or peeling, and you can remove it without a trace when you’re ready for a change. It’s the difference between a temporary fix and a lasting style statement.
This trend towards high-quality, removable decor is taking off. A recent survey showed that 61% of people now opt for prints and artistic decals over traditional paintings, especially as online shops make it easier than ever to find personalised designs. This is particularly true for the UK's 4.6 million renting households, where the damage-free removal of vinyl is a massive selling point for getting that deposit back.
Thinking About Different Rooms
The right vinyl often comes down to the room you're decorating. Every space in your home has its own unique needs and atmosphere.
- For a Nursery or Child's Room: Go for playful, calming designs in a matte finish to avoid any distracting glare. It’s also wise to look for vinyl that is certified non-toxic and easy to wipe clean.
- For the Living Room: This is where you can really make a statement. Think about a large-scale mural, a sophisticated geometric pattern, or an elegant quote that shows off your personality.
- For the Kitchen or Bathroom: You’ll want a gloss or satin finish vinyl here. Its durability and moisture resistance make it perfect for things like tile stickers or cabinet wraps.
Ultimately, choosing the right vinyl is all about balancing what looks good with what actually works for your home. By taking a moment to think about the finish, scale, and material quality, you'll be well on your way to picking a design that will beautifully transform your space.
Essential Prep Work for a Flawless Finish
The real secret to getting that perfect, painted-on look with vinyl wall decors has nothing to do with a steady hand. It’s all in the prep work. Honestly, spending a bit of time getting your surface ready is the most critical part of the whole process. It’s what stops those annoying peeling edges, trapped air bubbles, and wonky designs from ever happening.
Think of it this way: your decal needs a clean, smooth, and solid surface to really grab onto. Any spec of dust, grease, or dampness creates a barrier, and that’s when the adhesive starts to fail. A few simple steps now will save you a massive headache later.
Wiping Down Your Walls the Right Way
First up, the surface has to be clean. For most painted walls, a bit of mild soap and warm water is all you need. Grab a soft cloth, get it damp (not soaking!), and give the entire area a gentle wipe down.
You’ll want to be extra thorough in kitchens where cooking grease can build up, or in kids' rooms where you’re bound to find a few sticky fingerprints. Whatever you do, steer clear of harsh, oil-based, or ammonia-based cleaners. They often leave a film behind that stops the vinyl from sticking properly.
Crucial Tip: Your wall must be bone dry before you start. Let it air dry for at least 24 hours after cleaning. It might feel dry to the touch much sooner, but trust me, even a tiny bit of trapped moisture can ruin the whole application.
The All-Important Paint Curing Rule
This is a big one, and it catches so many people out. If you've just painted your walls, you have to wait for the paint to fully cure, not just dry. Drying is just the water evaporating; curing is the chemical process where the paint properly hardens. It takes longer than you'd think.
Stick a decal on uncured paint and you’re asking for trouble. The paint releases gases as it cures (this is called "off-gassing"), which will literally push the vinyl off the wall. You’ll end up with bubbles and peeling edges within a few days.
- For standard latex or emulsion paint: Give it a minimum of 3-4 weeks.
- For low-VOC or zero-VOC paints: These eco-friendly options can take even longer, so play it safe and wait at least 4 weeks.
There are no shortcuts here. Being patient is the only way to guarantee your decal sticks like it's meant to and, just as importantly, doesn’t pull your paint off when it's time for a change.
Measuring and Marking for Perfect Placement
Right, final step before the fun begins: planning where it’s all going to go. Don't just eyeball it, especially if you have a large or detailed design. A decal that’s even slightly off-kilter can make the whole room feel unbalanced.
Get your tape measure out and figure out the dimensions of both your decal and your wall space. Once you’ve decided on the perfect spot, use a pencil and a spirit level to make a couple of very light guide marks.
Even better, and completely damage-free, is to use a strip of masking tape. You can create a perfectly straight horizontal or vertical line to butt the edge of your decal up against. This gives you a clear, easy-to-see guide, taking all the guesswork out of the application and ensuring your vinyl wall decors end up looking professionally done, exactly where you wanted them.
Applying Vinyl Wall Decors Like a Professional
Right, you’ve done the prep work and your wall is ready to go. This is the exciting part! Applying a vinyl decal, especially a larger one, can feel a bit nerve-wracking the first time, but I promise it's easier than it looks. With a couple of handy tricks, you’ll get a smooth, bubble-free finish that looks like it was professionally done.
The golden rule here is patience. Don't rush it. Rushing is how you end up with a wonky design or those frustrating little air bubbles. You're creating something you'll look at every day, so take your time and enjoy the process.
You've already nailed the essential groundwork, which always boils down to these three simple steps.
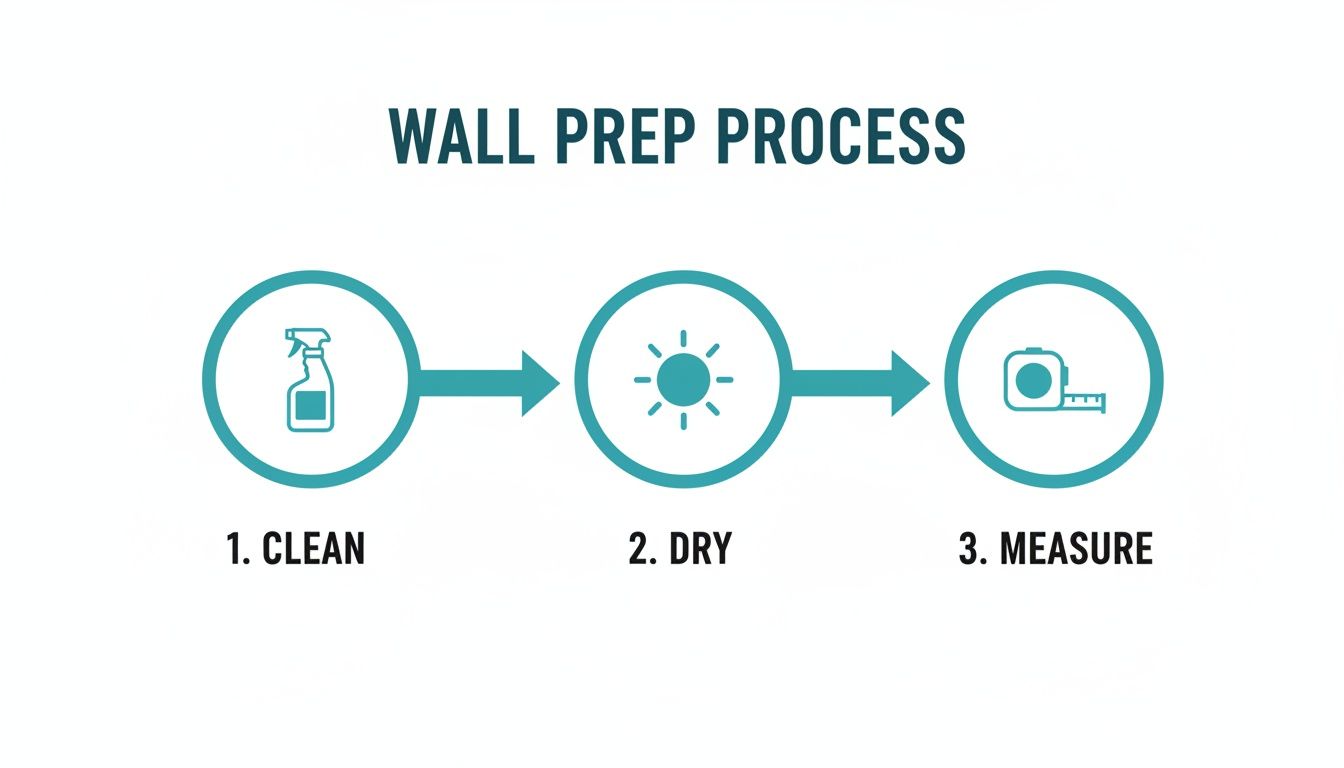
Seriously, getting the "clean, dry, measure" part right is the foundation for everything that follows.
Mastering the Hinge Method for Large Decals
If you're working with a big or intricate design, the "hinge method" is an absolute lifesaver. It’s a game-changer for getting the placement spot-on without the sticky vinyl accidentally attaching itself to the wall before you’re ready.
Here’s how it works. Instead of peeling the whole backing paper off in one go, you use masking tape to create a temporary hinge.
- Position the decal on the wall with the backing paper still on.
- Once you're happy with the spot, run a horizontal strip of masking tape across the middle, securing it to the wall. This is your anchor.
- Now, you can work on one half at a time. Lift the top section, peel the backing paper down to your tape hinge, and snip it off with scissors.
- Smooth the exposed top half of the vinyl onto the wall.
- Finally, remove the masking tape and repeat the process for the bottom section.
This little technique gives you so much more control and prevents the nightmare of the decal folding over and sticking to itself. If you're a visual learner, there's some great expert advice on how to apply wall stickers that can walk you through it.
The Squeegee is Your Best Friend
Want that seamless, painted-on look? You need a squeegee. This little plastic tool is essential for applying firm, even pressure to push out air bubbles and get a really strong bond with the wall. No squeegee? A credit card or any similar plastic card will do the job just fine.
The key is to always work from the centre outwards. Using short, overlapping strokes, hold your squeegee at about a 45-degree angle. This method systematically shoves any trapped air towards the edges of the decal, stopping bubbles from forming in the middle.
Pro Tip: If a stubborn bubble pops up, don’t panic! Just take a pin or a fine needle and make a tiny hole right in the middle of it. Then, you can gently smooth the air out through the pinprick with your finger or the squeegee. The blemish will vanish completely.
Tackling Tricky Surfaces
Let’s be honest, not many of our walls are perfectly smooth, especially in older UK homes. But that doesn't mean you can't use vinyl decor.
-
Textured Walls: For those slightly bumpy "orange peel" textures, a hairdryer is your secret weapon. After applying the decal, gently warm a small section with your hairdryer on a low setting. This makes the vinyl a bit more flexible. You can then use a soft cloth (or even a tennis ball) to press it into the little grooves and crevices for a much better stick.
-
Freshly Painted Surfaces: I can't stress this enough: you must wait. Vinyl applied to paint that hasn't fully cured for at least 3-4 weeks is destined to fail. The gases escaping from the drying paint will get trapped underneath, creating bubbles and causing the whole thing to peel off.
-
Furniture Application: The same principles apply when wrapping furniture. Make sure the surface is completely clean and free from any old polish, wax, or oils. For getting around corners and curved edges, that hairdryer trick is brilliant for helping the vinyl mould perfectly to the shape.
Once your decal is firmly in place, it's time for the final reveal. Slowly peel back the top layer of application tape. The trick is to pull it back on itself at a tight 180-degree angle, keeping it flat against the wall as you go. This clean separation ensures the vinyl stays put, leaving you with your fantastic new design.
Creative Styling Ideas for Every Room
Alright, you've got the practical side sorted. Now for the fun part. The real magic of vinyl wall decors lies in their incredible versatility. They're so much more than just a picture for a wall; they’re a way to inject your personality, add a bit of function, and bring genuine style to every corner of your home.
Let's dive into some inspiring ways you can use vinyl to completely transform your space. From creating a tranquil nursery to a quick kitchen update, the possibilities really are endless. It all starts with thinking about the mood you want to create or the problem you're trying to solve. I guarantee there’s a vinyl solution out there.
Create a Magical Nursery or Kids' Room
A child's room is the perfect canvas for imagination, and vinyl makes it so easy to build a space that can grow right along with them. Forget about painting detailed murals they’ll be tired of in a few years. With vinyl, you can design a whimsical world that’s incredibly simple to update.
- Personalised Name Decals: Placing a beautifully scripted name decal above the cot adds a truly personal touch. It creates an instant focal point and makes the room feel like it's uniquely theirs from day one.
- Themed Sticker Packs: How about a jungle adventure, a journey into outer space, or a flutter of delicate butterflies? You can scatter themed sticker packs across the walls to create an immersive feel without it being too overwhelming.
- Functional & Fun: Think beyond pure decoration. A vinyl height chart is a lovely way to track how quickly they're growing, and you can even get chalkboard or whiteboard vinyl to create a dedicated doodling spot without any damage to your walls.
And the best part? As their obsession shifts from dinosaurs to superheroes, you can just peel away the old theme and bring in a new one with next to no fuss or expense.
Elevate Your Living Room and Bedroom
Your main living spaces are where you really get to express your personal style, and vinyl wall decors offer some surprisingly sophisticated ways to make a statement. You really don't need to redecorate an entire room to give it a fresh, modern feel.
A large-scale quote decal, for instance, can set the tone for the whole room. Placed thoughtfully above a sofa or bed, a meaningful phrase becomes a piece of art in its own right. Go for a sleek, modern font for a minimalist look, or choose an elegant script for something a bit more traditional.
Another technique I love is creating a feature wall with a geometric pattern. Instead of the big commitment of wallpaper, you can apply individual vinyl shapes—like triangles, hexagons, or simple lines—to craft a completely custom design. This method gives you total control over the pattern's layout and density.
Give Old Furniture a New Lease of Life
Now, this is where vinyl truly shines as an upcycling hero. Got an old, dated cabinet or a scuffed-up coffee table? Before you think about chucking it, consider giving it a vinyl wrap. It's a fantastic, budget-friendly way to completely change its look.
The home makeover trend is booming, partly because we're all spending more time at home and getting more interested in sustainable living. Accessories like furniture wraps are a huge part of this, offering a stylish way for upcyclers to revive old pieces. In fact, market drivers show a strong consumer preference for prints and decals, making furniture wraps a popular choice. You can see more data on UK home decor market trends to get a sense of how this area is growing.
Think about wrapping the drawer fronts of a plain chest of drawers in a vibrant pattern, or giving a tired IKEA bookshelf a realistic wood-grain or marble-effect finish. The transformation can be absolutely astonishing.
Practical and Stylish Kitchen and Bathroom Hacks
The high durability and moisture resistance of premium vinyl make it a perfect fit for kitchens and bathrooms. These are rooms that often need a refresh but can be notoriously expensive to renovate properly.
- Tile Sticker Backsplashes: Retiling a kitchen is a massive job. Instead, you can use individual tile stickers to cover up dated or plain tiles. They come in countless patterns, from Moroccan-inspired designs to classic metro tiles, giving you what looks like a brand-new backsplash in just an afternoon.
- Window Privacy Films: Need to obscure the view in a ground-floor bathroom without blocking all the lovely natural light? Frosted or patterned vinyl window film is the perfect solution. It gives you privacy while adding a nice decorative touch, and it's completely removable when you're ready for a change.
Long-Term Care and Damage-Free Removal
One of the best things about vinyl wall decor is how little fuss it is. They're designed to be a low-maintenance, no-commitment way to bring personality to a room. Keeping your designs looking fresh is a doddle, and when you fancy a change, a good quality decal will come off without a trace. That last part is especially important if you're renting and need your deposit back!
Looking after them couldn't be simpler. For day-to-day dust, a quick wipe with a soft, dry microfibre cloth is all it takes. If you spot a scuff or a mark, just dampen the cloth with a bit of water and gently clean the area. Steer clear of any abrasive sponges or harsh chemical cleaners, as they can scratch the vinyl's finish or break down the adhesive over time.
Getting a Clean and Easy Removal
The magic of high-quality vinyl is that it’s made to be removed cleanly. Still, a bit of technique will guarantee the process is perfect and you don't damage your walls. The secret is to soften the adhesive just enough for it to let go, avoiding any tacky residue or, worse, peeling paint. The only real risk is rushing it.
Your best friend for this job is a standard hairdryer. Set it to a low or medium heat and hold it about 15-20 centimetres from the edge of the decal. Wave it back and forth for about 30-60 seconds to gently warm the vinyl. You’ll feel it become a little softer and more flexible.
Once it’s warm, use your fingernail or a plastic scraper (like an old credit card) to gently lift one of the corners. The trick is to pull the vinyl back on itself at a really sharp, almost 180-degree angle. Whatever you do, don't pull it straight out from the wall—that creates tension and is how you end up taking paint with it.
Just work slowly and patiently, adding a bit more heat with the hairdryer as you peel it back. This steady approach gives the adhesive time to release properly. If you do happen to find a few stubborn sticky bits left behind, a cloth with a bit of soapy water will usually sort them out.
For a more detailed walkthrough, you can find a comprehensive guide on how to remove wall stickers that covers every step. Knowing this makes the whole experience completely stress-free, from putting them up to taking them down.
Your Vinyl Decor Questions Answered
Even when you’re excited about the possibilities, it’s completely normal to have a few questions before you commit. We get asked a lot of the same things by customers across the UK, so let’s tackle some of the most common queries about using vinyl wall decor in your home.
Are They Really Safe for a Nursery?
Absolutely. Any reputable supplier will use high-quality, non-toxic vinyl, making their decals perfectly safe for nurseries and kids' rooms. Unlike some paints, they don’t give off any nasty fumes, which offers brilliant peace of mind.
The only thing to be mindful of is placement. If your design has small, separate elements, make sure they’re well out of reach of curious little hands to prevent any potential choking hazards.
How Long Do I Need to Wait After Painting?
This is a big one, and it’s a step people are often tempted to rush. You have to wait for the paint to fully cure, not just feel dry to the touch.
For most standard emulsion paints, that means giving it at least three to four weeks before you even think about applying your vinyl. Stick it on any sooner, and you’re asking for trouble – the decal will likely bubble or start peeling as the paint underneath continues to release solvents.
Expert Tip: Patience is key here. Waiting the full cure time is the secret to a perfect application and ensures the vinyl won't damage the paint when it’s time for a change.
Most quality vinyl wall decors are designed to come off cleanly without damaging your walls, which is fantastic news for renters. When removed correctly, they shouldn’t pull off paint or leave behind any sticky residue.
As for whether you can reuse them, the answer is generally no. They are designed for one-time use to ensure that first application is flawless, with maximum adhesion and no pesky air bubbles.
Ready to bring your walls to life? At Quote My Wall, we have a huge range of premium vinyl wall decors, furniture wraps, and personalised stickers to help you get creative. Have a look at our collection at https://www.quotemywall.co.uk today.