

Playroom Wall Stickers UK: Design Tips & Safety Guide 2026
You're probably looking at a playroom wall right now that feels a bit flat, a bit scuffed, or stuck in the last phase your child was obsessed with. That's exactly where playroom wall stickers work well. They give you colour, personality and movement without the mess of wallpaper paste, the commitment of panelling, or the expense of redoing the whole room.
In UK homes, that flexibility matters even more. A lot of family houses have painted plasterboard, awkward alcoves, sloping ceilings, radiator interruptions, or tenancy rules that make permanent decorating a risk. Good wall stickers can solve those problems. Cheap ones usually create new ones.
The trick is knowing what to buy, where to place it, and how to apply it so it still looks tidy months later. That's where most parents save themselves time, money and a fair bit of frustration.
Choosing Your Perfect Playroom Stickers
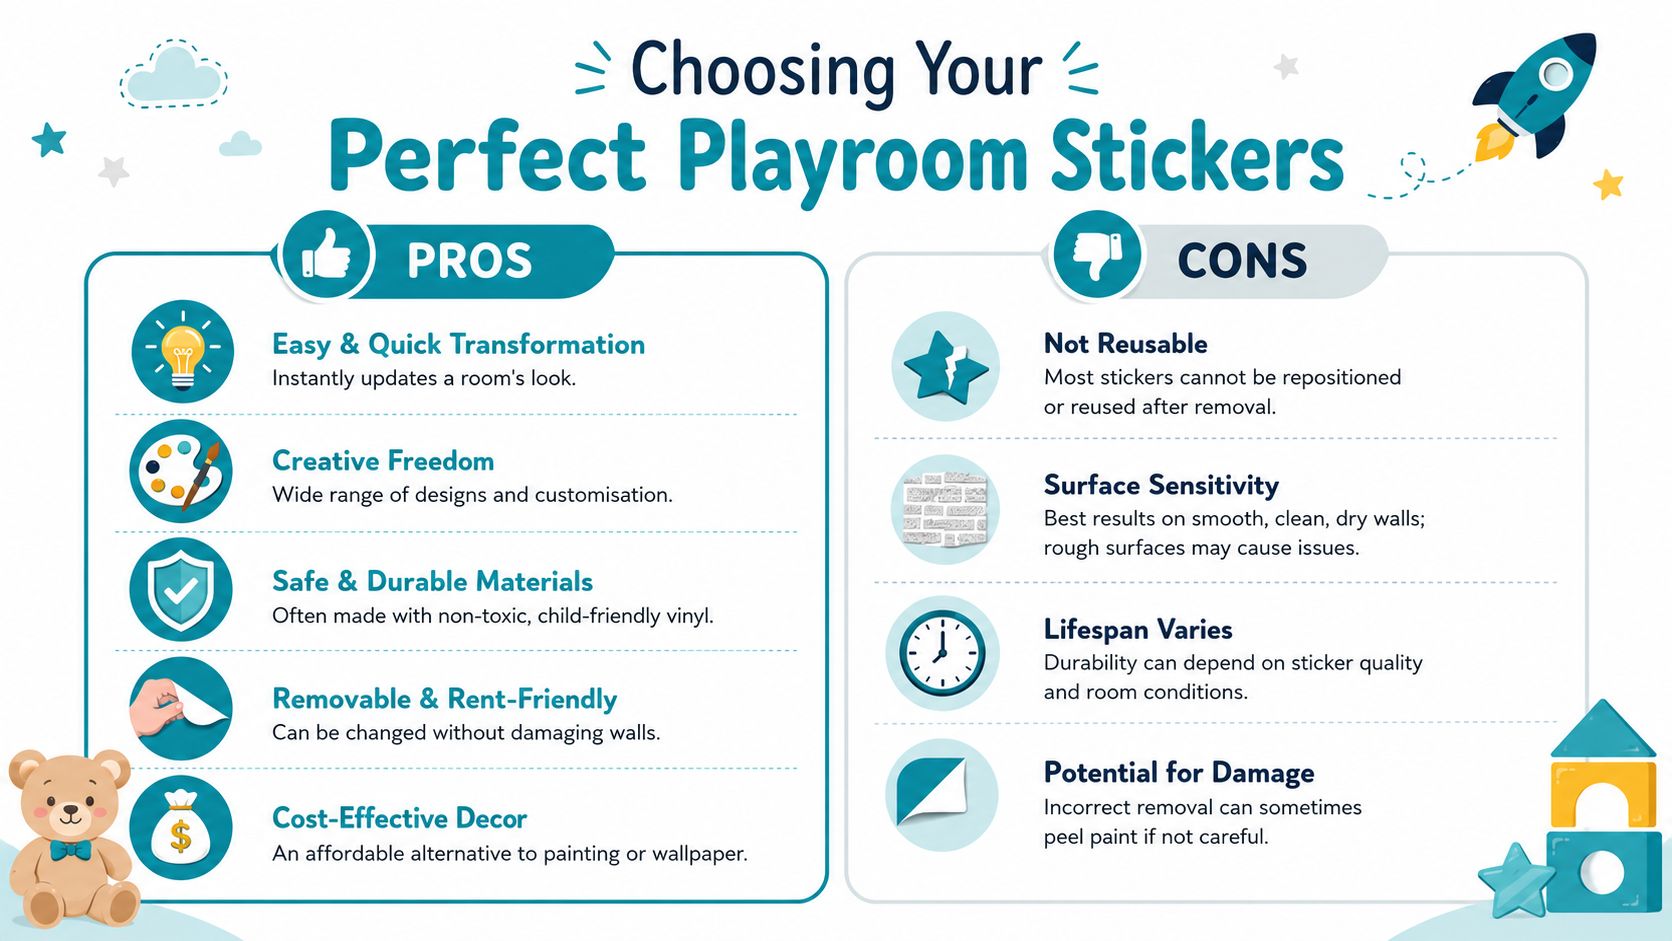
Not all playroom wall stickers are equal. Some look lovely online, then arrive thin, shiny, plasticky and stubborn on the wall. Others go on smoothly, sit neatly against the paintwork and come off without a battle when the room needs to grow up a little.
Start with the material
The first thing I'd check is what the sticker is made from. In nursery and playroom settings, recycled polyester is the safer choice over PVC-based vinyl because it eliminates phthalates, and Leaf Score notes that over 60% of budget wall stickers in the UK market still use PVC vinyl.
That matters most in children's spaces because stickers sit at eye level, hand level and often bed level. If you want the room to feel safe as well as stylish, the material isn't a boring technical detail. It's part of the decorating decision.
A quick comparison helps:
| Material | What works | What to watch |
|---|---|---|
| Recycled polyester | Better for non-toxic nursery and playroom use, softer look, often easier to handle | Can cost more upfront |
| PVC vinyl | Widely available, often cheaper, broad design range | More common in budget products, less appealing for families avoiding phthalates |
Pick the finish for the room, not just the photo
Matte stickers usually give the most convincing “painted on” effect. On standard painted walls, they tend to look calmer and more expensive. Gloss finishes can work for bright motifs, labels or playful details, but they reflect light more sharply. In a small UK box room with one window, that shine can make the sticker look more obviously temporary.
If the room already has a lot going on, toys, open shelves, bright storage and patterned rugs, matte is usually the safer choice. If the rest of the scheme is plain, a little sheen can be fun.
Practical rule: In a busy playroom, choose quieter finishes and stronger shapes. In a plain playroom, you can afford bolder colour or shine.
Check how the supplier talks about safety and surfaces
Reliable suppliers tend to explain their material, print finish, wall compatibility and removal method clearly. If the listing is vague, I'd be cautious. You want plain answers to simple questions. Is it suitable for painted plasterboard? Is it removable? Is it intended for children's rooms? Is there guidance for fresh paint?
If you're torn between wallpaper and stickers, The Sofa Cover Crafter's wallpaper guide is useful for comparing the commitment level before you choose one route or the other. And if you want inspiration specifically for sticker-led schemes, this playroom wall art gallery is helpful for judging scale and style before you order.
What usually works best
For most families searching for playroom wall stickers UK, I'd keep the selection process simple:
- Choose the safest material first. Design comes second.
- Match the finish to the room's light. Matte is usually easier to live with.
- Buy for your wall type. Smooth painted plasterboard behaves very differently from textured plaster.
- Avoid bargain packs with no proper specifications. They're often where peeling, residue and disappointment begin.
A beautiful sticker is only a good buy if it still looks good once it's on your actual wall.
Planning and Measuring for a Flawless Layout
A lovely sticker set can still look wrong if the layout is off. Most problems come down to scale. Parents often buy decals that are too small for the wall, then try to spread them out to fill the space. That's when a design starts to look bitty instead of intentional.
The good news is that planning doesn't need software or perfect drawing skills. A tape measure, masking tape and a rough sketch are enough.

The appetite for this kind of simple update keeps growing too. The UK kids' wall sticker market is projected to grow at a 5.8% compound annual rate, reflecting how many parents are choosing this affordable, removable option for children's rooms and playroom updates, according to this UK market forecast.
Measure the wall you'll actually use
Don't measure the whole wall if a radiator, book ledge, toy unit or sofa already takes up half of it. Measure the visible decorating zone.
In a typical UK playroom, that usually means one of these:
- Above storage units where you want a long horizontal arrangement
- Beside a teepee or reading corner where a cluster creates a feature
- Over a play table where the stickers act like a backdrop
- On a narrow wall end where a vertical design draws the eye upward
Use masking tape to mark the usable width and height. Stand back from the doorway. If the shape looks awkward in tape, it'll still look awkward in stickers.
Sketch before you stick
A rough pencil sketch is enough. You're not drawing for anyone else. You're checking balance.
Three layout approaches tend to work best in family homes:
-
One focal cluster
Best for a main wall. Think clouds, stars, jungle animals or transport motifs gathered around one zone. -
A scattered repeat pattern
Good for smaller decals like dots, stars or hearts. This works well on broad walls, but only if spacing stays loose and natural. -
A framing layout
Useful around shelves, a name sign, or a reading nook. It gives the room shape without swallowing every inch of wall.
If a design has to be stretched too far to fill the wall, it's the wrong size for the room.
Work with awkward UK features
Many UK homes have features that showroom photos don't. Boxed-in pipes, chimney breasts, sloped ceilings and low windows all interrupt a clean layout. That doesn't mean the wall is unusable. It just means the sticker plan needs to respect the architecture.
Here's a practical guide:
| Room feature | Best approach |
|---|---|
| Radiator | Keep stickers above the heat line and use the area as a visual top border |
| Sloped ceiling | Build a rising cluster that follows the angle instead of fighting it |
| Chimney breast | Treat it as a framed feature and centre the design there |
| Narrow alcove | Use vertical decals, name designs or stacked motifs |
Size matters more than quantity
A few larger pieces nearly always look better than lots of tiny ones, unless you're going for a deliberate repeat pattern. In small rooms, oversized stickers can be brilliant because they make the scheme feel confident. In larger rooms, tiny stickers get visually lost behind toy storage, books and general family life.
For playroom wall stickers UK parents usually get the best results when the wall decoration feels anchored to the furniture below it. If there's a toy unit, let the sticker arrangement feel proportionate to that width. If there's a reading chair, treat that little area as a styled corner rather than decorating the whole wall out of panic.
Good layout planning makes the final install look effortless, even though it rarely is.
The Foolproof Installation and Removal Guide
Most sticker failures don't happen because the design was poor. They happen because the wall wasn't ready. Dust, damp, fresh paint and impatience cause more peeling than people realise.
That's why installation starts long before the backing paper comes off.
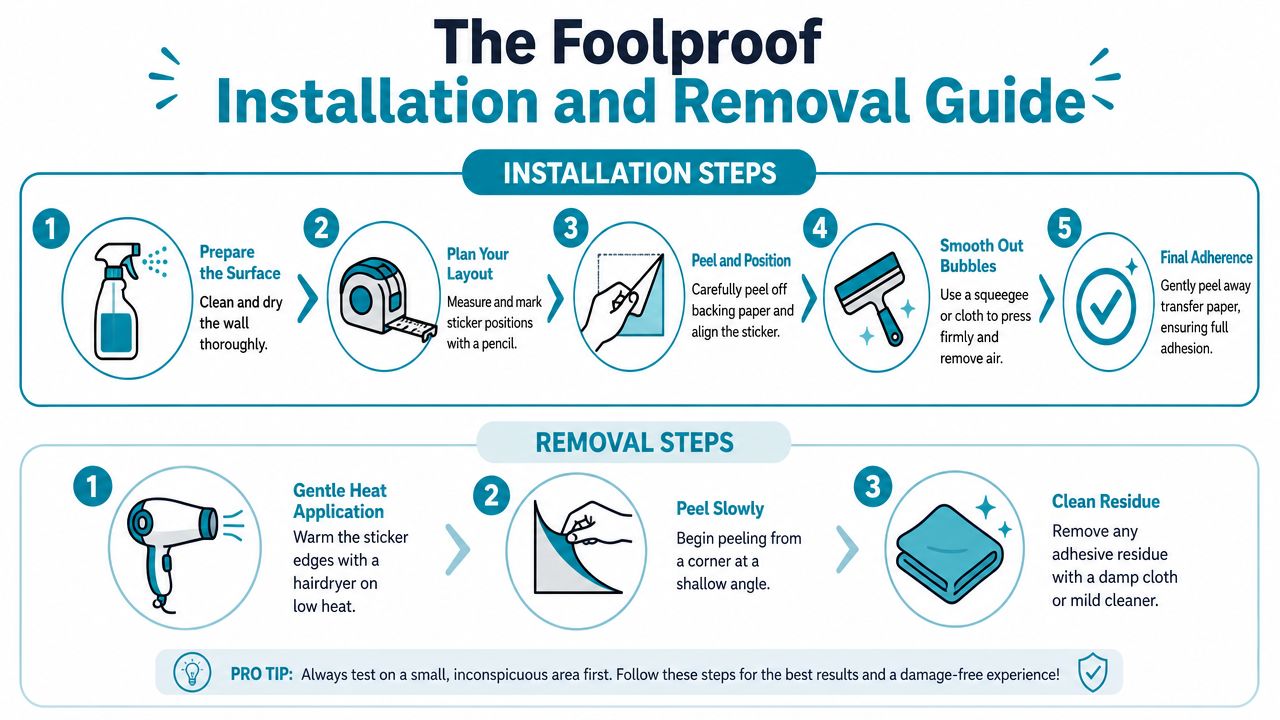
For interior use, premium vinyl wall stickers can last 5 years, but this guide on children's room wall decals notes that applying them to walls painted under 4 weeks ago, or to humid, poorly prepared surfaces, can reduce adhesion success by up to 40%. That's the difference between a neat finish and corners that start curling before the room is even properly styled.
Get the wall ready first
Use a microfibre cloth and a mild cleaner if the wall has marks, grease or dusty patches. Then dry it properly. A wall can feel dry to the touch and still hold surface moisture, especially in bathrooms-adjacent rooms, converted lofts or older houses.
Avoid applying stickers to:
- Freshly painted walls that haven't had enough curing time
- Textured surfaces where the adhesive can't make full contact
- Dusty plasterboard around repaired areas
- Walls with condensation issues near windows or external corners
Avoid this mistake: If you've just painted because the room needed “a quick refresh first”, wait. Fresh paint and wall stickers are a bad combination.
Apply small and large decals differently
Small individual motifs are forgiving. Large decals aren't. That's why the technique changes with size.
For smaller stickers:
- Tape a few paper guides to the wall if spacing matters.
- Peel the backing carefully.
- Position lightly first, then smooth from the centre outward with a cloth or squeegee.
For larger designs:
- Keep the backing partly attached while you line up the top edge.
- Fix one section first, then pull the backing away gradually.
- Smooth in stages instead of trying to slap the whole thing on at once.
If you want a product-specific walkthrough, this step-by-step guide to applying wall stickers is a useful reference before you start.
A few installation habits that save stress
I've found these habits make the difference between “simple afternoon job” and “why is this in three pieces on the floor?”:
- Use painter's tape first. Hold the decal in place before peeling anything.
- Work in daylight. Evening lamp light hides bubbles and crooked placement.
- Keep little hands away for the first pass. Children love helping, but placement goes better before the audience joins in.
- Stand back after every major piece. A sticker can look straight close-up and wrong from the doorway.
Peel slowly, smooth patiently, and don't try to rescue a misaligned large decal by tugging hard once it has fully grabbed.
Remove without taking the paint with it
Removal needs the same care as application, especially in rentals or on older paint finishes.
Start at one corner and use gentle heat from a hairdryer on a low setting. Don't blast the wall. Warm the adhesive slightly, then peel at a shallow angle. Slow is better than forceful.
A safe removal sequence looks like this:
| Step | What to do | Why it helps |
|---|---|---|
| Warm the edge | Use low heat briefly | Softens adhesive |
| Lift a corner | Fingernail or plastic edge only | Reduces gouging |
| Peel slowly | Keep close to the wall | Puts less stress on paint |
| Wipe residue | Damp cloth or mild cleaner | Clears any remaining tack |
If the paint starts lifting, stop and add a little more warmth rather than pulling harder. Most damage happens when people rush the final few inches.
Styling Ideas and Long-Term Durability
The nicest playrooms don't feel overdesigned. They feel as though the room belongs to the child, but still works for the grown-ups who have to look at it every day. That balance is where wall stickers shine.
I usually think about a child's room in stages. A baby's space often suits soft shapes and calm repetition. Then the toddler years arrive and the room needs more energy, more interaction and more visual cues. Later on, the same walls often need less “cute” and more personality.
Let the theme grow up gradually
One of the easiest mistakes is decorating for a very narrow phase. A wall covered only in one cartoon style or one hyper-specific interest can date quickly. It's better to build a flexible base and add changeable details.
A practical progression might look like this:
-
Nursery stage
Soft stars, clouds, moons, rainbows, leaves or gentle animals in a calm palette. -
Toddler play stage
Brighter motifs, interactive placement, alphabet elements, transport, safari or fairy tale scenes. -
School-age update
Names, sport details, graphic shapes, hobby-led icons, simple murals or cleaner monochrome designs.
The room still evolves, but the wall doesn't need ripping out every time your child changes favourite colours.
Clean and maintain them properly
Good stickers aren't high maintenance, but they do need sensible care. Wipe them with a soft damp cloth. Don't scrub at the edges. Don't soak them. And if the room gets steamy or cold, deal with the room conditions rather than blaming the sticker first.
I'd pay special attention to these areas:
| Area | What to watch |
|---|---|
| Near windows | Condensation and temperature swings |
| By toy storage | Knocking, rubbing and repeated contact |
| At child height | Picking at corners |
| Close to radiators | Dry heat and adhesive stress |
A sticker lasts longer when it isn't treated like a surface finish. It's decor, not a wipe-clean splashback.
Think in cost per year, not just purchase price
Quality usually triumphs. A cheap set can feel sensible at checkout, but not if it starts peeling, leaves residue, or needs replacing the next time the room is updated.
According to Nutmeg Wall Art Stickers, UK parents spend an average of £180 annually on temporary nursery decor, while a premium 5-year vinyl sticker can reduce that recurring cost by 60 to 70% compared with imported stickers that may peel after 6 months. That's the part many families miss. The bargain option often becomes the expensive option once you factor in replacement cycles.
A simple way to judge value is this:
-
Cheap import
Lower upfront spend, but more risk of early peeling, replacement and frustration. -
Better-made sticker
Higher upfront spend, but stronger long-term value if the design can stay through more than one room phase.
That's especially useful in playrooms where themes change. If the base scheme is durable, you can refresh the room with storage, textiles, prints or name details instead of replacing everything on the wall.
A Renter's Guide to Damage-Free Decorating
Renting doesn't mean children have to live with blank walls and a room that feels temporary. It does mean you need to decorate with a bit more discipline.
The deposit risk is real. Ideal Home's coverage of children's room wall ideas notes that 20% of UK private rentals have clauses prohibiting wall damage, and this matters to the 4.5 million UK families who rent. That's exactly why removable decor matters so much in a child's room.
Read the clause properly
A tenancy agreement may ban nails, wall damage, repainting without consent, or “alterations”. That doesn't always mean every removable decorative product is forbidden. It does mean you need to understand whether the issue is the decoration itself or the risk of marks left behind.
Check for wording around:
- Paint damage
- Adhesives
- Redecoration
- Landlord permission
- Returning the property to original condition
If the wording is broad, ask in writing before applying anything. A short email is far better than a dispute later.
Use a renter-safe protocol
This is the part that protects your deposit. Don't improvise.
-
Photograph the wall before decorating
Take clear, dated photos in natural light. -
Test one discreet area first
Use a small piece low-risk area rather than committing to the whole wall. -
Avoid damaged or flaky paint
If the paint is already unstable, even a good removable sticker can lift it. -
Keep packaging and instructions
If there's ever a question, it helps to show the product was designed for clean removal. -
Remove before checkout day pressure starts
Don't leave it until the night before handing keys back.
If you want extra context on choosing renter-friendly products, this guide to removable wall decals in the UK is worth reading before you buy.
Landlords usually care about the finish of the wall, not whether the room looked fun while you lived there. Your job is to leave the finish intact.
What works and what doesn't
In rental homes, some choices are much safer than others.
| Better choice | Riskier choice |
|---|---|
| Smooth, intact painted wall | Cracked, chalky or poorly patched paint |
| Moderate-size removable decals | Huge full-wall adhesive pieces on weak paint |
| Slow, warmed removal | Fast peeling on cold walls |
| Documented permission if needed | Assumptions and verbal agreements |
High-tack but clean-removal products can work very well in rentals when used properly. The key is that “removable” only stays renter-safe if the wall beneath is stable and the removal is patient. Most deposit problems come from bad walls, rushed peeling, or using decorative products with no clear removal guidance.
Ordering Custom Wall Stickers in the UK
Once the wall is measured and the design direction is clear, ordering becomes much easier. Often, parents make a final mistake. They rush the purchase because the fun part is choosing colours and characters, then skip the practical checks that would have prevented disappointment.
Custom stickers are often the smartest route when a room has an awkward shape, a child wants something personal, or you're trying to make one update work for longer. A name decal, a custom colour palette, or a layout designed around furniture can make the room feel finished rather than generic.
What to confirm before placing the order
Before you buy, I'd check five things:
-
Material details
You want clear wording on what the sticker is made from and whether it's suitable for children's spaces. -
Wall suitability
Painted plasterboard, furniture, doors and textured surfaces all behave differently. -
Size on the listing
Don't rely on product photos. Look at actual dimensions and compare them with your wall notes. -
Proofing for personalised designs
If names, initials or custom colours are involved, check whether you'll see a proof or preview. -
Dispatch and lead time
UK-made products are often easier when you're working to a room refresh deadline or want quicker answers if anything needs adjusting.
Why UK ordering tends to be simpler
Ordering from a UK supplier usually makes the process smoother for family homes. Delivery is often faster, communication is easier, and product descriptions tend to reflect UK wall types and decorating habits more accurately. That's useful when you're dealing with painted plasterboard, rented homes or a room that needs finishing before school starts.
It also helps with customisation. If you want a child's name, a specific spelling, colours that tie in with existing storage, or a decal sized for a narrow alcove, local communication makes those details easier to sort out.
The smartest way to buy
If I were advising a parent doing this once and doing it properly, I'd suggest this order of decisions:
- Pick the wall.
- Decide whether the feature is decorative, educational or personalised.
- Choose a material that fits the room and your safety preferences.
- Order to the exact space, not the vague idea of the space.
- Keep the scheme flexible enough to survive the next phase of childhood.
That last point matters most. The best playroom wall stickers UK families buy aren't always the cutest ones. They're the ones that still make sense when the room shifts from nursery to playroom, or playroom to homework corner, without forcing a complete reset.
If you're ready to create a playroom that looks polished, feels personal and works in a real UK home, Quote My Wall is a practical place to start. You'll find wall stickers, nursery and children's designs, and personalised options that make it easier to decorate around awkward walls, changing interests and everyday family life.