
How to Remove a Wall Decal Without Damaging Your Walls
So, you need to get a wall decal off, and you want to do it without wrecking the paintwork. The good news is, it's usually quite straightforward. All it really takes is a bit of gentle heat from a hairdryer and a slow, steady hand to peel it back at a sharp angle. That simple trick is the secret to a clean removal, leaving your walls looking like the decal was never even there.
Why Getting Wall Decal Removal Right is So Important
Wall decals are a brilliant way to put your own stamp on a room, especially if you're renting or just love changing your decor on a whim. But their biggest advantage—being temporary—is only a plus if you can actually take them down without a fuss.
Get it wrong, and you could be looking at peeled paint, a stubborn sticky mess, or even chunks taken out of the plaster. A quick and easy decor refresh can quickly turn into a weekend spent filling, sanding, and repainting.
This guide is all about sharing what we've learned from experience, so you can have fun with your decor without worrying about the aftermath. It all comes down to patience and the right technique, not just pulling and hoping for the best.
The Rise of Wall Art and Why Clean Removal is Key
It's no surprise that wall stickers have become so popular. They're an affordable and creative way to liven up a space without the commitment of wallpaper. Here in the UK, countless homeowners and renters are using them to add personality to their homes.
The entire point is to have a clean slate when you're done. That process starts with the decal itself. A high-quality vinyl, like the kind we use here at Quote My Wall, is made to apply smoothly and, just as importantly, come off cleanly. It sets you up for success right from the start.
The bottom line is this: a proper removal protects your paint, your rental deposit, and your sanity. Spending a few extra minutes on the removal can save you hours of repair work down the line.
We're going to walk through the methods that work with the adhesive, not against it. By learning a few simple tricks, you'll be able to keep your walls in perfect nick, ready for whatever design idea you have next. If you're curious about how our products are designed for easy swaps, you might find our guide on removable wall decals in the UK helpful.
Your Toolkit for a Flawless Decal Removal
Getting a wall decal off cleanly isn't about brute force; it's all about having the right gear on hand before you start. A little prep work is the secret to avoiding a frustrating mess of torn vinyl and sticky residue. The good news? You probably have everything you need tucked away in a drawer already.
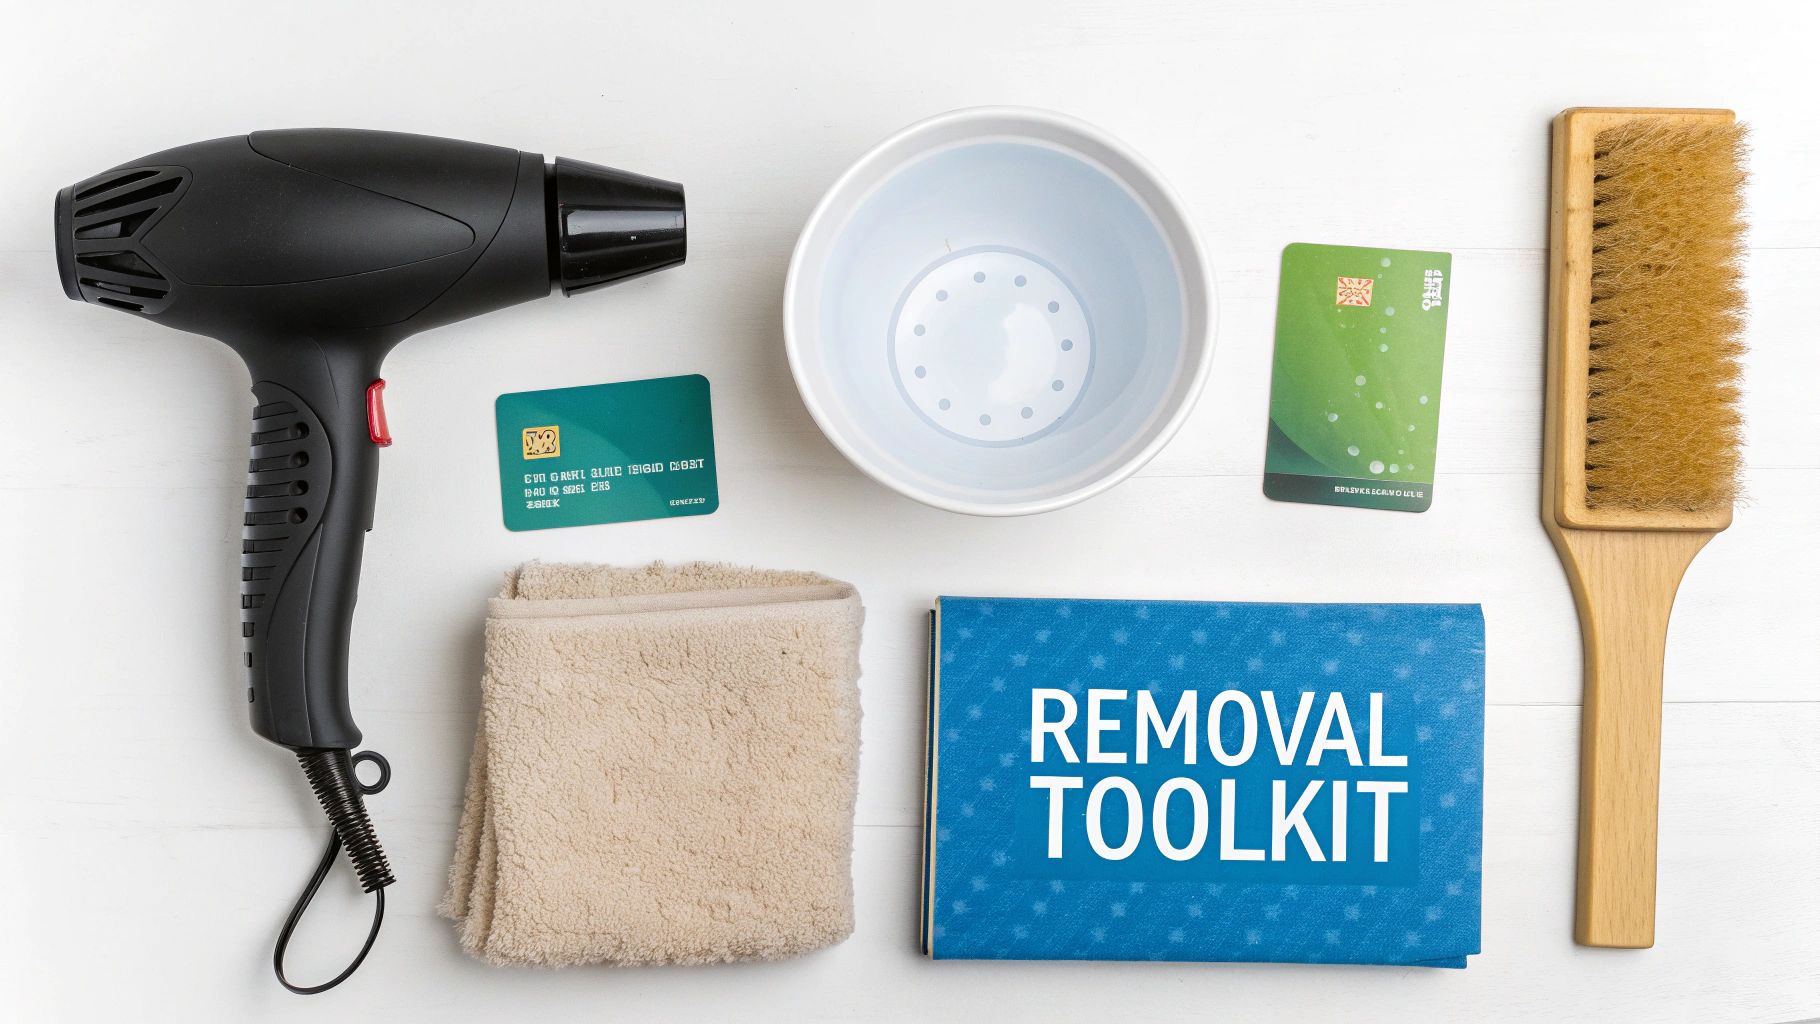
Taking just five minutes to gather these items will make the whole process smoother and protect your walls from damage. It’s a small step that makes a massive difference.
The Tools You’ll Need
Think of this as your mission control for the job ahead. Having these basics ready will set you up for success.
First up, and most importantly, is a standard hairdryer. The gentle heat is your best friend here. It works by softening the decal’s adhesive, making it pliable and much easier to lift without chipping the paint underneath. You'll want to use a low or medium setting to avoid scorching the wall.
Next, you need something to get under the edge of the decal once the adhesive has softened. The key is to use something that won't scratch your paintwork, so leave the metal tools in the box. Instead, reach for one of these:
- A plastic scraper or putty knife: These are ideal for gently working under the edge.
- An old credit card or loyalty card: The firm but flexible plastic is perfect for lifting decals without damaging the surface.
- Your fingernail: For really delicate surfaces, this is often the safest way to get the peel started.
For those more stubborn jobs where you need a bit more leverage, having a reliable paint scraper designed for delicate surfaces can be a real lifesaver.
My Two Cents: I can't stress this enough – always opt for plastic over metal. One slip with a metal blade can leave you with a deep scratch, turning a simple removal into a much bigger repair job.
Essential Decal Removal Toolkit
Gather these common household items to ensure a smooth, damage-free wall decal removal.
| Tool | Primary Use | Pro Tip |
|---|---|---|
| Hairdryer | Gently heats and softens the decal's adhesive. | Keep it moving in a circular motion, about 6-8 inches from the wall, to avoid overheating one spot. |
| Plastic Scraper/Card | Lifts the softened edges of the decal without scratching the paint. | An old credit card is perfect for this. Its flexibility gives you great control. |
| Warm, Soapy Water | Cleans off any leftover sticky residue after the decal is gone. | A few drops of washing-up liquid in a bowl of warm water is all you need. |
| Soft Cloths (x2) | One for applying the soapy water, the other for rinsing with clean water. | Microfibre cloths work brilliantly as they won't leave lint behind on the wall. |
With these simple tools at your disposal, you're well-equipped to tackle the job like a pro.
Supplies for Cleaning Up
Once the decal is finally off the wall, you'll likely notice a faint, sticky outline where it used to be. This is completely normal, especially if the decal has been up for a few years.
To finish the job properly, grab a small bowl of warm, soapy water and a couple of soft cloths or sponges. A simple solution of washing-up liquid and water is usually more than enough to break down the residue.
Use one cloth to gently wash the area and a second, clean cloth dipped in plain water to rinse away any soapy film. This final wipe-down leaves your wall looking spotless and ready for its next chapter.
Using Gentle Heat for a Perfect Peel
When you need to get a wall decal off without a fight, heat is your best friend. Forget scraping away or reaching for harsh chemicals; a simple hairdryer is the secret weapon I turn to time and time again. The idea isn't to blast the decal, but to gently warm it up, coaxing the adhesive into letting go.
Applying a bit of consistent warmth makes the vinyl pliable and softens the glue underneath. It turns a stubborn bond into something much more cooperative. This simple trick is what allows for a clean, damage-free peel, saving the paintwork you want to keep.
Think of it like warming up before a stretch. A cold decal is rigid and brittle, which means it’s likely to tear into dozens of frustrating little pieces. A warm decal, on the other hand, becomes soft and flexible, ready to come away in one satisfying sheet.
Finding the Right Temperature
Getting the temperature right on your hairdryer is key. You’re not trying to dry hair, so the high-heat setting is completely off the table—it can actually make things worse. Too much heat can turn the adhesive into a gooey mess or, even worse, scorch the paint.
Start with the low or medium heat setting. That’s all you need to get the job done without risking damage. Hold the hairdryer about six to eight inches from the wall and keep it moving.
I always focus the warm air along the edges of the decal first. Just sweep the hairdryer back and forth in a slow, steady motion. You'll actually see the vinyl start to soften, and sometimes you'll even see a corner lift ever so slightly. That's your cue.
Mastering the Peeling Technique
As soon as an edge looks like it’s loosening, it’s time to act. Switch the hairdryer off and pop it down somewhere safe. Use your fingernail or the edge of a plastic loyalty card to gently pry up a corner you've just heated. All you need is enough of a lip to get a decent grip.
Now for the most important part: the angle. Whatever you do, do not pull the decal straight out from the wall. That puts a huge amount of stress on the paint and is the number one cause of damage.
The secret to a clean removal is peeling the decal back on itself at a sharp angle, ideally close to 45 degrees. This simple change in technique minimises the force on the paint, encouraging the adhesive to let go of the wall instead of taking the paint with it.
Take your time with this. Pull the decal away slowly with one hand, keeping the hairdryer within reach with the other. If you feel any resistance or hear that dreaded tearing sound, stop straight away. That's a clear signal that the adhesive has cooled down and needs more warmth. Just give the area just ahead of where you're peeling another quick blast of heat, then carry on.
This methodical approach might feel a bit slow, but trust me, it’s a lot faster than having to patch and repaint a damaged wall.
Why Heat Is So Effective
The reason this works so well is pretty simple. Using heat is widely seen as the safest and most efficient way to remove wall decals because it dramatically cuts down on removal time and the risk of damage. A bit of controlled warmth from a hairdryer makes the adhesive more elastic and less brittle, which makes all the difference. This is especially helpful in the UK, where walls can often be cold, making adhesives even more stubborn. You can find more great insights about effective decal removal techniques on stickerbrand.com.
By working with the adhesive’s properties instead of fighting against them, you set yourself up for a smooth, successful removal every time.
Adapting Your Technique for Different Surfaces
The surface your decal is stuck to really dictates your game plan. What works brilliantly on a standard emulsion-painted wall might be a disaster on another. A one-size-fits-all approach is a recipe for trouble, so you absolutely have to adjust your technique.
For example, a sturdy, modern wall can handle a bit more persuasion than an older, more delicate surface. Taking a moment to think about what's underneath the decal before you start is the single best way to get a clean finish without any heart-sinking moments of regret.
This little flowchart is a great way to visualise the core process for getting a wall decal off safely.
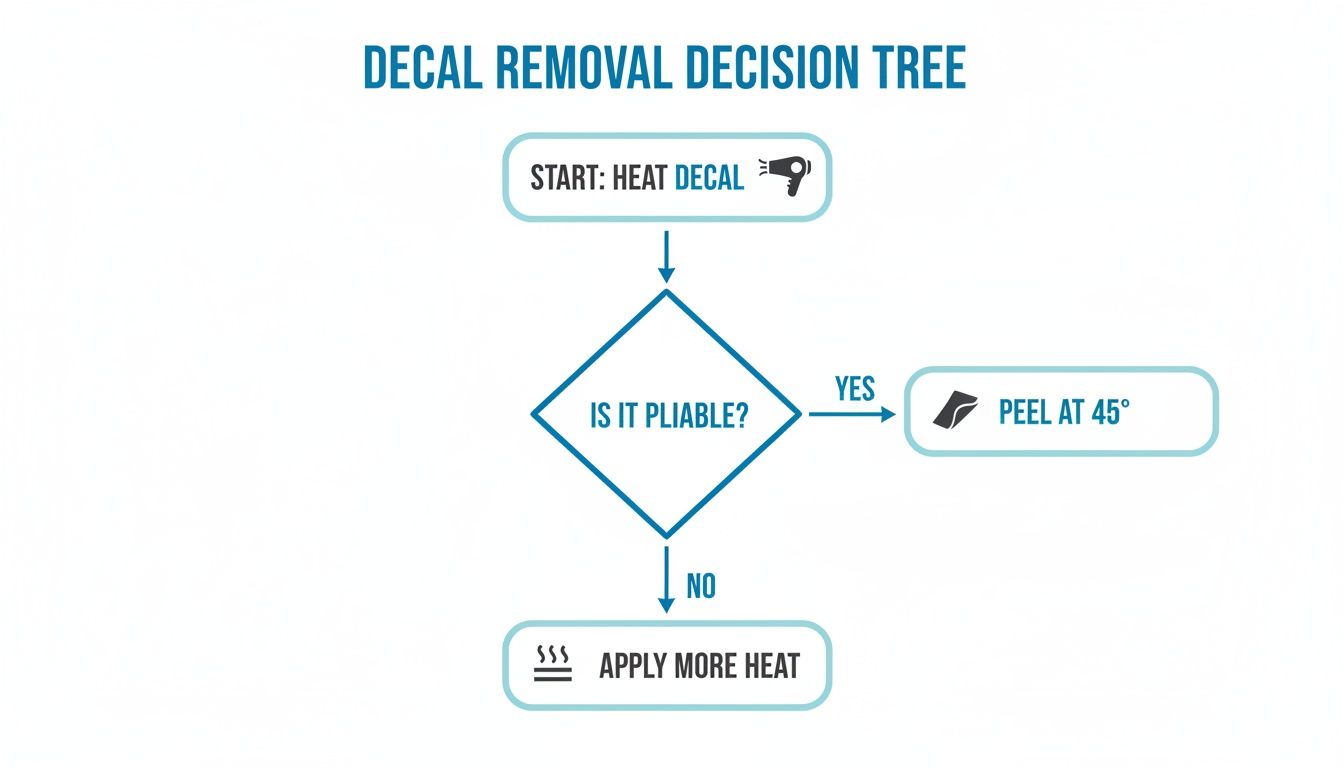
The main takeaway here is the feedback loop. If the decal isn't budging, the answer is always more gentle heat—never more force.
Removing Decals from Painted Walls
This is the situation most of us will be facing. For modern walls with a decent quality paint finish (like matt, eggshell, or silk), the trusty hairdryer technique is your go-to. The biggest variable here is the quality of the original paint job. If the paint was slapped on poorly or without a proper primer, it’s much more likely to peel away with the decal.
I always recommend starting in a small, out-of-the-way corner just to test how the paint is going to behave. If you see even a hint of bubbling or lifting, stop immediately and rethink your approach.
Tackling Textured Surfaces
Textured walls, whether it's an old-school Artex finish or a more common orange-peel texture, throw a spanner in the works. The uneven surface means the adhesive doesn’t have a consistent grip, which can make for a tricky peeling process.
- Heat is still your friend: You'll need to warm the decal thoroughly, making sure the heat gets into all those tiny nooks and crannies to soften the glue.
- Work with the wall: Try to peel with the direction of the texture, not against it. This really helps minimise the risk of pulling off little bits of the wall surface.
- Patience is everything: Go even slower than you would on a smooth wall. The decal is far more likely to tear around the raised bumps.
Working with Delicate Wallpaper
Right, this is the high-stakes version. Removing a decal from wallpaper demands extreme caution. Wallpaper is far more fragile than a painted wall, and any aggressive pulling will almost certainly end in rips and tears.
Your goal here is preservation. Use the lowest heat setting on your hairdryer and hold it a good distance from the wall. You’re just trying to gently warm the decal's vinyl, not the wallpaper paste underneath. Peel it back incredibly slowly, keeping a close eye on the wallpaper for any sign of lifting or stress.
For anyone who loves to switch up their decor but lives with wallpaper, looking into removable wallpaper options for renters is a brilliant way to have fun without the risk.
Removing Decals from Wood and Skirting Boards
Decals on wooden furniture, doors, or painted skirting boards need a slightly different touch. Heat can still work, but you have to be careful not to melt or damage any varnish, wood stain, or paint. Keep the hairdryer on a low setting and make sure you keep it moving constantly.
If you’re left with some stubborn sticky residue on a wood surface, step away from the harsh solvents. Instead, try a bit of vegetable oil or a dedicated citrus-based cleaner on a soft cloth. Let it sit on the gunk for a few minutes to break it down, then gently wipe it away. As always, test any cleaning product on a hidden spot first to make sure it doesn't discolour the finish.
Tackling Stubborn Decals and Pesky Residue
Let's be realistic—sometimes, a decal just doesn't want to leave. You follow all the steps, but you’re left with a sticker that tears into a million tiny pieces or a tacky, sticky mess on the wall. This is especially common with older decals, those that have been soaking up sunshine for years, or ones made from lower-quality vinyl.
Don't reach for a metal scraper in frustration! This is simply where you shift gears to your plan B.
The golden rule is to start with the gentlest method and only ramp things up if you absolutely have to. Most of the time, a bit of patience and a soft touch are all it takes to get your wall looking spotless again. This approach saves you from creating a bigger problem, like a patch of damaged paint.
What to Do When Decals Tear and Shred
If your decal starts falling apart instead of peeling off in one piece, that’s a sure sign the vinyl has gone brittle. The adhesive is giving up unevenly, and trying to pull faster will only make it worse. The key is to slow right down and apply more targeted heat.
Get your hairdryer and focus on one small, manageable section at a time. Heat it until you can feel the vinyl soften up. Then, use a plastic card—like an old credit card—to gently scrape and lift the tiny, stubborn pieces away. Yes, it’s a bit tedious, but taking your time here is 100% worth it to avoid gouging the wall.
The goal isn't speed. If a decal is fighting you this hard, it's a marathon, not a sprint. More heat and slower movements are your best friends—never more force.
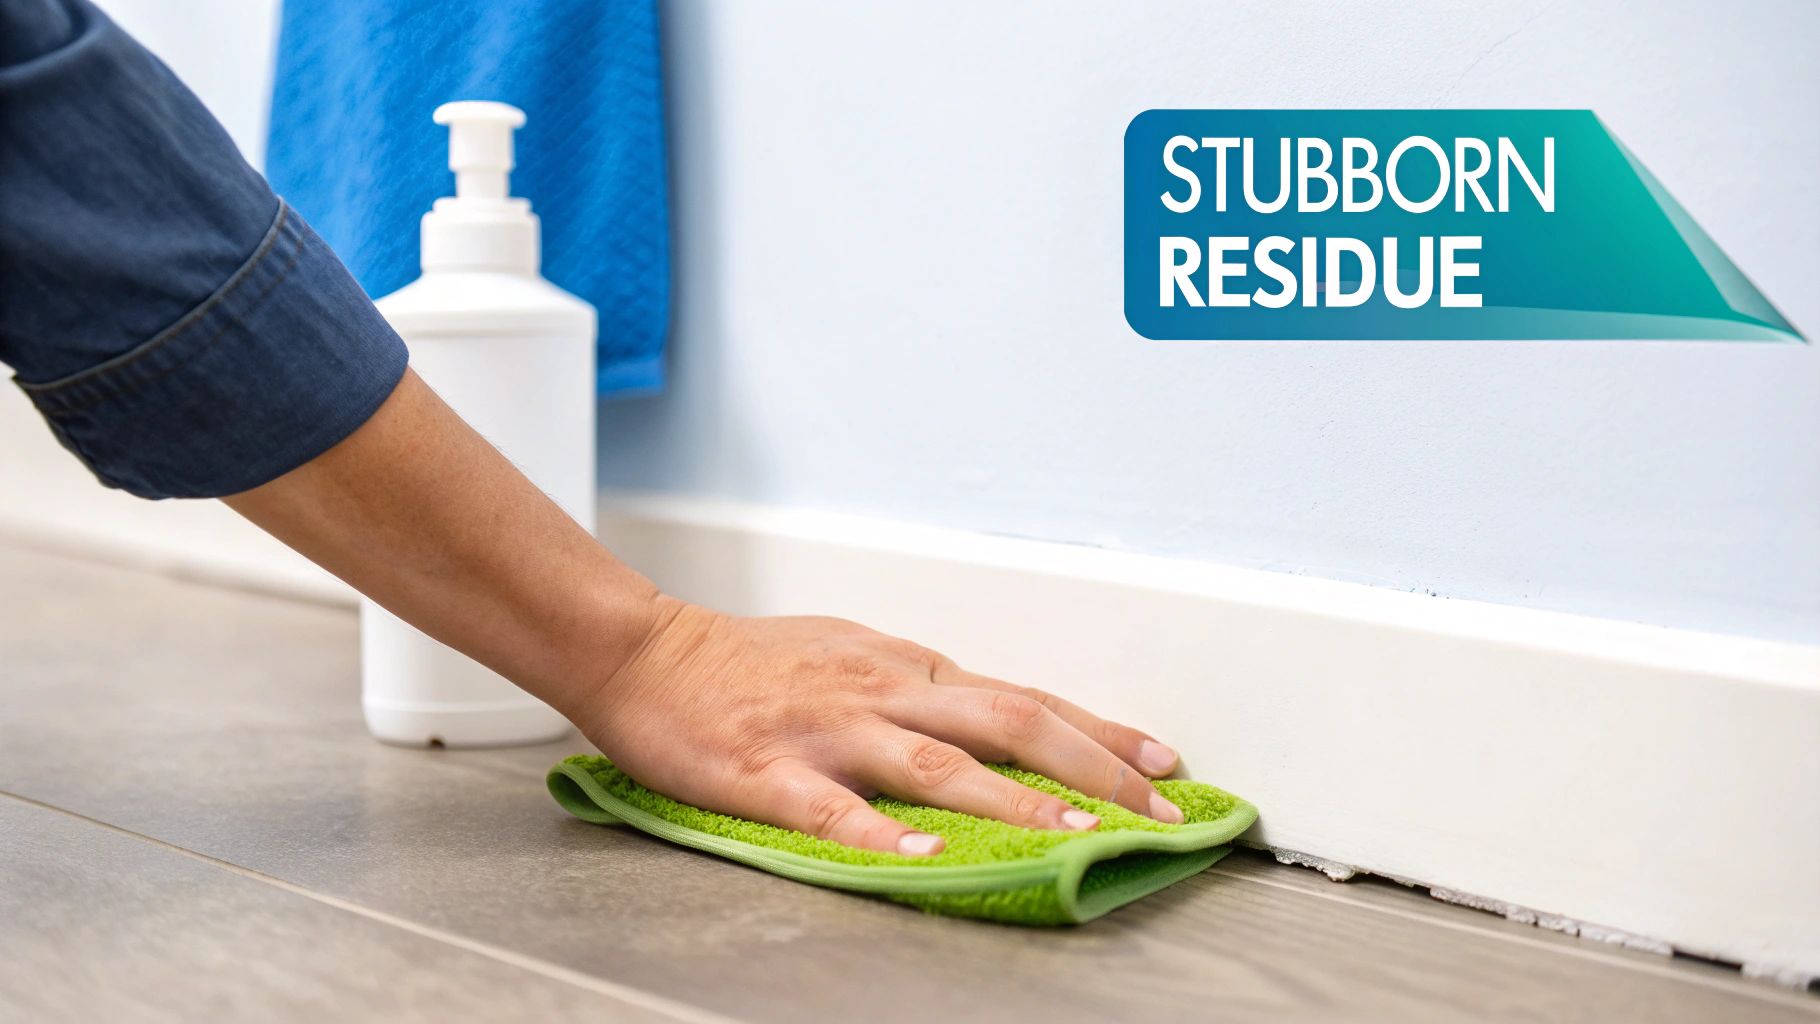
Safely Wiping Away Sticky Residue
Once the vinyl part of the decal is gone, you might be left with a sticky shadow of its former self. Before you grab the heavy-duty chemicals, give these gentler household remedies a try first.
-
Warm Soapy Water: Your first line of defence should always be a microfibre cloth and some warm water mixed with a few drops of washing-up liquid. Rub the sticky area in a gentle, circular motion. You’d be surprised how often this is all you need for fresh adhesive.
-
White Vinegar Solution: For residue that’s putting up a bit more of a fight, mix equal parts white vinegar and warm water. The mild acid in vinegar is fantastic for dissolving stickiness without being too harsh on most paint jobs.
-
Rubbing Alcohol: If the gunk still won’t budge, dampen a cotton ball with a little rubbing alcohol (isopropyl alcohol works too). Dab it onto the residue, let it work its magic for a minute, and then wipe it away.
Whichever solution you use, always test it on a small, hidden spot first—think behind the sofa or down by the skirting board. This quick patch test will tell you if it's going to affect your paint's colour or finish.
If you’re facing a particularly stubborn patch, our dedicated guide on how to remove sticky residue from walls offers an even deeper dive into different methods. With these tips in your back pocket, you’ll be ready for anything.
Getting Your Wall Back to Perfect
You've peeled off the decal and cleaned up the last of the sticky residue—nice one! But don't put your tools away just yet. The last little bit of prep is what really makes the difference, leaving your wall looking like the decal was never even there.
The Final Clean-Down
First things first, let's get rid of any lingering ghosts. Even after you've dealt with the main adhesive, you might notice a faint outline or a slight film from the decal or the cleaning products you used.
Grab a clean, soft cloth, dampen it with a little bit of water, and give the whole area a final wipe. This simple step cleans up any last traces and gives you a clear, true surface to check over.
Fixing Any Minor Blemishes
Now that the wall is spotless and dry, have a good look at it in bright light. Most of the time, especially if you were working with good-quality vinyl, the wall will look flawless. But sometimes, a tiny chip of paint can lift during removal, especially if the original paint job wasn't 100% perfect.
Don't panic—this is usually a quick and easy fix that won't require you to repaint the entire room. All you need is a little decorator's filler.
- Pop a tiny dab of filler right onto the nick using your fingertip.
- Use a small, flexible filling knife (or even an old credit card) to smooth it completely flush with the wall.
- Let it dry properly, following the time recommended on the tub.
- Once it's hard, a quick, gentle sand with fine-grit sandpaper is all it takes to get it perfectly smooth.
This leaves you with a seamless surface, ready for the final step.
Touching Up the Paint
With any repairs sorted, it’s time for the paint touch-up. Hopefully, you've got some leftover paint from when the room was last decorated. If not, most DIY shops sell small tester pots which are ideal for these little jobs. Getting the colour match right is everything here.
For the best results, use a small artist's brush instead of a standard paintbrush. It gives you far more control to dab the paint precisely where you need it. Apply a small amount over the filled spot, gently feathering the edges to blend it into the surrounding paintwork.
Pro Tip: It's always better to apply two thin coats of paint instead of one thick one. This approach helps the touched-up area blend in discreetly and prevents you from ending up with a noticeable, slightly-raised patch.
If you’ve removed the decal and find the wall needs more than just a small touch-up, or you’re simply ready for a complete refresh, calling in professional painting services can ensure a truly pristine finish.
And with that, your wall is back to its original best—a perfect blank canvas for whatever you have planned next.
Ready to transform your space with a fresh new look? Explore the huge range of high-quality, easy-to-remove wall decals at Quote My Wall and find the perfect design for your home today at https://www.quotemywall.co.uk.