
Removable Wallpaper for Renters A UK Guide
Stuck staring at bland, boring walls in your rental? If your tenancy agreement has you feeling trapped, I've got good news: removable wallpaper for renters. It’s like a custom-fit outfit for your walls, letting you inject your personality into a space and then peeling it all away when it's time to move on. Best of all? You’ll get that security deposit back.
Transform Your Rental Without Losing Your Deposit
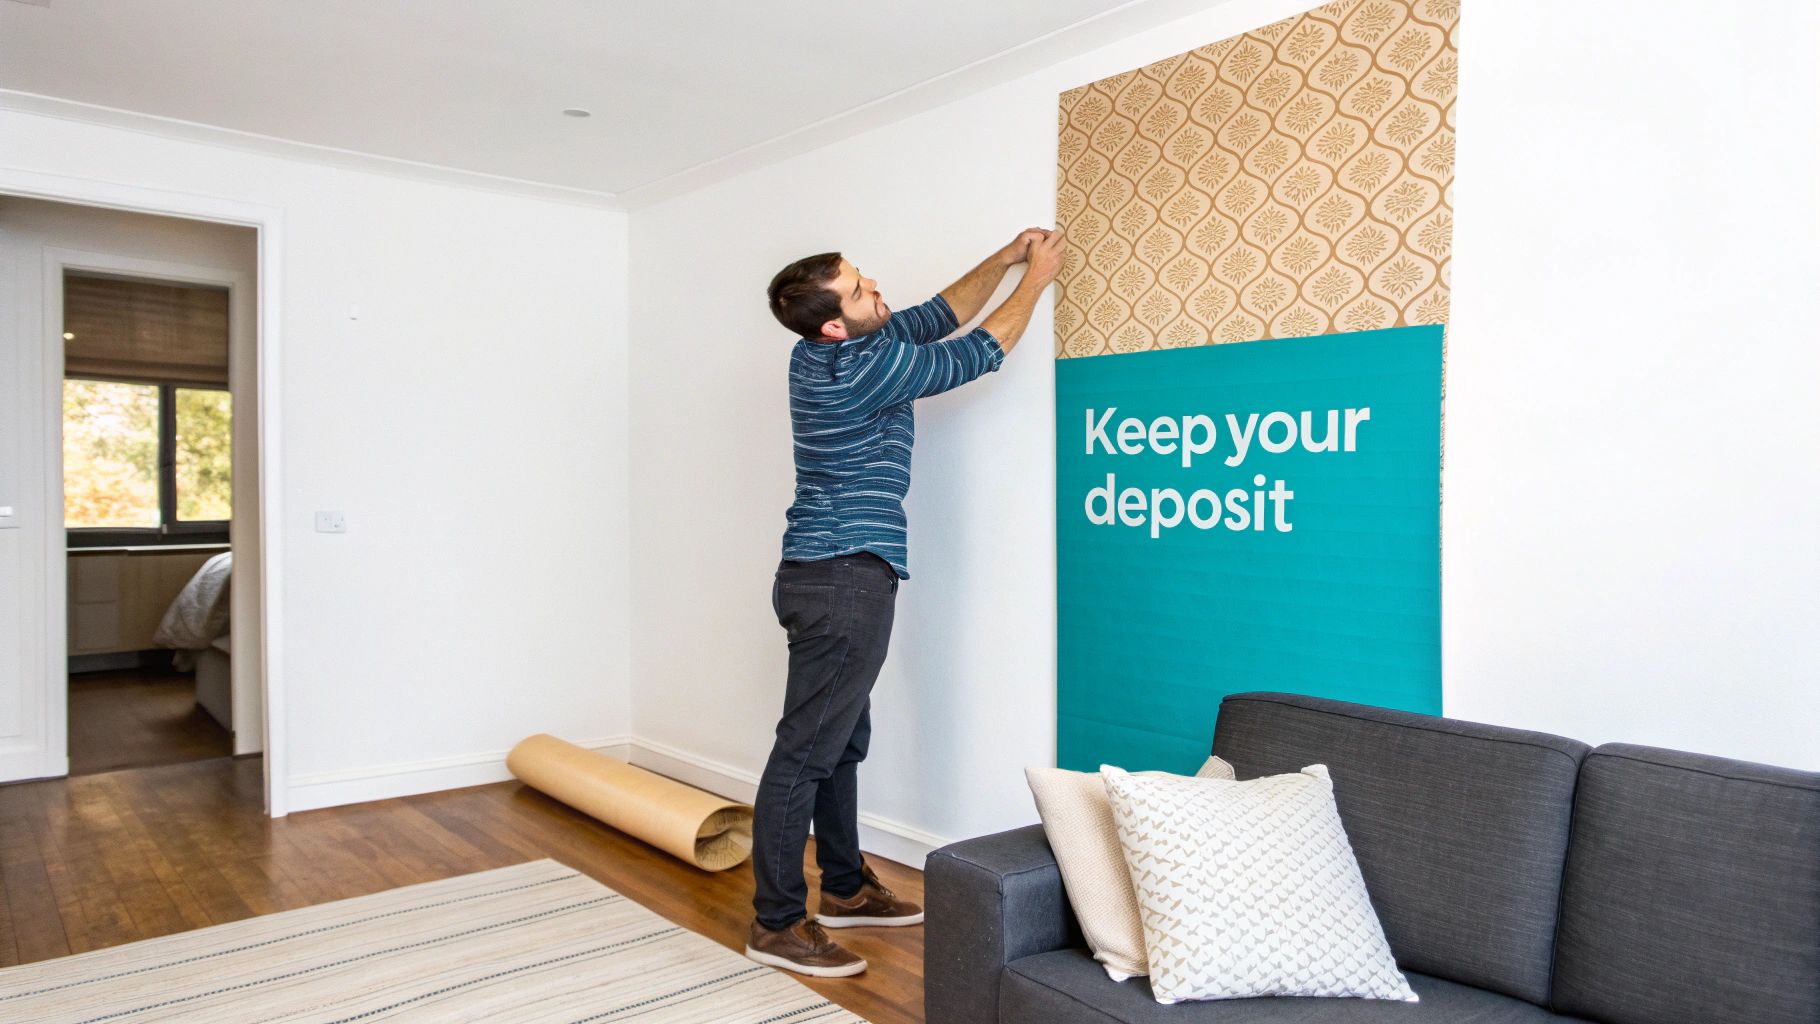
So many renters across the UK assume that personalising their flat automatically means kissing their deposit goodbye. Landlords aren't exactly keen on tenants painting walls or making permanent alterations, which often leaves you stuck with magnolia monotony that never quite feels like home.
This is exactly where peel-and-stick wallpaper shines. It’s essentially a giant, high-quality sticker designed for walls. The magic is in the adhesive—strong enough to stay put, but gentle enough to come off cleanly. Forget the messy paste and professional installers of traditional wallpaper; this is a DIY dream that puts you in charge of your home’s look without any long-term strings attached.
Why It's a Game-Changer for Renters
The appeal goes way beyond just adding a bit of colour. It’s a genuinely practical solution for navigating the hurdles of renting and making a place feel like it’s truly yours.
- Damage-Free Guarantee: The special low-tack adhesive is designed to peel off without taking paint with it or leaving a sticky mess, as long as the wall underneath is in decent shape.
- Endless Style Options: Whether you love bold geometric prints, calming botanicals, or subtle textures, there are thousands of designs out there to suit any taste.
- DIY-Friendly Application: Most versions are made for a one-person job. You won't need a van full of tools or any real experience to get a great result.
- Affordable Transformation: Creating a stunning feature wall is a surprisingly budget-friendly project that delivers a massive visual punch for a relatively small cost.
Removable wallpaper is the ultimate decorating hack for tenants. It bridges the gap between wanting a personalised, stylish home and needing to adhere to the strict rules of a tenancy agreement.
More Than Just Walls
One of the best things about this stuff is how versatile it is. Don't limit your thinking to just a feature wall. You can use it to give old furniture a new lease of life, line the back of a bookshelf for a pop of colour, or even create a temporary kitchen splashback.
Even if you’re looking at a furnished 1 bedroom flat to rent, a few strips of removable wallpaper can help you cover up the landlord's questionable taste and make the space feel like your own.
It's a low-risk, high-reward solution that puts the design power firmly back in your hands. In this guide, we’ll walk you through everything—from picking the right material to getting a flawless, bubble-free finish. It’s time to say goodbye to boring and hello to a rental that finally feels like you.
Choosing Between Peel-and-Stick and Pre-Pasted Wallpaper
Before you get lost in a sea of beautiful patterns and colours, you’ll need to make a key decision. There are two main players in the world of removable wallpaper, and your choice will shape everything from how you put it up to how it looks in the end. The two primary contenders are peel-and-stick and pre-pasted.
Think of peel-and-stick wallpaper as a giant, high-quality sticker for your wall. It comes with its own adhesive already on the back, covered by a simple peel-away liner. This option is a crowd-favourite for its sheer simplicity, making it the go-to for most DIY beginners.
Pre-pasted wallpaper, on the other hand, comes with a dry, dormant adhesive coating. All it needs is a bit of water to wake it up—usually by soaking it or spraying the back. This activates a strong but temporary bond that’s also designed to come off cleanly when you move out.
Understanding Peel-and-Stick Wallpaper
Peel-and-stick is by far the most straightforward option, which is why it’s so popular with renters looking for a quick, hassle-free makeover. Its biggest selling point is how forgiving it is. If you don't get a panel quite right the first time, you can usually peel it back and reposition it without losing its stickiness—a massive relief when you’re trying to line up a fiddly pattern.
The material itself is typically a durable vinyl or a woven fabric, which means it’s tough and often wipeable. This resilience is fantastic for busy areas like hallways or even moisture-prone spaces like kitchens and bathrooms, as long as you opt for a water-resistant vinyl version.
The real magic of peel-and-stick is its forgiving application. You can smooth out bubbles, lift a section to get it just right, and see the finished result instantly without waiting for any paste to dry.
This is the perfect choice for smooth, well-painted walls. It can, however, struggle to get a good grip on heavily textured surfaces like popcorn or knockdown finishes. The adhesive really needs a flat, even plane to create a secure bond. For a deeper look at application techniques, check out our complete guide to peel-and-stick wallpaper.
Exploring Pre-Pasted Removable Wallpaper
What if your rental has walls that are a little less than perfect? Maybe they have a few minor bumps or an older paint job. In that case, pre-pasted wallpaper might be your best bet. The water-activated paste creates a more substantial bond that’s often better at gliding over subtle imperfections.
The process does involve a little more prep, as you'll need a water tray or a spray bottle to get the adhesive ready. While it might sound a bit messier, the "slip" you get from the wet paste is a huge advantage. It lets you slide the panel around on the wall to get the alignment absolutely perfect—a trick that many professional decorators swear by.
Choosing between the two really comes down to your walls and your confidence level. Let's break it down in a simple table.
Comparing Peel-and-Stick vs Pre-Pasted Wallpaper
| Feature | Peel-and-Stick Wallpaper | Pre-Pasted Removable Wallpaper |
|---|---|---|
| Application Method | Self-adhesive backing; just peel and stick. | Water-activated paste; requires soaking or spraying. |
| Ease of Use | Very beginner-friendly. Forgiving for repositioning. | Moderate. The 'slip' helps with alignment but is messier. |
| Best For | Smooth, well-prepared walls. Kitchens and bathrooms. | Walls with minor imperfections. |
| Removal | Peels off cleanly in one piece when applied correctly. | Soaks off with water, usually with minimal residue. |
| Tools Needed | Squeegee, utility knife, measuring tape. | Water tray/spray bottle, sponge, squeegee, knife. |
Ultimately, both are designed with renters in mind, so you can't really go wrong. By weighing the pros and cons against your specific needs, you'll be able to choose the perfect wallpaper for your space.
The demand for these non-permanent solutions isn't surprising. The English Private Rented Sector grew by around 19% between 2014 and 2020, and with that came a huge need for damage-free decorating options. The UK removable wallpaper market is now valued at approximately £40 million, and experts predict it will grow by over 7% each year as new, innovative materials hit the scene. You can read more research on the removable wallpaper market to see these trends for yourself.
Both peel-and-stick and pre-pasted wallpapers give you a fantastic way to make your rental feel like home, all without risking your security deposit. Just consider your wall's condition and your own DIY comfort level, and you'll be ready to start your transformation.
Choosing the Perfect Design for Your Space
Right, this is where the fun really starts. With a whole world of patterns, colours, and textures out there, you've got the power to completely transform the feel of your rental. But this isn't just about picking something you like the look of; it’s about making a smart choice that actually improves your space and shouts you.
Think of it like dressing a room. You’re looking for something that fits just right, works with the existing features, and makes you smile every time you walk in. Let's walk through the essentials, from getting your measurements spot-on to understanding how patterns can trick the eye, so you can be sure you'll love the result.
Measure Twice, Buy Once
Before you let yourself fall head over heels for a design, you need to get practical with a tape measure. Honestly, this simple step is the single best way to stay on budget and avoid that sinking feeling when you realise you’re a strip short. Running out and reordering is a real headache, as different print batches can have tiny colour variations that you'll definitely notice.
Start by measuring the width and height of each wall you want to paper. Multiply those two numbers together to get the square metres for that wall. Do this for all the walls you're covering and then add up the totals.
A Word of Advice: Always, and I mean always, order about 10-15% more wallpaper than your calculations say you need. This little buffer is a lifesaver. It covers you for any mis-cuts, tricky bits around windows or sockets, and gives you the extra needed to get those patterns lined up perfectly. It's a small price to pay for peace of mind.
Why Samples Are Non-Negotiable
You wouldn't buy a car without a test drive, would you? The same logic applies here. You absolutely must order a sample before committing to several rolls of wallpaper. A picture on a screen just can't show you the true texture, the way it catches the light, or the exact shade of a colour. Lighting is everything; the cool morning light in your bedroom is worlds away from the warm lamplight in your living room at night.
Getting a few samples in your hand lets you:
- See the Colours in Your Own Light: Stick the sample on the wall and watch it throughout the day. You'll be amazed at how much the colours can change.
- Feel the Texture: Is it smooth vinyl? A chalky matte paper? Or something with a fabric-like feel? The texture has a massive impact on the overall look.
- Test the Tack: A sample is your best friend for checking if the adhesive plays nicely with your walls, especially if they aren't perfectly smooth. See how well it sticks and, crucially, how cleanly it comes away.
Spending a few quid on samples now could save you from a much bigger, more expensive mistake down the line.
Using Design to Transform Your Space
The right pattern can do so much more than just look pretty – it can visually reshape a room. This is a classic trick that interior designers use to fix awkward layouts and create a sense of balance. For a renter, this is your secret weapon for making a space feel bigger, brighter, or taller without touching a single wall.
First, think about the effect you're after:
- To Make a Ceiling Feel Higher: Vertical stripes or any pattern with a strong upward motion naturally draws the eye up, creating an illusion of height. This is a brilliant trick for ground-floor flats or rooms with lower ceilings.
- To Make a Room Seem Wider: If you've got a narrow space like a hallway or a box room, horizontal patterns can make it feel much more spacious and less cramped.
- To Open Up a Small Space: Stick to light-coloured wallpapers with small, delicate patterns. They reflect more light and help a room feel airy and open. Steer clear of large, dark, busy patterns, which can quickly make a compact room feel claustrophobic.
This whole approach to renter-friendly decorating is really taking off in the UK. Recent market analysis shows that around 35% of renters have either used or thought about using removable wallpaper. What’s more, over 65% of those users are under 35. These are often people in cities who want to put their stamp on a place. With a standard roll costing between £20 and £60, it's a genuinely accessible way to make a huge impact. You can discover more insights about the UK removable wallpaper market trends and see just why it's become so popular.
Coordinating with Your Existing Furniture
Unless you’re starting completely from scratch, your new wallpaper has to get along with the furniture and décor you already own. A cohesive look is all about creating a nice conversation between all the different elements in your room.
First, take a look around and identify the main colours in your big-ticket items—the sofa, rug, curtains, and any artwork. Your wallpaper should either complement these tones or create a deliberate, stylish contrast. For instance, if you have a solid, neutral-coloured sofa, a bold, patterned wallpaper can instantly become the star of the show.
On the other hand, if your furniture is already quite patterned, a more subtle, textural wallpaper is probably a better bet to avoid everything looking too busy. The goal is simply to create a balanced, intentional look that feels pulled together, even on a renter's budget.
Your Step-by-Step Guide to a Flawless Application
Putting up removable wallpaper might seem a bit intimidating, but honestly, it’s more like applying a giant, beautiful sticker than tackling a traditional decorating job. With a little patience and the right technique, you can get a finish that looks genuinely professional. This guide will walk you through it, phase by phase, so every panel goes on smoothly.
The real secret to a great result? It’s all in the prep work. Skipping this stage is like trying to paint on a dusty canvas – the end result just won't be as good. Taking an hour to prep your space now will save you a world of frustration later on.
This simple process flow shows the key decisions you'll make before you even think about unrolling your first panel.
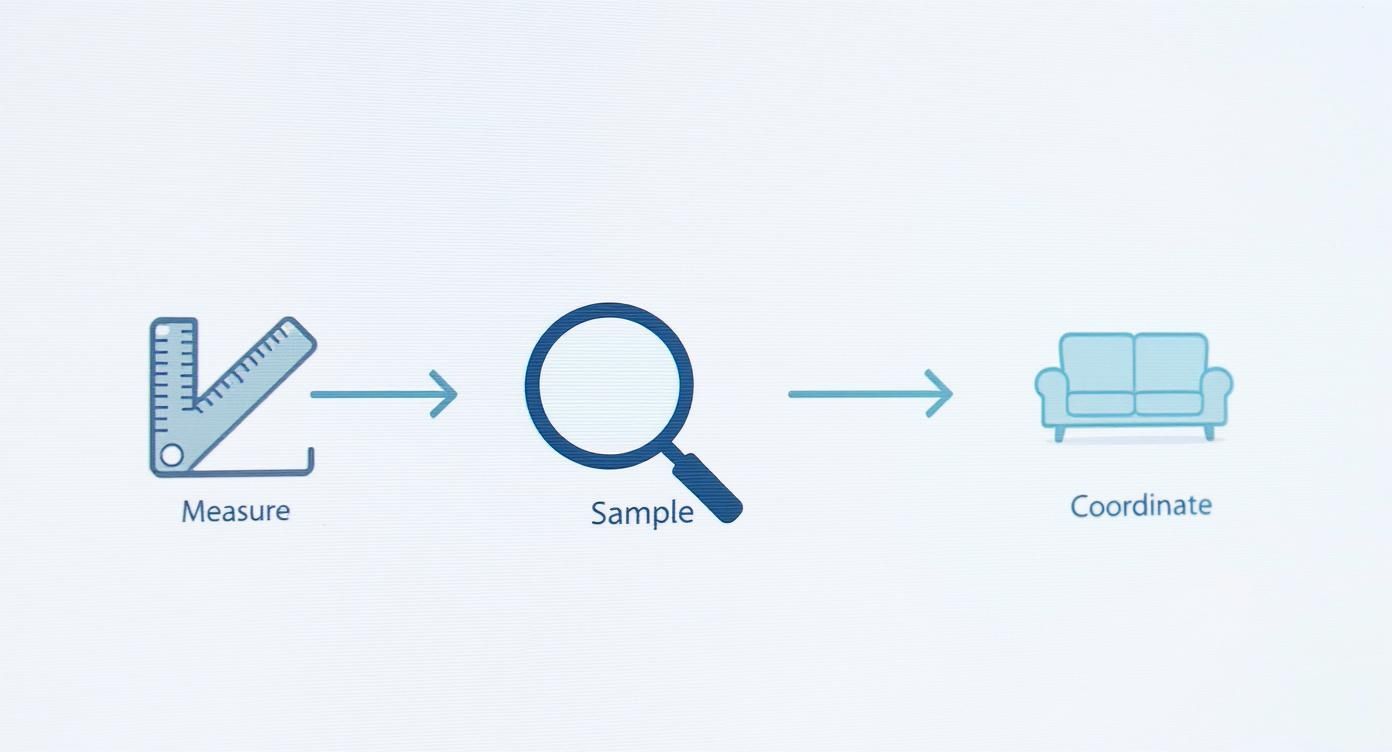
As you can see, a successful project starts long before the paper touches the wall, kicking off with careful measurements and making sure your choice works with your existing decor.
Phase One: Wall Preparation
First things first: your walls need to be clean. Over time, walls collect a fine layer of dust and grime that can stop the wallpaper’s adhesive from getting a proper grip.
Give the entire surface a wipe-down with a damp cloth and a mild cleaning solution. A simple mix of washing-up liquid and water is perfect. Afterwards, go over it again with a clean, damp cloth to get rid of any soap residue and let it dry completely. This might take a few hours, so be patient.
"How good your wallpaper looks on the wall depends on this step... Lightly sand down paint drips that might puncture or cause bubbling in your wallpaper. Finally, wipe down your wall with a damp cloth, and allow it to dry before proceeding."
Next, get your toolkit ready. Having everything you need within arm's reach makes the whole process feel much less chaotic. You don’t need a lot, but these items are non-negotiable:
- A smoothing tool or squeegee: This will be your best friend for chasing out air bubbles.
- A sharp craft knife: Essential for clean, precise cuts around edges and sockets.
- A steel ruler or straight edge: Use this to guide your knife for perfectly straight trims.
- A tape measure and a pencil: For marking up your starting point accurately.
- A step ladder: So you can safely reach the top of the wall without stretching.
Phase Two: The Application Process
With your walls prepped and tools at the ready, it's time to hang that first panel. This is easily the most important step, as it creates the guide for all the other panels. A word of warning: never assume your walls or ceiling are perfectly straight. They rarely are.
-
Draw a Plumb Line: Measure the width of your wallpaper roll and then subtract an inch or so. From the corner of the wall, measure this distance out and use a spirit level to draw a faint, perfectly vertical pencil line from the ceiling to the floor. This line – not the corner – is your guide for the first panel.
-
Peel and Position: Start at the very top of the wall. Peel back about 12 inches of the backing paper and fold it down. Carefully align the edge of your wallpaper with the pencil line you drew, leaving a couple of inches of excess paper overlapping the ceiling.
-
Smooth It Out: Working from the centre outwards, use your smoothing tool to press the wallpaper onto the wall. This motion is key for pushing any trapped air out towards the edges. Smooth down that initial 12-inch section firmly.
-
Work Your Way Down: Keep pulling the backing paper down in small sections while you continue smoothing the wallpaper onto the wall. Taking this methodical approach stops big air bubbles from forming and prevents the sticky back from clinging to itself – a famously frustrating experience!
Once that first panel is up, the rest is just a matter of matching the pattern. Overlap your second panel ever so slightly with the first, aligning the pattern perfectly as you go. Smooth it down using that same centre-out method.
Phase Three: Finishing Touches and Tricky Spots
With all your panels on the wall, it’s time for the final details that create a crisp, professional look. Grab your sharp craft knife and a straight edge, and carefully trim the excess wallpaper along the ceiling line and skirting boards. A fresh blade is absolutely crucial here if you want to avoid torn, ragged edges.
Working around obstacles like plug sockets and windows takes a bit of precision, but it's completely doable.
-
For Plug Sockets: Before you start, turn off the electricity at your fuse box. Safety first! Remove the socket cover. Hang the wallpaper right over the socket area, then make a small cross-shaped cut over the centre with your knife. Trim away the flaps, leaving a neat little border around the opening, and then simply refit the socket cover over the wallpaper. It gives a seamless finish.
-
For Corners: When you reach an internal corner, smooth the wallpaper right into the crease and about half an inch onto the adjoining wall. Start the new panel directly in the corner, overlapping this small piece. For external corners, just wrap the paper around the corner by about an inch and start the next panel on the other side, making sure you have a clean overlap.
Don't rush these details. A well-trimmed edge or a neatly wallpapered socket makes a massive difference to the final look, elevating your project from a simple DIY job to a truly impressive room transformation.
The Secret to Damage-Free Removal

So, the time has come to move out. That moment every renter dreads is here: taking down the wallpaper. This is where your chosen removable wallpaper for renters truly proves its worth, and I'm happy to report that with the right technique, it's completely stress-free. Your mission is simple: leave the walls looking exactly as you found them and get your full security deposit back.
The trick to a clean removal isn't about brute force. It's all about patience and knowing what kind of wallpaper you're working with. The method for taking down peel-and-stick is a little different from pre-pasted paper, but both are designed to come away without a fight.
Removing Peel-and-Stick Wallpaper
Peel-and-stick wallpaper is held up by a pressure-sensitive adhesive. After a few months or years, that adhesive can get pretty firm. The secret to loosening its grip is a bit of gentle heat, which softens the glue and persuades the wallpaper to release from the wall cleanly.
Here’s a simple, effective process that always works:
- Start at a Corner: Pick a top corner of a wallpaper panel and use your fingernail or a plastic scraper to carefully lift it. You just need enough of a lip to get a good grip.
- Apply Gentle Heat: Grab a hairdryer and set it to a low heat setting. Hold it about 15-20 centimetres from the wall, gently warming the surface just ahead of where you're peeling. This warmth is all it takes to soften the adhesive.
- Peel Slowly and Steadily: Pull the wallpaper away from the wall at a 45-degree angle. Whatever you do, don't yank it straight off – that’s how you tear the paper or pull paint with it. A slow, consistent pulling motion is what you're after.
- Work in Sections: Continue warming and peeling in small sections, moving the hairdryer down the wall as you go. Patience is your best friend here.
The goal is to encourage the wallpaper to let go, not to force it. Slow, steady peeling combined with low heat will prevent the vast majority of removal issues and leave your walls pristine.
This same principle of gentle removal applies to other renter-friendly decorations. For more on this, our guide on how to remove a wall sticker has some extra tips that you might find helpful.
Removing Pre-Pasted Wallpaper
If you went with pre-pasted wallpaper, the removal process is even easier because all you're doing is deactivating the original adhesive. And the magic ingredient? Plain old water.
You’ll just need a spray bottle filled with warm water or a sponge. Start at the top of a panel and give the surface a good soaking, letting the water sink in and reactivate the glue. Wait a few minutes, and you should find the paper peels away with ease, often in full, satisfying sheets.
Dealing with Minor Residue
In the rare case that you find a slightly sticky patch left behind, don't panic. It's an easy fix. Just mix a tiny bit of washing-up liquid with some warm water. Use a soft sponge or cloth to gently wipe the area, and the residue should lift away with almost no effort.
By following these simple steps tailored to your wallpaper type, you can make sure removing it is just as easy as putting it up. That means a happy landlord and your deposit safely back where it belongs.
Creative Ways to Use Leftover Wallpaper
Finished your feature wall and now you're staring at a few offcuts and a half-used roll? Don't even think about binning them! Those leftover scraps are gold dust for small, creative DIY projects that can bring a cohesive, designer touch to your entire rental.
Think of these pieces as bonus material. Instead of seeing them as waste, see them as an opportunity to inject personality into forgotten corners and everyday items. This is where you can get really creative, extending your new style beyond the walls and proving that peel-and-stick wallpaper is far more versatile than you might think.
Upcycling Furniture and Fixtures
One of the most satisfying ways to use your leftovers is to give a tired piece of furniture a new lease on life. That plain, flat-pack chest of drawers or a simple coffee table can be turned into a statement piece with just a few carefully placed strips of wallpaper.
- Bookshelf Backing: This is a classic designer trick for a reason. Lining the back of a bookshelf adds a stunning pop of colour and pattern, making your books and treasures look instantly more stylish and curated.
- Tabletop Transformation: Got a boring coffee table or a set of nesting tables? Covering the tops gives them an immediate upgrade. If it's a surface that sees a lot of action, you might want to get a piece of glass cut to size to protect it.
- Drawer Fronts: Applying wallpaper to the fronts of drawers is a fantastic way to create a custom look that’s completely reversible when it’s time to move out.
Using leftover removable wallpaper is a brilliant, low-risk way to play with bold patterns on a smaller scale. It’s your chance to personalise your rental beyond the walls, making sure every corner truly feels like your own.
Small Projects with Big Impact
You don't need a huge surface to make a statement. Even the smallest offcuts can be used to add detail and charm to your rental home, often in the most unexpected places.
If you're in a multi-level flat, why not add a splash of pattern to your stair risers? It’s a delightful detail that greets you every time you head upstairs. For a simple and stylish kitchen fix, you can use water-resistant vinyl paper to create a temporary splashback. For more clever ways to use adhesive vinyl, you can check out our DIY guide on transforming your home with tile stickers and vinyl wraps.
This kind of creative thinking is huge in the UK's rental market. With over 4.5 million rented households, it makes sense that around 60% of UK renters are always on the lookout for décor ideas that won't risk their security deposit. Using leftover wallpaper for these mini-projects is the perfect solution for damage-free personalisation. These small, thoughtful touches are what really make a rental feel like home.
Got Questions? We’ve Got Answers
It’s completely normal to have a few questions swirling around before you commit to peel-and-stick wallpaper. After all, when you’re decorating a space that isn't technically yours, you want to be 100% sure you’re making the right call. Let's tackle some of the most common queries.
Think of this as our little FAQ session to clear up any lingering doubts, so you can get started on your project with total confidence.
Can I Use It in a Bathroom or Kitchen?
Yes, you absolutely can! The trick is to choose the right material for these high-humidity spots. For bathrooms and kitchens, you'll want to go for vinyl-based wallpapers. These are built to handle moisture and won't flinch at the steam from your shower or the condensation from a boiling kettle.
They’re perfect for creating a statement splashback or an accent wall. Just be sure to avoid putting it in areas that get a direct, constant soaking, like right inside the shower cubicle.
Will It Work on Textured Walls?
This is a big one, and the honest answer is... it's a maybe. Peel-and-stick wallpaper truly loves a smooth, clean surface. That’s where its adhesive can get the best grip, ensuring it stays put without bubbling or peeling away.
If your walls have a very light texture, something like a faint "orange peel" finish, you might get away with using a thicker, more forgiving fabric-based paper.
But here’s the golden rule: always order a sample first. It’s the only real way to know for sure. Stick a small piece on your wall for a few days and see how it holds up. This little test will tell you everything you need to know about how well it will bond to your specific surface.
For anything more than a minor texture, like heavily bumpy or uneven plaster, removable wallpaper probably won’t work. The adhesive just can’t make enough contact to stick properly.
How Much Does It Cost in the UK?
You’ll be happy to hear that removable wallpaper is a surprisingly affordable way to get a high-impact look. In the UK, you can generally expect to pay anywhere from £20 to £60 per roll.
Of course, the final price tag comes down to a few things:
- The Brand: Designer labels will naturally cost a bit more than lesser-known brands.
- The Material: Premium vinyls and fabric papers are usually at the higher end of the scale.
- Design Complexity: An intricate pattern or a design with metallic foils will often bump up the price.
Don't let the higher-end options put you off, though. There's a massive selection of gorgeous, durable wallpapers available for around the £20-£30 mark. The most important thing is to measure your walls carefully before you start shopping so you know exactly how many rolls you'll need.