
How to Remove Sticky Residue from Walls Without Damaging Paint
The best way to get sticky stuff off your walls is to start small. I always begin with the simplest tool: a warm, damp cloth and a drop of washing-up liquid. For anything more stubborn, a mix of white vinegar and water often does the trick, or even a bit of gentle heat from a hairdryer can work wonders. The golden rule, though? Always patch-test any method on a hidden spot first. You don't want to trade a sticky mark for a damaged patch of paint or wallpaper.
Understanding Your Sticky Situation

Before you grab the nearest cloth and start scrubbing, take a moment to figure out what you’re dealing with. The tacky film from old Sellotape, the greasy stain from a poster held up with Blu Tack, or that weird adhesive left behind by the last tenants are all chemically different. That’s why there’s no single magic solution, and going in with the wrong one can sometimes make a bigger mess.
The key to getting this right is to start with the mildest, least aggressive technique possible. Think of it as a "start slow" approach. This protects your wall's finish, whether it’s painted, wallpapered, or has a textured surface. I’ve seen it countless times—someone gets impatient, grabs a harsh chemical or a scouring pad, and ends up with scraped paint or a bleached-out spot that’s far worse than the original gunk.
The Most Common Culprits
If you're staring at a sticky patch on your wall, you're in good company. In fact, a UK survey found that over 40% of households have fought this exact battle, usually after taking down temporary decorations. It’s a classic problem in family homes and student lets alike. You can find out more about this common household challenge and its solutions online.
Most of the time, you're dealing with one of these three offenders:
- Tape and Sticker Adhesive: This leaves a gummy, tacky residue that's a magnet for dust and dirt, which is why it gets darker and more obvious over time.
- Poster Putty (like Blu Tack): The problem here is usually an oily stain. The plasticisers that keep the putty soft can leach into the wall, leaving a greasy mark behind.
- Adhesive Hooks and Strips: When you pull these off too fast, they can leave behind a stubborn foam or rubbery adhesive that just doesn't want to budge.
Knowing where the residue came from gives you a huge head start. It helps you pick the right tool for the job. For example, a water-based cleaner won't do much for an oily stain, but a different approach might lift it right off.
Key Takeaway: Always try to identify the source of the residue. The strategy for removing a child's sticker is completely different from tackling an oily mark left by poster putty that’s been on the wall for five years.
To give you a clearer picture before we get into the step-by-step methods, the table below offers a quick comparison of the common techniques we'll be covering. Think of it as a handy cheat sheet to match the problem with the right solution.
At-A-Glance Residue Removal Methods
| Method | Best For | Surface Suitability | Key Precaution |
|---|---|---|---|
| Warm Soapy Water | Fresh tape residue, light grime | Most painted walls, some vinyl wallpapers | Avoid over-saturating the wall, especially drywall. |
| White Vinegar Solution | General sticker adhesive, moderate residue | Durable painted finishes (satin, semi-gloss) | Test first on matte paint as it can affect the sheen. |
| Hairdryer (Heat) | Hardened, brittle glue from old tape or labels | Painted walls, wood | Keep the hairdryer moving to prevent scorching the paint. |
| Commercial Citrus Cleaner | Stubborn, aged adhesive and greasy marks | Most painted walls (check label) | Ensure good ventilation and wear gloves. |
This table should help you quickly assess your options and choose the most promising starting point for your particular sticky situation.
Tacking Minor Marks with Gentle Household Solutions
Before you reach for the heavy-duty chemicals, take a look in your kitchen cupboard. For those minor sticky spots—the faint tackiness left by birthday banners or posters—a gentle approach is almost always the best place to start. It’s safer for your walls and, frankly, surprisingly effective. Starting mild prevents any unnecessary damage to your paintwork.
Your first port of call should always be a simple mix of warm water and a few drops of washing-up liquid. This classic combo is fantastic for fresh, water-based adhesives. The warmth of the water softens the gunk, while the soap gets to work breaking down any oils and grime, letting you wipe it all away.
For this method, just mix the solution, dip in a soft microfibre cloth, and wring it out so it’s barely damp. Gently rub the area in small circles. The key here is patience. Avoid scrubbing aggressively, as that can easily damage the finish, especially on delicate matte paint.
The Gentle Power of White Vinegar
If soapy water isn't quite cutting it, your next best friend is distilled white vinegar. Its mild acetic acid is a brilliant solvent for many common adhesives, but it’s not harsh enough to strip most modern paints. It’s particularly good at dissolving the residue from price tags, labels, or the kids' sticker collection.
To make the solution, simply mix equal parts white vinegar and warm water. This 1:1 ratio is usually the sweet spot—strong enough to work but gentle enough for most surfaces. Still, you should always do a quick patch test somewhere out of sight, like behind the sofa, just to be certain it won't affect your wall's colour.
Once you’ve tested it, apply the vinegar solution to a clean cloth and press it against the sticky patch for a minute or two. This gives the acid time to penetrate and break down the adhesive's bonds. Afterwards, the residue should wipe away with much less effort.
Unconventional but Effective Physical Removers
Sometimes, getting rid of sticky stuff is more about physical action than a liquid solution. Two surprisingly effective tools you might not have thought of are a simple pencil eraser and a fresh ball of poster putty, like Blu Tack.
-
Pencil Eraser: A good quality, non-smudging art gum or rubber eraser can work wonders on small, dried-on bits of gunk. The gentle friction lifts the adhesive right off the wall without abrading the paint. It's perfect for those tiny, stubborn spots that liquids just seem to spread around.
-
Blu Tack or Poster Putty: It sounds a bit strange, but fighting fire with fire really works here. Take a fresh piece of Blu Tack, knead it until it's warm, and then press it firmly onto the old, oily stain. Pull it away quickly. The fresh, sticky putty will often lift the stubborn oils and leftover bits right off the wall. Just keep dabbing until the mark is gone.
I’ve personally used the "Blu Tack trick" countless times, especially in rented flats where you inherit greasy marks from previous tenants. It’s amazing how it can pull that stubborn oily residue right out of the wall's pores, often leaving no trace behind.
These simple, low-cost methods should always be your first line of attack. They put the health of your walls first and often solve the problem without you ever needing to escalate to more potent removers. Just remember to work gently and give each method a proper chance before giving up. Most minor sticky situations can be fixed with a little patience and something you already have in the house.
Advanced Techniques for Stubborn Adhesive Residue
When soapy water and vinegar don’t make a dent, you know you’re up against something more serious. This is where you need to bring out the bigger guns, but the trick is to escalate your method without escalating the damage. This is especially true for painted walls, where the finish can be surprisingly delicate.
Some adhesives, particularly those that have been clinging to a wall for years, cure and harden over time, becoming almost part of the surface. Others, like the infamous Blu Tack, leave behind an oily stain that seems to defy all logic. For these jobs, it's time to move beyond the kitchen cupboard and into more specialised techniques.
Using Heat to Soften Hardened Adhesives
One of the best ways to deal with brittle, aged glue is to introduce a bit of controlled heat. A hairdryer is your perfect tool here. It lets you gently soften the adhesive enough to break its bond with the wall, all without scorching the paint.
Set your hairdryer to a low or medium heat and hold it about six to eight inches from the sticky patch. The key is to keep it moving in a constant circular motion—this distributes the heat evenly and stops one spot from getting dangerously hot. After a minute or two, you’ll see the residue start to look softer and feel tackier. That’s your cue to gently peel or scrape it away with a plastic scraper or even an old credit card. For more tips on this kind of delicate work, our guide on how to remove a wall sticker has some great pointers.
Turning to Commercial Citrus-Based Cleaners
If heat doesn't quite cut it, a citrus-based cleaner is an excellent next step. These products use solvents derived from citrus fruit peel that are brilliant at dissolving sticky adhesives and cutting through greasy muck. They’re generally much safer for indoor use than harsh chemical strippers, but you'll still want to make sure the room is well-ventilated.
Before you start, always read the label to check it’s suitable for your wall finish and do a quick patch test somewhere out of sight. Crucially, apply the cleaner to a microfibre cloth, not directly onto the wall, and work it into the residue with small, circular motions. You should feel the adhesive start to break down and lift away.
A great UK-specific technique involves a citrus-based solvent like TAG, which you can find in most decorating or cleaning supply shops. In tests, it's been shown to be effective on 95% of matte walls when applied with a gloved cloth and buffed in circles. Sometimes, combining methods is the real secret; for Blu Tack, using a hairdryer on a low heat of around 50°C for a couple of minutes before peeling it slowly reduces the risk of paint damage by 70% compared to just yanking it off cold. You can dig deeper into these methods over at One Stop Cleaning Shop.
Pro Tip: When you're using any liquid cleaner, drips are your enemy. To stop them from creating new stains further down the wall, just hold a folded piece of kitchen roll or a dry cloth right below the area you're working on to catch any runoff.
Dealing with Oily Stains from Poster Putty
Ah, the dreaded oily stain. That greasy ghost left behind by products like Blu Tack needs a totally different strategy. This isn't just something sitting on the surface; it's an oil that has soaked right into the porous paint or plaster. Simply wiping it with a solvent can often just spread the grease around, making it worse. The real trick is to draw the oil out.
Here are a couple of tried-and-true methods for those stubborn oily marks:
- Sugar Soap: A decorator’s best friend for a reason. Concentrated sugar soap is fantastic for degreasing surfaces before painting, and it works wonders on these stains. Just dilute it according to the instructions, apply it with a sponge, and give the area a gentle scrub before rinsing with a clean, damp cloth.
- Cornflour Paste: For a gentler, more absorbent approach, try mixing cornflour with a little water to form a thick paste. Slather this directly over the oily patch and let it dry completely. As it dries, the cornflour will literally pull the oil out of the wall. Once it's bone dry, you can just brush it away.
No matter which solution you use, always make sure you've cleaned away any leftover cleaning agents. Learning how to deal with sticky soap residue can save you from creating a new problem that looks suspiciously like the one you just fixed. Armed with these advanced methods, you should be able to finally conquer those stubborn marks for good.
How to Adapt Your Method for Different Wall Surfaces
The secret to getting sticky stuff off your walls isn't just about what you use, but where you're using it. A method that works brilliantly on a tough, semi-gloss kitchen wall could spell disaster for that delicate wallpaper in the hallway. Choosing the right approach for your specific wall surface is the most important step to avoid making the problem worse.
Think of it this way: you wouldn't scrub a wool carpet with the same cleaner you'd use on ceramic tiles. Walls are exactly the same. Every finish, from a modern matt paint to old-school textured plaster, has its own set of rules. The goal is simple: get the gunk off without stripping paint, tearing paper, or leaving a permanent mark.
First, you need to know what you're up against. This quick visual guide can help you figure out what kind of residue you're dealing with.
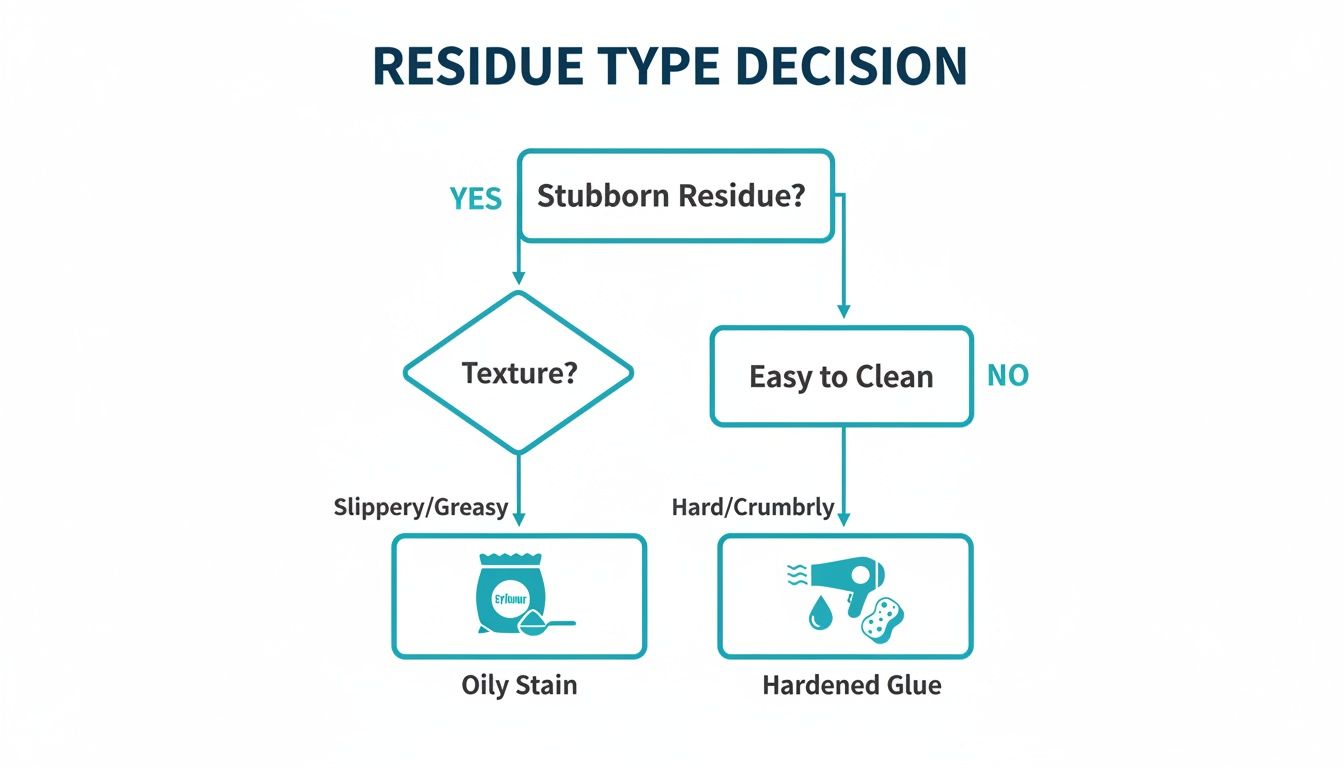
As you can see, knowing whether you have an oily stain or hardened glue immediately sets you on the right path to finding a solution that actually works.
To avoid any costly mistakes, it pays to know which methods are safe for your walls. I've put together this quick reference table based on common UK wall types. Always, always test a small, hidden spot first!
Wall Surface Safety Guide
| Wall Surface | Recommended Methods | Methods to Avoid |
|---|---|---|
| Matt/Flat Paint | Mild soapy water, microfibre cloth, kneadable eraser. | Harsh scrubbing, abrasive sponges, strong solvents (alcohol, citrus cleaners). |
| Satin/Eggshell Paint | White vinegar solution, rubbing alcohol (sparingly), commercial citrus cleaners. | Abrasive powders or scouring pads that can dull the sheen. |
| Wallpaper | Hairdryer on low heat, kneadable eraser, solvent-based remover on a cloth. | Water-based solutions, direct spraying of liquids, excessive rubbing. |
| Textured Plaster | Soapy water with a soft brush, blotting with a dry cloth. | Wiping with cloths (smears residue), oil-based cleaners that can stain. |
Following these guidelines will save you a lot of headaches, but let's dive into the specifics for each surface.
Working with Standard Painted Walls
Most modern homes in the UK have walls painted with some form of emulsion. These finishes range from chalky matt to a durable satin, and each one needs a slightly different touch.
For matt or flat finishes, which are quite porous and not very hard-wearing, you have to be gentle. Avoid harsh scrubbing and strong solvents at all costs. Your best bet is a microfibre cloth lightly dampened with a mild soapy water solution. If that doesn't cut it, try dabbing a tiny amount of rubbing alcohol on a cotton bud, but be sure to test it somewhere hidden first.
On the other hand, tougher satin, eggshell, or semi-gloss paints have a protective sheen that can handle a bit more elbow grease. For these, a white vinegar solution or a good commercial citrus cleaner is usually safe. The main thing to avoid is any kind of abrasive pad that could scratch or dull the finish, leaving a noticeable patch.
Handling Delicate Wallpapered Surfaces
This is where you need to be extra careful. Water, solvents, or too much rubbing can cause wallpaper to tear, bubble, or discolour in a heartbeat. The golden rule here is to use as little moisture as humanly possible.
Start with a dry method. Gently rolling a piece of Blu Tack or a kneadable eraser over the spot can often lift the adhesive without harming the paper. If you absolutely need a liquid, go for a solvent-based sticky stuff remover applied sparingly to a cloth—never spray it directly onto the wall.
A great little trick I've used for stubborn sticker residue on wallpaper is a hairdryer. Set it to its lowest heat and gently warm the area. This often softens the glue just enough to let you peel it away cleanly, no liquids required.
If you're planning to put up new decorations, it’s worth looking into the different types of removable wall stickers UK homeowners are using these days. It can save you from this whole headache in the future.
Strategies for Textured Walls and Ceilings
Textured surfaces like Artex or 'popcorn' ceilings are a real pain. The gunk gets trapped in all the nooks and crannies, and trying to wipe it with a cloth just smears it deeper into the texture.
Your best friend here is a stiff-bristled brush—an old toothbrush or a nail brush is perfect. Apply your cleaning solution (soapy water is a good starting point) and use the brush to gently work the residue out of the crevices. Patience is key; work in small sections to avoid soaking the plaster. Once you've loosened the grime, blot the area with a clean, dry cloth to lift it away.
Living with Sticky Walls: A Renter's Guide
For anyone renting, finding a sticky patch on the wall is more than just a nuisance—it’s a direct threat to your security deposit. When you don't own the walls, you can't just attack a mark with the strongest thing you can find. A careless attempt to remove some old adhesive can easily pull off paint, turning a simple cleaning job into a messy and expensive dispute with your landlord.
The first thing to do is dig out your tenancy agreement. Nearly all UK contracts will have a clause stating you must return the property in its original condition, allowing for "fair wear and tear." Trust me, a big sticky square or a patch of peeled-off paint from a botched removal job almost never qualifies.
The Real Cost of Getting It Wrong
Come check-out day, landlords and letting agents go over the walls with a fine-tooth comb. Any marks left behind by posters, command hooks, or festive decorations will almost certainly get flagged. And this isn't a small thing—it can have a real impact on your wallet.
According to UK rental agency CPS Homes, failing to sort these marks properly can lead to deposit deductions of around £50 to £100 for each damaged bit of wall. Looking at their data from managing over 5,000 properties a year, they found that over 25% of all end-of-tenancy disputes involve marks from adhesives. You can read more about the impact of wall stains on tenancy agreements at MJ Kloss, which really drives home how seriously this is taken.
I learned this lesson the hard way during my university days. I used a cheap, harsh adhesive remover on a small mark and ended up taking a dinner-plate-sized chunk of paint with it. The landlord billed me £120 for a professional to repaint the spot—way more than the initial problem was worth.
How to Tackle It Without Losing Your Deposit
To keep your deposit safe, always start with the least invasive, most damage-free methods. The goal here is to remove the gunk without leaving any evidence that it—or you—were ever there.
Here are a few renter-safe strategies to try:
- Take a Picture First: Before you even think about touching the wall, get your phone out. Take clear, well-lit photos of the sticky patch. This "before" shot is your proof if any questions come up later.
- Always Start Gentle: Begin with the softest approach. A warm, damp microfibre cloth or even a simple pencil eraser can often do the trick without any risk of damage. You'd be surprised how often this is all you need.
- A Little Heat Goes a Long Way: A hairdryer on its lowest heat setting is a renter's best friend. It gently softens the adhesive without needing any chemicals, making it much easier to peel away. Just be sure to keep the hairdryer moving so you don't accidentally scorch the paint.
If you're thinking of putting up decorations in your rented home, it pays to plan ahead. You might find our guide on removable wallpaper for renters useful for personalising your space without putting your deposit on the line.
When in Doubt, Communicate
What if that sticky mark was already on the wall when you moved in? Don't leave it until moving day to bring it up. The moment you notice it, make a note on your initial inventory report.
Better yet, take a quick photo and email it to your landlord or letting agent right away. This creates a time-stamped paper trail, proving you weren't responsible. It's a simple step that protects you from being charged for someone else's mess and helps build a transparent, trusting relationship from day one.
When to Hang Up the Scouring Pad and Call a Pro
Most sticky wall problems can be sorted out with a bit of elbow grease and some common household items. But every so often, you run into a situation where pushing ahead with a DIY fix is the worst thing you can do. Knowing when to step back and call in a professional isn't about giving up; it's about protecting your home and, more importantly, your health.
Sometimes, what looks like a simple clean-up job can quickly escalate into a full-blown repair nightmare. It’s crucial to recognise the signs that you're out of your depth. To get a better sense of what can go wrong, it's worth understanding the dangers of DIY projects that turn simple fixes into costly problems.
The Hidden Threat: Asbestos in Old Adhesives
The biggest red flag, particularly in older homes, is the potential for asbestos. If your property was built before the year 2000, you need to be incredibly careful with any old, black, tar-like adhesive you might uncover. This stuff often lurks behind old wall coverings or floor tiles. This isn't just stubborn gunk; it could be asbestos-containing bitumen adhesive.
Scraping or scrubbing this material is extremely dangerous. It can release microscopic asbestos fibres into the air, which are a serious health hazard when inhaled. UK law acknowledges that any building constructed before 2000 might contain these materials. In fact, an estimated 2.5 million properties across the UK could have these hidden dangers, making a professional assessment absolutely vital. You can find more details on the risks and removal process by exploring information about asbestos bitumen adhesives.
Critical Safety Warning: If you come across a black, tarry adhesive in a home built before 2000, stop what you are doing immediately. Do not touch it, scrape it, or try to remove it. Contact a certified asbestos removal specialist for proper testing and safe abatement.
When the Wall Itself Is Damaged
Beyond hazardous materials, the other clear sign to call for backup is when the wall's integrity is at stake. Your efforts to get rid of a stubborn sticker or patch of glue might end up revealing a much deeper problem.
It's time to bring in a professional decorator or plasterer if you run into any of these issues:
- Widespread Paint Peeling: If removing the residue is taking huge flakes of paint with it, it suggests the paint wasn't properly bonded to the wall in the first place.
- Gouged Plaster or Drywall: When your scraper starts pulling off chunks of plaster or the paper face of the drywall, you’re creating damage that requires skilled repair.
- Deep, Stubborn Staining: If the adhesive has left a deep stain that cleaning only seems to smear around or make worse, you'll need more than just soap and water.
In these scenarios, a professional won't just remove the gunk. They have the skills and materials to properly patch the wall, prime it correctly, and repaint the area so it blends in seamlessly. Trying to fix significant wall damage yourself often leads to an obviously patchy repair that looks far worse than the original sticky spot.
Got Questions About Sticky Walls? We’ve Got Answers.
Even with the best advice, you're bound to run into a tricky spot or two. Let's tackle some of the most common questions that come up when you're dealing with stubborn sticky stuff on your walls.
How Do I Get Rid of That Old, Hardened Tape Residue?
We’ve all seen it: tape that’s been stuck on a wall for so long it’s practically fossilised. When adhesive gets old, it cures and becomes incredibly brittle, so trying to scrape it off cold will likely just damage the paint.
The trick here is to gently bring it back to life with a bit of heat. Grab a hairdryer and set it to low, holding it about six inches from the residue. Keep it moving to avoid scorching the paint. After a minute or so, you should feel the glue soften up.
At that point, you can usually lift it away with a plastic scraper or the edge of an old credit card. If you're left with a faint stain, a cotton bud dipped in a tiny amount of rubbing alcohol can often sort it out. Just remember to test it somewhere out of sight first!
Expert Tip: For ancient, rock-hard adhesive, heat is your best friend. It reactivates the glue's bond just enough to release it from the wall, often saving you from having to use harsh solvents that could ruin your paint job.
Will These Cleaning Products Strip the Paint Off My Walls?
Yes, they absolutely can, and it's a real risk. Harsh chemical solvents, anything abrasive, and even some powerful citrus-based cleaners can easily lift or discolour paint. This is especially true for delicate finishes like matt or flat paint.
To keep your walls looking their best, always stick to these simple rules:
- Start with the gentlest option. A bit of warm, soapy water is always your first port of call.
- Always do a patch test. Find a hidden spot, like behind a sofa or a door, to test any cleaning solution before you go all in.
- Apply the cleaner to a cloth, not the wall. This gives you much better control and prevents drips and oversaturation that can cause damage.
What’s the Secret to Preventing Sticky Marks in the First Place?
Honestly, the best way to deal with sticky residue is to never have to deal with it at all. A little bit of planning goes a long way.
For temporary decorations, always reach for painter’s tape. It's specifically made for clean removal. For anything with a bit more weight, look for brands that sell removable hooks and strips. The key is to follow their removal instructions to the letter—pulling them off at the wrong angle is what usually causes problems. Sticking with products designed for temporary use is the single best thing you can do to protect your walls.