
Wall Stickers Nursery: UK Guide to Nursery Decor (wall stickers nursery)
Blank nursery walls can feel a bit daunting, can’t they? If you're looking for a simple, damage-free way to create a magical space for your baby, wall stickers for a nursery are a fantastic solution. They offer a wonderfully creative and affordable alternative to paint or wallpaper, letting you completely transform a room in just a few hours with zero long-term commitment.
Why Wall Stickers Are a Perfect Choice for Your Nursery
Getting the nursery ready is one of the most exciting parts of expecting a new baby, but let's be honest, it can also feel a bit overwhelming. You want to create a space that’s warm, stimulating, and full of love, but practical things like budgets, time constraints, and tenancy agreements often get in the way.
This is where the humble wall sticker really shines. Unlike traditional decorating, wall stickers give you incredible flexibility. They let you inject personality and charm into the room without the mess, expense, or permanence of painting a mural or hanging wallpaper.
Ideal for Renters and Evolving Tastes
If you're renting, the worry about losing your security deposit can really put a damper on your decorating plans. Nursery wall stickers are a brilliant workaround. They're typically made from high-quality vinyl with a gentle adhesive, which means they can be peeled off cleanly without stripping the paint or leaving that awful sticky gunk behind.
This easy removability is also a lifesaver for parents. We all know that a child's favourite thing one day is old news the next. Those adorable safari animals you picked for your newborn can easily be swapped out for dinosaurs or spaceships in a few years’ time, allowing the room to grow and change right alongside your child. For more inspiration on adapting your space, you can explore some brilliant nursery wall decor ideas.
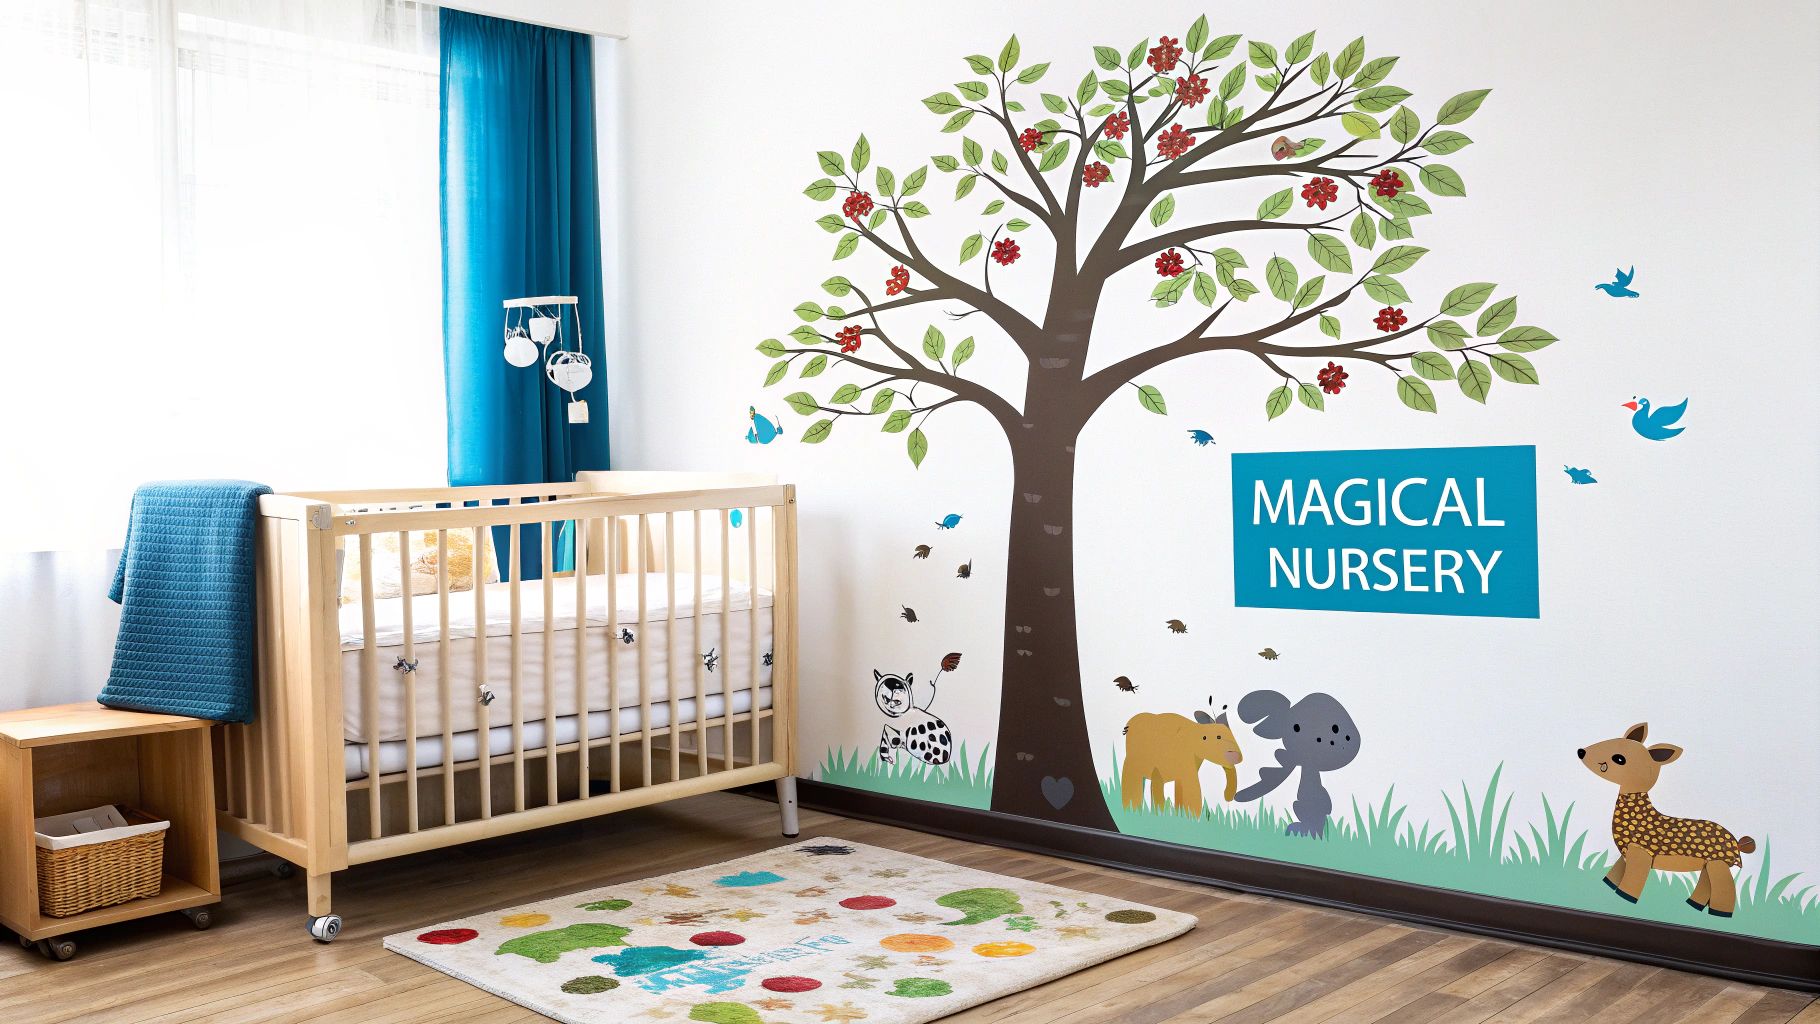
The real magic of wall stickers is their ability to tell a story. They turn plain walls into a backdrop for imagination, creating a space that feels uniquely yours and nurtures your baby’s sense of wonder from their very first days.
A Growing Trend in UK Home Decor
This move towards flexible, non-permanent decor is becoming more and more popular across the UK. In fact, wall coverings like stickers are the largest and fastest-growing part of the UK's wall art market, which brought in around USD 3.6 billion back in 2022.
The trend is especially strong for nurseries, where practicality is just as important as creating a beautiful space. For a more holistic approach, guides on creating the perfect nursery can offer some really valuable insights into putting it all together.
How to Choose the Perfect Nursery Wall Stickers
Choosing wall stickers for your nursery is about so much more than just picking a cute design. It’s your chance to create a special atmosphere, tell a story, and make practical choices that keep the room beautiful and, most importantly, safe. With so many lovely options out there, it’s easy to feel a bit overwhelmed. Let's walk through how to find the perfect designs to bring your vision to life.
Finding Your Nursery's Theme
Before you even start scrolling through designs, take a moment to think about the feeling you want to create. Are you picturing a calm, serene sanctuary or a vibrant, playful space for your little one? Deciding on a theme first gives you a clear path forward, helping you make cohesive choices that all work together beautifully.
A theme doesn't have to be complicated. It could be as simple as a colour scheme or as detailed as a scene from a favourite storybook. For instance, a woodland theme often uses gentle, earthy tones, with stickers of deer, friendly foxes, and tall trees creating a peaceful vibe. On the other hand, a jungle safari theme might be bursting with bright greens and oranges, featuring cheeky monkeys and majestic lions for a more energetic feel.
A Little Tip From Experience: Don't feel you have to follow a theme to the letter. Some of the most charming nurseries I've seen mix and match elements to create a really personal space. The real goal is to choose designs that feel right for your family and create a room you love spending time in.
Why Material and Safety Are Everything
When you're decorating a baby’s room, the quality of what you put on the walls is non-negotiable. Always look for wall stickers nursery products made from high-quality, non-toxic vinyl. Good UK suppliers will clearly state that their decals are free from nasty chemicals like VOCs (Volatile Organic Compounds), giving you peace of mind that the air in your nursery is clean and safe for tiny lungs.
The finish on the vinyl makes a big difference, too. A matte finish is usually the best bet for walls, as it cuts down on glare from lights and gives the stickers a lovely, painted-on look. If you want to get into the nitty-gritty of different materials, this ultimate guide to vinyl stickers is a great resource for understanding durability and appearance.
The demand for stylish and safe nursery décor is growing fast. Here in the UK, the market for children's wall decals is really expanding, especially as parents look for flexible decorating solutions that don't involve a paintbrush. Online shops are the main go-to for these products, putting UK brands in a great position to offer fantastic, safe options.
Getting the Scale and Placement Just Right
Once you've settled on a theme and know what material to look for, it's time to think about size. Getting the scale of your stickers right in relation to the room and furniture is key to a balanced, professional-looking finish. One of the most common slip-ups is choosing decals that are too small; they can easily get lost on a big wall and end up looking a bit random.
Here are a few ways to think about scale:
- The Main Attraction: A single, large sticker, like a beautiful sprawling tree or a big hot air balloon, can create a stunning focal point. Placing it behind the cot or changing table is a brilliant way to anchor that part of the room.
- Telling a Story: Use a collection of medium-sized stickers to build a scene across a wall. Imagine a parade of safari animals trotting along the skirting board – it creates a playful little world for a crawling baby to discover.
- An Immersive Feel: Smaller, repeating stickers like stars, clouds, or simple polka dots are perfect for covering a whole wall or even the ceiling. This creates a magical, immersive atmosphere without needing one huge image to do all the work.
Nursery Wall Sticker Theme Comparison
To help you get started, here’s a quick comparison of some popular nursery themes. It can be a great starting point for figuring out what mood you want to create.
| Theme | Best For | Colour Palette | Mood & Atmosphere |
|---|---|---|---|
| Woodland Retreat | Creating a calm, gender-neutral space. | Earthy tones: moss green, soft brown, muted orange. | Soothing, gentle, and connected to nature. |
| Jungle Safari | An adventurous and stimulating environment. | Vibrant greens, bright yellows, bold animal prints. | Playful, energetic, and full of character. |
| Dreamy Night Sky | A serene and magical atmosphere for sleep. | Deep blues, soft greys, metallic silver or gold. | Calming, enchanting, and peaceful. |
| Ocean Adventure | A cheerful and imaginative underwater world. | Shades of blue, coral, sandy beige, and teal. | Whimsical, fun, and inspires curiosity. |
Ultimately, choosing your nursery's wall stickers should be one of the most enjoyable parts of getting ready for your baby's arrival. By thinking about your theme, putting safety first, and planning the scale and placement, you can confidently create a beautiful and welcoming first room for your little one.
A Practical Guide to Flawless Application
Putting up wall stickers can feel a bit nerve-wracking, but with a bit of prep and the right technique, it’s a genuinely satisfying DIY job. Getting that professional, bubble-free finish is much easier than you might think. It all comes down to starting on the right foot, so let's walk through it together.
The All-Important Wall Prep
If you take one thing away from this, let it be this: a clean, smooth wall is everything. It's the key to making sure the adhesive bonds properly, keeping your wall stickers nursery design looking brilliant and staying put for years to come.
Start by giving the wall a gentle wipe with a soft, damp cloth. You can use a tiny drop of mild soap for any stubborn marks, but make sure to go over it again with a clean, damp cloth to remove any residue. Let it dry completely before you even think about grabbing the sticker.
Getting Your Timing Right After Painting
This is probably the most common question we get asked. If you've just painted the nursery, you absolutely must be patient. You need to wait for the paint to fully cure, which takes at least three to four weeks.
If you apply a sticker too soon, you’ll trap moisture and gases that are still escaping from the paint. This leads to bubbling and peeling. Worse still, the sticker's adhesive can actually bond with the wet paint, meaning you could pull a chunk of paint off the wall when it's time for a change. Giving it a full month is your best bet for a perfect finish and damage-free removal later on.
Gathering Your Simple Toolkit
You don’t need any fancy equipment. In fact, you've probably got everything you need lying around the house already.
Here’s a quick list of what I'd grab:
- Masking Tape: Essential for getting the position just right before you commit.
- A Smoothing Tool: A credit card or any plastic bank card is perfect. A small squeegee works too.
- A Soft Cloth: For the initial clean and a final gentle press over the sticker.
- A Spirit Level (Optional): Really useful for larger designs or text quotes to make sure they're perfectly straight.
With your wall clean and your tools at the ready, you're all set. The actual process is straightforward, and this little guide shows the basic steps.
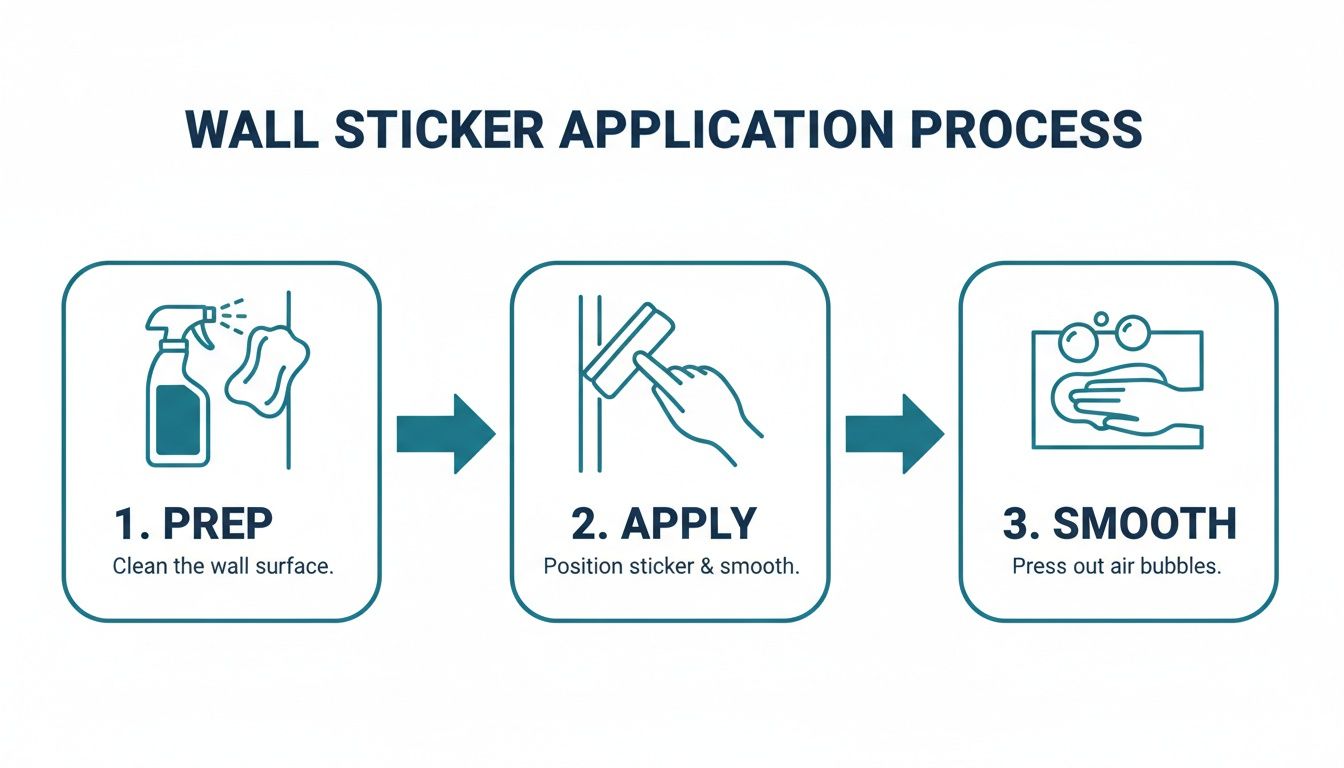
As you can see, it boils down to three simple actions: prepare the wall, apply the sticker while smoothing it down, and finish by making sure every edge is firmly pressed down.
The Hinge Method for Perfect Placement
For larger or more fiddly designs, the 'hinge method' is a game-changer. I swear by it. It stops the sticker from folding over on itself or going on wonky, which can be a real nightmare to fix.
First, figure out exactly where you want it. Hold the sticker up to the wall, and once you're happy, run a strip of masking tape along the top edge to hold it in place. This tape now acts as your hinge.
Now, you can flip the sticker up and carefully peel the backing paper away from the top half, stopping at the tape hinge. Snip off the loose backing paper. Next, slowly lower the exposed sticky section back onto the wall, using your card or squeegee to smooth it down from the centre outwards.
Once the top half is secure, you can remove the masking tape hinge. Gently lift the bottom half of the sticker and peel off the rest of the backing paper. Just continue smoothing the decal onto the wall, always working from the middle outwards to push any air bubbles to the edge.
If you’d like to see this in more detail, our guide on how to apply wall stickers has a full video tutorial.
My Top Tip: When smoothing, use firm, overlapping strokes at about a 45-degree angle. It's the best way to chase any lurking air bubbles out to the edges and stop them from getting trapped.
Tackling Different Wall Surfaces
Your wall's texture can make a difference. Most modern vinyl stickers are designed for standard interior walls, but it's worth knowing what works best.
Smooth, painted plasterboard is the dream surface. The sticker's adhesive gets a brilliant grip, and you get that seamless, painted-on look. You can also get great results on lightly textured walls – sometimes called an 'orange peel' finish. The trick here is to spend a bit more time during application, really using a soft cloth to press the sticker into all the little dips and grooves to get a strong bond.
Unfortunately, heavily textured surfaces like popcorn ceilings, rough plaster, or exposed brick just aren't suitable. There isn't enough flat surface area for the adhesive to grab onto, and the sticker will almost certainly start to peel away.
Keeping Your Little One Safe with Nursery Wall Stickers
When you're putting together a nursery, your baby's safety is always front of mind. Wall stickers are a fantastic way to add a splash of colour and personality, but it's crucial to be smart about how you choose and place them. The good news is, creating a secure space doesn't mean you have to compromise on style.
Let's start with the most important rule, one that's absolutely non-negotiable: keep all decals well out of your baby's reach. This is especially vital for smaller, individual stickers. A curious baby, and later a determined toddler, will try to grab, pull, and taste everything they can get their little hands on.
Smart Placement for Peace of Mind
Try to look at the room from your baby’s perspective. Think about where they'll be sleeping, playing, and having their nappy changed. These are the spots that need the most careful thought.
- Above the Cot: It’s so tempting to create a stunning scene right above the cot, but this is a real no-go zone. Instead, think about placing stickers higher up or on an adjacent wall, well away from where your baby could reach, even when they learn to stand.
- Near the Changing Table: A wriggly baby can have a surprisingly long reach! Avoid placing small, fiddly stickers on the wall right next to the changing station where they might be picked at during nappy time.
- Down Low on the Walls: As soon as your baby starts crawling, anything near the floor is fair game. If you want to decorate lower down, I'd recommend using larger, single-piece designs rather than lots of little ones that are easier to peel.
A good rule of thumb I always share with parents is to place any sticker at least a full arm's length away from the edge of the cot or playpen. This simple guideline helps eliminate the biggest risk right from the start.
Why Non-Toxic Materials Are a Must
It goes without saying that your baby’s health comes first, and that includes the air they breathe. When you're looking for wall stickers, always buy from reputable UK suppliers who are open about what goes into their products. You want to see labels like non-toxic and VOC-free.
What are VOCs? They're Volatile Organic Compounds – basically, nasty chemicals that can be released into the air from some low-quality plastics and glues. Choosing VOC-free vinyl means you're keeping the nursery air clean and healthy for tiny, developing lungs. Any seller worth their salt will put safety first and be happy to tell you exactly what their decals are made of.
A Quick, Ongoing Safety Check
Once your stickers are up and looking lovely, the job isn't quite finished. It’s a great idea to build a quick check into your regular cleaning routine. It only takes a moment but gives you that extra bit of confidence.
Every few weeks, just run your hand over the decals. You're checking to make sure all the edges are still stuck down tight. Pay a little more attention to any stickers near a radiator or in a part of the room that gets a bit steamy, as big temperature swings can sometimes weaken the adhesive. If you feel an edge starting to lift, just give it a firm press with a soft cloth. It’s a simple habit that ensures no little piece ever becomes loose enough for tiny fingers to find.
Keeping Your Nursery Fresh: A Guide to Upkeep and Damage-Free Removal
One of the best things about using wall stickers in a nursery is the freedom. You can create a stunning, personal space knowing that as your child’s tastes shift from fluffy clouds to roaring dinosaurs, the room can evolve right alongside them. Keeping the designs vibrant and, crucially, removing them without a trace are all part of the journey. Luckily, both are surprisingly simple.
Unlike painted murals, high-quality vinyl stickers are designed for real life—and in a nursery, that often means sticky fingers. The good news is that keeping them looking pristine requires no special potions or hard scrubbing.
Simple Upkeep for Lasting Colour
The best way to clean your wall stickers is also the kindest. Grab a soft, lint-free cloth (a microfibre one is perfect), dampen it slightly with plain water, and gently wipe over the surface. That’s really all there is to it.
You’ll want to steer clear of chemical sprays, soaps, or anything abrasive. They can do more harm than good, potentially damaging the printed design or weakening the adhesive at the edges, which might cause them to lift over time. A quick, gentle wipe is all it takes to keep the colours popping.
The Gentle Art of Sticker Removal
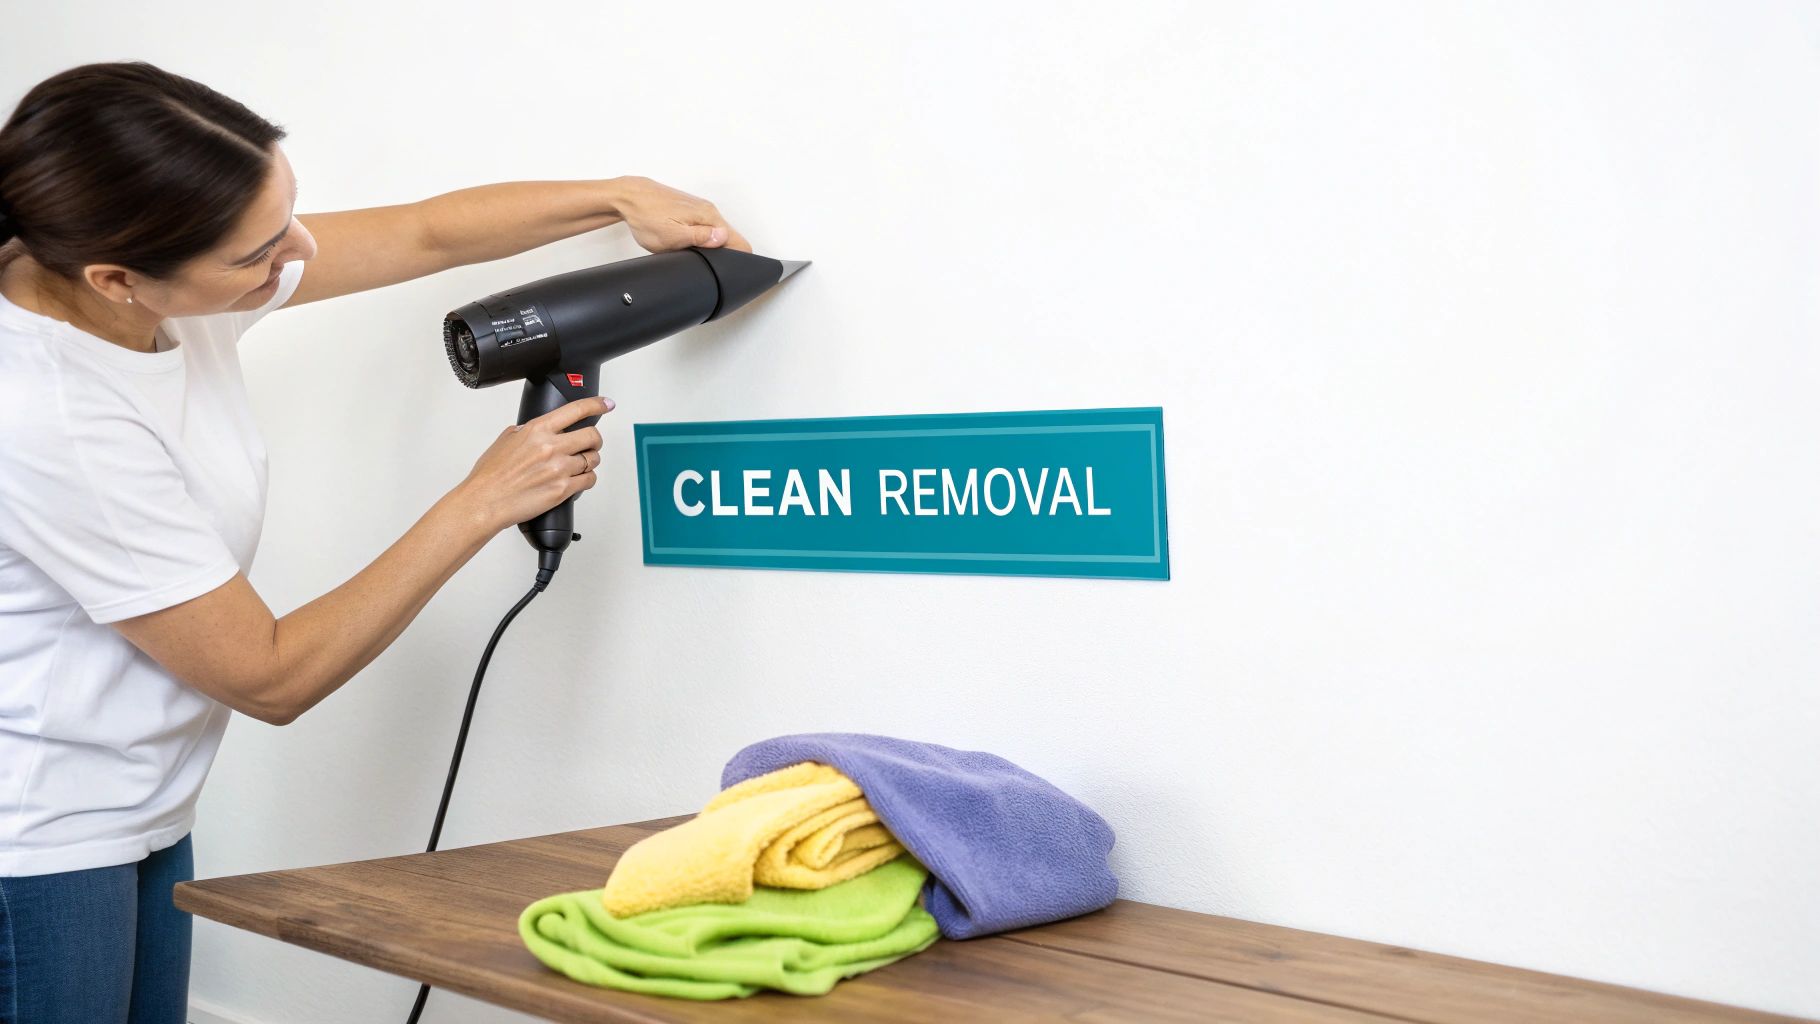
When it’s time for a change, the removal process is where good quality vinyl really shines. The goal is a clean getaway, leaving your wall looking exactly as it did before. With a bit of patience and a common household gadget, you can get a perfect, damage-free removal every single time.
Your secret weapon? A hairdryer. The gentle warmth is just enough to soften the adhesive, making the sticker pliable and happy to peel away without putting up a fight.
The real trick to clean removal is heat and patience. I’ve seen it time and again—rushing the process by pulling too fast on a cold sticker is the number one cause of paint damage. A few extra minutes of gentle heating makes all the difference.
A Step-by-Step Guide to a Clean Slate
Ready to take them down? Just follow this straightforward process for a flawless finish, leaving your walls ready for their next chapter.
-
Warm it up: Set your hairdryer to a low or medium heat. Hold it about 15-20 cm away from the sticker’s edge and move it back and forth for around 30 seconds. This gently warms the vinyl and, more importantly, the adhesive underneath.
-
Get it started: Once the edge feels warm, use your fingernail or a plastic scraper (like a credit card) to carefully lift a corner. You’ll feel it give way much more easily than if it were cold.
-
Peel low and slow: This is the most critical step. Pull the sticker back on itself at a low angle, keeping it almost parallel to the wall. Don't pull it straight out towards you. As you peel, keep applying gentle heat just ahead of the area you’re working on. This slow, steady motion keeps the adhesive soft and encourages it to come away with the sticker, not stay on the wall.
For an even more detailed look, our guide on how to remove wall stickers has extra tips and visuals to help you get it perfect.
Dealing with Any Lingering Stickiness
Nine times out of ten, especially if you've used the heat method, your wall will be left perfectly clean. However, things like how long the sticker has been up, the type of paint, and even the room's humidity can sometimes leave a faint, sticky residue. Don't panic—it’s easy to sort out.
First, try just rubbing the residue with your finger; it will often ball up and come right off. If it’s a bit more stubborn, a soft cloth with a tiny bit of warm, soapy water will usually do the trick. Rub in a gentle circular motion, then wipe with a clean, damp cloth to remove any soap.
For any really persistent spots, a dab of rubbing alcohol on a cotton ball can work wonders. Just be sure to test it on a hidden area of your wall first (like behind a piece of furniture) to make sure it doesn’t affect the paint finish. These simple steps guarantee a clean slate, making nursery wall stickers a truly stress-free and joyful part of your decorating adventure.
Got Questions About Nursery Wall Stickers? We’ve Got Answers
Decorating the nursery is one of the most exciting parts of getting ready for a new baby, but it's completely normal to have a few questions. When you're using wall stickers in a nursery, you want to be sure you’re doing everything right. We've put together answers to some of the most common things UK parents ask us, so you can decorate with total peace of mind.
How Long Should I Wait to Put Stickers on a Freshly Painted Wall?
This is a big one, and the answer is all about patience. You absolutely must wait at least three to four weeks after painting before you even think about applying a wall sticker. I know it feels like an eternity when you're keen to get the room finished, but it’s a non-negotiable step for a good reason.
Fresh paint needs time to 'cure', which means letting all the solvents and moisture evaporate. If you stick a decal on too soon, you’re essentially trapping those gases. This not only causes the sticker to bubble up and peel off, but the adhesive can also fuse with the uncured paint. The result? When you eventually go to remove the sticker, it'll likely take a chunk of paint with it.
Think of it this way: waiting that month is your best guarantee for a perfect, bubble-free finish now and clean, damage-free walls later on.
Are Wall Stickers Actually Safe for a Baby’s Room?
Yes, they are – as long as you buy them from a good source and are smart about where you put them. The safety of your wall stickers nursery really hinges on two things: what they're made of and where they go.
First, always buy from a reputable UK-based company that explicitly states they use non-toxic, VOC-free vinyl. This is your assurance that no nasty chemicals are being released into the air in your baby’s room.
Placement, however, is the most crucial safety rule.
- Make sure any stickers, especially smaller ones that could be peeled off, are well out of your baby's reach.
- Avoid putting them directly over or right inside the cot. Once your little one can pull themselves up, those stickers can become a tempting target.
- It’s also a good habit to occasionally run your hand over them, just to check that all the edges are still firmly stuck down.
Do Wall Stickers Work on Textured Walls?
For the best results, wall stickers need a smooth, clean, dry surface. That said, they can often work on very lightly textured walls – think of the common 'orange peel' finish you find in many UK new-builds. The trick is to spend extra time during application, really pressing the sticker firmly into all the tiny grooves.
Where they really struggle is on heavily textured surfaces. Things like Artex or 'popcorn' ceilings, rough plaster, or exposed brick just don't offer enough flat area for the adhesive to grab onto. The sticker will almost certainly start to lift at the edges and eventually peel off. If you're in any doubt, the best thing to do is order a small sample sticker and test it on an inconspicuous patch of wall first.
How Do I Clean My Wall Stickers?
Keeping your wall stickers looking good as new is wonderfully simple. You don't need any fancy cleaning sprays or elbow grease – in fact, harsh chemicals are their worst enemy.
All you need is a soft, lint-free cloth (a microfibre one is perfect) slightly dampened with plain water. Gently wipe over the sticker to get rid of any dust or little fingerprints. Steer clear of all-purpose cleaners, abrasive sponges, or anything containing solvents. These can easily scratch the design, fade the colours, or even weaken the adhesive and cause the edges to curl up. A quick, gentle wipe is all they’ll ever need.
At Quote My Wall, we offer a huge range of beautiful, non-toxic, and easy-to-apply nursery wall stickers to help you create the perfect space for your little one. Explore our collection and bring your vision to life today at https://www.quotemywall.co.uk.