
A Parent's Guide to Wall Stickers for Children's Rooms
Staring at your child's plain bedroom walls, wondering how to sprinkle a bit of magic without the commitment of paint or wallpaper? Wall stickers for children's rooms are your secret weapon. They're a brilliantly simple and affordable way to inject personality into a space, quickly turning a blank canvas into a wonderland.
Effortlessly Transform Your Child's Room
You don't need a massive project or a huge budget to create a truly special, personalised space for your little one. It's no surprise that wall stickers have become such a firm favourite for parents across the UK. They perfectly fill that gap between a temporary decoration and a full-blown renovation, giving you a fantastic middle ground for adding charm.
This isn't just about looks; it's about practicality. Their popularity has made wall stickers a major player in the UK children's décor market. The combination of low cost and easy removal is a game-changer, especially for the 35% of UK families living in rented accommodation.
Why Parents Are Choosing Wall Stickers
Wall decals are so appealing because they solve real-world decorating problems for parents, whether you're renting, own your home, or just want the freedom to change your mind.
For example, you can create a gentle, calming nursery today and, in a few years, swap it out for a roaring dinosaur landscape as your child's passions change. This kind of flexibility is something more permanent options just can't offer.
Gone are the days of being locked into one design for years on end. With wall stickers, you can easily update a room for a new arrival, a curious toddler, or your school-aged child's latest obsession, all without breaking the bank.
A great starting point is to gather some inspiration. Browsing galleries of stylish unisex nursery theme ideas can really get your own creative ideas flowing and show you just what’s possible.
Key Benefits for Any Family Home
For busy families, the practical advantages make wall stickers a no-brainer. Here’s a quick rundown of why they’ve become a staple in so many children's rooms:
- Affordability: You get a high-impact transformation for a fraction of what you'd spend on wallpapering or hiring a painter.
- Easy Application: Honestly, most designs are up on the wall in under an hour. No special tools, no mess, no stress.
- Damage-Free Removal: This is the big one, especially for renters. They peel off cleanly when you're ready for a change, leaving your paintwork untouched.
- Endless Variety: From soft watercolour animals and bold geometric shapes to personalised name decals, the choices are virtually limitless.
Think of this guide as your go-to resource. We’ll walk you through everything, from picking the perfect theme to getting that flawless, bubble-free application, helping you create a space your child will adore, whatever your budget.
How to Choose the Perfect Wall Stickers
Finding the right wall stickers for your child's room is a wonderful blend of creativity and practicality. It's your chance to bring their personality to life, but you also need to think about safety, size, and how long the design will last. With a sea of options out there, it can feel a bit overwhelming, so let's walk through how to pick a design that both you and your little one will love.
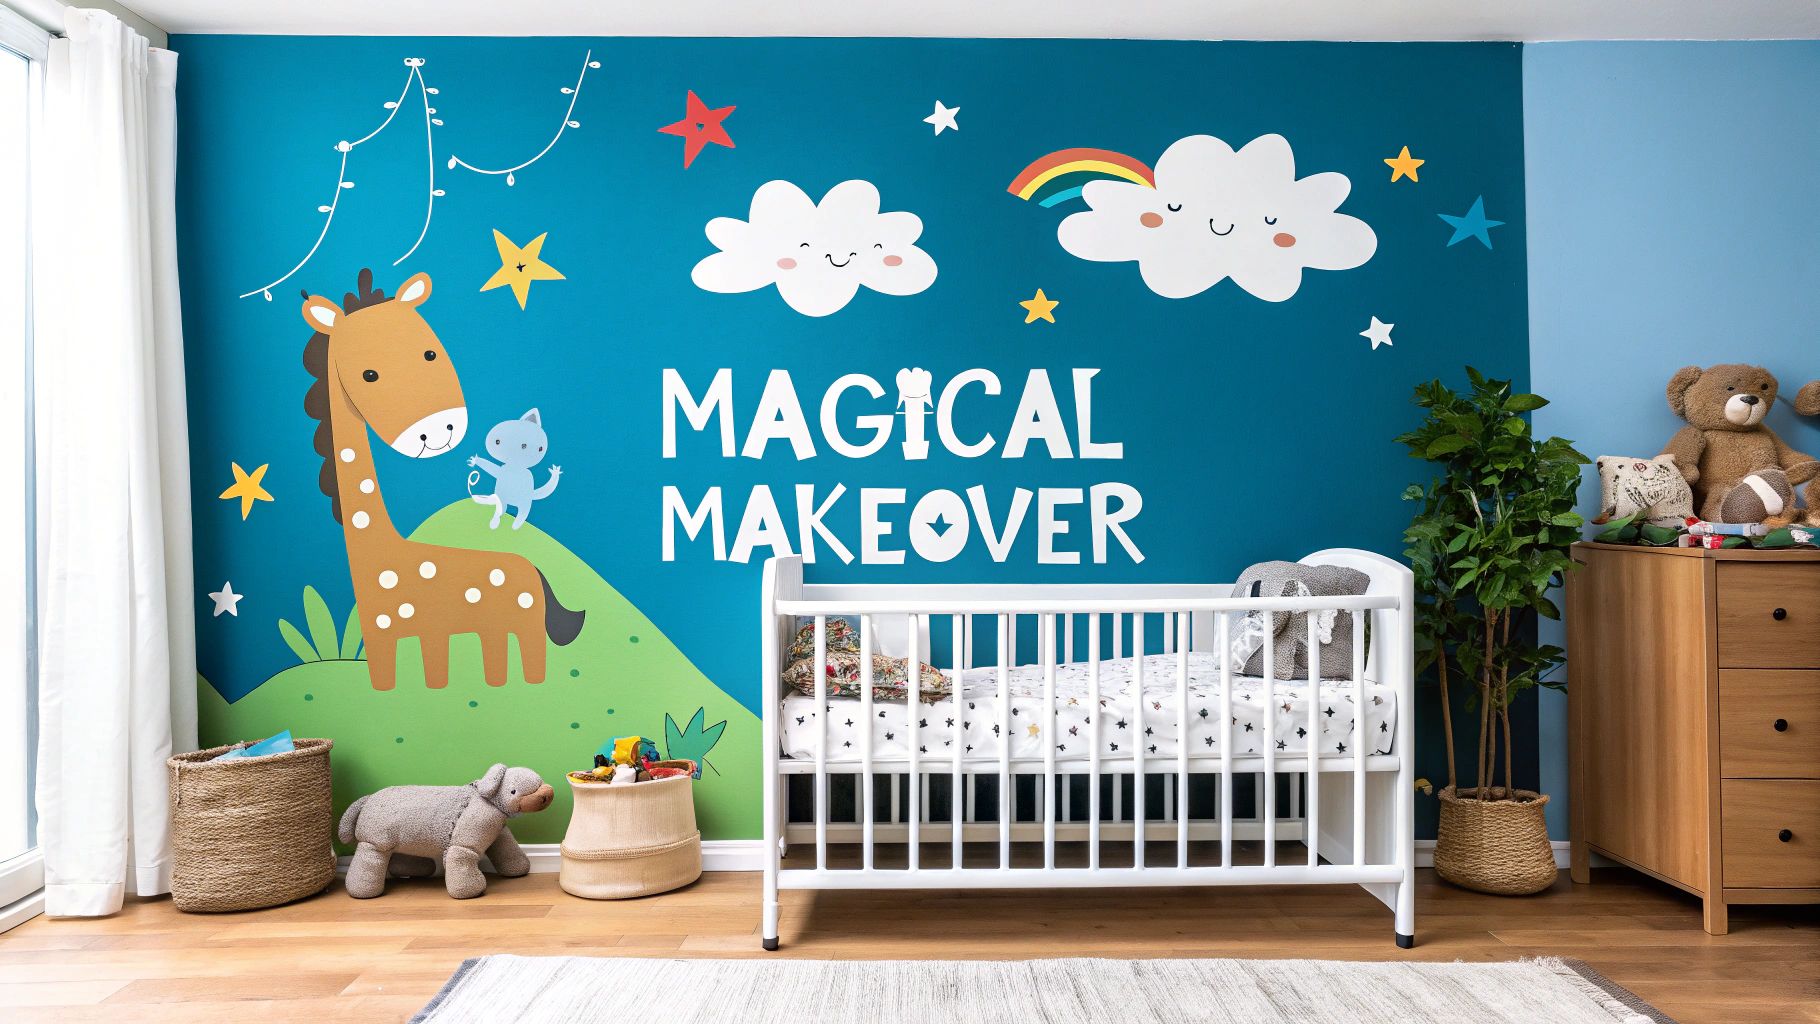
Start by thinking about the theme and colour scheme. What is your child absolutely obsessed with right now? Dinosaurs, space, fairytale castles, or maybe just a specific colour? Tapping into their current passion is the best way to narrow down your choices and find something that will make their eyes light up.
Here in the UK, wall stickers for children's rooms have become incredibly popular. It’s part of a bigger shift towards customisable home décor that isn't permanent. Parents want to create magical spaces for their kids without the fuss and finality of paint or wallpaper.
Consider Your Child's Age and Development
The best themes are often those that can grow with your child or be easily updated down the line. For a baby's nursery, you might lean towards soft pastels and simple, calming shapes. It's also worth looking into the benefits of high-contrast images for baby vision, as certain designs can be both beautiful and beneficial for their development.
Once they hit the toddler years, you can bring in more interactive elements. Think height charts, alphabet stickers, or even a world map to spark their curiosity. A great trick is to choose a theme that you can build on—start with a few jungle animals and add more to the scene as they get older. It keeps the room feeling fresh without a complete overhaul.
Material Quality is Non-Negotiable
When it’s for your child's room, safety is everything. Always, always choose wall stickers made from high-quality, non-toxic materials. Reputable UK sellers will clearly state that their products are free from nasty chemicals like phthalates, giving you peace of mind that they're safe for nurseries and playrooms.
But material isn't just about safety; it also dictates how the sticker looks and how well it lasts.
Here's a quick comparison to help you choose the right material for your child's room.
Comparing Common Wall Sticker Materials
| Material Type | Best For | Durability | Removability | Safety Note |
|---|---|---|---|---|
| Matte Vinyl | Creating a painted-on, seamless look on smooth walls. | High (5+ years) | Clean & easy | Look for non-toxic, child-safe certifications. |
| Gloss Vinyl | High-traffic areas or furniture; easy to wipe clean. | Very High | Can be trickier | Excellent for durability but can create glare. |
| Fabric Decals | Reusability and use on slightly textured surfaces. | Medium | Repositionable | Often a premium, eco-friendly option. |
For bedrooms, most people find that matte vinyl is the way to go. It doesn't create a glare from lamps or sunlight, which helps the design look like it was painted right onto the wall.
Sizing and Placement Make All the Difference
One of the easiest mistakes to make is picking a sticker that's too small for the space. Something that looks huge on a website can end up looking a bit lost and lonely on a big, empty wall.
To get it right, grab a tape measure. Before you even think about buying, measure out the sticker’s dimensions and use a few bits of low-tack masking tape to outline the shape on the wall. This simple trick gives you a real-world feel for the scale and ensures it has the visual impact you're hoping for.
A great rule of thumb is that a feature design—like a large tree or animal scene—should take up about two-thirds of the wall space it's intended for. This creates a balanced, intentional look rather than a random afterthought.
Also, think about where your furniture is. A whimsical animal peeking out from behind a bookshelf, a cluster of stars floating above a headboard, or a beautiful mural behind the cot can add a real sense of depth and playfulness to the room.
Add a Personal Touch
Personalisation is what turns a nicely decorated room into a space that feels uniquely theirs. Custom name stickers are a fantastic and simple way to do this, looking great above a bed, on their door, or over a little desk area.
You could also add a favourite quote from a beloved book or an inspiring phrase to foster a positive vibe. If you explore some of the different options for personalised name wall stickers, you’ll find tons of ideas for fonts and styles that can tie in perfectly with your theme. It’s that little extra touch that makes a room feel truly special.
Your Guide to a Flawless Application
You’ve picked out the perfect design, and now for the exciting part—bringing it to life on the wall. It’s easier than you might think, and with a bit of prep and a steady hand, you'll get a finish that looks like it was done by a professional. Getting this stage right is the key to ensuring your wall stickers for children's rooms look fantastic for years.
Honestly, the biggest mistake I see people make is rushing the prep. It's tempting to skip straight to sticking, but a clean, properly prepared surface is the real secret to a perfect, long-lasting finish. So, let’s start there.
The image below shows how choosing the right theme, material, and size all leads up to this crucial application stage.
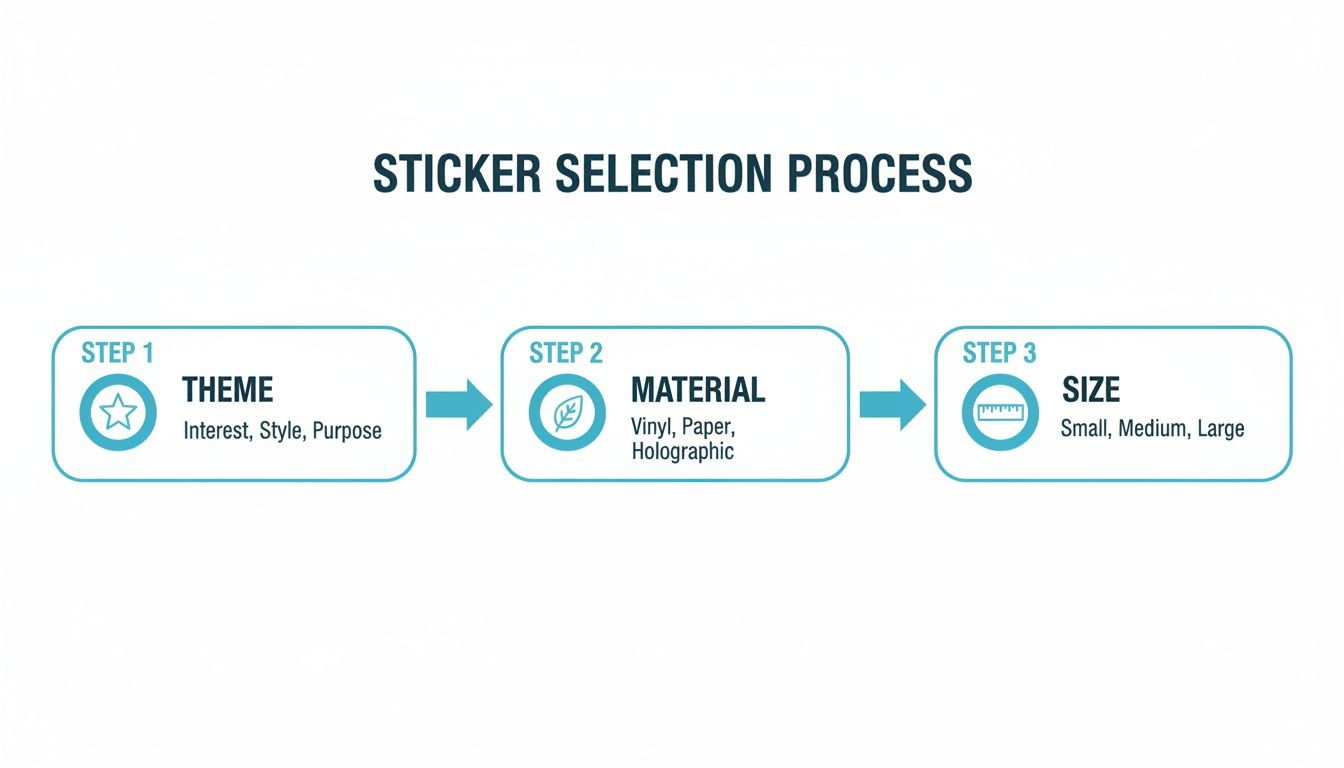
As you can see, a little thought during selection is the foundation for a successful application, making sure the sticker you’ve chosen is spot-on for your space.
Preparing Your Walls for Success
First things first, the wall needs to be spotlessly clean and completely dry. Even if it looks fine, tiny bits of dust or grease can stop the vinyl from gripping properly.
Just grab a soft cloth or sponge, mix up some mild soap and warm water, and give the area a gentle wipe. Follow up with a clean, damp cloth to rinse, and then let it air dry. Don't rush this bit – patience now will pay off massively.
A common question we get is about freshly painted walls. You absolutely must let the paint cure properly before applying any stickers. A wall might feel dry in a day, but the paint can take 2-3 weeks to fully cure. Sticking one on too soon can trap gases, leading to bubbles and even causing paint to peel off when you eventually remove the sticker.
The Tools You Will Need
You don’t need a fancy toolkit for this job. Just a few everyday items will make things much smoother.
- A Squeegee or Credit Card: This is your number one tool for smoothing out the sticker and getting rid of air bubbles. Most kits include a small plastic one, but a bank card works just as well.
- Masking Tape: Invaluable for getting your positioning just right, especially with bigger or fiddly designs. A low-tack tape is best as it won’t pull any paint off.
- A Spirit Level: Absolutely essential for making sure your design isn't wonky.
- A Soft, Dry Cloth: Perfect for giving the sticker a final press-down once it’s on the wall.
Applying Your Wall Sticker Like a Pro
For little, individual stickers, it’s usually as simple as peel and stick. But for the larger decals, a bit of technique makes all the difference. The 'hinge method' is a game-changer for getting perfect alignment without any stress.
Here’s the breakdown:
- Position It: Leave the backing paper on and hold the sticker against the wall. Use your spirit level to get it perfectly straight, then stick a long strip of masking tape along the top edge. This tape is your 'hinge'.
- Create the Hinge: Now, flip the sticker up towards the ceiling, and carefully start peeling the backing paper away from the top half, stopping when you get to your tape hinge. Grab some scissors and snip off the loose backing paper.
- Apply the Top Half: Gently lower the exposed sticky section back down onto the wall. Starting from the centre (right below your tape) and moving outwards, use your squeegee to smooth it down firmly.
- Finish the Job: With the top half stuck fast, you can now remove the masking tape. Carefully lift the bottom half of the sticker and peel off the rest of the backing. Continue smoothing with the squeegee from the middle out to the edges.
This technique is brilliant because it stops the sticker from folding over and sticking to itself, giving you total control. It's especially handy for large murals or quotes. If you’re a visual learner, there's a fantastic guide that shows you how to apply wall stickers with clear, step-by-step images.
Troubleshooting Common Application Issues
Even with careful prep, you might hit a small snag. Don't panic! Most common problems are incredibly easy to fix.
The classic issue is the dreaded air bubble. If you spot one after you're done, resist the urge to peel the sticker back. Instead, take a very fine pin and make a tiny hole in the middle of the bubble. Gently push the air out through the pinprick with your finger. The vinyl will flatten out, and the tiny hole will be invisible.
What if a corner or edge isn't sticking down properly? This is usually caused by a bit of dust or the wall's texture. Just take a dry cloth and press down firmly on the area for about 30 seconds. For a really stubborn edge, a quick blast with a hairdryer on a low heat setting can warm up the adhesive and help it bond. Just be careful not to get it too hot.
Creative Ways to Style Wall Stickers
So, you've got the sticker on the wall, and it looks great. But now the real fun starts—turning a simple decoration into the heart of your child’s room. Wall stickers for children's rooms are more than just decals; they're a canvas for telling a story and creating a space that’s as unique as your little one.
Let’s move beyond just sticking them on and look at how to style them like a pro, transforming a plain room into a truly magical space.
Create a Stunning Feature Wall
One of the quickest ways to make a huge impact is by dedicating one wall to a big, bold design. A feature wall acts as the room's focal point, and it’s a brilliant alternative to fussy wallpaper or a strong paint colour that might overwhelm the space. The wall behind the cot or bed is usually the perfect spot.
Imagine a huge, sprawling tree sticker with a few friendly woodland creatures peeking out from behind the cot. Or what about a vibrant solar system scene stretching over your toddler's headboard? Add some glow-in-the-dark stars, and you’ve created a comforting view for them to drift off to. This approach anchors the theme and gives the room a polished, thoughtful feel.
To make your feature wall pop, go for a design that has a sense of scale and movement. A fleet of hot air balloons floating upwards or a procession of jungle animals on a journey creates a dynamic scene that really fires up the imagination.
The Art of the Scatter Effect
You don’t always need one massive sticker to make a statement. Sometimes, a more subtle, whimsical charm comes from using lots of smaller stickers scattered across a wall. This technique is fantastic for creating a light, airy atmosphere that doesn't feel too busy.
A few ideas to get you started:
- Minimalist Polka Dots: Simple metallic or pastel dots, placed randomly, give a nursery a chic, modern look that won’t date quickly.
- Floating Feathers or Stars: A gentle cascade of delicate feathers or a sprinkle of different-sized stars can soften a room, adding a dreamy quality.
- Individual Flowers: Dainty floral stickers can look as if they're growing up from the skirting boards or tumbling down from the ceiling.
Best of all, this method is incredibly forgiving. There’s no need for perfect measurements or straight lines—just place them wherever feels right.
Extend the Theme Beyond the Walls
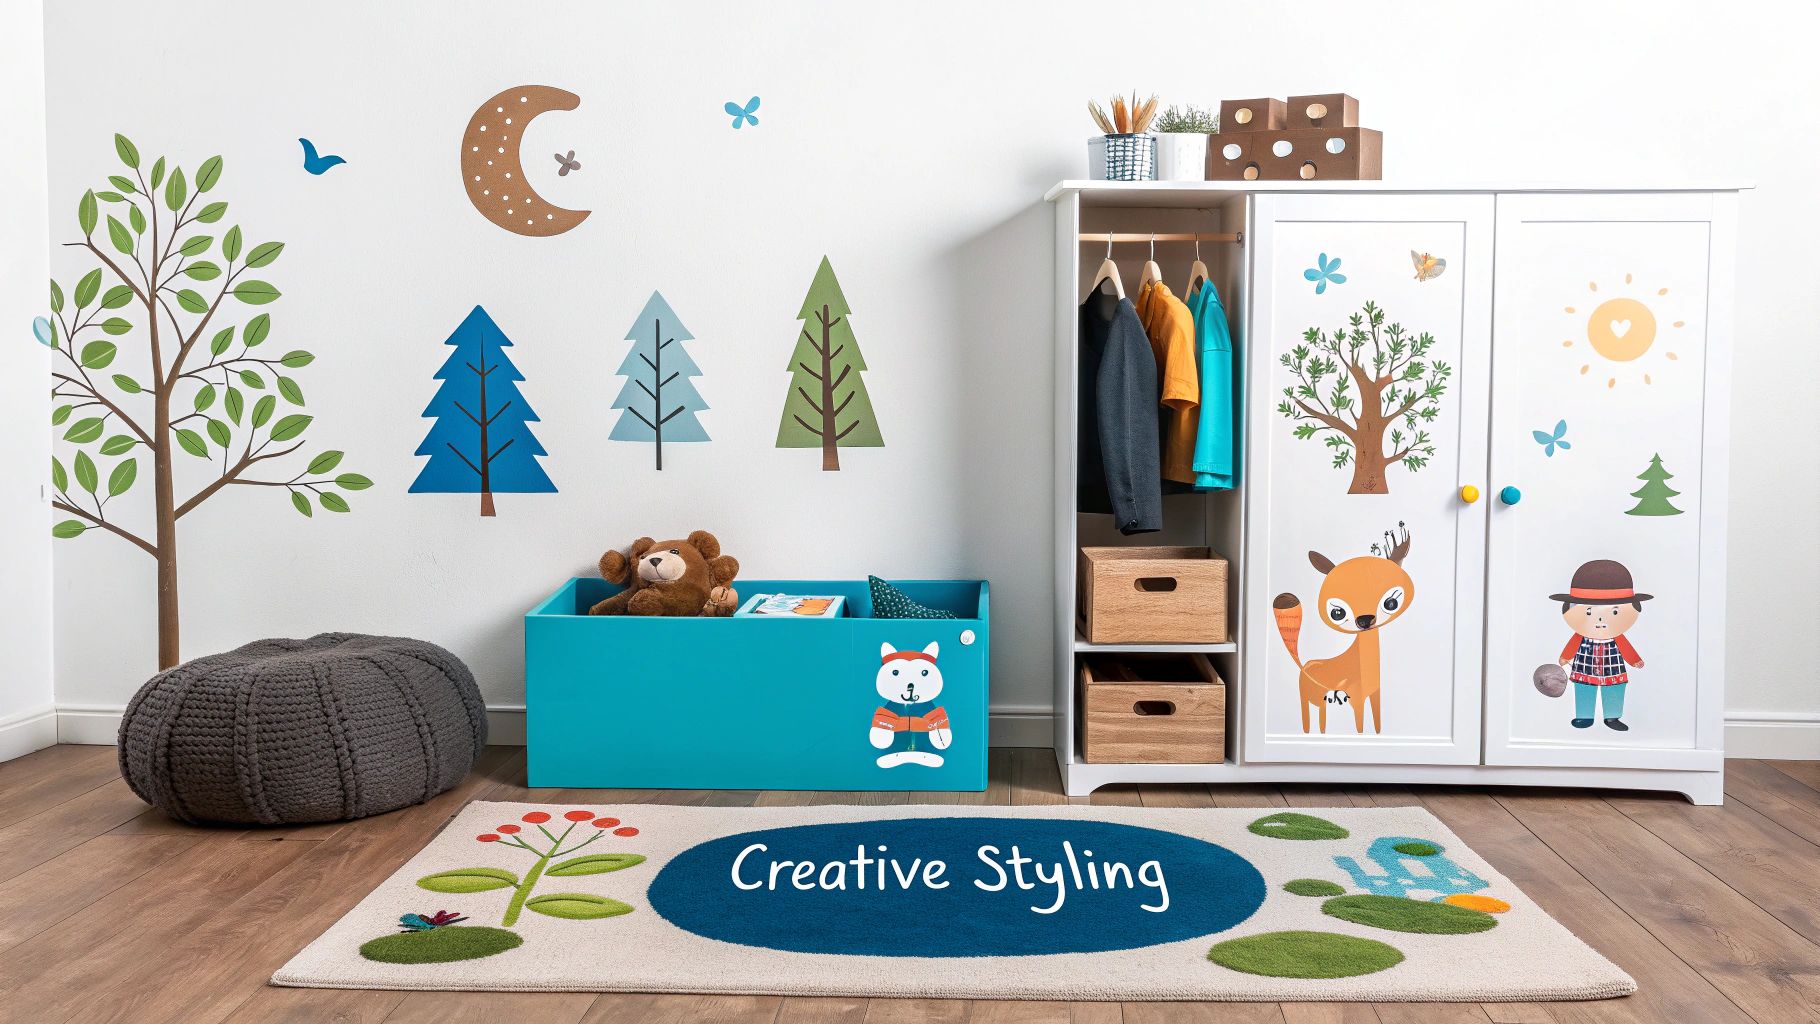
Why stop at the walls? A truly immersive theme flows through the whole room, and stickers are perfect for tying everything together. Pop a few matching decals onto furniture to connect the dots. This is a brilliant trick for upcycling plain pieces or adding personality in a rented home where you can't make permanent changes.
A few safari animals on the drawers of a chest? Some racing cars on the side of a toy box? It works a treat. A plain white wardrobe can be completely transformed with a few birds or butterflies that match your main wall design. It’s a simple touch that makes the furniture feel like it was custom-made for the room.
Mix and Match to Build a Unique Scene
Don't feel like you have to stick to just one pack of decals. The most imaginative rooms are often born from mixing different sets to create a scene that’s totally unique. This is where you get to be the storyteller.
For example, you could start with a set of simple green hill decals and then add various packs of farm animals, trees, and a sun to build your own sprawling countryside. Or, combine a deep-space background with separate packs of planets, astronauts, and rockets. By doing this, you're creating a room that’s perfectly tailored to what your child loves and guaranteed to be one-of-a-kind. Just try to stick to a complementary colour palette to make sure the final result looks harmonious, not chaotic.
Keeping Your Wall Stickers Looking Perfect and Removing Them Safely
Once your new wall stickers are up, you'll be pleased to know they're incredibly low-maintenance. Their durable design means they'll look fantastic for years with just a little bit of attention.
High-quality vinyl is a dream to clean. If you spot a bit of dust or a few mucky fingerprints, just grab a soft, damp cloth. A gentle wipe over the surface is all that's needed – definitely stay away from harsh chemicals or abrasive cleaners, as they can ruin the finish.
A Quick Fix for Lifting Edges
Every now and then, you might spot a corner or an edge starting to lift a tiny bit. Don't panic! This is completely normal and can be caused by anything from dust to humidity changes. It’s also incredibly easy to fix.
Simply take a clean, dry cloth and press down firmly on the area for about 30 seconds. The warmth from your hand is usually enough to get the adhesive working again. If you have a particularly stubborn spot, a quick blast with a hairdryer on its lowest heat setting will do the trick, helping the vinyl stick securely once more.
The Secret to Damage-Free Removal
One of the best things about wall stickers for children's rooms is that they aren't a permanent decision. When your little one moves on to their next obsession or you just fancy a change, taking them down is simple and won't leave a mark. This is a huge relief, especially if you're renting.
The two magic ingredients for a clean removal are heat and patience. Whatever you do, don't just rip the sticker off the wall – that's a sure-fire way to take some paint with it. A gentle touch is all it takes.
Your best friend for safe removal is a hairdryer. Gently warming the vinyl softens the adhesive, letting it peel away from the wall cleanly without pulling off paint or leaving a sticky mess behind.
Start at one corner of the sticker. Hold your hairdryer about 15-20 cm away and warm the area for 20-30 seconds on a low heat setting. You'll feel the vinyl soften and become more flexible.
Next, use a fingernail to carefully lift that warmed edge. Then, slowly peel the sticker back on itself, keeping it as close to the wall as you can. Pulling at a sharp, flat angle like this puts the least amount of stress on the paint underneath.
If you feel any resistance, just stop pulling and give that spot another quick blast of heat before you carry on. For a more detailed guide, check out our post on how to remove wall stickers for some extra pointers. It’s a straightforward technique that gives you the freedom to change your mind whenever you like.
Got Questions About Kids' Wall Stickers? We've Got Answers
It’s completely normal to have a few lingering questions before you start peeling and sticking. You've picked a design, you're excited, but you want to get it just right. It's a fantastic way to bring a room to life, but a little bit of know-how goes a long way.
Let's run through the most common queries we hear from parents. From nursery safety to dealing with pesky textured walls, this will give you the confidence to get started.
Are They Safe for a Nursery or Toddler's Room?
This is the big one, and for good reason. The short answer is a resounding yes, as long as you're buying from a reputable UK source. Quality wall stickers are made from non-toxic, child-safe vinyl, meaning they're free from nasty chemicals like phthalates and are perfectly fine for your little one's space.
That said, it pays to use a bit of common sense. If your chosen design is made up of lots of small, separate pieces – think individual stars or polka dots – it’s wise to place them high up, well out of reach of a cot. This simply removes any temptation for curious little fingers to peel one off, which could become a choking hazard.
For larger, single-piece designs, the risk is practically non-existent. Just be sure to check the product description for safety reassurances to set your mind completely at ease.
Can I Put Stickers on a Freshly Painted Wall?
I know how tempting it is to get decorating as soon as that last coat of paint is touch-dry, but hold your horses! This is one area where patience really is a virtue. Paint needs time to properly 'cure' – that’s the process of it fully hardening and releasing all its chemical solvents.
If you apply a sticker too soon, you can trap those escaping gases, which is the number one cause of annoying bubbles forming under the vinyl. Worse still, the adhesive can fuse with the soft paint, meaning when you eventually decide to remove the sticker, you might just peel the paint clean off the wall with it.
As a solid rule of thumb, wait at least two to three weeks after painting before applying any wall stickers. This guarantees the paint is fully hardened and provides the perfect, stable surface for a flawless and damage-free finish.
Will They Actually Stick to My Textured Walls?
This all comes down to just how textured your walls are. Vinyl stickers are happiest on a smooth, clean surface where the adhesive can get a proper grip. They might just about manage on a very light texture, like a subtle 'orange peel' finish, but the bond won't be as strong, and you could find the edges starting to lift over time.
For anything more heavily textured – think Artex, exposed brick, or rough plaster – standard vinyl stickers are a definite no-go. The little air gaps created by all those bumps and dips prevent the adhesive from making full contact, and the sticker will inevitably start to peel away.
Don't despair if you have textured walls, though. You could look into fabric wall decals. They're made from a more flexible, woven material that can mould itself much better to uneven surfaces. If you're unsure, the best bet is always to test a small corner of the sticker on an out-of-the-way spot first.
How Should I Store Leftover or Reusable Stickers?
If you have some bits left over, or you've invested in reusable fabric stickers, storing them properly is the secret to using them again. The absolute best way is to pop them straight back onto their original backing paper.
Misplaced the backing paper? No problem. A sheet of wax or parchment paper from your kitchen drawer works just as well. Carefully smooth the sticker onto the shiny side of the paper, pressing out any air bubbles as you go.
Once it's flat, just roll the sheet up with the sticker safely on the inside and secure it with a rubber band. Tucked away in a cool, dry place out of direct sunlight, the colours and adhesive will stay in perfect condition for next time.
At Quote My Wall, we have a huge range of beautiful, high-quality, and non-toxic wall stickers for children's rooms. Whether you’re crafting a peaceful nursery or a fun-filled playroom, you can find your perfect design in our shop.