
Wall Stickers Childrens Room A Complete Design Guide
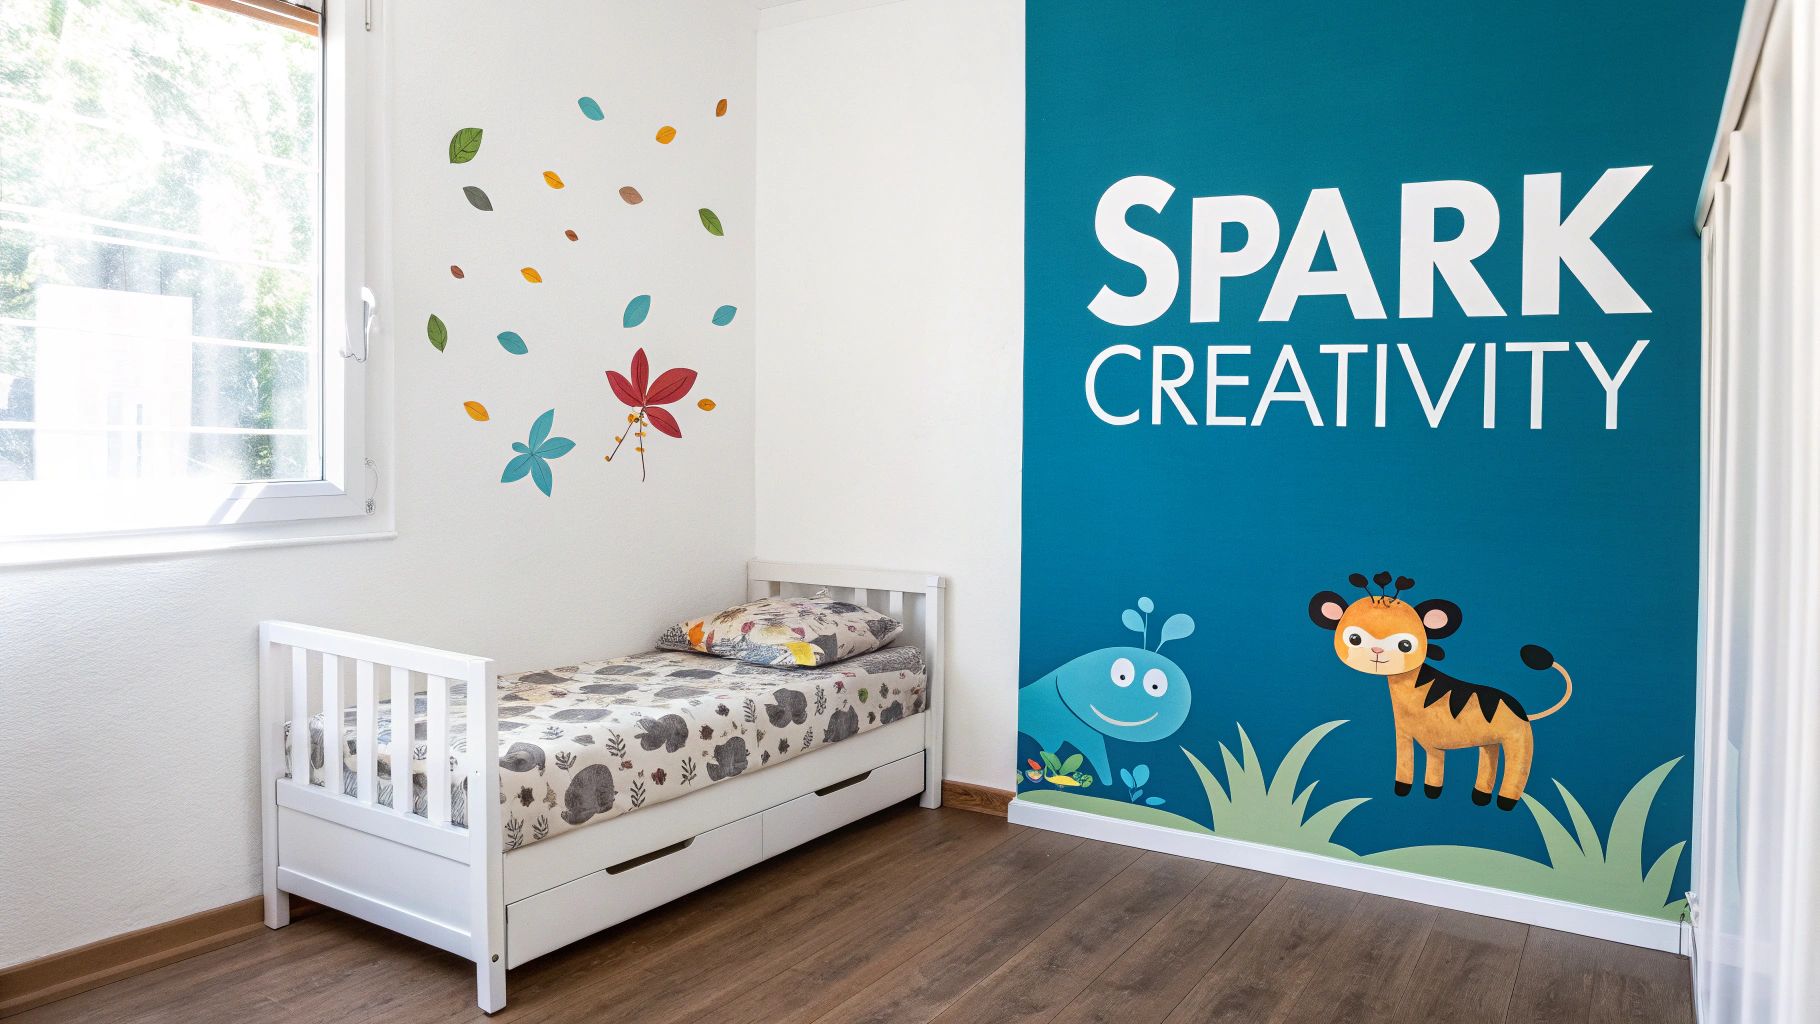
Looking for a simple, affordable, and endlessly creative way to bring your child's room to life? Wall stickers are your answer. Forget the commitment of paint or the faff of wallpaper; these versatile decals let you personalise a bedroom, nursery, or playroom in minutes, creating a magical atmosphere that can grow and change right alongside your little one.
Why Wall Stickers Are Perfect for Your Child's Room
If the thought of paint pots and messy brushes fills you with dread, you're not alone. Modern parents are quickly realising that high-quality vinyl wall stickers are the secret to creating beautiful, stimulating spaces without the headache. They’re a fantastic tool for sparking joy and imagination.
Think of them as temporary tattoos for your walls. They offer an instant splash of colour and personality but peel away cleanly when your child’s interests inevitably shift from dinosaurs to superheroes, or from woodland creatures to outer space. This kind of flexibility is a real game-changer for kids' decor.
The Modern Way to Decorate
The move towards flexible and personalised home decor is more than just a passing phase. The UK wall art market is booming, and it's the sticker and wall covering segment leading the charge. In fact, it captured a massive 34.59% of the market back in 2022, proving just how much we've all embraced this easy approach to home updates. You can read more about the rise of wall decor trends to see what's driving this growth.
This guide will walk you through everything you need to know, from picking the right design to getting a flawless finish. We’ll cover all the essentials so you can feel confident and get creative.
Here's what you'll learn:
- How to choose a theme that perfectly captures your child’s personality.
- The importance of selecting safe, durable, and non-toxic materials.
- Tips for a flawless, bubble-free application that looks professional.
- The simple secret to removing decals without a trace of damage.
Wall decor is so much more than just decoration. It’s about creating an environment that nurtures creativity, comfort, and play. By choosing the right wall stickers, you're not just decorating walls—you're building a world of wonder for your child.
By the time you've finished reading, you’ll have all the inspiration and know-how to turn a plain room into a magical haven your child will adore. Let's get started on this creative journey together.
How To Choose The Perfect Stickers For Your Kid's Room
Choosing the right wall stickers for your child's room is about more than just picking a design you like. It’s a delicate balance between what they adore and what’s practical, safe, and built to last. This decision will shape their everyday world, so thinking about the material, theme, and overall design is crucial for creating a space that works as beautifully as it looks.
Think of it like casting the lead role in the play that is your child’s room. The material is the actor’s talent, the theme is their costume, and the colour scheme is the stage lighting. Every element needs to work in harmony to bring the story to life.
The Foundation: Why Material Matters
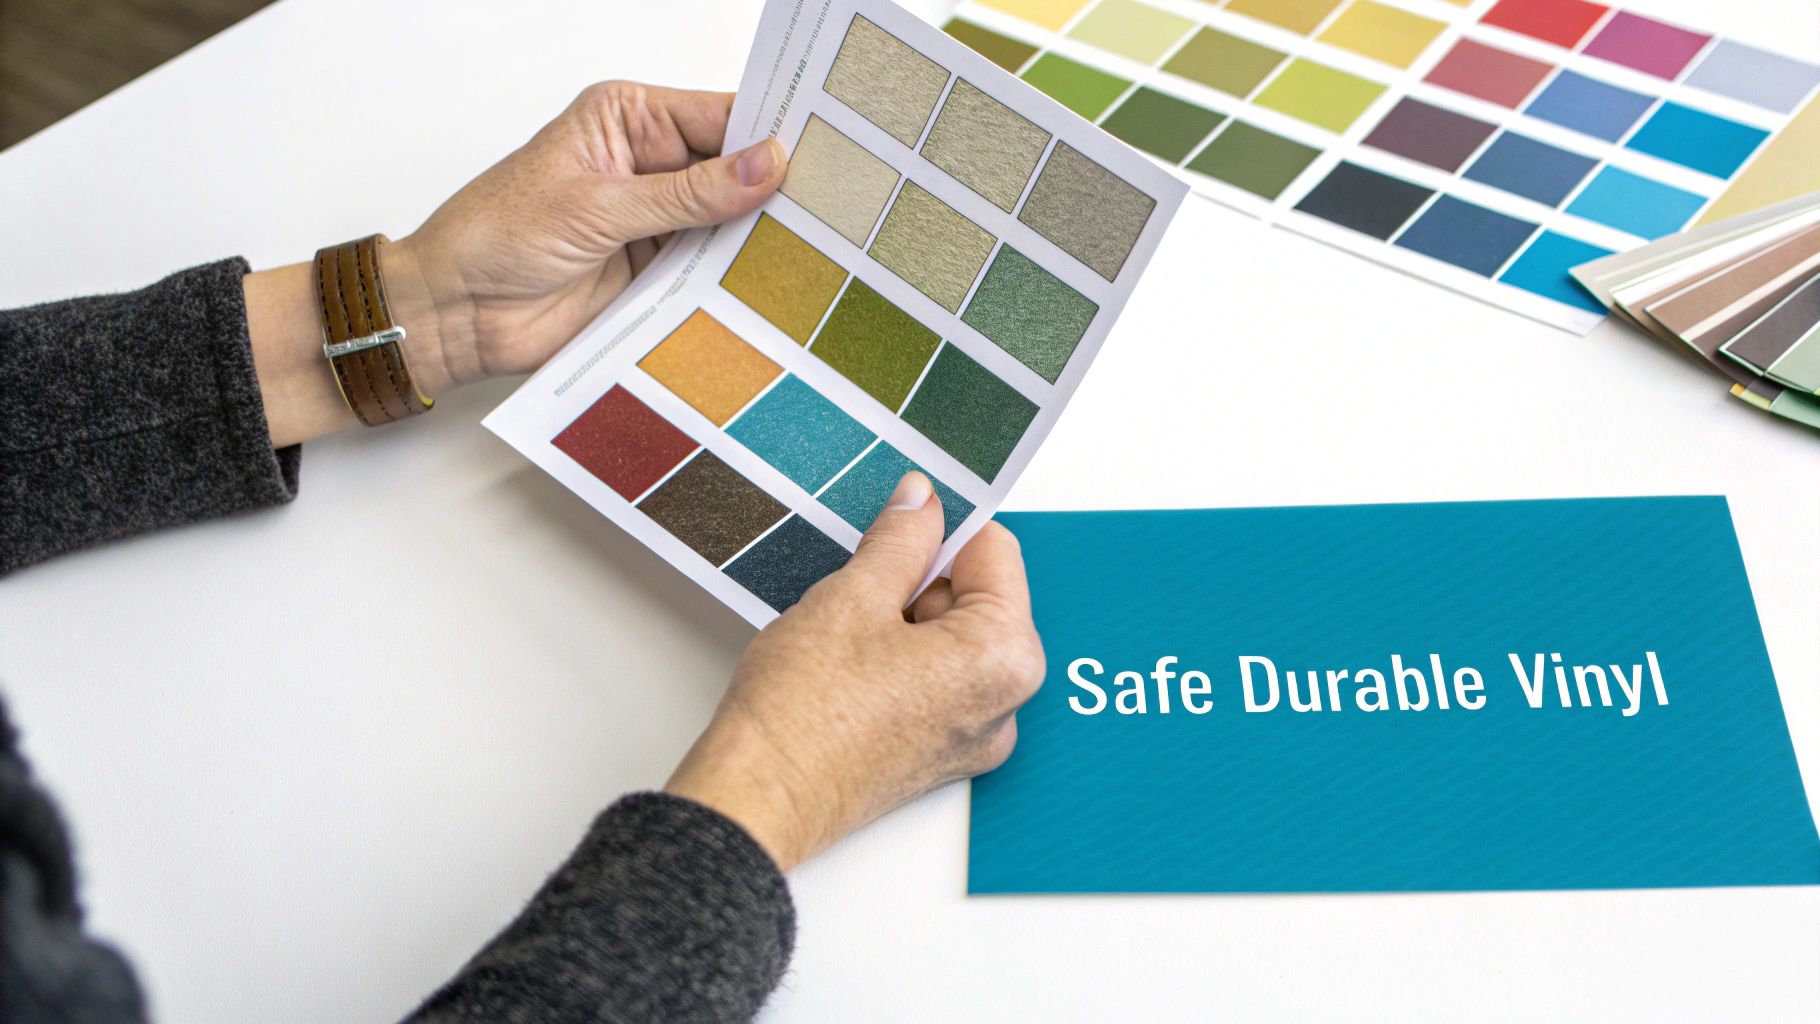
Not all wall stickers are made the same. The material they’re crafted from directly affects their look, their lifespan, and—most importantly—their safety. For a child’s room, this is where you absolutely can't cut corners.
The gold standard here is premium, non-toxic vinyl. This stuff is tough enough to withstand curious little hands and can be gently wiped clean, making it a lifesaver in a space where sticky fingers are just a part of the adventure. Cheaper options might seem like a bargain, but they often use aggressive adhesives that can strip paint or contain chemicals you really don't want anywhere near your child.
Prioritising child-safe, non-toxic materials is essential. Look for stickers made from high-quality vinyl that is free from harmful substances like phthalates, ensuring the decor is as safe as it is stylish.
This focus on quality and personalisation is a big reason why the global children's wall décor market, valued at USD 1.2 billion in 2024, continues to grow. Parents are clearly keen to create unique, personality-driven spaces for their kids.
Comparing Wall Sticker Materials
To help you choose the safest and most durable material for your child's room, here's a quick comparison to ensure your decor is both beautiful and long-lasting.
| Material Type | Durability | Safety (Non-Toxic) | Removability | Best For |
|---|---|---|---|---|
| Premium Vinyl | High | Excellent (when specified) | Excellent (damage-free) | Nurseries, bedrooms, and playrooms; long-term use. |
| Fabric (Peel & Stick) | Good | Generally good | Good (often reusable) | Temporary decor, renters, and textured walls. |
| Paper-Based | Low | Varies | Poor (can tear/damage walls) | Short-term party decorations, not ideal for rooms. |
Ultimately, investing in premium vinyl is a choice for both safety and longevity, giving you peace of mind while ensuring the design stays looking fantastic for years.
Selecting A Theme That Grows With Them
One of the biggest hurdles is picking a theme that your child will still love in a year's time. The trick is to find a design that can evolve. While a specific cartoon character might be their absolute favourite today, it could be old news before you know it.
For nurseries, softer, gentler themes are often a winner. Think whimsical woodland animals, dreamy cloud and star patterns, or soft pastel shapes. These create a calming atmosphere that’s just right for a baby’s room.
As they grow into toddlers and young children, their passions become much more pronounced. This is where you can have some real fun.
- Epic Space Adventures: Rockets, planets, and constellations can spark a lifelong fascination with astronomy.
- Dinosaur Landscapes: Bring the Jurassic period roaring back to life with a T-Rex or a friendly Stegosaurus.
- Enchanted Forests: Create a storybook setting with magical trees, friendly bears, or delicate fairies.
- Educational Elements: A world map, the alphabet, or colourful numbers can make learning a natural part of their playtime.
A brilliant strategy is to get your child involved in choosing. Giving them a say creates a sense of ownership and makes them feel incredibly proud of their personal space. For more creative ideas, feel free to explore our guide on kids wall stickers ideas and selecting tips.
Matching Decals To Your Room's Style
Finally, to get that polished, put-together look, your chosen stickers should harmonise with the room's existing decor. This doesn't mean everything must match perfectly, but all the elements should feel connected.
Start by looking at the current colour scheme. If the walls are painted in neutral tones like grey or beige, you’ve got a fantastic canvas to introduce bold, vibrant stickers as a focal point. A huge, colourful dinosaur or a bright rainbow can inject a burst of energy without overwhelming the space.
On the other hand, if the walls are already a strong colour, you might opt for more subtle decals in complementary or monochromatic shades. For example, crisp white or silver stars on a dark blue wall can create a truly stunning night-sky effect.
Don't forget the furniture! Position a sticker so a friendly animal looks like it's peeking out from behind a bookshelf, or have a vine of leaves "growing" up the side of a wardrobe. This kind of thoughtful placement makes the stickers feel intentional and integrated, turning a simple decoration into a magical part of the room’s little world.
Planning Your Layout for a Professional Finish
The secret to turning a simple pack of wall stickers into a stunning, professional-looking feature wall? A little bit of planning. Before you even think about peeling that first decal, spending ten minutes mapping out your design will save you from crooked lines, awkward gaps, and that sinking feeling when you realise your giant sticker doesn't quite fit. This one step is what makes a design look intentional and balanced.
Think of it like being a theatre director. You wouldn't just tell the actors to stand wherever they fancy; you'd block out their positions to create a visually pleasing scene. Your stickers are the stars, and the nursery wall is your stage.
Measure Twice, Apply Once
First things first, get to know your canvas. Grab a tape measure and jot down the exact height and width of the wall you're decorating. This is absolutely vital for choosing wall stickers childrens room decor that's the right scale for the space. A huge decal can easily overwhelm a small wall, while a tiny one can get completely lost on a large, empty expanse.
Don't forget to account for the furniture. How much clear wall space is there above the cot, beside the bookshelf, or over the headboard? Measuring these specific areas will help you picture how the stickers will fit into the existing layout, making sure they complement the room rather than compete with it.
A well-planned layout considers the whole room, not just a blank patch of wall. The aim is to create a cohesive look where the stickers feel like a natural part of the environment, perhaps framing furniture or defining a little play zone.
Before you commit, it's always a good idea to visualise your design. A quick sketch can save you a world of hassle, and for a deep dive into creating effective interior design sketches, you might find this guide helpful.
Creative Layout Ideas to Spark Inspiration
With your measurements in hand, the fun can really begin. You don't have to just plonk everything in the middle of the wall. There are so many imaginative ways to arrange your decals to create a space that feels truly special.
Here are a few popular strategies to get you started:
- Create a Focal Point: This is a classic for a reason. Use one large, show-stopping sticker or a tight cluster of smaller ones to create a stunning centrepiece. It works brilliantly above a key piece of furniture like a cot or bed, instantly drawing the eye.
- Scatter for Immersion: If you have lots of smaller, repeating stickers like stars, dots, or little animals, scattering them across an entire wall creates an immersive, almost wallpaper-like effect. This is perfect for building a whimsical woodland scene or a dreamy night sky.
- Frame a Feature: Use your decals to highlight an architectural detail or a specific area. Imagine a vine of leaves climbing up the side of a doorway, or a few friendly animals peeking out from around a reading nook to make it feel extra cosy.
Preparing Your Wall for Perfect Adhesion
Finally, we get to the most critical step before application: wall prep. A clean, smooth surface is absolutely essential for getting that strong bond needed to prevent peeling edges and annoying air bubbles. It’s a simple job, but it makes all the difference.
Just follow this quick pre-application checklist for a flawless result:
- Clean the Surface: Gently wipe the whole area with a soft, damp cloth and a bit of mild soap. This gets rid of any dust, grime, or invisible oils that can weaken the adhesive.
- Let it Dry Completely: Patience is your friend here. The wall must be 100% dry before you apply the sticker. We always recommend waiting at least 24 hours after cleaning.
- Check Your Paint: Freshly painted walls need time to cure. If you stick decals on too soon, you can trap gases and cause bubbles, or worse, pull the paint off when you eventually remove them. It’s best to wait at least two to three weeks after painting.
By taking the time for these planning and preparation steps, you're setting yourself up for a smooth, stress-free installation and a final result that looks fantastic.
Your Step-By-Step Guide To Flawless Application
You've planned the layout and prepped the wall – now for the fun bit! This is where you get to bring the whole design to life, transforming a simple sheet of vinyl into a standout feature in your child's room.
Think of it like putting a screen protector on a new phone. A little patience and the right technique are all you need for a perfect, bubble-free finish. Don't worry, it's a straightforward process, and I'll walk you through it one step at a time.
Most quality wall stickers for a childrens room come as a three-layer sandwich. You've got the white backing paper at the bottom, the actual vinyl sticker in the middle, and a layer of clear or semi-opaque transfer tape on top. This top layer is the key; it holds all the little pieces of your design together, ensuring everything moves from the backing to the wall in one go.
Preparing Your Sticker for Application
First things first, unroll your new sticker and lay it out on a clean, flat surface like a table or the floor. It's completely normal for a few little air bubbles to appear between the layers during transit, but they're easy to sort out.
Grab a squeegee, a credit card, or any tool with a firm, flat edge. Now, rub it firmly all over the clear transfer tape. This does two things: it pushes out any trapped air and, more importantly, it makes sure the vinyl decal is properly stuck to the clear tape, ready for action.
Positioning and Securing Your Design
Alright, let's get this on the wall. This is where that earlier planning really pays off. Start by carefully peeling back just a small section of the white backing paper from the top of the sticker to reveal the sticky vinyl underneath.
Lightly place this exposed top edge onto the wall where you want it to go. Don't press it down firmly yet! Grab a spirit level and make sure it’s perfectly straight. Once you’re happy with the position, stick a strip of painter's tape along that top edge to create a hinge. This will hold it securely in place while you handle the rest.
This hinge method is a total game-changer, especially for bigger or more intricate designs. It’s like having an extra pair of hands, keeping the sticker exactly where you want it so it can’t shift around while you work.
The Application Process Step-By-Step
With your sticker hinged in place, you're ready to go. The trick here is to work slowly and methodically to avoid trapping any air bubbles.
- Start Peeling: Let the sticker hang down, held by the tape hinge. Begin to slowly peel the white backing paper away from the top, pulling it downwards.
- Smooth and Squeegee: As you peel the backing off with one hand, use your other hand and the squeegee to smooth the sticker onto the wall. Always work from the centre outwards, using firm, overlapping strokes to push the air out.
- Continue Downwards: Keep going with this peel-and-smooth motion, working in small sections until the backing paper is completely gone and the sticker is fully on the wall.
This simple flowchart breaks down the crucial prep work before you even start sticking.
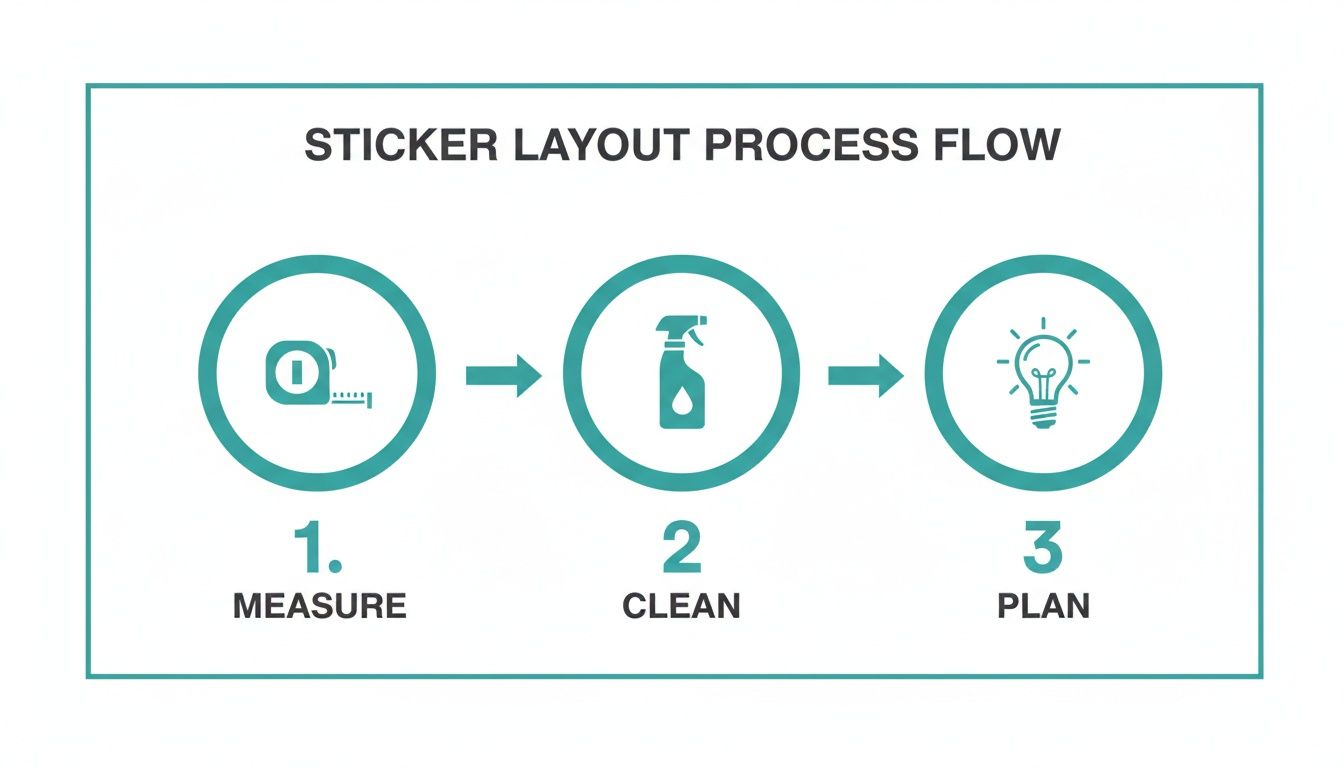
It’s a great reminder that getting the preparation right is half the battle won.
The Final Reveal
Now that the sticker is on the wall, give it one last good rub-down with the squeegee. Make sure every single part of the design has made solid contact with the paint. And now for the most satisfying step of all.
Start at a top corner and begin to slowly peel the clear transfer tape away from the wall. The trick is to pull it back on itself at a really sharp angle – almost 180 degrees flat against the wall – not straight out. This technique encourages the vinyl to stay put. If any part of the sticker tries to lift off with the tape, just smooth it back down, give that spot another firm rub, and then continue peeling.
Once the tape is off, you’re done! Step back and admire your work. For an even more in-depth look at the process, check out our comprehensive guide on how to apply wall stickers, which is packed with extra tips.
Keeping Your Wall Stickers Looking Fresh (And Removing Them When You're Ready)
So, the new wall stickers are up, and the room looks amazing. It's been transformed into a space that’s full of personality. But how do you keep it looking that good? And what happens when the dinosaur phase inevitably gives way to a full-blown obsession with astronauts?
Luckily, this is where high-quality vinyl decals really shine. They're incredibly easy to look after, and just as easy to remove, which is exactly what you need in a kid's room that’s always changing.
One of the best things about premium vinyl is how little looking after it needs. Life with kids gets messy, but your new wall art won't add to the cleaning list. You can forget about special chemicals or heavy-duty scrubbing that might harm the design or the paint underneath.
A Quick Wipe-Down Is All You Need
Keeping your wall stickers childrens room decor looking brand new is honestly no trouble at all. A bit of gentle care is all it takes to keep the colours bright and the edges stuck fast for years. Dust and daily grime can make them look a bit dull, but a quick wipe brings them right back to life.
For a routine clean, just follow these two simple steps:
- Grab a soft, microfibre cloth and make it slightly damp with plain water. You don't want it soaking, just moist enough to grab any dust.
- Gently wipe over the sticker's surface. Make sure you don't use any harsh cleaning sprays, abrasive pads, or too much pressure, as this could lift the edges or scratch the vinyl.
And that’s it. That simple little trick is all you need to handle fingerprints, dust, and the odd grubby mark. It just goes to show that brilliant decor doesn’t have to be a chore to maintain.
Time for a Change? No-Fuss, Damage-Free Removal
The real magic of wall stickers is their flexibility. When your little one decides they’re ready for a new theme, or if you're moving house, you can peel them off without leaving a single trace. Your walls will look as good as new. This makes them absolutely perfect for renters who need to keep the paintwork pristine.
The secret weapon for a clean removal is a bit of heat. A hairdryer on a low setting provides just enough warmth to soften the adhesive, making it easy to peel away from the wall. This simple trick is what stops you from accidentally pulling off paint or leaving behind that stubborn, sticky gunk that’s a pain to clean.
The key to a successful removal is patience. Softening the adhesive properly and peeling slowly at a sharp angle ensures the sticker comes away cleanly, protecting the surface underneath.
Here’s a step-by-step guide to getting your decals off the wall without any drama:
- Warm It Up: Set your hairdryer to a low or medium heat. Hold it about 15-20 centimetres from the sticker’s edge and warm the vinyl for about 30 seconds, moving it gently back and forth.
- Lift a Corner: Once the sticker feels warm, use your fingernail or a plastic scraper (like an old credit card) to carefully lift a corner.
- Peel Slowly and Steadily: Gently pull the sticker away from the wall. The best way to do this is to pull it back on itself at a 180-degree angle, keeping it almost flat against the wall as you go. Don't just yank it towards you!
- Add More Heat if Needed: If you feel any resistance or the sticker starts to tear, just stop and give that section another quick blast of heat before you carry on peeling.
This patient approach guarantees a clean removal every time, leaving your walls ready for the next big creative idea. For a more in-depth look, we’ve got a guide that explains in full how to remove wall stickers without leaving a mark.
Why Wall Stickers Are a Smart and Stylish Choice
When you’re decorating a child’s room, it’s always a balancing act. You want something creative and fun, but it also has to be practical. Wall stickers manage to tick every single one of those boxes, which is why they’ve become such a go-to for families across the UK. They’re so much more than just a bit of decoration; they’re a brilliant way to build a world of imagination right there on the walls.
The real magic of using wall stickers in a child's room is just how adaptable they are. They give you the freedom to create a vibrant, personal space that can change as quickly as your little one’s latest obsession. One year it’s all about dinosaurs, the next it’s a journey to outer space. With stickers, you can make that switch in a single afternoon, without even thinking about picking up a paintbrush.
The Modern Decor Solution
This isn't just a fleeting trend; it’s a genuine shift in how we approach home decor. As parents look for more flexible, affordable, and stylish ways to decorate, the wall sticker market has grown at an incredible pace. It’s a clear signal that we’re moving towards smarter, less permanent ways to create inspiring spaces for our kids.
The numbers really back this up. The wall stickers segment is set to grow faster than any other part of the wall décor market, with a projected growth rate of 23.4% from 2025 to 2032. This boom is all down to how affordable, simple, and versatile they are, cementing them as a top choice for families. If you're curious, you can discover more insights about these market trends to see just how popular they’ve become.
Wall stickers give you the creative freedom of a designer but with the budget and ease of a simple weekend project. They let you respond to your child's personality, crafting a room that truly feels like their own special haven.
It’s the perfect blend of style and practicality—a solution that looks stunning while fitting into the realities of family life.
Your Creative Journey Starts Here
From whimsical patterns and educational maps to personalised name art, the possibilities are pretty much endless. You can design a room that not only looks fantastic but also nurtures your child's interests and sparks their creativity. It’s all about making their personal space a reflection of who they are right now.
Of course, while wall stickers offer amazing flexibility, you can also mix and match with other brilliant, eco-friendly options. Things like recycled paper art wall prints can add a different kind of visual interest and tie into a more sustainable design.
At the end of the day, you’re not just sticking things on a wall; you’re setting the stage for bedtime stories, imaginative play, and countless happy memories. So, dive in, explore the creative options, and start putting together a room that your child will absolutely adore.
Frequently Asked Questions
Even after you've picked the perfect theme and measured your space, a few questions might still pop into your head. That's completely normal! Here are some straightforward answers to the queries we get asked most often about using wall stickers in a childrens room, to help you feel totally confident with your choice.
Are Wall Stickers Safe For A Nursery Or Child's Room?
Yes, absolutely. High-quality wall stickers are made from non-toxic vinyl, which means they’re free from nasty chemicals like phthalates. This makes them a perfectly safe choice for nurseries and kids’ bedrooms. Just be sure to buy from a reputable UK supplier that is transparent about using child-safe materials.
As an extra precaution, make sure the stickers are pressed firmly onto the wall. For little ones, it’s always a good idea to place them out of immediate reach of tiny, curious hands that might be tempted to peel them off.
Will Wall Stickers Damage My Walls When I Remove Them?
This is a big one, but you can relax. When you take them down correctly, good quality vinyl stickers shouldn't damage your paintwork or leave any sticky residue behind. That's what makes them such a brilliant, stress-free option for renters or anyone who loves changing things up.
The trick is to peel them off slowly and carefully. If a sticker puts up a bit of a fight, a quick blast with a hairdryer on a low heat setting will soften the adhesive. This makes it peel away cleanly, with no fuss at all.
Think of the hairdryer as a key, unlocking the adhesive from the wall. A little warmth and patience are all you need for a clean break, leaving your paintwork completely untouched and ready for its next chapter.
Can I Apply Wall Stickers To Any Surface?
For the best results, wall stickers need a smooth, clean, and dry surface to grip onto, like a standard painted wall. They can, however, struggle to get a proper hold on certain textures and finishes.
You'll want to be a bit careful with surfaces like these:
- Highly textured walls: Things like stucco, "popcorn" ceilings, or very rough plaster just don’t give the sticker enough flat surface to bond with.
- Porous materials: Unsealed brick or concrete can be too absorbent for the adhesive to work its magic.
- Specialty paints: Some modern paints containing stain-resistant, Teflon, or "washable" additives are designed to repel things—and that can include your sticker's adhesive.
If you’re ever unsure, the best bet is to do a quick patch test. Just snip a tiny, inconspicuous piece of the sticker and try it out in a hidden spot. It’s a simple check that will tell you if your wall is ready for its new design.
At Quote My Wall, we’re passionate about making beautiful, personalised decor easy for everyone. Our premium, non-toxic vinyl stickers are designed to be safe, durable, and a breeze to apply, helping you create a magical space for your child. Explore our huge range of designs at https://www.quotemywall.co.uk and start your room transformation today.