

Wall decals for children's rooms: A Mess-Free Decorating Guide
Let’s be honest, staring at the blank walls of your child's room can feel a bit daunting. You want to create a space that’s magical and full of personality, but the thought of committing to paint or wrestling with wallpaper is enough to put anyone off. This is where wall decals come in. They are a brilliant way to bring a room to life—quickly, affordably, and with a surprisingly durable finish.
It’s the simple, stress-free route to a complete room transformation in just a few minutes.
Why Wall Decals Are a Parent's Best Friend
Decorating for kids is a unique challenge. You’re trying to build a world that captures their latest obsession, but you know all too well that today's dinosaur fanatic could be tomorrow's aspiring astronaut. It’s this constant change that makes wall decals such a fantastic choice. They offer a level of flexibility that traditional decorating methods just can't compete with.
You can forget the paint fumes, the fiddly masking tape, and the cost of hiring a professional. With high-quality vinyl decals, you have the creative control to overhaul a room in a single afternoon. From sweet, whimsical animals for a nursery to cool, geometric shapes for a teen’s den, these designs adapt as your child grows. Room updates become a fun project, not a weekend-consuming chore.
A Smart Alternative to Permanent Decor
The appeal of wall decals isn’t just about looks; it's deeply practical. For renters, they're a dream come true, as they can be removed without a trace, meaning you won’t have to worry about your security deposit. It’s also worth looking into the wider market for items like wall stickers to see the sheer variety of options available.
Even if you own your home, decals give you the freedom to experiment without the fear of making a permanent, expensive mistake. Want to try out a bold theme or a new colour palette? Go for it. If it doesn’t work, you can simply peel it off and start again.
The real beauty of wall decals is their ability to make a big impact with minimal effort. They empower parents to create a custom, high-end look without needing any special skills or tools, turning a plain wall into a feature piece instantly.
To see at a glance how vinyl wall decals stack up against painting and wallpapering for your child's room, check out this quick comparison.
Wall Decals vs Traditional Decor Quick Comparison
| Feature | Vinyl Wall Decals | Painting | Wallpaper |
|---|---|---|---|
| Cost | Low to moderate | Moderate (paint, brushes, rollers) | High (paper, paste, tools) |
| Installation | DIY-friendly, quick (minutes to hours) | Time-consuming, messy, requires prep | Difficult, often needs a professional |
| Permanence | Removable, damage-free | Semi-permanent, requires repainting | Difficult and messy to remove |
| Variety | Virtually limitless designs and custom options | Limited by skill and paint colours | Wide variety but less customisable |
| Renter-Friendly | Yes, almost always | No, requires landlord permission | No, typically forbidden |
As you can see, for flexibility, cost, and ease of use, decals are often the clear winner for a child’s ever-changing world.
A Growing Trend in the UK
This decorating approach is far more than a passing fad; it’s a genuine shift in how we think about children's interiors. Here in the UK, the market for children's wall decals has seen consistent growth as more families look for creative and adaptable decor.
In fact, UK sales have climbed by an impressive 15% annually in recent years, largely thanks to the boom in online shopping. This trend fits a wider pattern, where children's room decoration now fuels 35% of the demand in some regional wall sticker markets. It’s a clear sign of just how popular they are with young families.
This growth highlights a new mindset among parents—one that prioritises ease and adaptability. It’s no longer about making permanent choices but about creating a dynamic, evolving space that truly reflects a child's personality, all without the cost and headache of traditional decorating.
Choosing Decals That Spark Joy and Last

Choosing the right wall decals for children's rooms is about more than just picking a pretty picture. The real goal is to find something that your child absolutely loves, but that also holds up over time and feels like a natural part of your home. It’s that sweet spot where joy meets quality.
This is something we're seeing more and more of in the UK, where personalising a child's space has become a huge trend. In fact, children's bedrooms are the most popular spot for decals, making up 45% of sales, with playrooms close behind at 25%. It’s a smart move, especially for the 19% of UK households that rent. Decals offer a splash of personality without the permanence of paint, potentially cutting redecorating costs by 50-70% when it’s time to move. You can dig deeper into these trends on the rise of kids' wall stickers.
Prioritise Material Quality and Safety
First things first, let’s talk materials. Not all vinyl is the same, and when it comes to a kid's room, quality and safety aren't negotiable. You'll want to look for decals made from high-quality, non-toxic vinyl that’s free from nasty chemicals like phthalates.
Good vinyl is also far more durable. It resists tearing and fading much better than cheaper options, meaning the design will stay looking vibrant for years, rather than peeling at the corners after a few months.
Another little detail I always recommend looking for is a matte finish. This helps cut down on glare from windows and lamps, giving the decal a much more premium, ‘painted-on’ look that blends seamlessly into the wall.
When you choose a high-grade vinyl decal, you're not just buying a sticker. You're investing in a piece of decor that is safe for your child's environment, will last through their ever-changing phases, and looks like it was always part of the room's design.
Match the Theme to Their Personality
Now for the fun part: diving into your child’s world! The best themes are the ones that connect with what they're passionate about right now, transforming their bedroom into their own personal haven.
- For the Nature Lover: Think about creating a calming woodland scene with friendly animals, a sprawling safari adventure, or a magical forest tree.
- For the Future Scientist: Why not spark their curiosity with a solar system decal or a wall teeming with dinosaurs from a prehistoric land?
- For the Dreamer: You can turn their room into an enchanted kingdom with delicate fairies, majestic castles, unicorns, or a brilliant rainbow.
A great tip is to get them involved. Pick out a few options you love and let them have the final say. It gives them a sense of ownership and guarantees you’ll end up with a design they truly adore.
Harmonise the Colour Palette
While the theme is for your little one, the colour scheme needs to feel right for the room as a whole. A bright, colourful decal can look amazing, but it works best when it complements the existing wall colour, furniture, and bedding.
Here’s a simple trick I use: pick one or two colours from the decal and echo them somewhere else in the room. This could be through cushions, a rug, a lampshade, or even storage boxes. For instance, if you’ve chosen a jungle decal with deep greens and a pop of orange, adding a green throw and an orange toy basket will tie everything together beautifully.
This simple step makes the wall decals for children's rooms feel like a deliberate part of the design, not just an afterthought. If you're struggling to find the perfect match, you can always explore personalised wall stickers in the UK to get the exact colours you need.
Get the Scale and Placement Right
The size of your decal is just as important as the design itself. A small sticker can get lost on a big, empty wall, while a huge one can completely overwhelm a small room. It's all about balance.
Before you commit, grab a tape measure and some masking tape. Mark out the decal’s dimensions on the wall where you plan to put it. This little bit of prep work lets you see exactly how it will look and feel in the space.
Think about how it will work with the furniture, too. A tall tree decal might look perfect "growing" up from behind a cot, while a spray of stars could look magical scattered above a headboard. Planning the layout beforehand ensures your new decal has the biggest and best impact.
Prepping Your Space for a Flawless Finish
The real secret to making wall decals for children's rooms look like they were professionally applied isn’t about having a perfectly steady hand—it’s all in the prep work. Honestly, taking a bit of time to get your space ready is the single most important thing you can do for a smooth, bubble-free finish that lasts.
Think of it as your pre-flight checklist for a stress-free application. It’s the groundwork that stops peeling, bubbling, and that sinking feeling of placement regret. Get this right, and you ensure the decal's adhesive can form a strong bond with the surface, which is absolutely crucial for longevity. Skipping these steps is almost always the reason decals fail to stick properly or start lifting at the edges.
Clean Your Walls the Right Way
Before you even think about peeling the backing off your new decal, that wall needs to be spotless. You might not see it, but over time, walls collect a fine layer of dust, grime, and oils. This invisible layer acts as a barrier, preventing the decal's adhesive from getting a proper grip.
All you need to get it clean is a soft sponge or cloth and a simple mixture of mild soap and water. Gently wipe down the entire area where the decal will go, then go over it again with a cloth dampened with just water to remove any soap residue.
What you don't use is just as important as what you do.
- Avoid harsh chemical cleaners: Many household sprays contain chemicals, oils, or silicones that leave behind a slick film. That film is the enemy of good adhesion.
- Steer clear of all-in-one wipes: These often contain moisturisers or lotions that will interfere with the vinyl's ability to stick.
After cleaning, patience is your best friend. The wall must be 100% dry before you move on. I always recommend waiting at least 24 hours to be certain all moisture has evaporated, especially if your room is a bit humid. Applying a decal to a damp wall is a recipe for failure.
Plan Your Layout with This Simple Trick
Have you ever stuck something to a wall, stepped back, and realised it’s wonky or off-centre? We’ve all been there. To avoid this classic pitfall, I use a simple trick with masking tape to map everything out first. It lets you see exactly how it will look before you commit.
Just place your decal on the wall—without removing the backing paper—and temporarily stick it in place with a few pieces of low-tack masking tape. This lets you stand back, look at it from different angles, and shuffle it around until you're completely happy. You can grab a spirit level or a measuring tape to make sure it's perfect.
This quick step takes just a few minutes but can save you a world of frustration. It gives you the confidence to position your decal exactly where you want it, making sure it looks balanced with the room's furniture and decor.
Understanding Different Wall Surfaces
Not all walls are created equal, and the texture and paint finish play a huge role in how well your decal will adhere. Most modern UK homes have plasterboard walls, but the paint on top can make all the difference.
Smooth, Flat Surfaces These are the dream canvas for wall decals. If your walls have a standard matt or satin/eggshell emulsion, you’re in luck. The vinyl will bond beautifully and create that seamless "painted-on" look everyone wants. The only catch? Make sure the paint has had enough time to cure. Freshly painted walls need at least two to three weeks to fully cure and "outgas" before you can safely apply a decal. Putting one on any sooner can cause bubbling or even damage the paint when you eventually remove it.
Textured Walls Lightly textured walls, like those with an orange peel finish, can be a bit trickier. While many high-quality vinyl decals will still work, the uneven surface can create tiny air channels that weaken the bond. For these walls, it’s extra important to firmly press the decal into every nook and cranny during application, paying special attention to the edges to get a secure seal.
Paints to Be Wary Of From experience, I can tell you that certain paints and vinyl just don't mix. Be cautious if your walls are painted with:
- Washable or "scrubbable" paints: These often contain additives like Teflon or silicone to repel stains, but they’ll also repel the decal’s adhesive.
- Low-VOC or Zero-VOC paints: While much better for air quality, some of these eco-friendly formulas can struggle to bond with vinyl.
If you have any doubts at all, do a patch test. Many decal sellers include a small test piece for this very reason. Just stick it in an inconspicuous area for a day or two to see how it holds. This tiny check gives you total peace of mind before you apply your main design.
Getting Your Decals on the Wall (Without the Stress)
Right, your walls are clean, dry, and you're ready for the exciting bit. This is where all that planning pays off and you finally see your vision come to life. If you've ever had a frustrating experience with peeling corners or confusing instructions, forget it. Putting up wall decals for children's rooms can be genuinely satisfying when you know the proper way to do it.
Whether you’re working with a single, small character or a massive, intricate mural, the fundamental approach is the same. It just takes a little patience and a methodical touch to get a smooth, professional-looking finish that will last for years.
This simple diagram breaks down the essential prep work into three key actions.
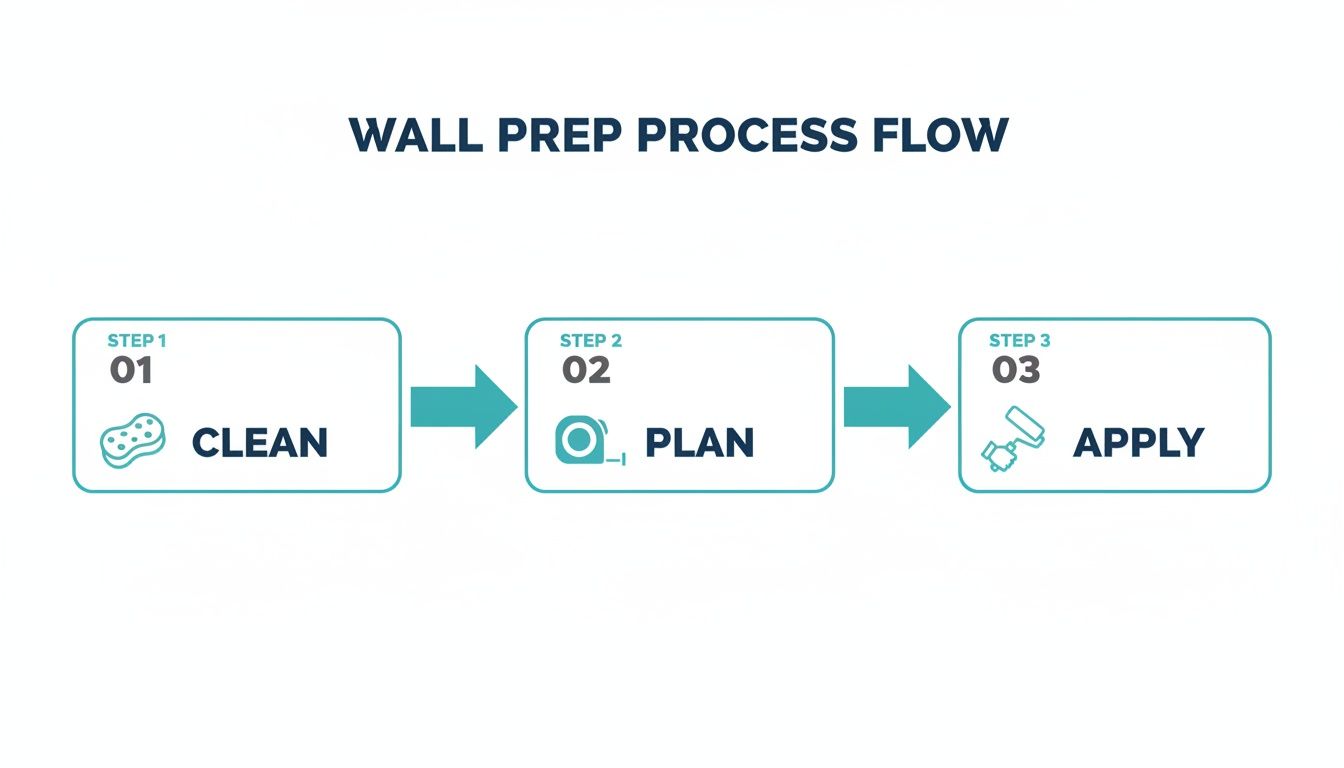
Moving from cleaning to planning and finally applying shows how each step sets you up for success in the next, leading to a flawless result.
Mastering the Hinge Method for Perfect Placement
For any decal bigger than your hand, the "hinge method" is an absolute game-changer. I swear by it. It completely removes the risk of the decal sticking to itself, going on wonky, or trapping those massive, frustrating air bubbles. It gives you total control.
Here’s the breakdown:
- Position It: Find the perfect spot (using the masking tape guides you set up earlier) and run a long strip of masking tape across the horizontal centre of the decal. This piece of tape is your "hinge."
- Peel the Top: Carefully peel the backing paper away from the top section of the decal, right down to your tape hinge. Grab some scissors and snip off that exposed bit of backing paper.
- Apply the Top: Starting from the centre hinge and working your way outwards, use a squeegee or even a credit card to smooth the top half of the decal onto the wall. Use overlapping strokes to push all the air out.
Once the top section is firmly on, you can remove the hinge tape. Now just peel away the rest of the backing paper and smooth down the bottom half using the exact same technique—always working from the middle outwards. For a more detailed look at this process, you can learn more about how to apply wall stickers in our dedicated guide.
Squeegee Skills for a Bubble-Free Bond
Your squeegee is your best mate for achieving that perfect, painted-on look. The trick is to apply firm, even pressure at a 45-degree angle. That angle is the key; it properly pushes air out from underneath the vinyl, rather than just shifting it around.
Always start from the centre of the decal and work towards the edges. Don’t be shy about going over the same spot a couple of times to make sure you have a really strong bond, especially if your walls have a slight texture. That pressure helps the adhesive mould into all the tiny little grooves in the paint.
Think of it like spreading butter on toast—you're aiming for smooth, consistent coverage from one edge to the other without any gaps. This is what stops peeling and bubbling down the line.
The Final Step: Peeling the Transfer Tape
After you’ve given the entire decal a thorough going-over with the squeegee, it’s time for the big reveal. The transfer tape, that semi-see-through layer on top, needs to come off carefully. You don't want it pulling the decal off the wall with it.
Here’s the secret: peel it back on itself at a sharp 180-degree angle. Keep it almost flat against the wall as you pull. If you yank it away from the wall at a 90-degree angle, you're practically asking for the delicate edges of your decal to lift.
Go slow and watch the vinyl as you peel. If any little bit starts to lift with the tape, just stop. Lay the tape back down, give that specific spot another firm rub with your finger or squeegee, and then carry on peeling slowly.
Quick Fixes for Common Issues
Even the most careful person might end up with a small air bubble here or there. Don't panic! It’s an incredibly easy fix.
Just take a very fine pin or a needle and make a tiny hole right in the centre of the bubble. Then, use your finger to gently push the trapped air out through the hole. The vinyl will smooth down perfectly, and you'll never even know the pinprick was there. It's a simple little trick that ensures a perfect finish every single time.
Keeping Decals Fresh and Removing Them Damage-Free
One of the best things about using wall decals for children's rooms is that they aren't forever. You get the freedom to update the space as your child grows and their interests change, but that flexibility naturally brings up questions about care and, eventually, removal. The good news is, keeping them looking great is simple, and taking them down is even easier when you know the trick.
For day-to-day upkeep, a soft, dry microfibre cloth is your best friend. A gentle wipe over the decals is all it takes to keep dust from building up, and it won't scratch the vinyl or mess with the adhesive.
Simple Cleaning for Sticky Fingers
When you’re dealing with more than just dust—think sticky fingerprints or the occasional crayon mark—you’ll need a slightly different tactic. Whatever you do, steer clear of harsh chemical sprays or abrasive sponges. They’re a fast track to damaging both the decal and the paint underneath.
Instead, here’s a gentler method that works a treat:
- Dampen a soft cloth with a tiny bit of mild, soapy water.
- Gently dab the marked area. Don't scrub.
- Wipe away any soap residue with a second cloth dampened with just water.
- Pat the spot dry with a clean, soft towel.
This light touch is usually all it takes to get your decals looking brand new again, preserving their colour and stick for the long haul.
The Secret to Damage-Free Removal
When it’s time for a change—maybe that farm animal phase has given way to a deep fascination with planets—you can remove the old decals without leaving a trace. You don’t need to worry about sticky residue or peeled paint, especially if you bring a little heat into the picture.
Your most valuable tool here is a standard household hairdryer. The gentle warmth softens the vinyl's adhesive, making it pliable and letting it peel away cleanly from the wall. This simple technique is the key to leaving your walls pristine and ready for their next look.
Using a bit of heat is the non-negotiable step for a clean removal. It loosens the adhesive's bond just enough for the decal to release smoothly, which is precisely what protects your paintwork and prevents any stubborn, sticky patches from being left behind.
Your Step-by-Step Removal Guide
Ready for a room refresh? Just follow these steps for a flawless removal every time.
- Warm It Up: Set your hairdryer to a low or medium heat. Hold it about 15-20 centimetres from the edge of the decal and wave it back and forth for 30-45 seconds. You just want to gently warm the vinyl.
- Lift an Edge: Once the edge feels warm, use your fingernail or a plastic scraper to carefully lift a corner. The warmth should make this surprisingly easy.
- Peel Slowly and Steadily: Pull the decal away from the wall at a sharp, almost 180-degree angle. Keeping the angle low helps stop the paint from coming with it. If you feel any resistance, just hit that spot with a bit more heat before you continue peeling.
This straightforward method is a huge relief for renters or anyone who just loves to switch up their decor often. For a deeper dive, check out our complete guide on how to remove wall stickers without any drama.
Creative Ways to Use Decals Beyond the Walls
While they’re called wall decals, don’t let the name fool you. These versatile little decorations are far too good to be stuck on just four walls. When you start thinking outside the box, you can turn a simple decal into a storytelling tool that pulls the whole room together into one cohesive, imaginative space.
The real magic happens when you stop seeing them as stickers and start seeing them as an extension of your child's world. Placing them in unexpected spots adds layers of personality and charm, making the whole design feel much more complete and immersive.
Creating Unique Themed Zones
One of my favourite ways to use decals is to carve out specific zones in a room. This is a brilliant trick for giving the space a bit of structure, signalling different areas for different activities, whether it's for quiet time or full-on imaginative play.
You could, for instance, create an adorable reading nook. Just place a large, whimsical tree decal in a corner, with its branches spreading out over a comfy beanbag or some floor cushions. Add a few floating shelves for books and maybe some friendly animal decals peeking out from behind them. It’s no longer just a corner; it's suddenly an enchanted forest library.
In the same way, a cluster of star and planet decals around a toy box can transform it into "mission control" for epic space adventures. It’s a simple visual cue that can spark hours of play.
Customising Furniture and Accessories
Plain furniture is basically a blank canvas. Applying decals to dressers, toy boxes, or even a headboard is a fantastic way to tie the room's theme together without having to paint a thing.
A simple chest of drawers can become a custom piece of art. Imagine adding delicate floral decals to each drawer for a shabby chic look, or fun dinosaur footprints trailing up the side for a prehistoric theme. This simple trick makes furniture feel bespoke without the cost.
This is especially great for upcycling older items or giving that standard flat-pack furniture a unique, high-end feel. It stops the furniture from just being in the room and makes it a real part of the story.
Layering Decals for a Mural Effect
Who says you have to stick to one design? Layering different decal sets is how you can build a truly one-of-a-kind mural, giving you total creative freedom.
- Start with a background: Begin with larger, simpler shapes to set the scene. Think soft clouds, rolling green hills, or gentle blue waves.
- Add the main characters: Next, bring in your main elements. This could be anything from safari animals and whimsical fairytale characters to cool cars and rockets.
- Finish with the details: Finally, scatter smaller accent decals—like stars, flowers, or little birds—to fill in the gaps and give the scene a sense of depth and movement.
This approach creates a rich, dynamic scene that feels so much more intricate and personal than a single decal ever could. You could even take it a step further and work with a company that creates custom decals from your child's artwork, making the space uniquely theirs.
Got Questions? Let's Talk Wall Decals
It’s completely normal to have a few questions buzzing around before you dive into decorating. After all, you want to get it just right for your little one's space. So, let’s clear up some of the most common queries I hear from parents about using wall decals for children's rooms.
Are They Actually Safe for Nurseries and Kids' Rooms?
Yes, absolutely—as long as you buy from a trusted source. Good-quality decals are made from non-toxic, PVC-free vinyl and printed with water-based, odourless inks. This means they're perfectly safe to have around babies and children. Just make sure to double-check the product description for a "non-toxic" confirmation before you buy.
How Long Will They Really Last?
You’d be surprised at their staying power! A well-made vinyl decal, properly applied to a clean wall, can easily last for five years or more inside. They’re designed to resist peeling, fading, or cracking, so they'll look great for years. It all comes down to the quality of the vinyl and making sure your wall is prepped and ready.
People often think decals are just a temporary fix, but that's not the whole story. They're actually a durable decorating choice that you remove when you want a new look, not because they’ve fallen apart.
Will They Wreck My Walls When I Take Them Off?
This is the number one worry, especially if you're renting! The good news is, in most cases, the answer is no. The trick is to remove them correctly. A little bit of gentle heat from a hairdryer will soften the adhesive, letting you peel the decal away cleanly without taking the paint with it or leaving a sticky mess behind.
Can I Move Them Around or Use Them Again?
For the most part, standard vinyl decals are a one-and-done deal. Once they're off the wall, the adhesive won't be as effective, and the vinyl itself can stretch or tear if you try to reapply it.
However, if you love the idea of changing things up, look for decals made from fabric-based materials. These are specifically designed to be reusable and repositionable—just be sure to check the product details to see if that's a feature.
Ready to bring some magic to your child’s room? At Quote My Wall, we create high-quality, non-toxic vinyl decals that are perfect for nurseries, bedrooms, and playrooms. Come and explore our huge collection of kids' designs at our online shop.