
10 Incredible Kitchen Renovation Ideas on a Budget for 2026
Dreaming of a beautiful, modern kitchen but constrained by a tight budget? You're not alone. The heart of the home deserves a refresh, but the cost of a full-scale renovation can be daunting, often running into thousands of pounds for new cabinets, flooring, and tiling. Fortunately, achieving a high-end look doesn't require a high-end spend. This comprehensive guide is your ultimate resource for practical kitchen renovation ideas on a budget, focusing on high-impact, low-cost solutions that you can often implement yourself in a single weekend.
We move beyond generic advice to explore the transformative power of modern, durable materials like premium vinyl. You will discover how to completely change the look and feel of your space with minimal fuss and maximum effect. Forget the expense and mess of traditional methods; we'll show you how to achieve stunning results using clever, cost-effective alternatives.
This listicle provides a deep dive into 10 actionable strategies, complete with step-by-step instructions, realistic cost expectations, and maintenance tips. We'll cover everything from using furniture wraps to give dated cabinets a sleek, new lease on life, to applying peel-and-stick tile stickers that redefine your floors and splashbacks overnight. We even include landlord-friendly options perfect for renters. Prepare to be inspired to create a kitchen that is not only functional and stylish but also a true reflection of your personality, all without breaking the bank. Your dream kitchen is closer and more affordable than you think.
1. Vinyl Wall Decals and Wall Stickers for Kitchen Backsplash
A traditional tiled backsplash can be a significant expense in any kitchen renovation, often involving costly materials and professional labour. For a high-impact yet budget-friendly alternative, consider using premium vinyl wall stickers. This modern solution offers one of the most accessible kitchen renovation ideas on a budget, allowing you to mimic the look of expensive ceramic, stone, or patterned tiles for a fraction of the cost and effort.
Specialist companies like Quote My Wall have popularised high-quality, self-adhesive vinyl designed specifically to withstand the heat and moisture of a kitchen environment. These aren't simple stickers; they are durable, wipe-clean surfaces that can dramatically transform your space in just a few hours.
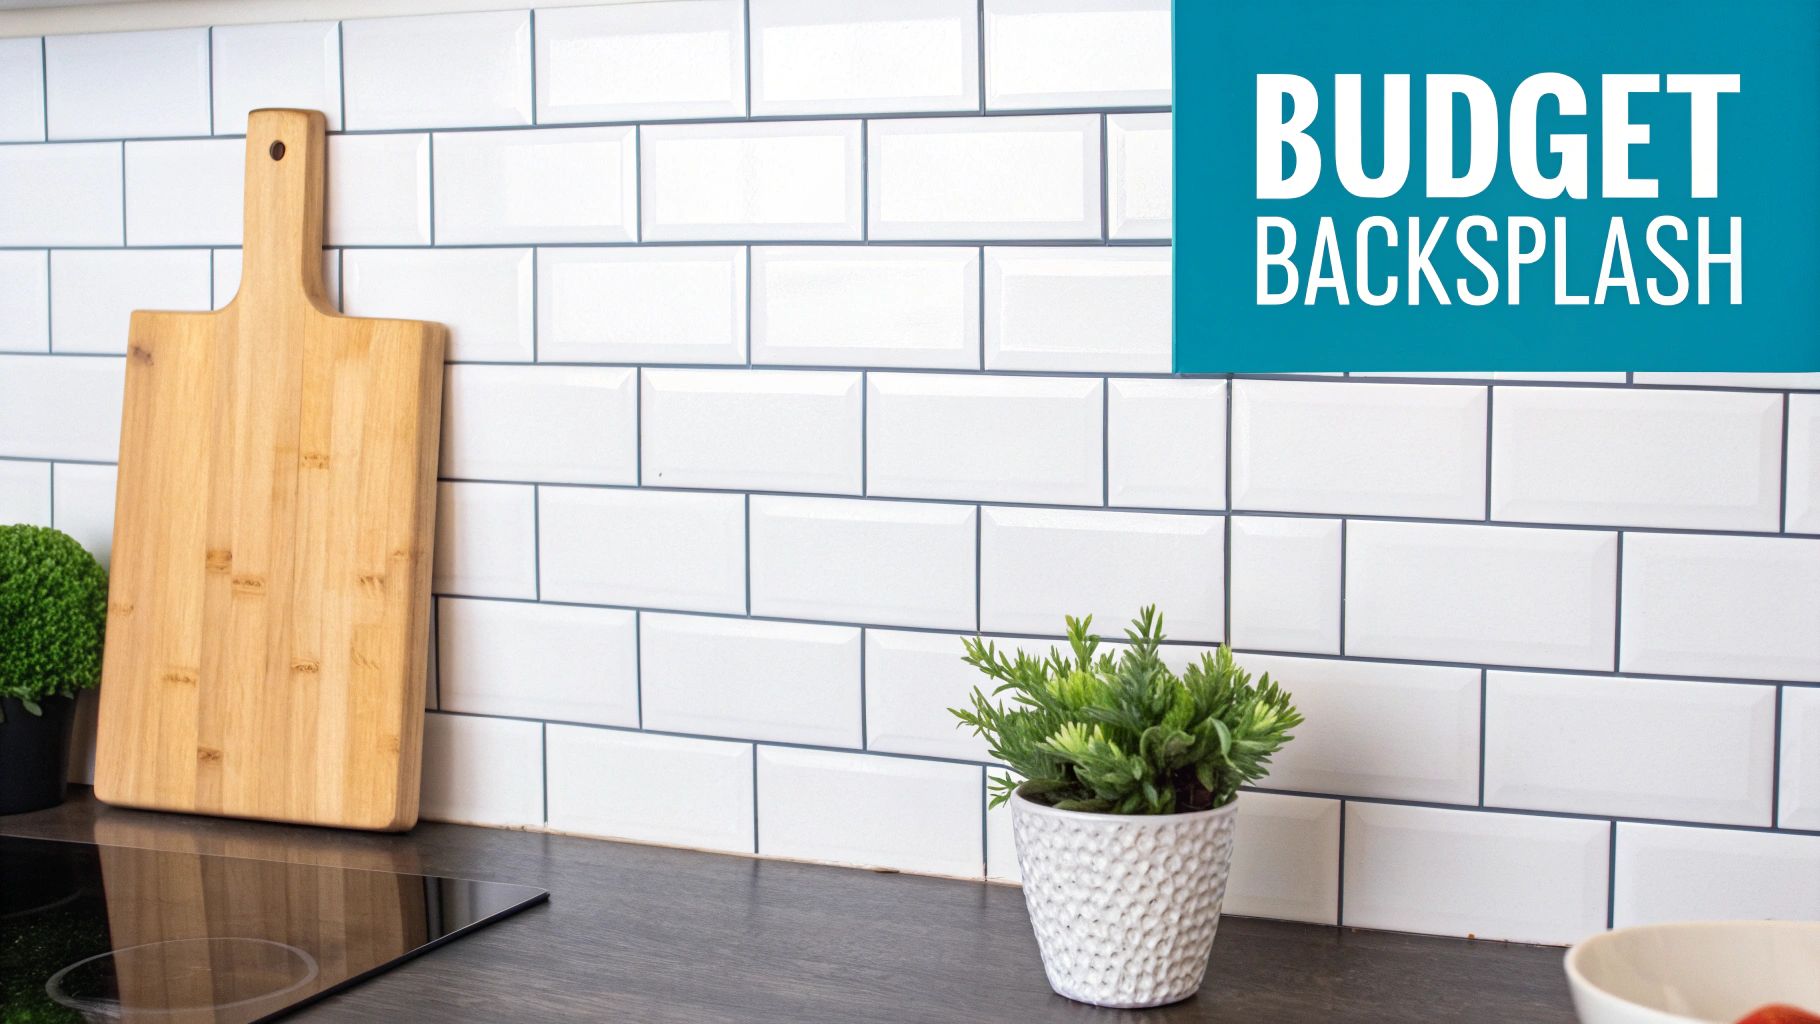
Why Choose Vinyl for Your Backsplash?
This method is particularly brilliant for renters who are forbidden from making permanent changes, as the decals can be removed without damaging the wall underneath. It's also ideal for homeowners who want a quick, trend-focused update without committing to a permanent tile choice. You could see a UK homeowner applying classic subway tile-patterned stickers for a clean, modern look, or someone with a period property using geometric Victorian-style vinyl to add character without the authentic tile price tag.
How to Apply Vinyl Backsplash Stickers
For a professional-looking finish, preparation is key. Follow these steps for a seamless application:
- Prepare the Surface: Clean your walls thoroughly with a sugar soap solution to remove any grease or grime. Allow the surface to dry completely before you begin.
- Plan Your Layout: Start your application from the centre point of the backsplash and work outwards. This ensures the pattern remains symmetrical and helps minimise air bubbles.
- Smooth as You Go: Use a plastic squeegee or a soft, dry cloth to smooth the sticker onto the wall. Apply gentle, consistent pressure to push out any trapped air.
- Test a Small Area: Before committing, apply a small test piece to an inconspicuous area to check for compatibility with your wall's paint or surface.
- Safety First: While many vinyl options are heat-resistant, it's best to avoid applying them directly behind a hob where intense, direct heat could affect the adhesive over time.
2. Vinyl Furniture Wraps for Kitchen Cabinet Transformation
Replacing entire kitchen cabinets is one of the most expensive and disruptive parts of a full kitchen overhaul. A savvy and cost-effective alternative is to use high-quality vinyl furniture wraps to completely transform their appearance. This is a standout kitchen renovation idea on a budget, allowing you to update dated or worn cabinetry with modern colours, realistic wood finishes, or custom designs without the expense of a complete replacement.
Companies like Quote My Wall offer extensive collections of premium, self-adhesive vinyl designed to adhere directly to cabinet doors and frames. These durable wraps create a seamless, professional finish, effectively giving you the look of brand-new kitchen units for a fraction of the cost. A London homeowner, for example, could cover their 1980s brown wood cabinets with a modern grey vinyl wrap, potentially saving over £3,000 compared to new cabinetry.
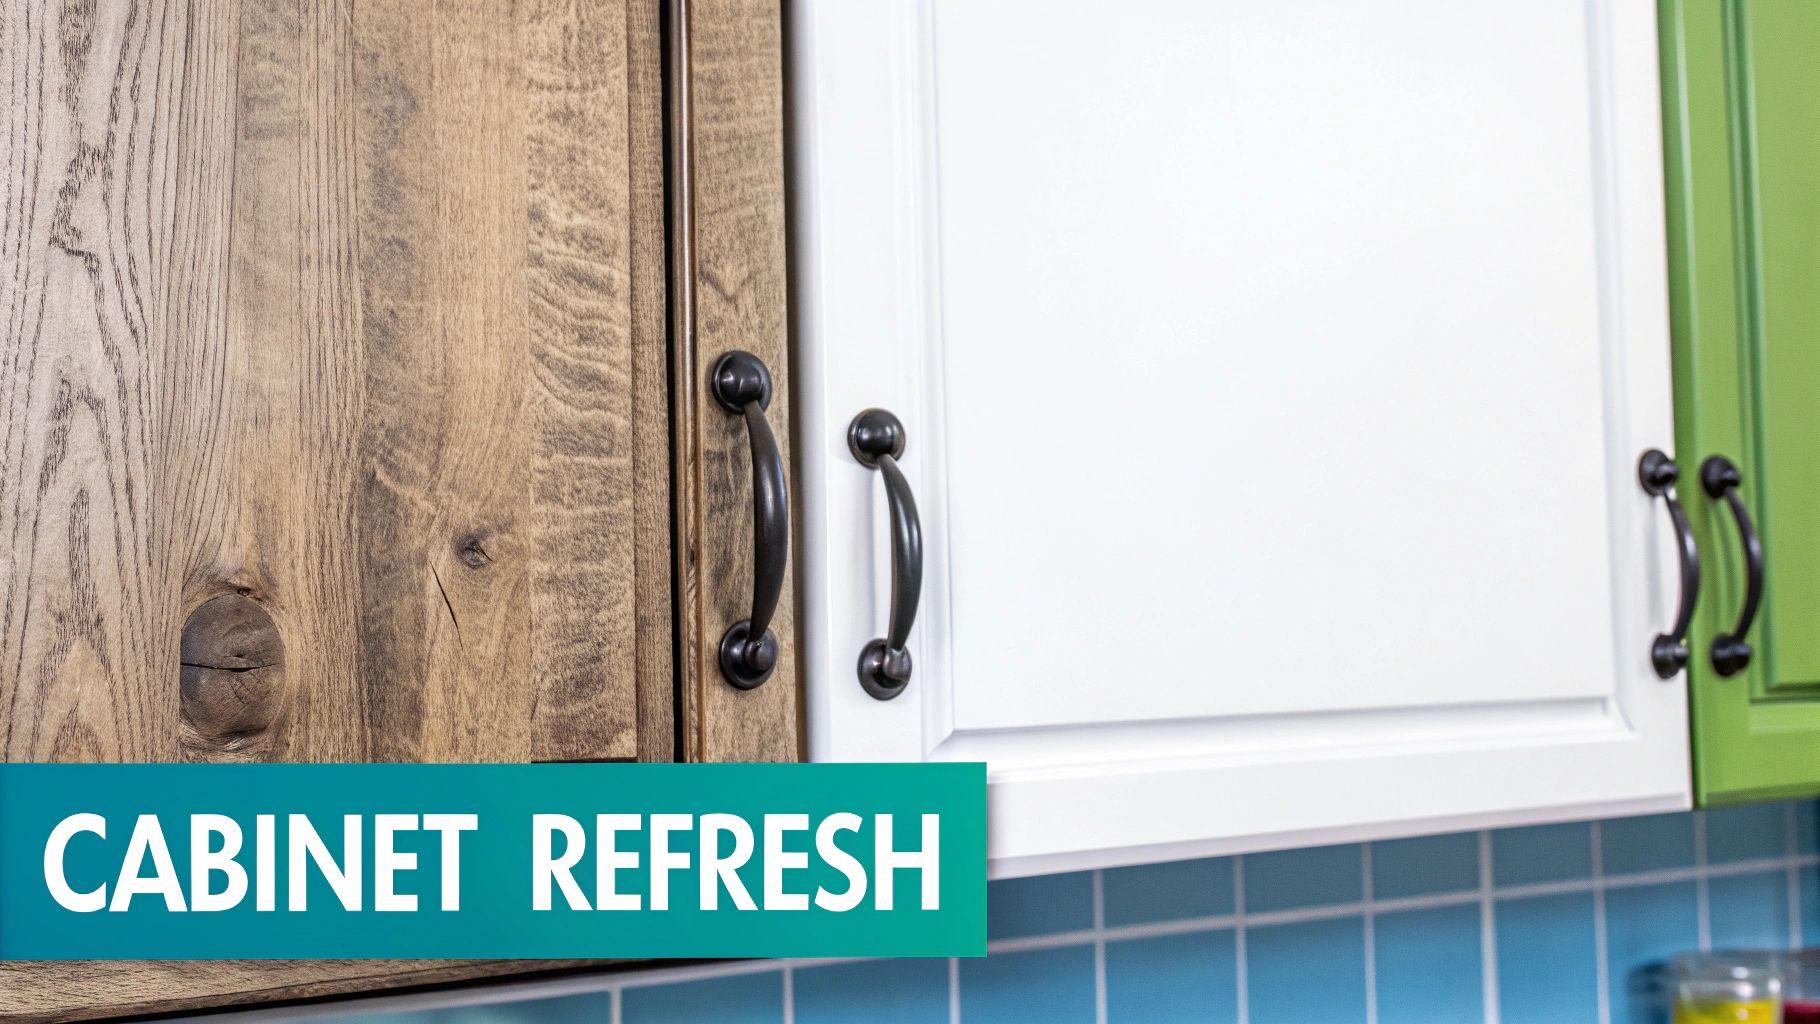
Why Choose Vinyl for Your Cabinets?
This method is perfect for homeowners wanting a major aesthetic change without the major investment. It's a sustainable choice that upcycles existing units, reducing landfill waste. Rental property owners also benefit, as they can inexpensively modernise a kitchen's appearance for new tenants. The sheer variety of finishes means you can achieve almost any look, from a contemporary white gloss kitchen to a rustic oak effect. If you're considering a more involved vinyl solution for your cabinets, you might want to explore dedicated guides on how to apply vinyl wrap cabinet doors.
How to Apply Vinyl Cabinet Wraps
Achieving a bubble-free, durable finish requires careful preparation and application. Follow these steps for the best results:
- Prepare the Surface: This is the most crucial step. Thoroughly clean and degrease all cabinet surfaces with a sugar soap solution to ensure the vinyl adheres properly. Allow them to dry completely.
- Measure and Cut: Measure each door and drawer front individually and cut your vinyl to size, leaving a small overlap to trim later for a precise fit.
- Apply Carefully: Start applying the vinyl from the top edge and work your way down, smoothing it out with a squeegee to prevent air pockets from forming.
- Handle Edges and Curves: Use a heat gun on a low setting or a hairdryer to gently warm the vinyl. This makes it more pliable and helps it conform smoothly around corners and curved edges.
- Test a Small Area: Always test the vinyl on an inconspicuous area first, like the inside of a cabinet door, to ensure it adheres well and doesn't damage the surface. You can learn more about how to upcycle kitchen cabinets with these techniques.
3. Peel-and-Stick Tile Stickers for Kitchen Flooring Updates
Replacing a kitchen floor is a major undertaking, often involving substantial disruption, labour costs, and expensive materials. For an equally dramatic transformation without the hassle or expense, peel-and-stick tile stickers offer an ingenious solution. This is one of the most effective kitchen renovation ideas on a budget because it allows you to completely change the look of your floor by applying durable, self-adhesive vinyl tiles directly over your existing surface.
Specialist companies like Quote My Wall offer premium-quality, hard-wearing tile stickers designed to endure the high traffic and daily wear of a busy kitchen. These are not flimsy decals; they are thick, often laminated, and feature a strong adhesive that creates a lasting bond with linoleum, vinyl, or even existing ceramic tiles, providing a fresh, new look in a single afternoon.
Why Choose Tile Stickers for Your Floor?
This approach is perfect for homeowners wanting a fast, modern update. A Victorian terrace kitchen, for instance, could be given an authentic feel with faux-encaustic patterned stickers, while a contemporary space could be refreshed with sleek marble-effect or concrete-style designs. It’s also a game-changer for renters, who can easily upgrade tired kitchen floors without making permanent alterations that would violate their tenancy agreement.
How to Apply Peel-and-Stick Floor Tiles
A successful application hinges on careful preparation. Follow these steps for a floor that looks professionally tiled:
- Prepare the Surface: The floor must be impeccably clean. Use a strong degreaser to remove all dirt, grease, and residue, then allow it to dry completely.
- Plan Your Layout: Start from one corner of the room and work methodically across the floor. This ensures your lines stay straight and the pattern aligns correctly.
- Smooth as You Go: As you lay each tile sticker, use a hard squeegee or a small roller to press it firmly onto the surface, pushing from the centre outwards to eliminate air bubbles.
- Allow Adhesive to Cure: For the best long-term results, avoid heavy foot traffic and mopping for at least 24 hours to allow the adhesive to fully set.
- Seal for Durability: For extra protection in high-moisture areas, consider applying a thin bead of clear waterproof sealant along the seams between stickers. You can learn more about how to cover kitchen tiles on quotemywall.co.uk.
4. Personalized and Inspirational Vinyl Stickers: Quotes, Recipes & Meal Planning
Beyond surfaces and backsplashes, another fantastic way to personalise your kitchen is by using custom vinyl lettering and decals. This approach adds character and functionality without needing a single tin of paint or any structural changes. It's one of the most personal kitchen renovation ideas on a budget, turning blank walls or cupboards into inspirational or organisational focal points.
Companies like Quote My Wall excel at creating bespoke vinyl quotes, favourite recipes, or even weekly meal planners that adhere smoothly to your walls. Imagine a beautifully scripted quote like 'The heart of the home' above a dining nook, or a practical, stylish menu board on a pantry door that you can update weekly. These stickers add a layer of warmth and personality that makes the space uniquely yours.
Why Choose Personalised Decals?
This idea is perfect for families wanting to create a welcoming, organised hub or for individuals who love to showcase their personality through their decor. A UK family might display a cherished family recipe in a stylised 'recipe card' format on a cabinet door, keeping a beloved tradition in sight. It is also an excellent renter-friendly option, as the decals are fully removable and leave no residue, allowing for complete customisation without risking your deposit.
How to Apply and Use Personalised Vinyl
To get the most out of your decorative and functional stickers, careful application is essential.
- Select the Right Spot: Position quotes at eye level on a feature wall or place meal planners in a high-traffic area like the fridge or a main cupboard door for maximum visibility and use.
- Match Your Style: Choose fonts and designs that complement your existing kitchen aesthetic. A sleek, minimalist sans-serif font will suit a modern kitchen, while a flowing script font works well in a more traditional or country-style space.
- Prepare and Apply: As with all vinyl, ensure the surface is clean and dry. Use a squeegee to apply the decal, working from the centre outwards to eliminate air bubbles for a professional finish.
- Use the Right Tools: For meal planner decals, use dry-erase markers specifically designed for vinyl surfaces to ensure they wipe clean without staining.
- Keep it Fresh: Consider updating decals seasonally. You could feature a summery quote or a list of seasonal produce to keep your kitchen decor feeling current and engaging.
5. Window Privacy Film for Kitchen Glass Doors and Cabinets
Glass-front cabinets and doors can look stylish, but they often reveal cluttered shelves, creating a visually messy kitchen. Replacing the glass or the entire unit is a costly endeavour. A far more accessible and elegant solution is applying decorative or frosted window privacy film, one of the most clever kitchen renovation ideas on a budget for instant sophistication.
This high-quality vinyl film adheres directly to the glass, obscuring the contents while allowing light to filter through, maintaining a bright and airy feel. Companies like Quote My Wall offer an extensive collection of designs, from simple frosted effects to intricate geometric patterns, allowing you to add a contemporary design element without the expense of etched glass.
Why Choose Privacy Film for Your Kitchen?
This method is perfect for homeowners who want to hide mismatched dishware or pantry items without sacrificing the open feel of glass cabinets. It’s also a fantastic, non-permanent option for renters. You could see a minimalist UK kitchen using a simple frosted film for a clean, Scandinavian-inspired look, or a family adding a bespoke film with their house name to a glass pantry door for a personalised touch.
How to Apply Window Privacy Film
A bubble-free finish comes down to careful application. Follow these steps for a professional result:
- Prepare the Surface: Clean the glass thoroughly with a vinegar and water solution or an alcohol-based cleaner to remove all grease and dust. Let it dry completely.
- Measure and Cut: Carefully measure your glass panels and cut the film to size, leaving a tiny margin if you plan to trim it in place for a perfect fit.
- Use a Wet Application: Lightly spray the glass with a mixture of water and a tiny drop of washing-up liquid. This allows you to slide the film into the perfect position before it adheres.
- Smooth From the Centre: Use a plastic squeegee to smooth the film, working from the centre outwards to push out all water and air bubbles.
- Trim the Edges: Once in position, use a sharp craft knife and a straight edge to trim any excess film for a clean, precise finish around the edges. For detailed instructions, you can learn more about how to install window privacy film on quotemywall.co.uk.
6. Removable Wallpaper and Vinyl Wall Coverings as Budget Paint Alternative
Painting kitchen walls can be time-consuming and messy, requiring significant prep work and drying time. A fantastic and increasingly popular alternative is to use premium removable wallpaper or vinyl wall coverings. This is one of the most transformative kitchen renovation ideas on a budget, offering endless possibilities for pattern, texture, and colour without the commitment or permanence of paint.
Innovators like Quote My Wall have developed a range of high-quality, self-adhesive wall coverings designed for easy application and removal. These vinyl products are perfect for creating a dramatic feature wall or covering all four walls, instantly refreshing a dated kitchen with a modern, clean, or characterful look. They are durable, often wipeable, and can be installed in a single afternoon.
Why Choose Removable Coverings Over Paint?
This method is a game-changer for renters wanting to personalise their space without losing their security deposit, as the coverings can be peeled off cleanly. It’s also ideal for homeowners who enjoy frequently changing their decor to match current trends. For instance, a country kitchen could be instantly refreshed with a rustic shiplap wood-effect covering, while a modern flat could gain a sophisticated edge with a botanical or geometric print.
How to Apply Removable Wallpaper
A smooth, bubble-free finish is achievable with careful preparation. Follow these key steps for a professional result:
- Prepare the Surface: Ensure the wall is clean, smooth, and dry. Fill and sand any holes or imperfections, as these can show through the vinyl.
- Plan Your Layout: Measure your walls carefully before ordering to minimise waste. Start applying the covering from a top corner and work your way down and across the wall.
- Smooth as You Go: Use a plastic squeegee or a soft, dry cloth to press the covering onto the wall. Work from the centre outwards to push out any air bubbles.
- Trim for a Perfect Fit: Use a sharp craft knife and a straight edge to neatly trim any excess material at the ceiling line, baseboards, and around sockets or switches.
- Allow to Settle: Give the adhesive around 24 hours to fully bond with the wall before exposing it to significant kitchen moisture or heat.
7. Vinyl Sticker Decor for Kitchen Appliances and Hardware Updates
Replacing functional but dated kitchen appliances is a major expense that can quickly derail a modest renovation budget. A creative and affordable alternative is to use premium vinyl wraps and stickers to give your fridge, dishwasher, or oven a brand-new look. This approach is one of the most transformative kitchen renovation ideas on a budget, allowing you to modernise appliances or coordinate hardware finishes without the cost of replacement.
Companies like Quote My Wall offer custom vinyl designs specifically for appliances, which are durable enough to handle the daily wear and tear of a busy kitchen. These high-quality wraps can introduce colour, pattern, or even a sleek stainless steel effect, instantly updating the entire aesthetic of your room for minimal outlay.
Why Choose Vinyl for Appliances and Hardware?
This solution is ideal for anyone looking to achieve a high-end, cohesive look without investing in new white goods. For instance, a UK family could wrap their fridge in a custom chalkboard vinyl, creating a fun and functional memo board. In a contemporary kitchen, small metallic stickers could be used to update old-fashioned brass or chrome cabinet handles to a more modern brushed gold or matte black finish, a popular trend seen in many high-street kitchen showrooms. This method is also excellent for renters wanting to personalise their space temporarily.
How to Apply Vinyl to Appliances and Hardware
A careful application is crucial for a bubble-free, professional finish. Follow these steps for the best results:
- Prepare the Surface: Thoroughly clean the appliance or hardware with an appropriate cleaner to remove all grease and dust. Ensure the surface is completely dry.
- Apply to Cool Surfaces: Never apply vinyl to a warm appliance, such as an oven that has just been used. Wait until it is completely cool to the touch.
- Smooth From the Centre: Begin applying the vinyl from the centre and work your way outwards. Use a soft cloth or squeegee to gently push out any air bubbles for a seamless look.
- Avoid Key Areas: Be careful not to cover any essential controls, digital displays, or ventilation grilles on your appliances.
- Consider Durability: For high-touch areas or custom artwork, ask your supplier about adding a clear laminate over the design for extra protection against scratches and frequent cleaning.
8. Organisational Vinyl Stickers and Labels for Kitchen Storage and Pantry Systems
A disorganised kitchen can feel chaotic and inefficient, but a full pantry overhaul can be costly. For a simple yet transformative project, using custom vinyl labels and organisational stickers is one of the most effective kitchen renovation ideas on a budget. This approach allows you to create a streamlined, cohesive storage system that not only looks professional but also makes daily life easier.
Companies like Quote My Wall specialise in producing durable, waterproof vinyl labels perfect for jars, containers, and shelves. These are not just basic labels; they are customisable design elements that can elevate your pantry and cabinets from cluttered to curated in an afternoon, creating a system that is both functional and beautiful.
Why Choose Vinyl Labels for Organisation?
This method is perfect for anyone wanting to achieve the high-end, organised look seen in home magazines and on social media without the expense of custom cabinetry or professional organisers. In a UK family home, for instance, you might see a pantry with matching glass jars, each bearing a clean, minimalist label for 'Flour,' 'Pasta,' or 'Rice.' This not only improves aesthetics but also helps with meal planning and grocery shopping. It’s a renter-friendly solution that adds immense value without any permanent changes.
How to Create a Cohesive Pantry System
For a highly effective and budget-friendly kitchen upgrade, delve into practical tips for organizing kitchen drawers and apply similar principles to your pantry with these steps:
- Plan Your System: Before ordering labels, decant your dry goods into clear, airtight containers. Measure the containers to ensure your custom labels will fit perfectly.
- Choose a Readable Font: Select a clear, legible font that fits your kitchen's style. For a household with older members, ensure the text is large and easy to read at a glance.
- Apply Consistently: For a polished, uniform look, place each label in the same position on every container. Centring them is often the most visually appealing choice.
- Consider Colour-Coding: Use different coloured labels or fonts to categorise items. For example, you could use green for gluten-free products or blue for baking supplies to make finding things quicker.
- Balance is Key: Keep the label size proportional to the container. A huge label on a tiny spice jar or a minuscule label on a large flour canister will look unbalanced.
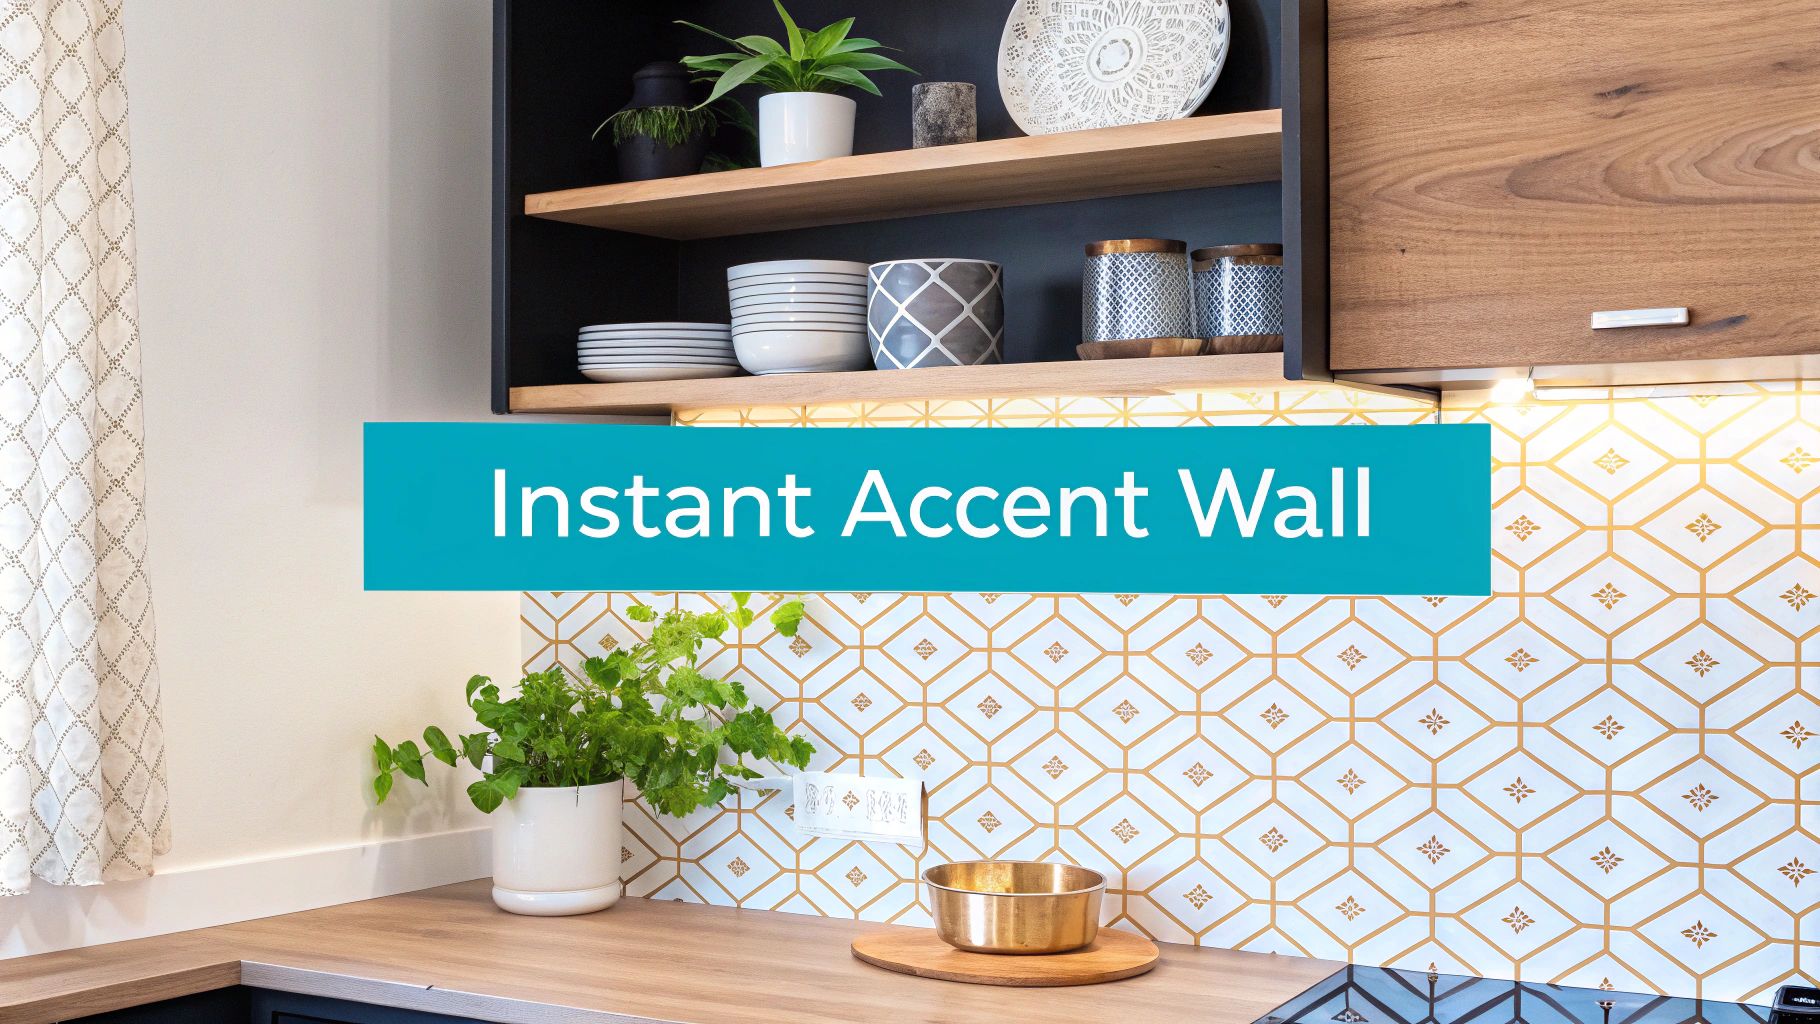
9. Decorative Tile Stickers for Kitchen Splashback Enhancement and Feature Walls
Tiling a full splashback or an entire feature wall can be prohibitively expensive, but decorative tile stickers offer a transformative and affordable alternative. This approach is one of the most creative kitchen renovation ideas on a budget, allowing you to introduce intricate patterns and vibrant colours without the cost and mess of traditional tiling. It’s an easy way to create a stunning focal point that reflects global design trends.
Companies like Quote My Wall provide an extensive library of premium, self-adhesive tile stickers in designs ranging from Moroccan and Portuguese to Scandinavian and classic Victorian. These high-quality vinyl stickers are specifically designed to be durable, easy to clean, and resistant to the humidity and heat found in a kitchen environment, making them perfect for both splashbacks and larger accent walls.
Why Use Decorative Tile Stickers?
This method is ideal for homeowners wanting to inject personality and character into their kitchen quickly and affordably. For example, a homeowner could use bold, geometric Moroccan-patterned stickers to create a statement wall in a modern kitchen, or apply classic Portuguese azulejo designs to achieve an authentic Mediterranean feel. It's also a fantastic solution for renters who want to personalise their space temporarily, as the stickers can be removed without causing damage.
How to Apply Decorative Tile Stickers
Achieving a seamless, professional finish requires careful application. Follow these steps for the best results:
- Choose a Complementary Pattern: Select a design and colour scheme that complements your existing cabinetry, worktops, and wall colour to ensure a cohesive look.
- Prepare the Wall: The surface must be perfectly smooth, clean, and dry. Use a sugar soap solution to remove any grease, and fill and sand any imperfections before you begin.
- Plan Your Layout: To avoid a visually overwhelming effect, consider applying stickers to just one feature wall or the splashback area. Carefully plan your pattern placement to ensure it looks continuous.
- Ensure Seamless Alignment: When applying each sticker, pay close attention to matching the pattern with the adjacent one. A high-quality squeegee will help you smooth out any air bubbles for a flawless finish.
- Create a Finished Edge: For a polished look, consider leaving a 5-10cm margin at the top and bottom of the wall to be painted or covered with trim.
10. Hardware Update Vinyl Wraps for Cabinet Knobs and Drawer Handles
Replacing all the cabinet knobs and drawer handles in a kitchen can quickly become a surprisingly expensive task, with designer hardware often costing a small fortune. A savvy and modern alternative is to use premium vinyl wraps to update your existing hardware. This approach is a cornerstone of creative kitchen renovation ideas on a budget, allowing you to achieve high-end metallic finishes like brass, copper, or matte black without the cost of new fittings.
Companies such as Quote My Wall offer specialised collections of metallic and textured vinyl wraps designed for these small-scale, detailed applications. These high-quality films adhere seamlessly to existing hardware, creating the illusion of a complete replacement and offering a durable, wipe-clean finish that unifies mismatched styles.
Why Choose Vinyl Wraps for Hardware?
This method is ideal for anyone looking to follow current interior design trends without a long-term commitment or significant expense. A UK homeowner could, for example, transform dated chrome handles into a sophisticated matte black to match new appliances, or update old brass fittings to a contemporary brushed gold. It's also an excellent solution for renters wanting to modernise their space without replacing the landlord's fixtures.
How to Apply Vinyl Wraps to Handles
Patience and a clean surface are essential for a flawless finish. Follow these steps for the best results:
- Prepare the Hardware: Remove the knobs and handles from your cabinets. Clean them thoroughly with a degreaser or rubbing alcohol to remove any oils or residue, then dry them completely.
- Cut and Apply: Cut a piece of vinyl slightly larger than the handle. Carefully apply it, starting from the centre and smoothing outwards to prevent air bubbles. For curved handles, gentle heat from a hairdryer can make the vinyl more pliable.
- Smooth and Trim: Use a small squeegee or your fingertip to press the vinyl firmly around all curves and edges. Once moulded, use a sharp craft knife to trim away any excess material for a clean line.
- Allow to Cure: Let the wrapped hardware sit for at least 24 hours before reattaching it. This allows the adhesive to fully bond, ensuring maximum durability for high-contact items.
10 Vinyl & Peel-and-Stick Budget Kitchen Upgrade Comparison
| Item | Implementation 🔄 | Resource requirements ⚡ | Expected outcomes ⭐ | Ideal use cases 💡 | Key advantages 📊 |
|---|---|---|---|---|---|
| Vinyl Wall Decals & Stickers (Kitchen Backsplash) | Low — DIY in hours; clean, smooth surface required | Low — cleaning supplies, squeegee; minimal material | ⭐⭐⭐ — convincing tile look, 5+ yr indoor durability; not heat-safe above hob | Budget backsplash updates, renters, quick aesthetic refresh (avoid above stove) | 50–75% cost saving vs tile; quick install; removable |
| Vinyl Furniture Wraps (Cabinet Transformation) | Medium — precise measurement; heat gun for curves; 1–2 days | Medium — vinyl wrap, heat tool, possible professional help | ⭐⭐⭐⭐ — dramatic cabinet makeover; 5–7 yr lifespan; won’t fix structural issues | Upcycling dated cabinets, rental updates, major style change | ~90% cheaper than replacement; environmentally friendly; hides damage |
| Peel‑and‑Stick Tile Stickers (Flooring) | Medium — careful seam alignment; flat, clean substrate; single day | Medium — larger material quantity, roller, optional sealant | ⭐⭐⭐ — strong visual floor upgrade; wear 3–5 yrs in heavy traffic | Temporary or rental flooring updates; hide discoloured floors | Low cost vs new flooring; DIY install; removable |
| Personalized & Inspirational Vinyl (Quotes, Meal Planning) | Low — simple placement; dry‑erase options require flat surface | Very low — small stickers/boards, markers | ⭐⭐⭐ — functional personalization; may wear with heavy erasing | Family kitchens, meal planning, gifts, recipe displays | Very affordable; multifunctional décor; encourages organisation |
| Window Privacy Film (Glass Doors & Cabinets) | Low–Medium — precise measuring; static‑cling easier to reposition | Low — film, squeegee, cleaning solution | ⭐⭐⭐ — good privacy + light transmission; UV reduction | Glass‑front cabinets, French doors, windows needing privacy | Hides clutter, reduces glare/UV, removable |
| Removable Wallpaper & Wall Coverings | Medium — panel matching, trimming; smooth walls needed | Medium — rolls, trimming tools, time for smoothing | ⭐⭐⭐⭐ — strong aesthetic change; covers imperfections; 5–7 yr removable | Feature walls, renters wanting textured/patterned finishes | Faster than paint, removable, creates texture/dimension |
| Vinyl Sticker Decor for Appliances & Hardware | Low–Medium — careful placement; avoid vents/controls | Low — appliance‑grade vinyl, cleaning, optional laminate | ⭐⭐⭐ — good cosmetic refresh; adhesion varies on stainless/hot surfaces | Refresh fridges/ovens, coordinate appliances, hide blemishes | Much cheaper than replacement; instant coordination; functional stickers available |
| Organisational Vinyl Labels (Pantry & Storage) | Low — planning/measurement; consistent placement | Very low — label sets, custom text options | ⭐⭐⭐⭐ — high functional impact; dishwasher‑safe labels last long | Pantries, family kitchens, care homes, organised shelving | Improves functionality, professional look, customisable |
| Decorative Tile Stickers (Feature Walls & Splashbacks) | Low–Medium — pattern matching; careful alignment | Low–Medium — patterned stickers, squeegee, prep time | ⭐⭐⭐⭐ — high visual impact for focal areas; seams possible | Accent walls, splashbacks (not directly above hobs), feature areas | Dramatic look at low cost; removable; quick transformation |
| Hardware Update Vinyl Wraps (Knobs & Handles) | Medium — precise wrapping around curves; small components | Low — metallic finish vinyl, cleaning tools | ⭐⭐⭐ — cohesive hardware appearance; may wear 2–3 yrs under heavy use | Unify mismatched hardware, rental updates, budget modernisation | Very low cost vs replacements; instant modernisation; fast application |
Your Dream Kitchen is Just a Peel-and-Stick Away
Embarking on a full-scale kitchen renovation can feel like a monumental task, often accompanied by a daunting price tag and weeks of disruption. However, as we've explored throughout this guide, achieving a stunning kitchen transformation doesn't require tearing down walls or draining your savings account. The central theme connecting all these powerful, budget-friendly ideas is the remarkable versatility and ingenuity of modern vinyl solutions. From bold wall coverings to subtle hardware updates, the power to reimagine your culinary space is quite literally in your hands.
The most significant takeaway is that high-impact changes are born from creativity, not just a hefty budget. By shifting your perspective from "demolish and replace" to "refresh and enhance," you unlock a world of possibilities. You’ve seen how vinyl furniture wraps can give tired, dated cabinets the sleek, modern finish of a brand-new installation for a mere fraction of the cost. Similarly, peel-and-stick tile stickers can completely revitalise a worn-out floor or a lacklustre splashback in a single afternoon, with no need for messy grout or specialised tools. These aren't just temporary fixes; high-quality vinyl offers a durable, washable, and long-lasting finish that stands up to the demands of a busy kitchen.
Recapping Your Path to a Budget-Friendly Renovation
Let's consolidate the key strategies that make these kitchen renovation ideas on a budget so effective:
- Focus on Surfaces: The largest visual areas, like cabinets, splashbacks, and floors, offer the biggest "bang for your buck." Targeting these with vinyl wraps or tile stickers creates an immediate and dramatic transformation.
- Embrace the Details: Small changes accumulate to create a significant overall impact. Upgrading hardware with vinyl wraps, adding decorative accents to appliances, and introducing organisational labels bring a cohesive and polished feel to the entire room.
- Prioritise Reversibility (Especially for Renters): Nearly every idea discussed, from window privacy film to wall decals, is fully removable. This empowers renters to personalise their space without risking their security deposit, and it gives homeowners the freedom to experiment with trends without long-term commitment.
- Personalisation is Paramount: Your kitchen should reflect your personality. Using vinyl to add a favourite quote, a family recipe, or a custom-designed pattern makes the space uniquely yours. It moves beyond a purely functional area to become the true heart of your home.
Your Actionable Next Steps
Feeling inspired? The journey to your dream kitchen can start today. Begin by identifying the one or two elements in your current kitchen that frustrate you the most. Is it the dark, dreary cabinets? The dated, patterned splashback? Or perhaps the chaotic pantry?
Once you have your starting point, revisit the relevant section of this article. Measure the area, browse for design inspiration online, and consider the colour palette and style you want to achieve. The beauty of these DIY projects is their low barrier to entry. You don't need a team of contractors; you just need a plan, a few simple tools, and the right materials. This approach allows you to tackle your renovation in manageable, affordable stages, seeing tangible progress without the stress and financial strain of a traditional overhaul.
Ultimately, mastering these budget-conscious techniques is about more than just saving money. It’s about empowerment. It's about realising that you have the ability to shape your environment and create a beautiful, functional space that brings you joy every single day. You don't have to wait until you have a massive budget to love your kitchen. With a little ingenuity and the power of premium vinyl, you can build a space that is stylish, practical, and perfectly you, proving that great design is truly accessible to everyone.
Ready to turn these ideas into reality? Quote My Wall specialises in high-quality, customisable vinyl stickers, wraps, and decals perfect for every project we've discussed. Explore their extensive collection at Quote My Wall and find the perfect tools to begin your affordable kitchen transformation today.