
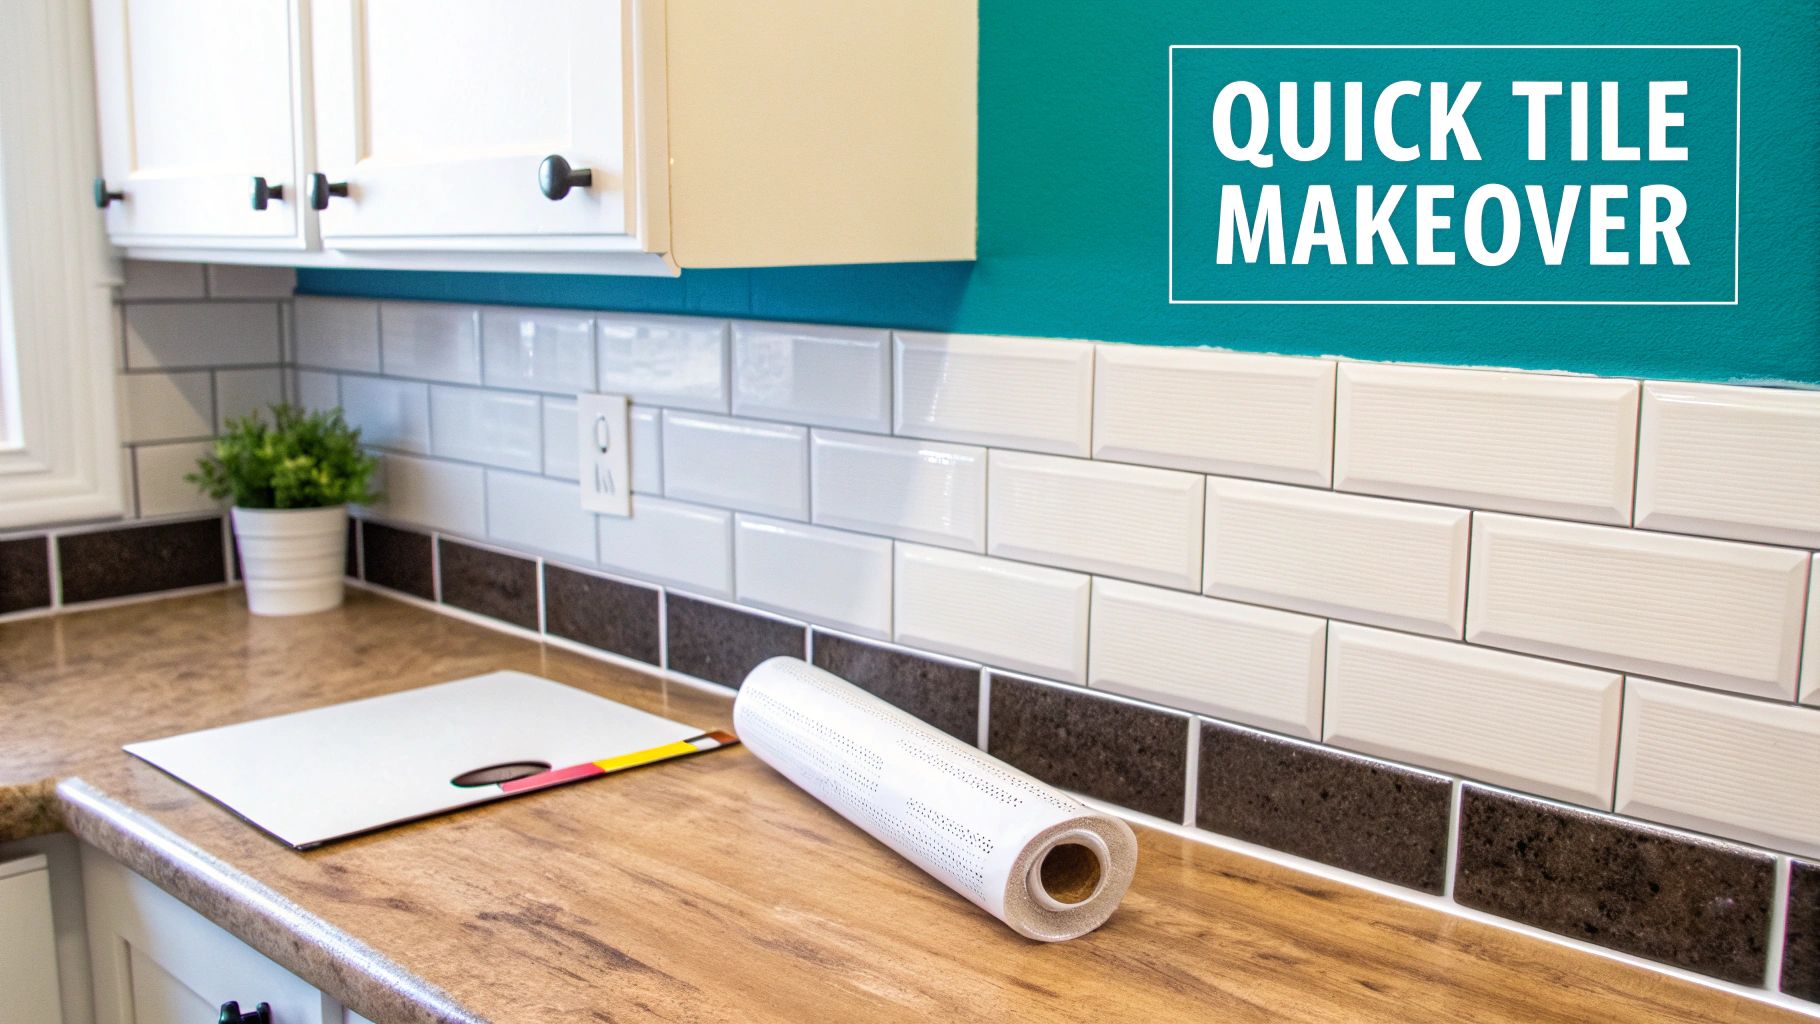
How to Cover Kitchen Tiles: Quick, Rent-Friendly Refresh
Staring at dated kitchen tiles every day can be a real drag. The good news is, you don't have to live with them, and you definitely don't need the cost and chaos of a full demolition to get a fresh look. The best ways to cover kitchen tiles involve clever, renter-friendly options like peel-and-stick tiles, specialty tile paint, or even stylish vinyl wraps that go right over your existing surface.
Why Covering Your Tiles Is the Smartest Kitchen Upgrade
Let's be honest, a full-blown kitchen renovation is a massive undertaking. We're talking dust, serious disruption, and a hefty dent in your bank account. Covering your existing tiles is a far more practical and stylish alternative, especially if you're renting or just fancy a high-impact change without the long-term commitment. It’s all about working smarter, not harder.
The demand for these clever solutions has been on the rise, particularly here in the UK. With the ceramic tiles market projected to hit USD 1.27 billion in 2025 and residential updates accounting for nearly 61.9% of all tile transactions, it's clear people want to refresh their spaces. This makes covering old tiles an incredibly popular and budget-friendly choice.
The real beauty of covering kitchen tiles is the instant gratification. You can completely transform the heart of your home in a single weekend, often for less than the cost of a new kettle.
This guide is your complete roadmap to making that happen. We'll walk through the best temporary and semi-permanent options that deliver a finish so good, no one will ever guess what’s underneath. It’s time to put down the sledgehammer; your dream kitchen is just a peel-and-stick away.
Key Benefits of Covering Instead of Replacing
- Cost-Effective: You can save thousands of pounds on labour and new materials compared to ripping out and re-tiling.
- Time-Saving: Most of these projects are easily finished over a weekend, saving you from weeks of living in a construction zone.
- Renter-Friendly: Many options, like tile stickers and some wallpapers, are completely removable. Our guide on removable wallpaper for renters has even more ideas on this front.
- Less Mess: You get to skip the noisy, dusty, and downright dirty process of demolition and disposal altogether.
Choosing the Right Tile Covering for Your Kitchen
So, you're ready to cover up those dated kitchen tiles but aren't sure where to start? Finding the right solution really just comes down to three things: your budget, your style, and how much elbow grease you're willing to put in.
Let’s look at the most popular temporary options out there. It’s all about matching the material to the mission. For instance, tile stickers are brilliant for adding a pop of intricate pattern to a small backsplash. On the flip side, a roll of peel-and-stick vinyl can give you a completely new floor in a single afternoon.
Weighing Up Your Options
Before you fall in love with a pattern, think about where it's going. The needs of a backsplash behind your hob, which has to deal with heat and grease, are very different from a decorative wall far from the action.
Here's a quick rundown of the main players:
-
Tile Stickers: These are just what they sound like – individual decals made to fit standard tile sizes. They’re perfect for creating an eye-catching feature wall, hiding a few cracked tiles, or adding a decorative border without much fuss. If you need some ideas, you can see the amazing potential of tile stickers for a perfect kitchen makeover.
-
Peel-and-Stick Vinyl Panels: Think bigger. These come as larger sheets or tile-like panels that cover several of your original tiles in one go. They're fantastic for achieving a more seamless finish on a large wall or even a floor, giving you a dramatic change with less fiddly work.
-
Specialty Tile Paint: If you're after a clean, uniform colour, this is your best bet. It does take a bit more prep work (don't skip the primer!), but the result is a completely fresh colour scheme. Just make sure you grab a paint specifically designed for ceramic or porcelain so it can handle the moisture and regular wipe-downs of a busy kitchen.
-
Vinyl Wraps: Similar to the stuff used to wrap cars or upcycle furniture, a good quality vinyl wrap can give your tiles a sleek, continuous surface. This method is especially effective if you want to create a realistic faux marble or concrete effect on a countertop backsplash.
Thinking about materials that can handle a bit of wear and tear is always smart. While we're talking kitchens, many of the same rules apply to other high-moisture areas. In fact, checking out a guide on how to choose bathroom tiles can give you some great insights into durability and water resistance that are just as relevant here.
A Head-to-Head Comparison
To help you decide, let's put these options side-by-side and see how they really stack up. Sometimes seeing the practical details in one place makes the choice much clearer.
The best choice isn't always the flashiest or the most expensive. It’s the one that solves your problem, whether that’s hiding an ugly pattern, working with a tight budget, or keeping your landlord happy.
This table breaks down what you can realistically expect from each method.
Comparing Renter-Friendly Tile Covering Options
| Covering Method | Average Cost (per sq metre) | Durability | Ease of Application | Best For |
|---|---|---|---|---|
| Tile Stickers | £15 - £30 | Low to Medium | Very Easy | Small backsplashes, accent walls, covering select tiles. |
| Peel-and-Stick Vinyl | £25 - £50 | Medium to High | Easy | Floors, large wall areas, achieving a seamless look. |
| Specialty Tile Paint | £10 - £20 (inc. primer) | Medium | Moderate | Creating a solid, uniform colour on walls or low-traffic floors. |
| Vinyl Wraps | £20 - £40 | Medium | Moderate to Hard | Smooth, modern backsplashes and achieving realistic material effects. |
Ultimately, it all comes down to the final look you're going for and the time you have. For a quick and cheerful pattern update, tile stickers are unbeatable. But if you're craving a total transformation that covers everything, peel-and-stick vinyl or a fresh coat of paint will deliver that dramatic change you're after.
Essential Prep Work for a Flawless Finish
Let me share a secret I've learned from countless projects: the real success of your kitchen tile makeover is sealed long before you even peel back the first sticker. Skipping the prep work is the number one mistake people make, and it's the fast track to peeling corners and a finish that just looks a bit shoddy.
Think of these prep steps as your insurance policy for getting that durable, professional-looking result you’re after.
The first, most crucial job is a proper deep clean. Kitchens are magnets for grease and airborne grime, and that residue is the sworn enemy of anything self-adhesive. You need a completely clean slate for your new covering to get a proper grip.
Banish Grease and Grime
A quick wipe-down just won't do the trick here. You need to cut through years of cooking residue with a serious degreasing agent. This is exactly why sugar soap is a staple for professional decorators – it’s brilliant at breaking down stubborn grease.
- Get your sugar soap mixed with warm water, following the instructions on the box.
- Give the tiles and grout lines a thorough scrub using a non-abrasive scouring pad. Don't be shy, get right in there!
- Rinse the whole area with clean water and a fresh cloth to get rid of every last bit of soap.
- Finally, and this is important, let the tiles dry completely. Trapped moisture can be just as damaging as leftover grease.
Any lingering grease will stop your peel-and-stick tiles or paint from sticking properly. Honestly, this one step is non-negotiable if you want a lasting finish.
Repair and Smooth the Surface
Once your tiles are sparkling, it's time to play detective. Get up close and inspect them for any minor chips or cracks. They might not look like much, but these little flaws can create weak spots or even show through your new covering. A tiny bit of epoxy filler is perfect for patching these up. Just apply it, smooth it level with the tile, and let it cure properly.
Next, have a good look at your grout. If the lines are quite deep, they can create indentations under your new surface, which can spoil the smooth look. To get around this, you can apply a thin layer of waterproof, flexible filler to bring the grout lines flush with the tile surface. It’s an extra step, but it gives you that perfectly flat canvas you need. For more ideas on getting a great finish, our guide to using peel-and-stick floor tiles in the UK has some handy tips.
Lastly, consider if you need a primer. If you're working with very glossy tiles—like many porcelain ones—I'd strongly recommend giving them a light scuff with fine-grit sandpaper and then rolling on a high-adhesion primer. This creates a bit of "tooth" for the new covering to really grab onto. This is especially true here in the UK, where durable porcelain tiles make up over 60% of the ceramic tile market. People love them because they stand up to a lot of wear and tear, but that shiny surface needs a bit of help.
Taking these prep steps seriously is genuinely the key to a flawless result you’ll be proud of.
Applying Your New Tile Surface Like a Pro
Right, the prep work is done, and now for the fun bit. This is where you actually get to see your new kitchen take shape. The secret to a flawless finish isn't magic; it's just a combination of patience and a few tricks of the trade.
Whether you're using peel-and-stick panels, individual tile stickers, or even a specialist paint, the old mantra holds true: measure twice, cut once. Honestly, rushing this stage is the fastest way to get wonky lines, annoying air bubbles, and a finish you're not happy with. So, take a breath and enjoy the process.
Nailing the Peel and Stick Method
For anything with a sticky back, accuracy is everything. I always recommend starting in the most visible corner of the room and working your way out from there. That way, if you have any tricky cuts or slightly misaligned pieces at the end, they’ll be tucked away where no one’s likely to notice.
When you come up against obstacles like plug sockets or pipes, don't just guess the measurements. Grab some scrap paper or card and make a template. Press it into the space, trace the outline of the socket, cut it out, and then transfer that shape onto the back of your vinyl. It’s a simple extra step that guarantees a perfect fit every time. This approach is common in many DIY projects; for instance, learning how to install peel and stick flooring often relies on the same templating technique for a professional result.
Pro Tip: Want a little extra ‘slip’ time to get things positioned perfectly? Lightly mist the tile with a spray bottle filled with water and a single, tiny drop of washing-up liquid. This breaks the surface tension and lets you slide the vinyl into place before the adhesive takes a firm hold.
Once you’re happy with the placement, grab a squeegee (or a credit card wrapped in a microfibre cloth) and smooth it down. Always work from the centre outwards, pushing any air towards the edges. A firm, consistent pressure is what creates that strong bond and bubble-free finish.

As this shows, getting the application right starts with a solid foundation of cleaning, filling, and priming.
Achieving a Seamless Pattern Match
If your chosen design has a repeating pattern, this is where you need to pay close attention. Don't just peel the backing and hope for the best.
Before you commit, hold the next panel or sticker up against the one you’ve just installed. Carefully line up the pattern elements. I like to make a tiny pencil mark on the wall or the adjacent tile as a guide.
When you start to apply it, focus on getting that one patterned edge perfectly aligned first. Once that seam is invisible, you can smooth down the rest of the piece with confidence. Taking that extra 30 seconds per piece is what separates a professional-looking wall from an obvious DIY job.
Techniques for Painting Tiles
If you've gone down the painting route, the aim is a smooth, durable finish without any tell-tale brush marks. The trick here is all in the tools and the technique. A small, high-density foam roller will be your best friend – it gives a beautifully even finish that almost looks sprayed on.
Here’s how I’d tackle it for the best results:
- Cut In First: Before you get the roller out, use a good-quality, small paintbrush to carefully paint around the edges and along all the grout lines.
- Go Thin on the First Coat: Load your foam roller, but don't saturate it. Apply a thin, even layer across the tiles. The goal isn't perfect coverage on the first pass; it's all about creating a solid base.
- Patience is Key: Let that first coat dry completely. Check the tin for the recommended time. If you go in with the second coat too soon, you can lift the first one right off.
- Build the Colour: Now, roll on your second coat. This should give you that solid, uniform colour you're after. For a kitchen splashback or any area that gets a lot of wear and tear, a third coat or a clear protective topcoat is a very smart move.
Keeping Your New Surface Looking Great
You’ve stood back and admired your handiwork—the kitchen looks completely transformed. Fantastic! The next job is keeping it that way. Looking after your new surface is thankfully simple, but it’s the key to making sure your efforts last as long as possible.
Different materials need slightly different care. For things like vinyl wraps and peel-and-stick panels, your best friends will be a soft microfibre cloth and a gentle, non-abrasive cleaner. Steer clear of anything with harsh chemicals or scouring pads, as they’ll quickly scratch or dull the finish.
If you’ve painted your tiles, the biggest thing is patience. You need to let the paint fully cure before you even think about scrubbing it, which can take up to a week. Once it's hardened, a light wipe with a pH-neutral cleaner is all it takes to keep it looking pristine without risking the topcoat.
Long-Term Care and Simple Fixes
Life happens in the kitchen, so a few scuffs or lifting edges are almost inevitable over time. Don't worry, though—most of these little issues are incredibly easy to sort out.
If you spot the corner of a sticker or panel starting to lift, don’t panic. Just grab a hairdryer and gently warm the area for about 15-20 seconds. This will reactivate the adhesive, letting you press it firmly back into place. For a really stubborn edge, a tiny dab of spray adhesive will secure it for good.
Keeping on top of these little fixes makes all the difference in protecting your investment of time and money. It's especially smart when you consider how expensive traditional tiling is becoming. The UK ceramic tiles market is growing, but so are the material and labour costs, which makes savvy DIY solutions like these more appealing than ever. You can learn more about the factors influencing tile prices and installation costs if you're curious.
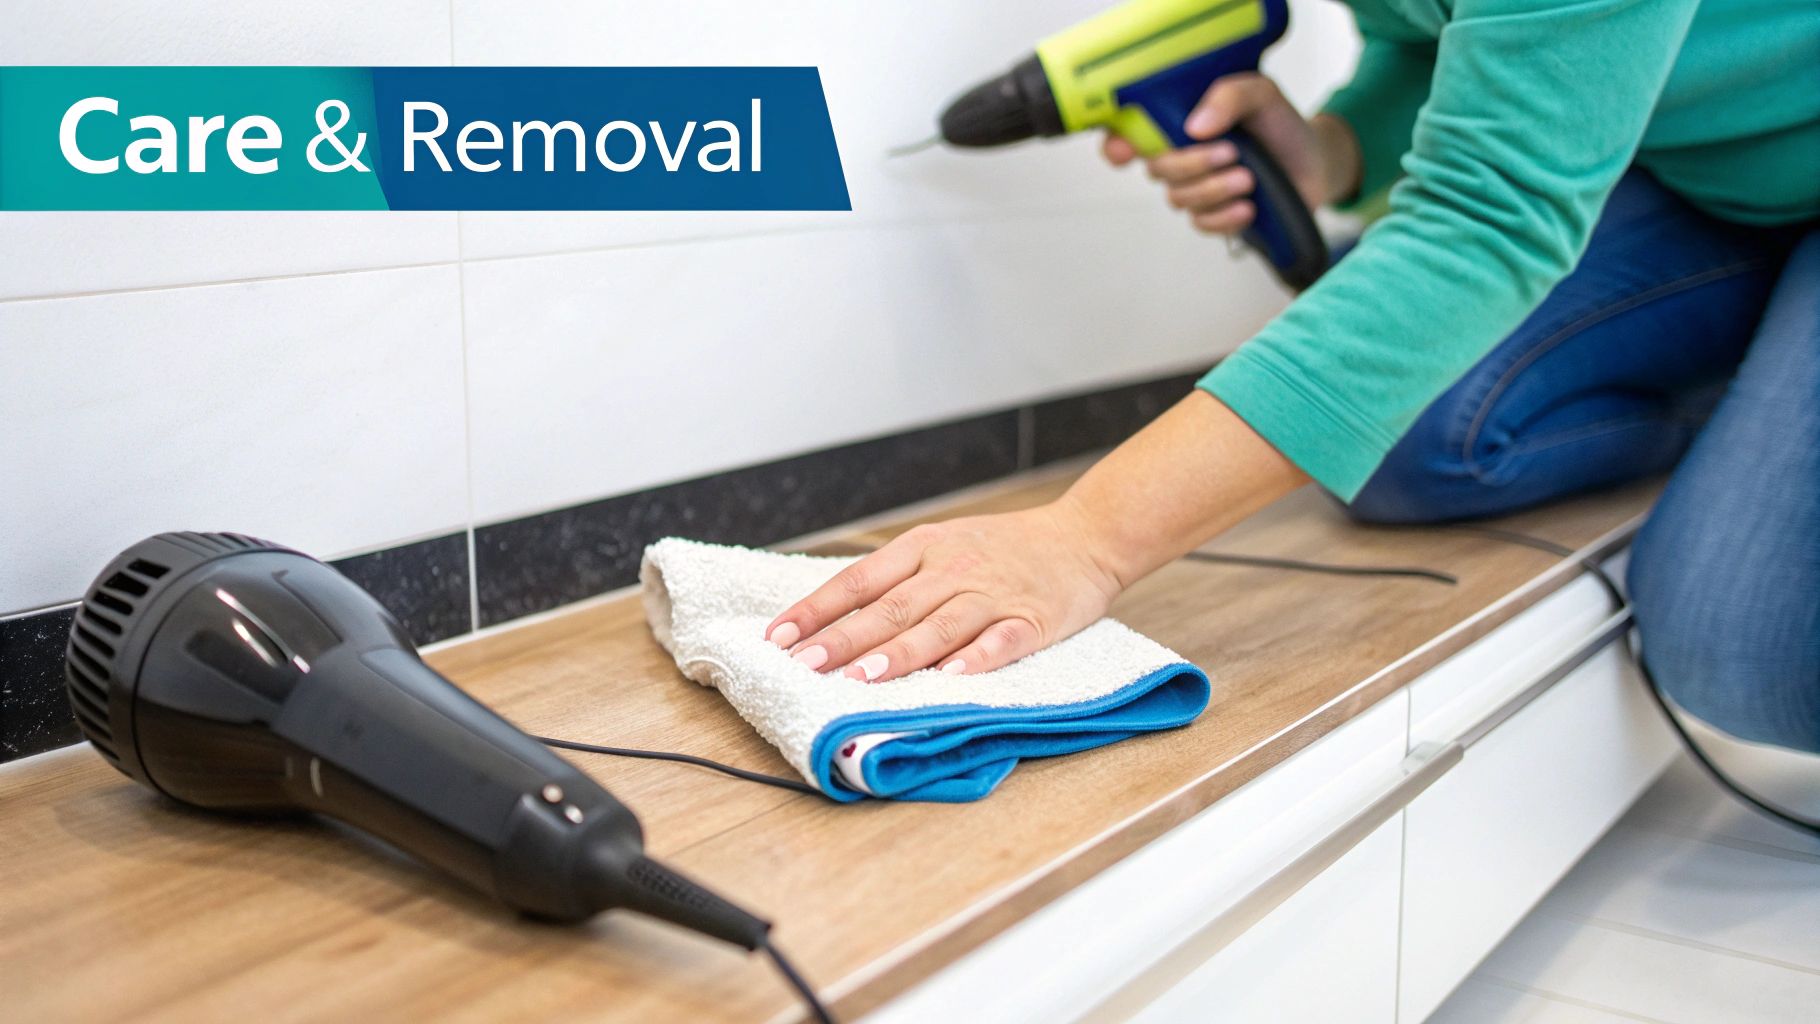
The All-Important Removal Process for Renters
For anyone renting, this final step is probably the most crucial one: getting it all off without leaving a trace. This is where these renter-friendly products really prove their worth.
The secret to a stress-free removal is heat. Applying gentle warmth softens the adhesive, allowing the covering to be peeled away without a fight and, most importantly, without damaging the original tiles underneath.
Pick a corner to start and aim a hairdryer on a medium setting at it, moving it back and forth over the surface. You'll feel the adhesive soften as the tile or vinyl begins to release. The trick is to peel it back slowly and at a low angle to avoid putting any strain on the surface.
Once it's all off, you might have a bit of sticky residue left over. No problem. A citrus-based cleaner or a cloth dampened with a little isopropyl alcohol will usually get rid of it in a flash. With a bit of patience, you can restore the kitchen to exactly how you found it—a crucial step for getting that security deposit back.
Have a Few More Questions? Let’s Get Them Answered
Even with the best guide in hand, it’s completely normal to have a few last-minute questions before you dive in. I’ve heard from countless DIYers who are 90% of the way there, but just need a little clarity on one or two things. So, let's tackle the most common queries I hear, and get you that final boost of confidence.
What If My Kitchen Tiles Are Really Textured or Uneven?
You can absolutely still cover them, but this is where a little extra prep work makes all the difference. If you just slap a thin peel-and-stick vinyl over a heavily textured tile, I guarantee the pattern underneath will telegraph through. It ruins that smooth, professional finish you're after.
The trick is to create a perfectly smooth canvas first. I recommend applying a thin skim coat of a self-levelling compound or even a high-adhesion filler primer. Once that’s fully cured, your surface will be flat and ready for whatever you want to throw at it. Don’t forget to fill in those deep grout lines with a flexible filler, too—this stops them from creating little valleys under your new covering.
Don't let textured tiles put you off. A bit of time spent smoothing the surface is the real secret to making these renter-friendly options look like they were always meant to be there.
How Well Do Peel-and-Stick Tiles Cope with Heat?
This is a big one, especially for anyone tackling the backsplash behind the hob. Most good-quality peel-and-stick products are designed to be heat-resistant, but you absolutely must check the manufacturer's specifications before you buy. Look for products that are explicitly rated for kitchen use and near cookers.
As a rule of thumb, it’s always smart to leave a bit of a safety gap – at least 15-20 cm (about 6-8 inches) – from any direct flame, like a gas hob. What about steamy areas near the kettle or sink? The key here is making sure the wall is bone dry before you start. That one simple step is your best defence against the adhesive failing and the edges starting to lift over time.
Is This Going to Damage My Original Tiles?
Not if you do it right! The whole point of these renter-friendly solutions is that they’re designed to come off cleanly, leaving the surface underneath exactly as you found it.
The secret weapon here isn't brute force; it's patience. Please, never use a metal scraper or a sharp knife to pry the coverings off. Your best friend is a simple hairdryer. Gently heating the surface softens the adhesive, allowing the vinyl or sticker to peel away without a fight. If there’s any sticky residue left behind, a bit of citrus-based cleaner or isopropyl alcohol on a soft cloth will usually take care of it.
How Long Will These Temporary Fixes Actually Last?
Honestly, this comes down to two main things: the quality of the product you choose and how much wear and tear it's going to face.
Here’s a realistic breakdown based on my experience:
- High-quality peel-and-stick vinyl: This stuff is pretty tough. With proper care, it can last for several years, making it a fantastic semi-permanent choice for both walls and even low-traffic floors.
- A well-applied tile paint job: If you seal it with a durable, non-yellowing topcoat, this can also look great for years. Just be aware it might be more prone to chipping in high-impact zones, like right around the sink.
- Individual tile stickers: These are usually the least permanent option. Expect them to show signs of wear after a year or two, especially in spots you’re wiping down all the time.
Before you commit, always have a quick read of the manufacturer’s warranty or product details. They’ll give you a more specific idea of what to expect.
Ready to give your kitchen that fresh, modern update it deserves without the mess or expense? At Quote My Wall, we have a huge range of high-quality, renter-friendly tile stickers and vinyl wraps perfect for your next project. Discover beautiful patterns and durable finishes at https://www.quotemywall.co.uk.