

How to Choose and Apply Frosted Glass Window Stickers
You're standing at the kitchen sink, staring at a street-facing window that feels far too open once the lights come on. The room has decent daylight in the day, but at night the glass turns into a display panel for anyone passing by. That's exactly where frosted glass window stickers earn their keep, because they let you keep the light while cutting the line of sight.
For a lot of UK homes, the appeal is simple. You want privacy without swapping the whole pane, and you want something you can remove later if you're renting, redecorating, or dealing with an older unit that shouldn't be altered permanently. That practical middle ground is why frosted film has become a go-to retrofit rather than a decorative afterthought.
Why Frosted Stickers Are the Smart Privacy Fix
A ground-floor flat, a bathroom with a facing path, or a home office partition all create the same problem. You need daylight, but you don't want your silhouette or your furniture on show. Frosted glass window stickers solve that neatly because they diffuse the view instead of blocking the window completely.
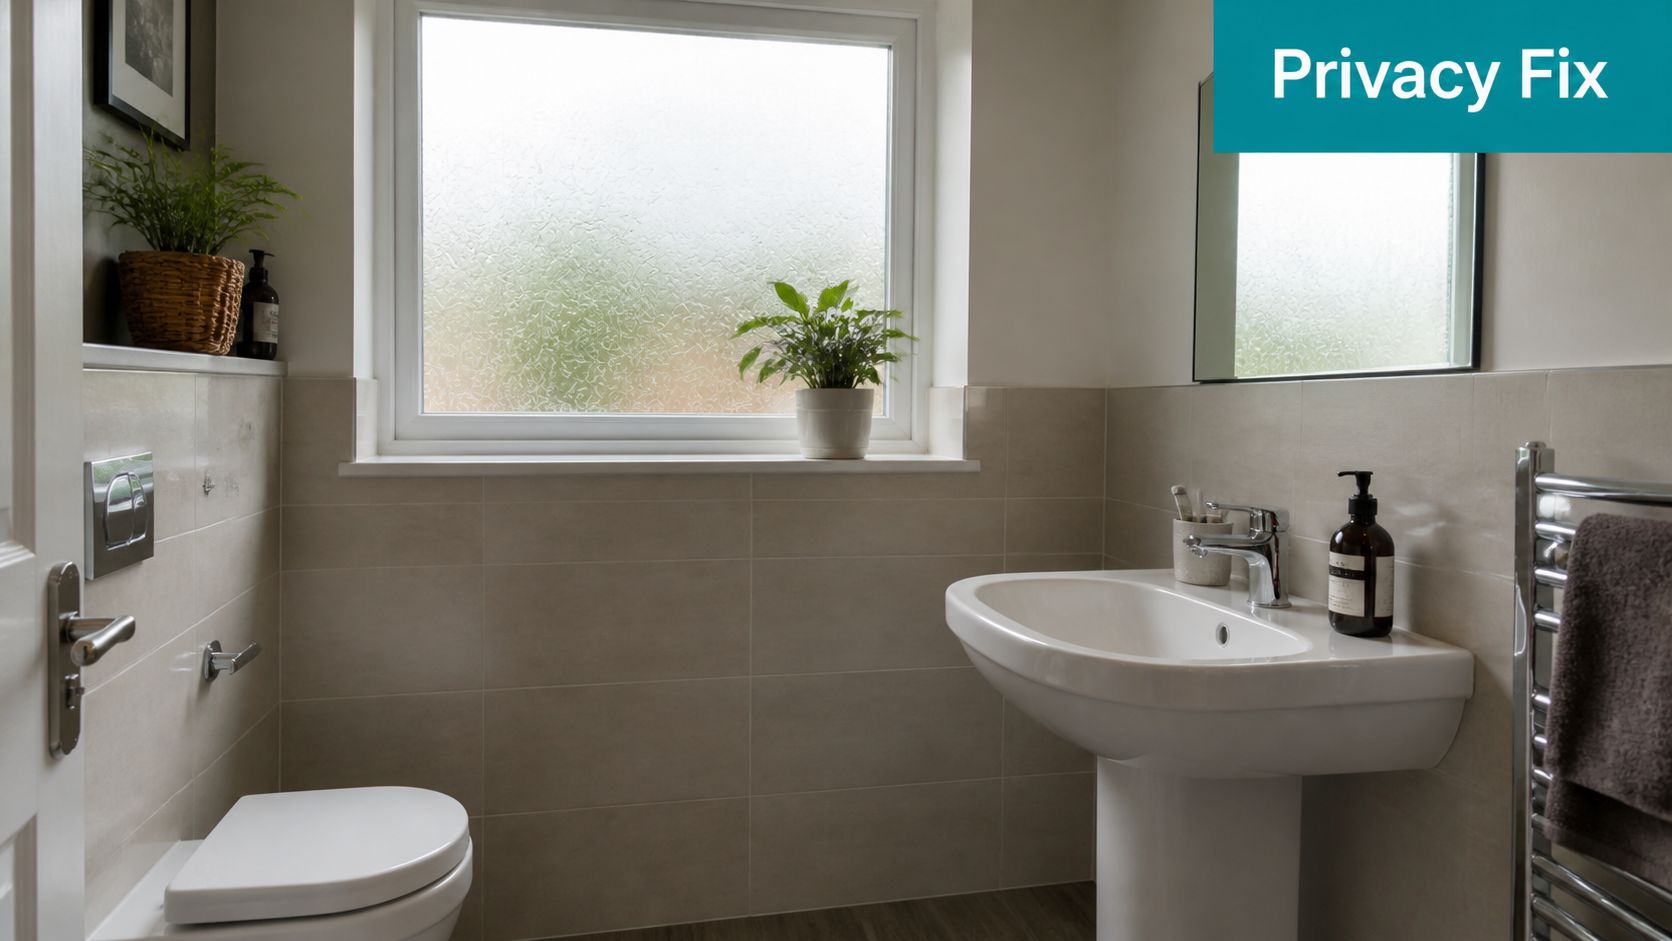
In practice, they sit between net curtains and permanent etched glass. Net curtains soften a view, but they change the whole feel of a room and collect dust. Etched glass looks refined, but it's a permanent glass replacement. A removable frost film gives you the same softened look on the existing pane, which is why it makes sense for renters, parents, and anyone who wants to upgrade a room without committing to new glazing.
The UK context matters here too. Lower glass prices after the abolition of the glass tax in 1845 and the end of the window tax in 1851 helped glazed windows spread more widely, and that created the conditions for privacy treatments to become useful in homes and pubs. There's also a long tradition of frosted-looking glass in English pubs, where people wanted daylight without a clear view through the pane, a use case that maps closely to today's bathrooms and street-facing rooms.
Practical rule: if the room needs light every day but only occasional or limited visibility, frosted film is usually the first thing to try.
If you're comparing it with other bathroom fixes, a useful reference point is the Western Bathroom Renovations nib wall guide, because it shows how much planning goes into even a small privacy feature when water, sightlines, and finishes all matter. Frosted film is simpler than that, but the thinking is similar.
Choosing the Right Film, Opacity and Finish
The biggest mistake buyers make is treating all frosted film as the same product. It isn't. A static-cling sheet that you can reposition with water behaves very differently from a pressure-sensitive adhesive film, and the finish you choose affects both privacy and how forgiving the fitting will be.
Film type and build quality
For UK interior glazing, a useful premium benchmark is 80-micron cast PVC with a permanent acrylic adhesive, giving 115 microns total caliper and 15-year indoor durability on Avery Dennison's EU technical data sheet, with initial adhesion of 400 N/m on stainless steel and ultimate adhesion of 480 N/m on glass (Avery Dennison EU technical data sheet). That spec matters because bathroom humidity, regular cleaning, and office traffic all test the edges first.
A better film doesn't just look more even, it usually stays flatter, trims cleaner, and tolerates routine wiping more predictably.
Static-cling film is the cleaner choice if removability matters more than long-term stay-put performance. Adhesive film suits bathrooms, offices, and places where you want a more settled finish. For a deeper buying comparison, this privacy film guide is useful as a practical reference point for the standard options people usually shortlist.
Opacity and appearance
Opacity is the privacy decision hiding inside the style decision. A lighter frost still breaks up detail, but it can leave more shape recognition when someone is close to the glass. A heavier frost gives a more uniform obscure effect, which is usually the safer bet for street-facing rooms and bathrooms.
Colour and pattern are more than decoration. Plain frost looks calm and unobtrusive. White, clear, or bronze-toned effects change how much the pane reads as “glass” versus “surface”. Geometric cut-outs, borders, and custom designs work well where you want privacy in the middle but not from top to bottom.
For most homes, bathroom glazing wants the heaviest obscurity you can live with. A nursery door or hallway panel often benefits from decorative balance, because you still want the room to feel bright and open. A street-facing lounge usually needs more considered coverage, especially if lights go on early in winter.
Measuring and Preparing the Window
The fitting itself goes much better when the glass is clean, dry, and already measured correctly. I've seen more failed installs from rushed prep than from bad film, and the problems usually start at the edges. If the film has to fight dust, silicone residue, or a crooked cut, it won't settle neatly.
Measure for the real pane, not the frame
Measure the visible glass area rather than the whole opening. If you're covering the full pane, order the sheet slightly oversized so you can trim cleanly after positioning. That extra margin is what saves you from a short edge or a visible gap where daylight catches the frame.
For decorative panels, measure the exact area you want the frost to sit on, then mark the centre line before you start. Full-height privacy needs a different approach from a narrow band across the middle of a door, and it's worth deciding that before the film comes out of its tube.
| Window type | Measure | Oversize for trimming |
|---|---|---|
| Bathroom pane | Visible glass only | Leave a small trim margin |
| Street-facing lounge | Full pane or chosen section | Cut slightly larger than the glass |
| Nursery door panel | Decorative area only | Add enough to square the edges |
| Office partition | Exact glass width and height | Keep extra for alignment |
Clean the glass properly
Warm water and a lint-free cloth are a good first pass. Add a small drop of washing-up liquid if the pane is greasy, then finish with isopropyl alcohol to remove anything left behind, especially silicone residue from old sealants. If the room has just had a hot shower, wait. Warm, damp air can make fitting awkward and can hide tiny specks that you'll only spot once the film is already half on.
Tape off painted frames if they're delicate. That's a small job that saves a lot of touch-up later, especially on older timber or tired uPVC edges.
Best practice: clean the glass as if you're fitting a final finish, because that's exactly what you're doing.
Applying the Film with a Wet Method
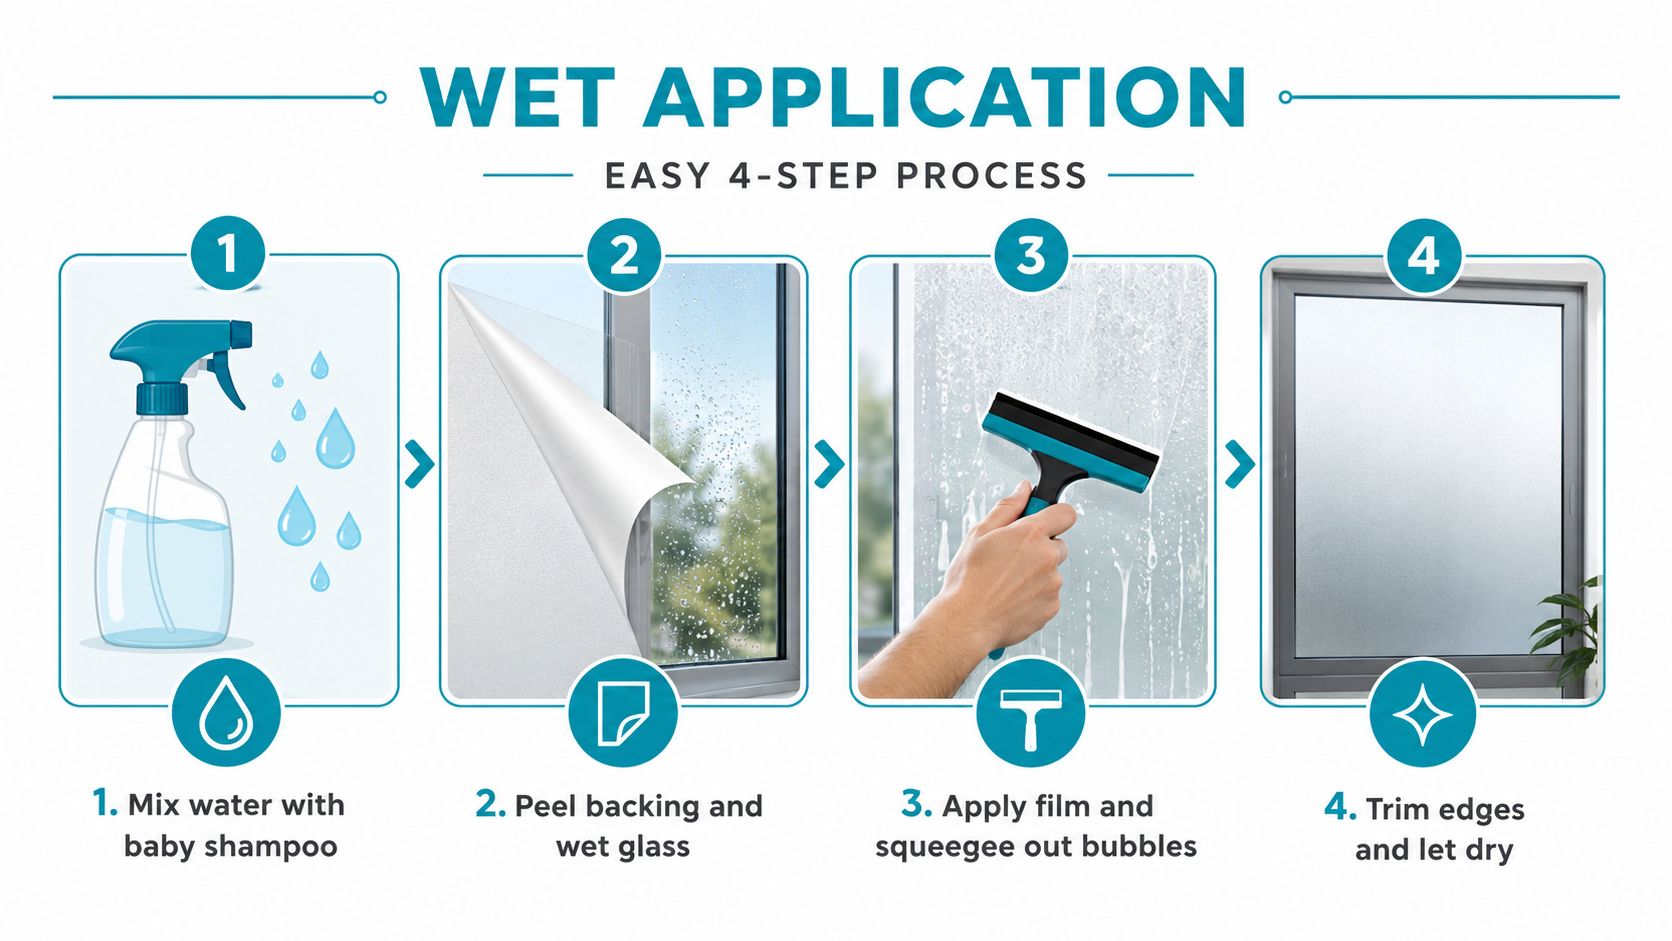
The wet method gives you control, and control is what you want when the sheet is large or the window isn't perfectly forgiving. Water with a few drops of baby shampoo or washing-up liquid creates slip, so the film can move slightly before it grabs. That extra movement is the difference between a careful fit and a rushed one.
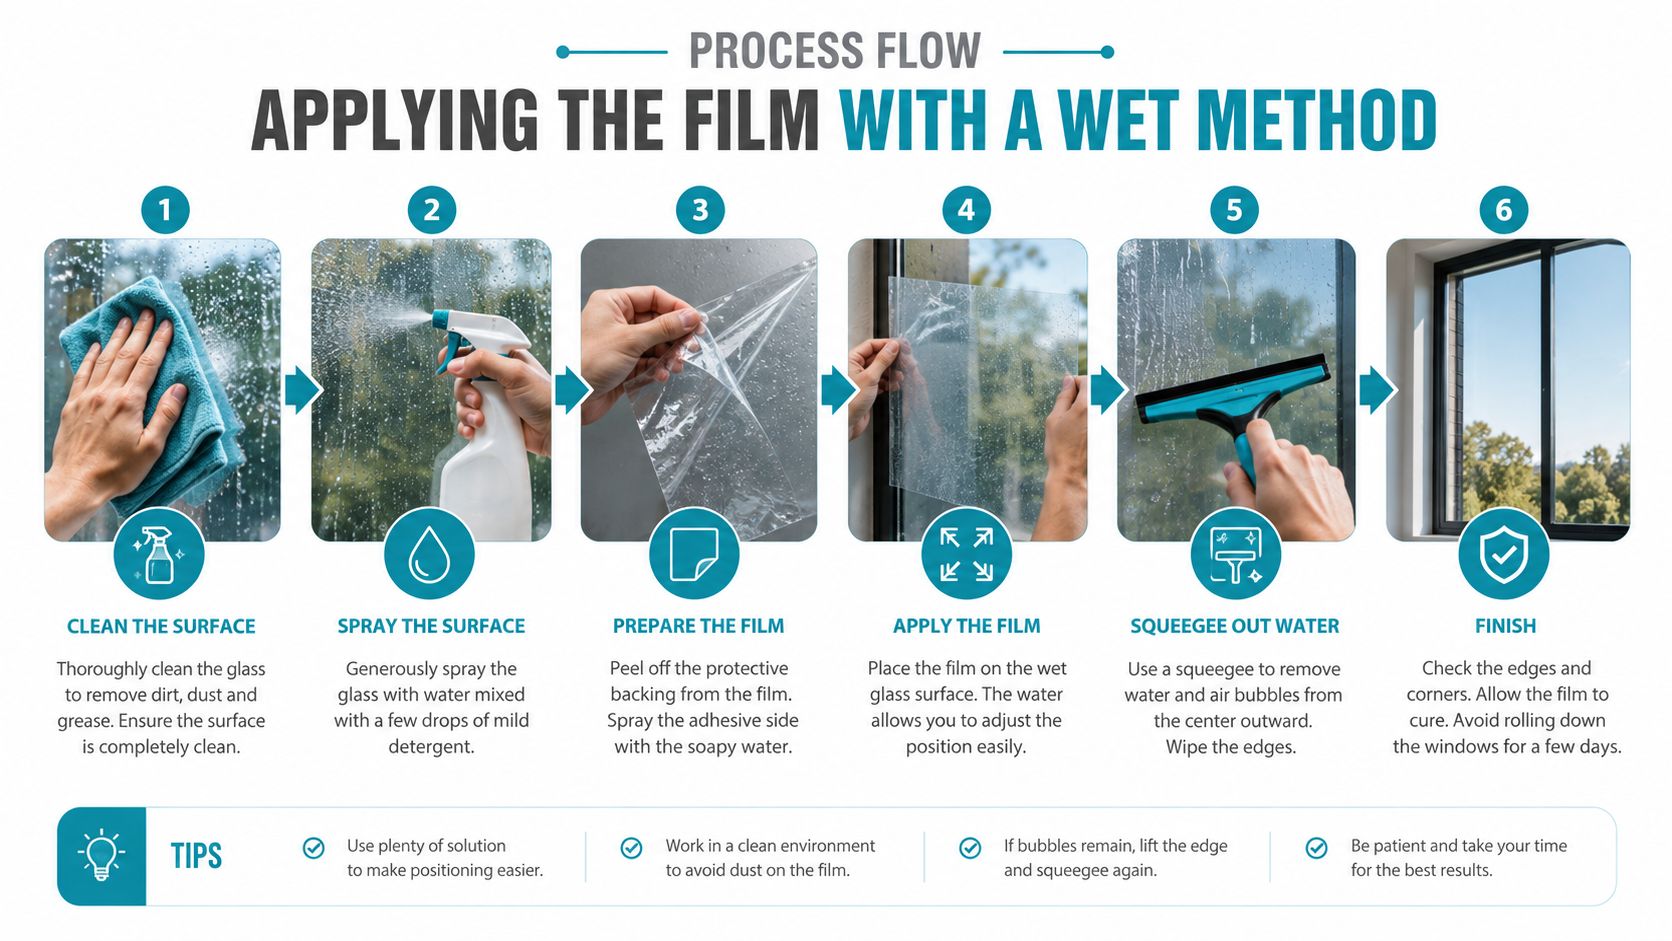
Start at the top and work down. Mist the glass, peel the backing, then mist the adhesive side before positioning the sheet. Once it's on the pane, use a felt-edged squeegee and push from the centre outward in overlapping passes. That keeps bubbles moving towards the perimeter instead of trapping them in the middle.
The wet method is the default for a reason. It gives you a second chance to slide the film a few millimetres if the top edge sits too high or the side edge runs off line. I've fitted enough panels to know that even careful measuring doesn't always land perfectly on the first placement.
If a dust particle lands underneath, lift the section back with a small piece of tape rather than trying to force it flat. The sooner you catch it, the cleaner the final finish. For small decals or tiny bathroom motifs where repositioning isn't really needed, the dry method can work, but on full panes it's less forgiving.
You can also cross-check technique against this window privacy film installation guide if you want a second practical walkthrough before you start.
Fixing Bubbles, Creases and Misalignment
Most first-fit mistakes look worse than they are. A small bubble, a light crease, or a slightly out-of-square edge usually means the film needs a correction, not a replacement. The key is acting before the adhesive has fully settled.
Small defects are usually salvageable
For a tiny air bubble, a pin hole at the edge of the bubble lets you press the trapped air out towards the nearest edge. Don't stab the centre and leave it. That just creates a visible mark where the light catches. If a crease forms, lift the affected section slowly and re-lay it with more slip solution, then smooth it again from the middle out.
Patterned film needs a bit more care. If a motif or repeat lands off, trim a clean edge and realign the repeat before the adhesive tightens. I'd rather lose a sliver at the edge than force a pattern to sit crooked across the pane.
If the film has already started to grab, gentle heat from a hairdryer can relax the adhesive enough to ease a section back into position.
What not to assume
A lot of buyers think “peel and stick” means any removal will be clean and instant. That isn't true, especially on older uPVC, painted frames, or double-glazed units that have seen heat and sunlight for years. The surface condition matters as much as the film type, and once an adhesive film has sat for a while, residue risk goes up.
That's why rushed corrections can be costly. Pulling too hard can stretch the sheet, crease the corner, or leave a trail of adhesive on the frame where you least want it.
Renter-Safe Removal and Residue Risk
A rented flat changes the decision slightly. You're not just asking whether the film looks good today, you're asking whether it comes off without starting an awkward conversation at checkout. The safest route depends on whether you've used static-cling or adhesive film, and how long it's been on the glass.
A static-cling sheet is the easiest to remove. It's designed to lift cleanly, which is why it suits temporary privacy in bathrooms, nurseries, and short-term lets. For a more durable adhesive option, I'd look at a durable Oracal window decal when a longer-lived graphic or label is needed, but it's a different choice from a removable privacy solution and should be treated that way.
For adhesive film, softening the surface helps. Warm soapy water and a hairdryer make peeling easier, especially on older glass where the bond has had time to set. If residue remains, a citrus-based adhesive remover can help, but always test a hidden corner first, particularly on painted frames.
The practical issue in the UK is that the private rented sector accounted for about 19% of households in England in 2023/24 (private rented sector guidance), so this isn't a niche concern. Plenty of people need a privacy fix they can remove without leaving visible damage behind.
For a closer look at removability, this static-cling film guide is worth reading before you choose a product. The main point is simple. The longer an adhesive film stays on, the more likely you are to need patience at removal time.
Styling Ideas for Bathrooms, Nurseries and More

A bathroom window is the straightforward case. Full-coverage frost gives the cleanest visual result, because there's no awkward strip of clear glass left around the edges. In a street-facing lounge, though, you might prefer a banded layout, or a full pane with a lighter pattern that still softens the room without making it feel boxed in.
Nurseries and children's rooms work well with themed cuts, gentle geometric patterns, or partial frosting on glazed doors. The goal isn't just privacy, it's keeping the room bright and calm. Hallway glass and internal doors often look better with a border or mid-height band rather than a full sheet, because the decorative line gives the space structure without overwhelming it.
There's a catch people miss. A frosted finish that blocks direct visibility in daylight can still allow recognition at night if the room light is on and the outside is dark. That's why street-facing rooms sometimes need a blind behind the film, or a denser frost than the one that would be fine for an internal bathroom. UK privacy glazing guidance also treats light transmission and obscuration as different things, so a film that looks private in the day isn't automatically a full substitute for obscure glazing in every situation.
Period properties often benefit from film where a curtain rail would look awkward. It gives a cleaner line than net curtains, especially on small panes or awkward bathroom windows. The finish feels more architectural when it's fitted square and trimmed tightly to the frame.
Keep it looking fresh with a soft cloth, mild soapy water, and no abrasive pads. Avoid ammonia, scouring pads, and harsh solvents, because they can cloud the surface or damage the edges over time. If you start seeing edge lift near a south-facing kitchen or another heat-heavy spot, deal with it early before dust works under the corner.
A simple checklist helps before you start:
- Check the glass type. Make sure the pane is suitable for film and not an awkward textured surface.
- Measure twice. Order enough material to trim cleanly.
- Clean thoroughly. Remove dust, grease, and silicone residue.
- Choose the right privacy level. Match the room to the opacity.
- Plan the removal. Think about tenancy end dates before you fit.
A quality film fitted and cared for properly should stay looking sharp for years, and premium products such as Avery Dennison's frosted glass film are rated for 15 years indoors and 7 years outdoors in the verified technical data above. Measure twice, clean thoroughly, wet-apply, and you'll get the look of proper frosted glass at a fraction of the disruption.
If you want privacy film, wall vinyl, or custom stickers that fit the same kind of careful DIY approach, browse Quote My Wall and look through the glass, wall, and vinyl options that suit your room. For renters, parents, and homeowners alike, it's a practical place to find simple finishes that can be fitted neatly and removed when the time comes.