
A Savvy Bathroom Makeover On A Budget You Can Actually Do
A stunning bathroom makeover on a budget isn't just a fantasy; it's completely doable. The trick is to focus on high-impact cosmetic changes instead of getting bogged down in costly, disruptive structural work. By getting clever with DIY-friendly updates like a fresh coat of paint, new hardware, and modern vinyl solutions, you can completely revitalise your space for a tiny fraction of a full renovation price tag.
Your Dream Bathroom Is Closer Than You Think
We've all flicked through magazines and seen those picture-perfect bathrooms, only to sigh when we think about the cost. Professional renovation quotes can easily spiral into thousands of pounds, making that dream feel completely out of reach. But what if I told you that a gorgeous transformation is actually within your grasp, without the eye-watering bill?
This guide is for every UK homeowner—and yes, even renters—who wants to breathe new life into their bathroom without the financial headache. We're not talking about dust, demolition, or expensive tradespeople. We're talking about smart, stylish updates you can proudly tackle yourself.
Understanding the True Cost Savings
Let's look at the numbers, because this is where a budget-friendly approach really shines. A full, professionally-done bathroom renovation in the UK averages around £6,500. It’s a hefty sum.
But savvy DIYers are proving you don't need to spend anywhere near that. A basic cosmetic remodel can start from as little as £1,500. That's a potential saving of up to 67% simply by avoiding major plumbing work and focusing on high-impact visual upgrades. If you want to dive deeper into the specifics, you can discover more insights about bathtub renovation costs in the UK.
The real secret to a successful budget makeover is putting your money where it makes the biggest difference visually. Swapping out tired taps, painting the walls a fresh new colour, and upgrading your floor with modern tile stickers can make an old bathroom feel brand new, all without touching the expensive stuff behind the walls.
To get a clear picture of what your project might cost and stay on track, it’s a great idea to play around with a bathroom remodel cost estimator. This will help you see where your money is going and plan effectively.
With this guide, you'll be able to:
- Pinpoint the high-impact, low-cost upgrades that matter most.
- Put your personal stamp on your space, even if you're renting.
- Plan a project that’s not just achievable, but genuinely fun to do.
Getting Started: How to Plan Your Bathroom Makeover
Diving into a bathroom makeover on a budget without a solid plan is a recipe for disaster. Before you even think about picking up a paintbrush, it's crucial to map everything out. This isn't the boring part; it's the bit that saves you from costly mistakes and ensures every pound you spend makes a real difference.
First things first, take a good, hard look at your current bathroom. Grab a notepad and create three simple lists: ‘Keep’, ‘Refresh’, and ‘Replace’. Be ruthless. That vanity might be a hideous shade of orange, but is it structurally sound? If so, it's a prime candidate for a ‘Refresh’ with vinyl wrap. That leaky tap, on the other hand, is a definite ‘Replace’. This simple exercise will help you focus your efforts and your cash where they matter most.
Figure Out Your Priorities and Your Budget
Now for the fun part: what do you actually want your new bathroom to feel like? Are you dreaming of a bright, airy space, or is a cosy, spa-like vibe more your speed? Jot down the top three things that will get you there. Maybe it’s covering up those cracked floor tiles, getting rid of the dated brass taps, or finally adding some decent storage.
With your priorities straight, you can set a budget that makes sense. To get a feel for potential costs, it's worth looking at a complete bathroom renovation cost breakdown. It’ll show you where the big expenses usually are in a full-scale project and highlight just how much you can save with smart DIY choices.
I always recommend creating a mood board—a private Pinterest board is perfect for this. It’s your secret weapon for visualising the final look and making sure that the paint colour, hardware, and accessories you've chosen actually work well together. Think of it as your project's North Star, guiding your decisions and stopping you from making impulse buys you'll regret.
What Your Budget Can Realistically Achieve
It can be tough to know what's possible at different price points. To help, I've put together a quick guide showing what kind of impact you can make, whether you've got £100 or £500 to spend on cosmetic upgrades.
| Upgrade Item | Under £100 Makeover | Under £300 Makeover | Under £500 Makeover |
|---|---|---|---|
| Walls | Paint one or two walls; use vinyl decals as a feature. | Paint the entire room; create a full feature wall with patterned vinyl. | Paint all walls; add wall vinyl to the lower half for a wainscoting effect. |
| Flooring | Add a stylish new bathmat and rug. | Cover the entire floor with peel-and-stick vinyl tiles. | High-quality peel-and-stick vinyl tiles plus new skirting. |
| Vanity | Paint the unit or cover just the doors with vinyl wrap. | Wrap the entire vanity and countertop with water-resistant vinyl. | Wrap the vanity and add new, modern handles and a new tap. |
| Fixtures & Hardware | Swap out the toilet roll holder and towel ring. | Replace all hardware: cabinet handles, towel rails, and toilet roll holder. | Upgrade all hardware and the main light fixture. |
| Accessories | New soap dispenser, toothbrush holder, and a plant. | A new mirror, coordinated accessories, and upgraded storage baskets. | A new mirror, premium accessories, plus a new shower curtain and bathmat set. |
As you can see, even a small budget can make a huge difference if you focus on the right areas. It’s all about being strategic with your choices.
Measure Twice, Save a Fortune Once
One of the most common and frustrating mistakes I see is people ordering the wrong amount of materials. It’s a surefire way to blow your budget. Before you click ‘buy’ on anything, get your tape measure out.
- Flooring: Calculate the total square meterage of your floor.
- Walls: Measure the height and width of each wall you plan to paint or cover, then subtract the area of any doors or windows.
- Surfaces: Jot down the exact dimensions of your vanity top, cabinet doors, or any other surfaces you plan to wrap with vinyl.
Having these numbers on hand means you buy exactly what you need—no more, no less. It saves you from wasting money on leftovers and avoids those frantic last-minute trips to the DIY shop.
The difference in cost between a full professional job and a clever DIY makeover is genuinely staggering.
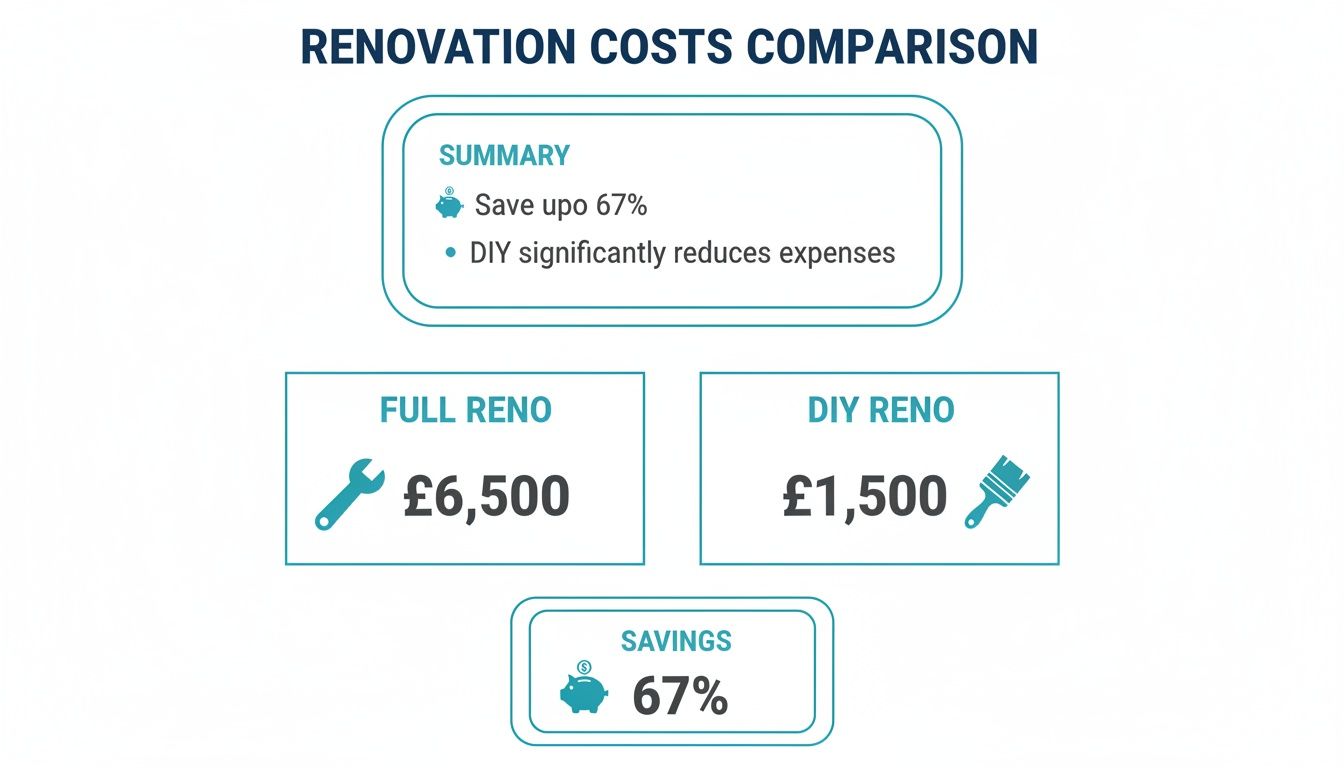
This just goes to show that with a bit of elbow grease and smart product choices, you can get a stunning new look for a fraction of the price. The money you save can go straight towards your next home project! With a solid plan sorted, you’re ready to get to the good stuff.
Transforming Walls And Floors Without The Mess
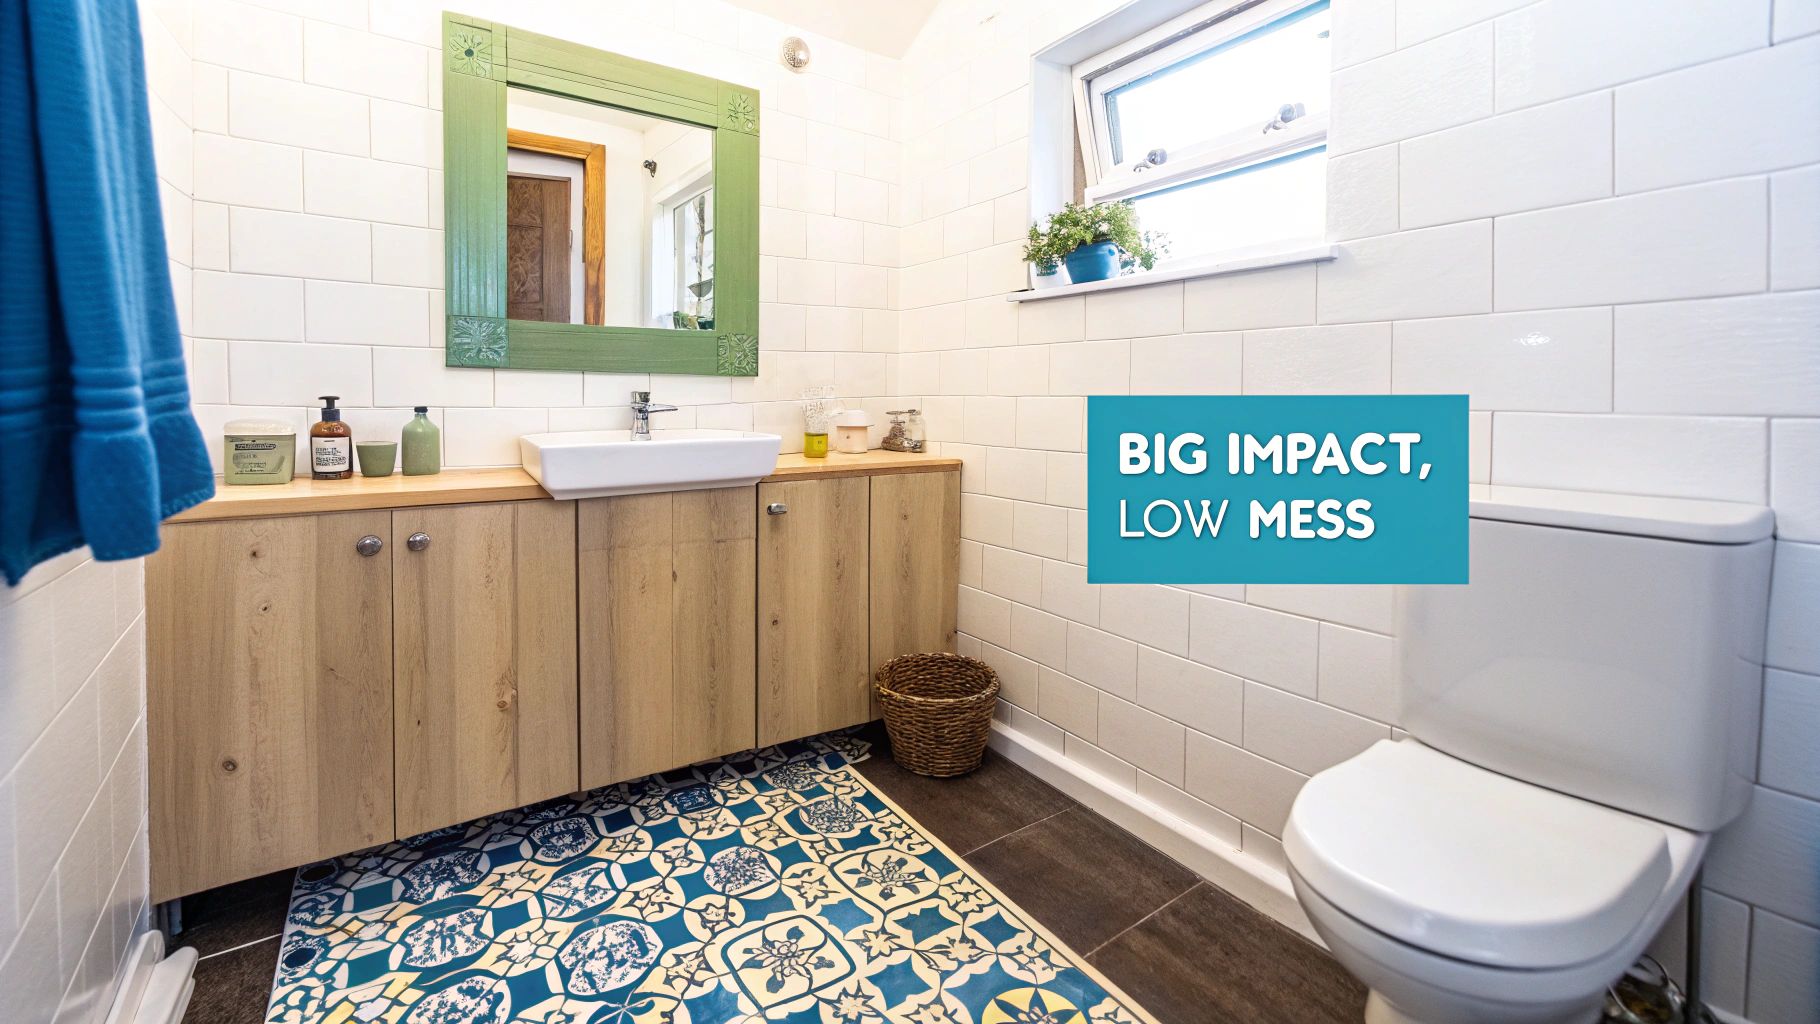
If you want the biggest bang for your buck in a bathroom makeover on a budget, start with the largest surfaces: the walls and floors. Forget about the dust, disruption, and eye-watering quotes from tilers. These days, modern solutions can completely change the look and feel of your space over a single weekend.
A fresh coat of paint is, without a doubt, the most powerful tool in your DIY arsenal. It’s cheap, cheerful, and can instantly make a cramped bathroom feel brighter and more spacious. The secret is choosing the right formula.
You’ll want to look for paints specifically designed for bathrooms and kitchens. They contain clever additives that resist moisture and prevent mould growth, which is an absolute must in a steamy environment. A satin or semi-gloss finish is also a smart move, as it’s much easier to wipe clean than a flat matt.
Choose Colours That Work Harder
When picking a colour, think beyond plain white. Soft blues, pale greens, or even a warm greige can create that serene, spa-like atmosphere we all crave. For small, windowless bathrooms, I’ve found that painting the ceiling the same light colour as the walls is a great trick for creating an illusion of height and openness.
Here are a few colour strategies to consider:
- Light & Bright: Pastels and off-whites are your best friends for bouncing light around and making the room feel larger.
- A Bold Accent Wall: Love dark colours but worried about them swallowing the space? Paint just one wall—the one behind the vanity is usually a great choice—in a deep navy or forest green for a pop of drama.
- Monochromatic Magic: Using different shades of the same colour for walls, towels, and accessories creates a surprisingly cohesive and sophisticated look.
The Magic Of Modern Vinyl Solutions
Paint is fantastic for walls, but what about those dated tiles and tired floors? This is where high-quality vinyl comes to the rescue, giving you a professional-looking finish without the cost or chaos of retiling. Full bathroom renovations in the UK can easily hit £4,500-£8,104 on average. That’s a hefty sum.
Clever vinyl solutions let you achieve that 'wow' factor for a tiny fraction of the price. Think about it: labour alone can account for £1,800-£4,000 of a professional job. Stick-on tile stickers cut that cost out entirely, letting you transform a room for as little as £20-£100. If you're curious about the full breakdown, Checkatrade has a great guide on bathroom remodel costs.
High-quality peel-and-stick tile stickers are a total game-changer for floors and splashbacks. They’re designed to be durable, water-resistant, and a breeze to clean. You just peel off the backing and apply them directly over your existing clean tiles. The result? A stunning new floor or feature wall that looks just like real patterned tiles.
Pro Tip: When applying tile stickers, grab a squeegee or even a credit card to smooth out any air bubbles as you go. Always start from the centre of the tile and work your way outwards for a flawless, professional finish.
Another brilliant use for vinyl is rescuing a dated vanity unit. Instead of ripping out a perfectly good cabinet, you can use a vinyl wrap to give it a completely new identity. From realistic wood grains to sleek matt colours, the options are endless. It's a simple peel-and-stick job that also protects the surface underneath, which makes it an ideal solution for renters.
Finally, don't overlook vinyl wall decals. If you're a bit hesitant about full-blown wallpaper but still want to inject some personality, decals are your answer. They can create a stunning feature wall with intricate patterns or add a playful touch without the long-term commitment. If you’re thinking about going bigger with vinyl, we’ve put together a guide where you can learn more about applying peel and stick wallpaper in a bathroom.
Upgrading Your Fixtures Without Calling a Plumber
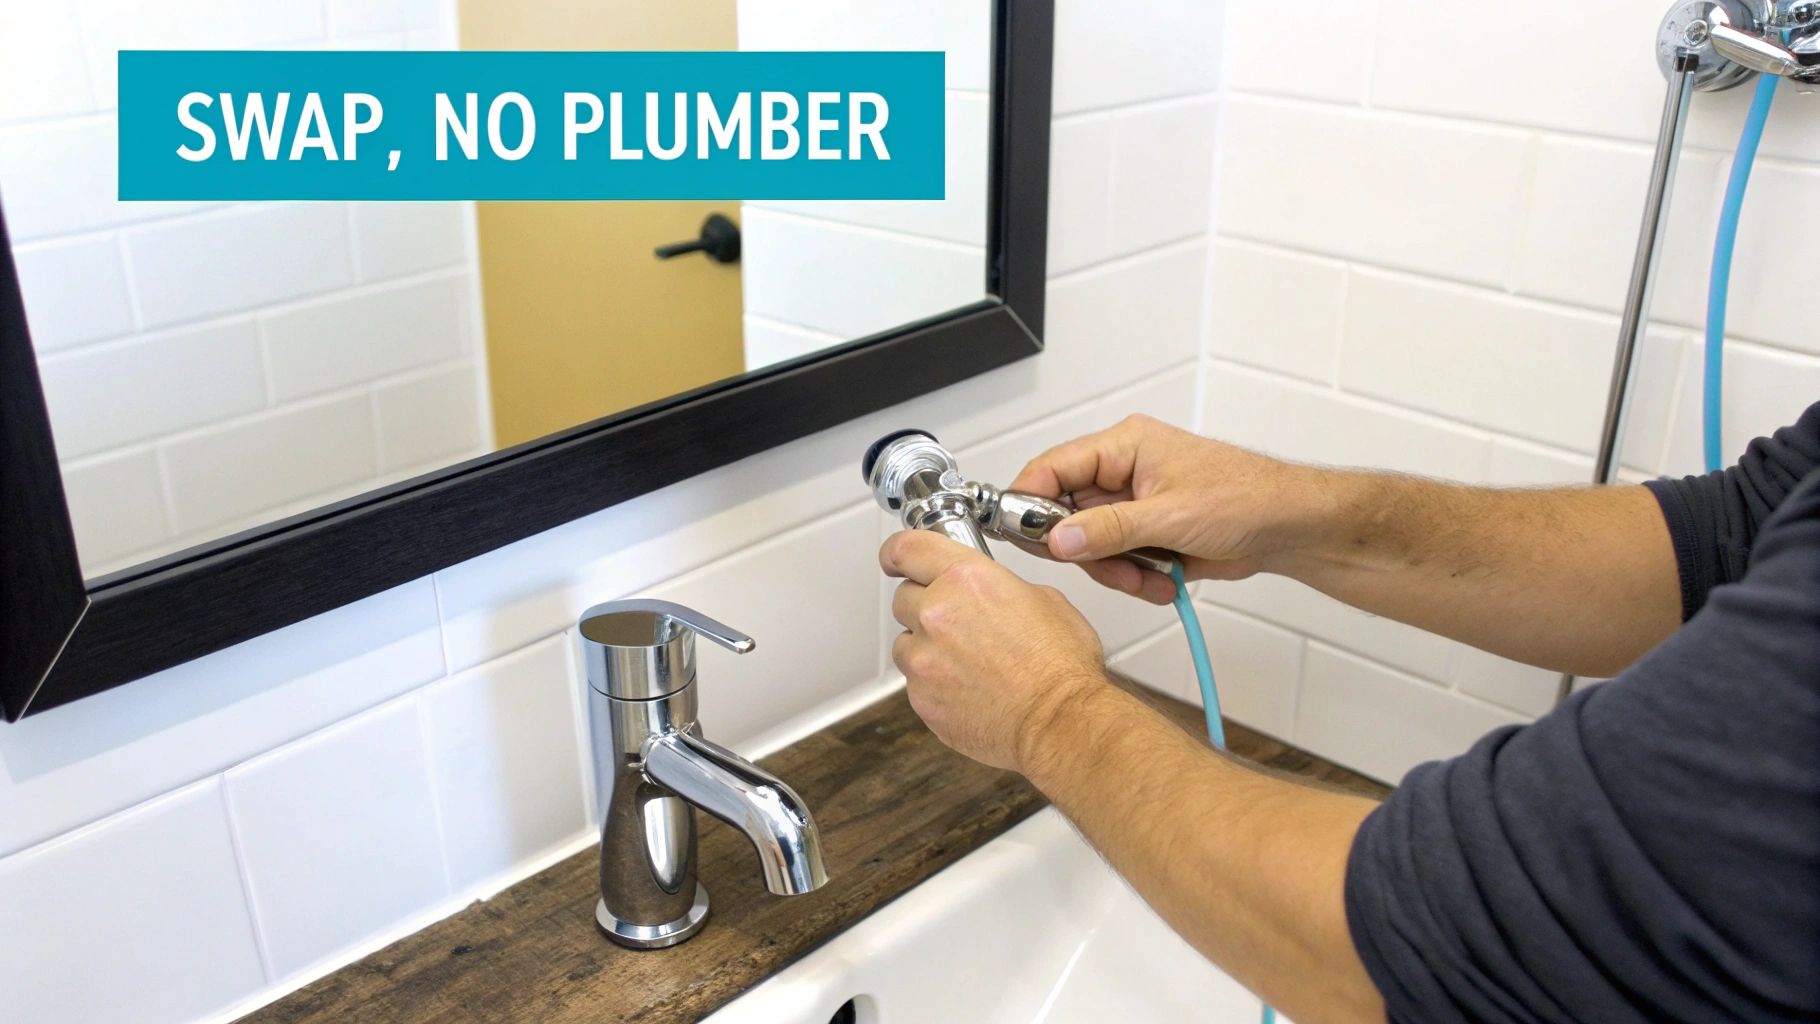
It’s often the small details that pack the biggest punch in a bathroom makeover on a budget. A fresh coat of paint provides a new backdrop, sure, but it’s the hardware and fixtures—the functional jewellery of the room—that really lift the space from simply refreshed to thoughtfully designed. And the best bit? Many of these high-impact swaps are surprisingly simple DIY jobs. No plumber needed.
Think about it. Dated taps, a shower head caked in limescale, or peeling chrome cabinet handles can instantly age a bathroom, no matter how spotless you keep it. Swapping these out for modern alternatives in a finish like matt black, brushed brass, or even a crisp new chrome is a project you can easily knock out in an afternoon. These small changes unify the room's aesthetic, making everything feel much more cohesive and intentional.
When you're choosing new taps, for instance, the main thing to check is compatibility. Just take a look at your current sink—does it have one hole for a mono mixer tap, or two for separate pillar taps? As long as you stick to the same configuration, replacing them is usually just a case of turning off the water supply and getting busy with a wrench.
Swapping Out The Small Stuff
Don't underestimate the power of coordinating the little things. Take a mental inventory of all the metalwork in your bathroom and try to get everything singing from the same hymn sheet.
- Cabinet Handles and Knobs: This is probably the easiest and cheapest upgrade going. A new set of handles can completely change the personality of a tired vanity unit.
- Towel Rails and Toilet Roll Holders: These are often overlooked, but they really contribute to the overall look. Ditching a basic builder-grade holder for something more stylish is a five-minute job that makes a real difference.
- Shower Heads: A new shower head improves both the look and the feel of your shower. Modern water-saving models can even help trim your utility bills, which is always a bonus.
If you’ve decided to give your vanity a fresh new look with a vinyl wrap, pairing it with new hardware is the perfect finishing touch. For a seamless application of the wrap before you fit your new handles, you can find a straightforward guide on how to apply vinyl wrap that walks you through the whole process.
By focusing on these smaller, accessible upgrades, you’re essentially giving your bathroom a mini-renovation for the price of a few accessories. It’s all about working smarter, not harder, to get that high-end look without the high-end price tag.
Let There Be (Better) Light
Lighting is another area where a small change delivers a huge reward. A single, harsh overhead light does absolutely nothing for a room's atmosphere. Replacing it with a more stylish fixture can instantly make the space feel warmer and more inviting.
You don't always need to be an electrician for the simplest swaps. If you're just replacing an existing ceiling fitting or wall sconce, it’s often a case of turning off the power at the circuit breaker and connecting a few wires. That said, if you are not 100% confident, this is one job where it's always best to call in a professional. Safety first!
Even just changing the style of a lampshade or switching to warmer LED bulbs can make a noticeable difference to the room's ambience.
Using Smart Storage And Styling To Finish The Look
Now that you've transformed the main surfaces, it’s time for the final, and arguably most satisfying, stage of your bathroom makeover on a budget: bringing the room to life. This is where you conquer the clutter and sprinkle in those finishing touches that pull everything together into a stylish and functional space.
Let's be honest, a disorganised bathroom never feels relaxing, no matter how beautiful the new paint job is. Clutter is the number one enemy of good design, especially in compact UK bathrooms where every centimetre is prime real estate.
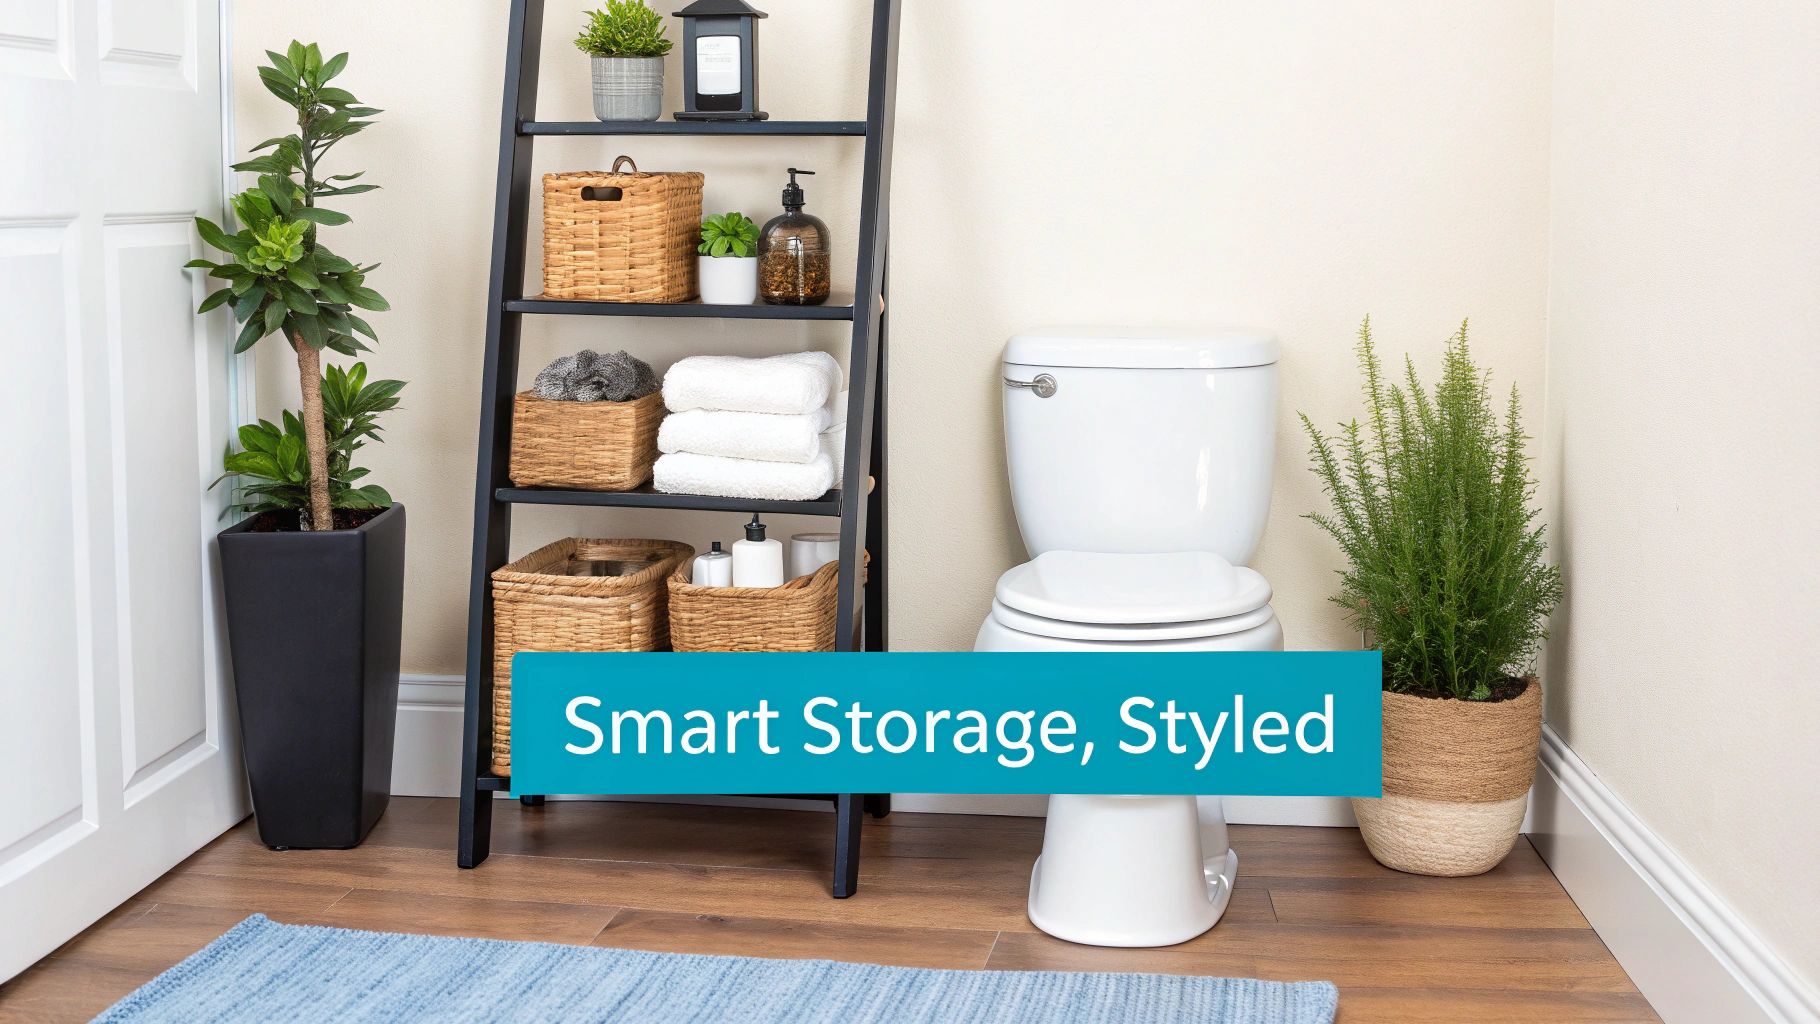
Smart Storage Solutions
The trick is to find storage solutions that look intentional and stylish, rather than purely practical. My go-to advice? Think vertically. This approach maximises your space without making the room feel crowded.
A slimline ladder shelf is a fantastic choice. It offers plenty of open storage for neatly folded towels, baskets of toiletries, and maybe a trailing plant, all while having a tiny footprint. Another brilliant option, and a classic space-saver, is an over-the-toilet unit. It turns what is essentially dead space into a home for spare loo rolls and cleaning supplies, keeping them handy but out of sight.
When you're shopping for these pieces, keep your new fixtures in mind. If you've gone for chic matt black taps, a black metal-framed shelving unit will connect the whole look perfectly.
Your final styling choices are what turn a refreshed room into a personal sanctuary. It's the moment the space truly becomes yours, reflecting your taste and creating a spa-like atmosphere you'll love spending time in.
With your storage sorted, it's time for the really fun part: the styling. This is where the last little bit of your budget can make a huge impact.
Finishing Touches That Make A Difference
It's the small details, working in harmony, that create that polished and inviting feel. This isn't just about adding new things, but about how they connect with the changes you've already made.
- Luxe Linens: A fresh set of plush, fluffy towels is an absolute must. Choose a colour that complements your new walls or go for a bold, contrasting pop to make a statement.
- Statement Shower Curtain: If you have a shower over the bath, a new curtain is a massive opportunity. Treat it like a piece of art; it’s a chance to inject pattern and personality.
- Add Some Greenery: A small, humidity-loving plant, like a fern or a snake plant, instantly breathes life into the room and boosts that sense of wellbeing.
- Coordinate Accessories: Matching your soap dispenser, toothbrush holder, and any little storage pots is a simple trick that makes the space feel instantly more organised and high-end.
These final touches are the top layer of your design. They need to work with the bigger changes you've made, such as your vinyl upgrades. To see how these elements can contribute to a stunning result, explore the benefits of using tile stickers in your home and get inspired.
Answering Your Top Budget Bathroom Questions
Taking on a bathroom makeover is exciting, but it’s natural to have a few questions buzzing around your head. Will these budget-friendly fixes actually last? How much time do I realistically need to set aside? Let's tackle some of the most common worries so you can get started with confidence.
I get asked about durability all the time, especially when it comes to using vinyl in a bathroom. It’s a fair question—bathrooms are steamy, high-traffic zones. The secret lies in choosing high-quality, water-resistant vinyl made specifically for this kind of environment. Modern vinyl tile stickers and wraps are built tough, with powerful adhesives that won't give up after a few hot showers. As long as you apply them to a clean, dry surface, they’ll create a durable, sealed finish that can look great for years.
How Long Will This Realistically Take?
Time is precious, and knowing what you're in for is half the battle. The fantastic thing about a cosmetic refresh is that it's worlds away from the disruption of a full-blown renovation. You can get this done in a single weekend.
Here’s what that could look like:
- Saturday Morning (3-4 hours): Start with a deep clean of every surface. Get the old hardware off and do any minor prep, like filling tiny holes or a quick scuff-sand.
- Saturday Afternoon (4-5 hours): Time for the first coat of moisture-resistant paint on the walls and ceiling. While that’s drying, you can get to work applying vinyl wrap to your vanity.
- Sunday Morning (3-4 hours): Get that second coat of paint on. This is also the perfect window to start laying your peel-and-stick floor tiles.
- Sunday Afternoon (2-3 hours): The final touches! Install your new hardware, put up that new light fixture, and arrange your accessories. Now, you can stand back and enjoy your work.
Is This a Good Idea if I’m Renting?
Yes, absolutely! This is where temporary solutions like vinyl truly shine. Because tile stickers, decals, and furniture wraps are designed to be removed without leaving damage behind, they’re a renter’s dream. You can inject your own style into a bland space without waving goodbye to your security deposit. Just remember to tuck the original taps and handles away somewhere safe to swap back in before you move out.
The financial gap between a traditional renovation and a smart DIY makeover is huge. It’s about more than just saving money; it’s about making a high-end look achievable without the stress, turning what feels like an impossible task into a genuinely fun and rewarding project.
Speaking of money, the savings are staggering. A typical UK bathroom renovation can set you back anywhere from £5,000 to £11,000. In contrast, a savvy makeover using vinyl solutions can be done for just £100-£400. That's a potential saving of over 90%. A simple refresh with high-tack vinyl stickers can give you a trendy, waterproof finish that lasts for up to five years for a tiny fraction of the cost. You can read more about the latest UK bathroom renovation costs to see the numbers for yourself.
Ready to find the perfect vinyl to bring your vision to life? At Quote My Wall, we have a huge range of high-quality, stylish vinyl wraps, tile stickers, and wall decals perfect for projects just like this. Start exploring our collections today!