
Wall Decals for Children: Easy Tips to Personalize Their Room
Staring at a blank wall in a nursery or playroom can feel a bit daunting, can't it? But what if you could fill that space with magic and personality, all without the fuss and permanence of paint or wallpaper? That's where high-quality wall decals for children come in. Forget those flimsy stickers you remember from childhood; think of these as premium vinyl art that can shift the entire mood of a room in an afternoon.
Bringing Imagination to Life with Wall Decals
Decorating a child's space should be fun, not a chore. The real magic of wall decals is how they inject colour, character, and creativity into a room with so little effort but for such a big reward. Unlike a painted mural or a roll of wallpaper, they give you the freedom to update the decor as your child grows and their passions evolve.
This flexibility is a massive part of why they've become so popular with parents across the UK. We’re all looking for decor that's beautiful but also practical. With decals, you can effortlessly swap out a serene woodland theme for a newborn and bring in a vibrant solar system for a space-obsessed toddler, all without ever opening a tin of paint.
Why Choose Wall Decals for Your Child's Room?
The appeal of using wall decals for children runs much deeper than just how they look. They offer a brilliant mix of benefits that make them a perfect fit for busy, modern families.
- It’s budget-friendly. You can get a high-end, professionally decorated look without the price tag of wallpaper or custom murals.
- They’re so easy to apply. Most sets are on the wall in under an hour. All you really need are your hands and a smoothing tool (a credit card works wonders!). It's a genuinely enjoyable DIY project.
- Removal is completely damage-free. When you're ready for a change, a good quality decal will peel off cleanly, leaving no sticky mess or damaged paint. This is an absolute lifesaver if you're renting.
- The possibilities are endless. From personalised name decals to educational maps and their favourite storybook characters, you can create a space that’s a true reflection of your child.
The demand for personalised, removable decor has made wall decals a huge trend. The market for children's wall decals in the UK is part of a global industry valued at an estimated USD 1.2 billion in 2023. It’s clear just how many parents are embracing this creative solution. If you're interested, you can learn more about the growing market for kids' wall stickers and see the latest industry trends.
In this guide, I'll walk you through everything you need to know to choose, apply, and get the most out of wall decals. We'll touch on everything from picking the safest materials to getting that perfect, bubble-free finish, giving you the confidence to turn any blank wall into a wonderland.
How to Choose the Perfect Decals for Your Child

Picking out the right wall decals for children is about more than just finding a cute design. It's really about striking a balance between what your child loves and what’s actually practical and safe for your home. If you think about the material, safety, and scale from the very beginning, you’ll land on decals that bring everyone joy for years.
The first big decision is the decal material itself. When you start looking, you'll mainly see two options: premium vinyl and fabric decals. Each has its own strengths, especially when it comes to a kid's room.
Let's dive into the differences.
Decal Material Comparison for Children's Rooms
Choosing between vinyl and fabric often comes down to your priorities—durability versus reusability. Here’s a quick breakdown to help you decide what’s best for your space.
| Material Type | Best For | Durability (Indoors) | Safety Notes | Removal |
|---|---|---|---|---|
| Premium Vinyl | High-traffic areas; rooms needing frequent cleaning (nurseries, playrooms). | Typically lasts 5+ years. Very durable and often waterproof. | Look for low-VOC adhesives and PVC-free options. | Usually a one-time application. Removable but not reusable. |
| Fabric (Polyester) | Renters; those who like to redecorate often; creating a soft, 'painted-on' look. | Generally lasts 3-5 years. Can tear if handled roughly. | Often non-toxic and PVC-free by nature. A great eco-friendly choice. | Easily repositionable and reusable. Peels off cleanly. |
Both materials are great, but knowing how you plan to use them can make the choice much clearer. Vinyl is the workhorse, while fabric offers fantastic flexibility.
Prioritising Safety in Your Child’s Room
When you’re decorating a nursery or bedroom, nothing is more important than safety. For wall decals, that means looking closely at the materials and glues involved. Your goal is to create a healthy, happy space without any unnecessary chemicals.
Always hunt for decals that are clearly labelled as non-toxic and made with low-VOC (Volatile Organic Compounds) adhesives. VOCs are chemicals that can be released into the air, and it's best to keep them out of your child’s room.
In the UK, safety and durability are top concerns for parents. There's a clear preference for non-toxic, washable materials, with quality indoor vinyl often rated for five years of life. This has pushed the market towards low-VOC adhesives and PVC-free options to meet the demand for safer, more eco-conscious decor.
This focus on a healthy environment goes beyond the walls. For a comprehensive guide on creating a safe and stylish nursery, consider all aspects of decorating, from the window treatments to how you arrange the furniture.
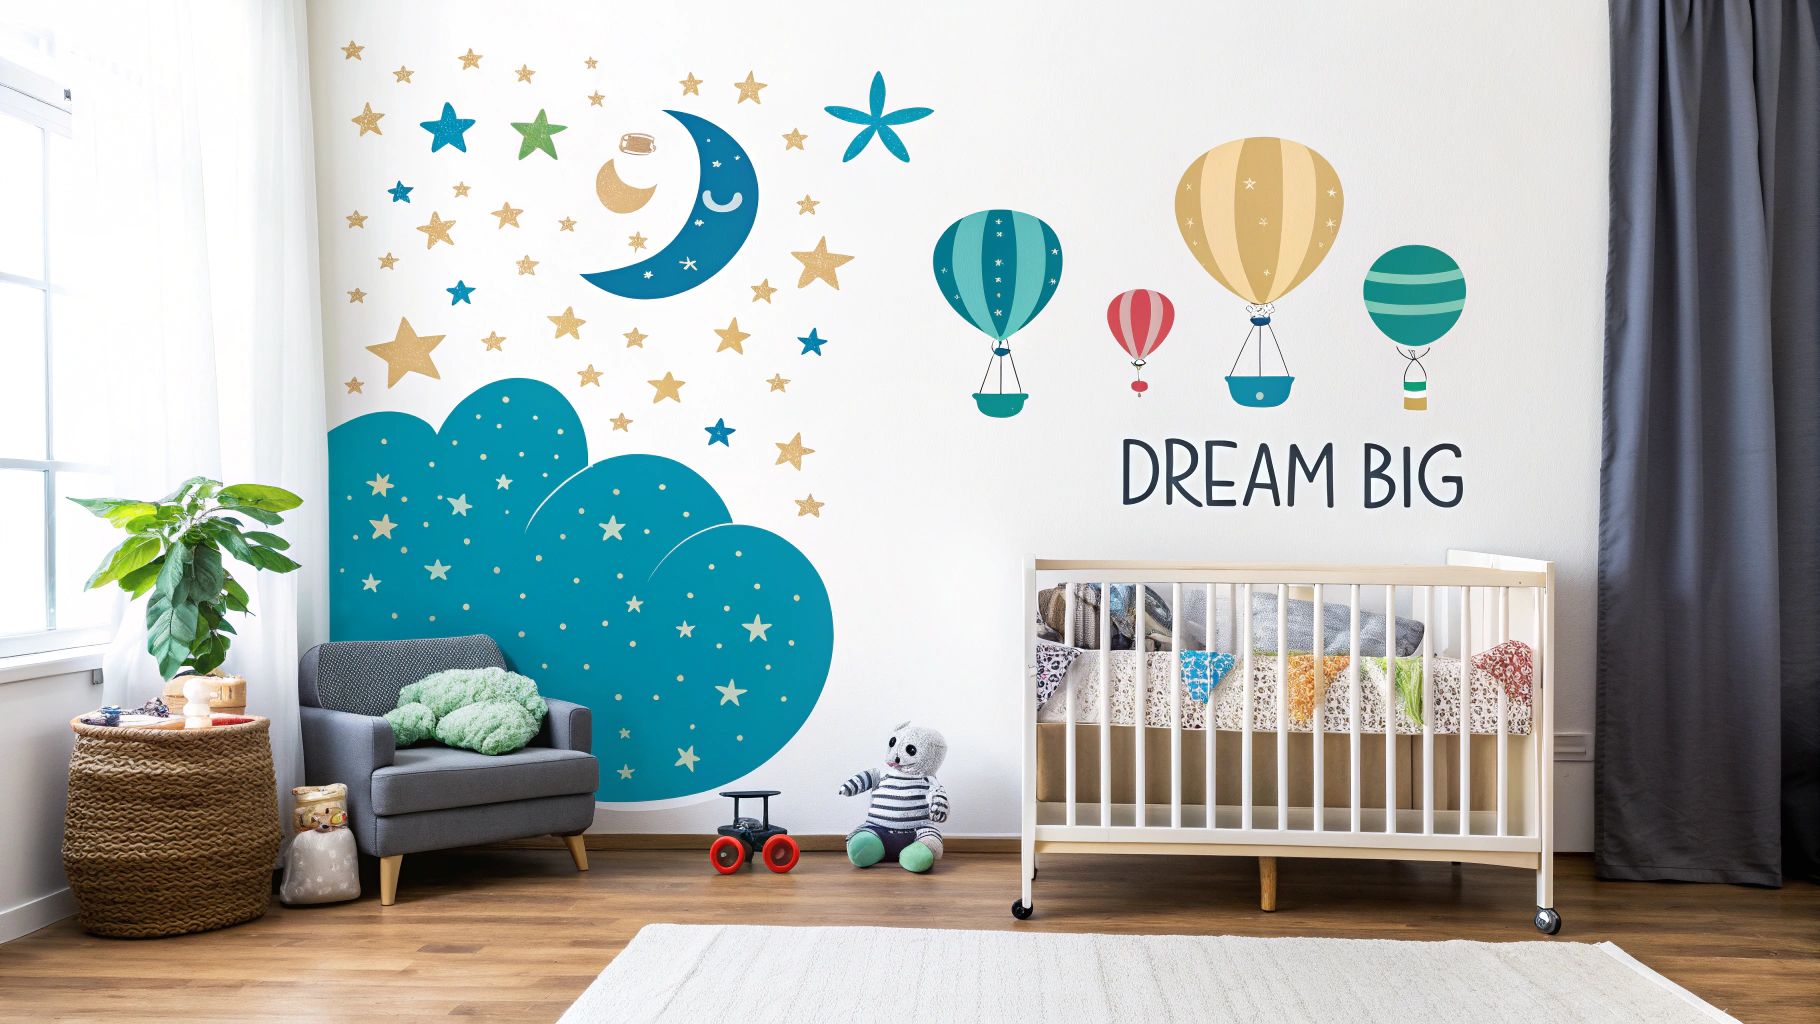
Matching the Theme to Their Personality
Now for the really fun part—finding a design that captures your child's unique spark. The theme can completely transform a room, turning it into a calm little sanctuary or a launchpad for adventure.
For a nursery, you might gravitate towards gentle, soothing themes:
- Woodland Creatures: Think soft-hued foxes, bears, and bunnies surrounded by watercolour-style trees.
- Celestial Skies: Dreamy moons, stars, and fluffy clouds create a peaceful vibe that’s perfect for sleep.
- Subtle Florals: A few delicate flowers and leaves can bring a touch of nature inside without feeling too busy.
As children get older, their interests really start to shine. For toddlers and big kids, decals can become a focal point for learning and play. Think about interactive designs like a huge world map, a fun height chart, or a vibrant solar system. For more ideas, check out these tips on selecting the perfect kids' wall stickers that can adapt as they grow.
Getting the Size and Scale Just Right
The final piece of the puzzle is figuring out the size of your decals. This one decision can have a huge impact on the room's overall feel. Are you after a single, show-stopping feature, or a scattering of smaller decals for a more subtle touch?
A large, single decal—like a massive tree or a personalised name sign—can create a brilliant focal point, especially on the wall behind a cot or bed. This approach works wonders when you want to make a bold statement without cluttering the room.
On the other hand, using a set of smaller, scattered decals can create a whimsical effect that almost looks like wallpaper. Imagine individual stars twinkling across a ceiling, a herd of dinosaurs marching along the skirting boards, or a shower of polka dots on a feature wall. This method gives you total freedom to customise the layout to fit your space perfectly.
Preparing Your Walls for a Flawless Finish
Let’s talk about the secret to getting those wall decals for children to look like they were painted on by a professional. It's all in the prep work. I know it’s tempting to skip this bit and get straight to the fun part, but a little effort now will guarantee a smooth, bubble-free finish that actually lasts.
Think of it this way: your wall is the canvas. To get the art to stick properly, that canvas needs to be clean, dry, and as smooth as possible. Good prep stops those annoying peeling edges and helps the adhesive do its job, saving you a lot of frustration later on. The best part? You don't need any fancy equipment—you probably have everything you need already.
Cleaning the Surface for the Best Stick
A wall might look clean, but it's almost always covered in a fine layer of dust or invisible grime. This is the number one enemy of a long-lasting decal. A quick but thorough clean is an absolute must.
You don’t need anything harsh. For most painted walls, a simple mix of warm water and a few drops of mild washing-up liquid does the trick. Dampen a soft, lint-free cloth, wring it out really well, and give the entire area a gentle wipe-down.
Once that’s done, go over it again with a different cloth dampened with just plain water to get rid of any soap residue. Then, you have to let it dry completely. Patience here is key—we're talking a few hours at least. Slapping a decal on a slightly damp wall is a sure-fire way to make it fail.
Know Your Wall and Paint Type
Not all walls are created equal, and the type of paint you have can make a big difference in how well your decals adhere. This is especially true if you're decorating a freshly painted nursery or playroom.
- Freshly Painted Walls: This is a big one. New paint needs time to “cure”—that’s the chemical process where it fully hardens. This takes at least two to three weeks. If you apply a decal too soon, you can trap gases underneath, causing bubbles. Worse, you might pull the paint right off the wall when you eventually remove the decal.
- Paint Finish: The sheen of your paint really matters. Vinyl decals absolutely love the slightly porous surface of matte or eggshell finishes. Glossy or semi-gloss paints are a bit trickier because their slick surface gives the adhesive less to grip onto.
- Textured Surfaces: What if your walls aren't perfectly smooth? Light textures, like a subtle "orange peel" finish, are usually fine, though the decal won't sit quite as flush. Heavily textured walls, however, can be a real challenge. If you’re not sure, it’s always a good idea to test a small, out-of-the-way piece of the decal first.
Pro Tip: Got glossy walls? You can give the decal a helping hand by very lightly scuffing the area with fine-grit sandpaper (around 220-grit). This creates just enough texture for the adhesive to grab onto. Just be sure to wipe away every speck of dust before you start.
Gather Your Tools and Plan the Layout
With your wall clean, dry, and ready to go, the final bit of prep is all about planning. This is your chance to play around with the design and make sure everything is perfectly placed before you commit.
Here’s a quick list of what to grab:
- Measuring Tape: Essential for getting things centred and straight.
- Pencil: For making a few light, temporary guide marks on the wall.
- Masking Tape: This will be your best friend. Use it to temporarily stick the decal (with its backing still on) to the wall.
- A Smoothing Tool: A squeegee is great, but a credit card or even a plastic loyalty card works just as well for pushing out air bubbles.
Before you even think about peeling off the backing paper, use your masking tape to fix the whole decal sheet to the wall. This lets you step back and look. Is it level? Is it too high or too low? How does it look next to the cot or bookcase? This simple step takes all the guesswork out of the process and makes sure you end up with a result you'll absolutely love.
Your Guide to Applying Decals Like a Pro
Right, this is the moment you've been waiting for—turning that sheet of vinyl into a stunning piece of wall art. This is where the magic happens, and trust me, with a few simple techniques, you’ll find the process is not only easy but also incredibly satisfying. Forget any worries you have about wonky placements or stubborn air bubbles; we’ll sort all that out.
The secret to a stress-free application is patience. Once your new wall decals for children have arrived, resist the urge to stick them up straight away. Unroll them and lay them flat on a clean surface, like a dining table or the floor, for at least a few hours. I usually pop a few books on the corners to help them flatten out completely.
This little step is more important than it sounds. It lets the vinyl relax and acclimatise to your room's temperature, which makes it far easier to handle and stops it from trying to curl up during application.
This quick visual guide sums up the prep work perfectly.
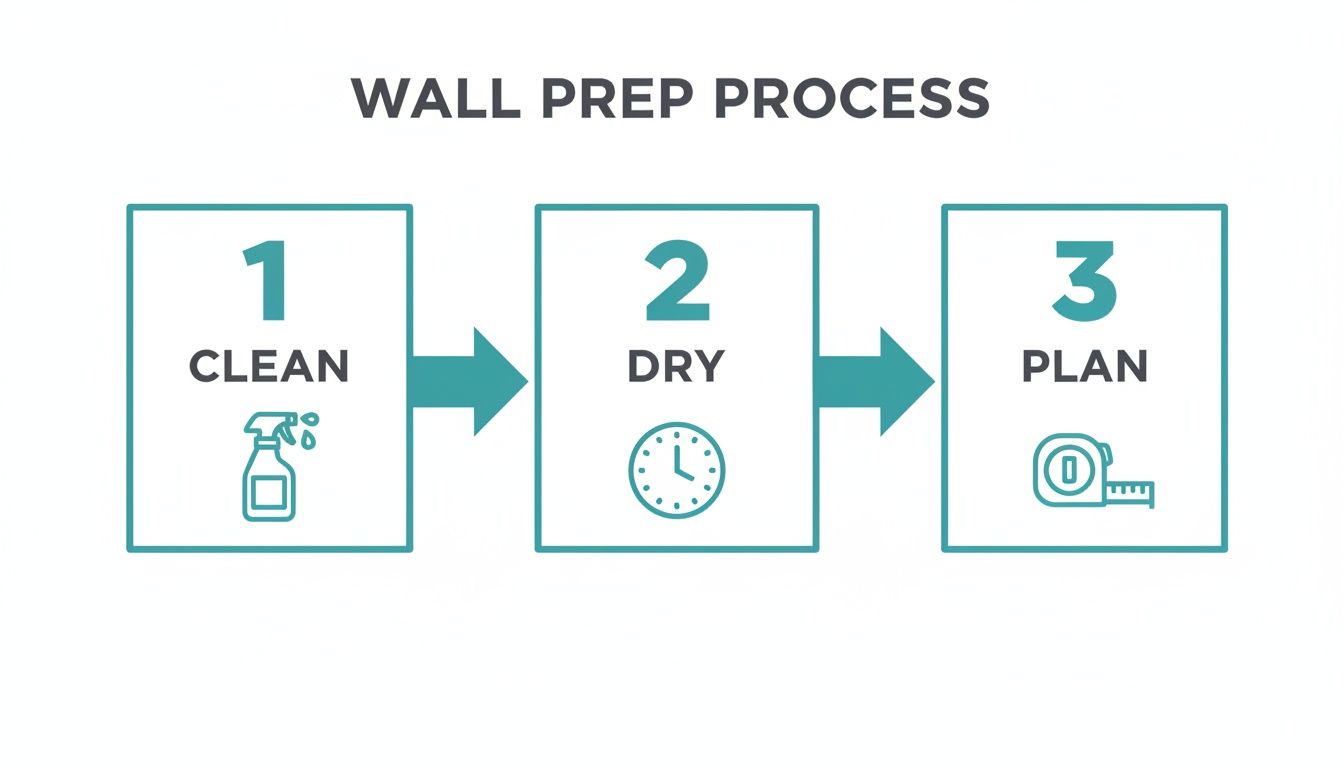
As you can see, a clean, dry, and well-planned surface is the foundation for a flawless, long-lasting finish.
Mastering the Hinge Method for Perfect Placement
For larger or more intricate designs, the "hinge method" is a total game-changer. It's a technique the professionals use to guarantee a straight, bubble-free application every single time, and it’s surprisingly simple to do yourself. It gets rid of the risk of the sticky side folding back on itself or going on crooked.
Here’s how it works:
- Position the Decal: With the backing paper still on, place your decal on the wall. Use masking tape to secure the top edge firmly. This tape is your 'hinge'.
- Flip and Peel: Lift the decal up as if it’s on a hinge and peel away the top half of the backing paper, snipping it off with scissors.
- Smooth It Down: Carefully lower the now-exposed sticky half of the decal back against the wall. Using your squeegee (or a credit card), start smoothing from the centre of the hinge downwards and outwards.
- Repeat for the Bottom: Once the top half is secure, remove the masking tape hinge. Gently lift the bottom half and peel away the remaining backing paper, continuing to smooth downwards from the middle to the edges.
This methodical approach gives you complete control, which is ideal when you're applying a large name decal above a cot or a detailed tree design in a playroom. If you're a visual learner, you can find a helpful guide on how to apply wall stickers that breaks this down even further.
The Art of Smoothing and Removing Bubbles
As you apply the decal, your main goal is to push out any trapped air. The trick is to always work from the centre outwards. This motion forces air towards the edges where it can escape, rather than trapping it in the middle of your design.
Use your smoothing tool at a 45-degree angle, applying firm, even pressure. Don't be afraid to go over the same spot a few times to ensure a really strong bond between the vinyl and the wall.
Pro Tip: Don't press too hard at first. Use medium pressure to get the decal onto the wall, then go back over it with more firmness after the transfer tape is removed. This helps you avoid stretching the vinyl.
So, what happens if a stubborn bubble appears? Don't panic. It's almost always an easy fix.
For small bubbles, you can often just press and smooth them towards the nearest edge. If that doesn't work, grab a very fine pin or needle and make a tiny puncture in the centre of the bubble. This allows the trapped air to escape when you smooth over it again. The hole will be so small, it will be completely invisible.
The Final Peel for a Painted-On Look
Once your decal is smoothed down and you're happy that it's fully adhered, it's time for the final, satisfying reveal. This is where you remove the top layer, known as the transfer tape.
Start at one corner and begin peeling the transfer tape back on itself at a sharp, 180-degree angle. Go slowly and carefully, keeping the tape flat against the wall as you pull. If any part of the vinyl decal starts to lift with the tape, just stop. Press it back down, give that spot another firm rub with your smoothing tool, and then continue peeling.
After the transfer tape is off, give the entire decal one last gentle press with your fingers or a soft cloth. This ensures all the edges are securely bonded to the wall, giving you that beautiful, seamless finish that looks like it was painted right on.
Creative Ways to Decorate with Decals
Right, you’ve got the practical stuff sorted – you know how to choose and apply them. Now for the fun part: unleashing your creativity. Wall decals for children are so much more than just sticking a character on a blank wall. Think of them as a powerful design tool, one that helps you build a space that feels imaginative, cohesive, and truly personal to your little one.
Decals are like the final, expressive brushstroke in a room's design. They can pull a colour scheme together, create different 'zones' in a playroom, or even carry a theme from the walls onto furniture. We're moving beyond simple decoration here and into the realm of storytelling.
Designing a Cohesive Nursery Theme
In a nursery, the goal is usually to create a serene, calming atmosphere. Wall decals are absolutely brilliant for this because they can add personality without overwhelming the small space. My advice? Instead of one massive decal, think about building a gentle, immersive theme with smaller, scattered elements.
For a nature-themed nursery, you could have a delicate tree decal in one corner, with individual leaves appearing to float across the wall towards the cot. It creates a beautiful sense of movement and tranquility.
- Woodland Serenity: Try combining decals of soft, watercolour-style animals—think foxes and deer—with subtle tree and mountain silhouettes. Place them at different heights to give the wall a sense of depth.
- Celestial Dreams: A mix of gold and silver star decals scattered across the ceiling and upper walls can look magical. Add a large, soft-focus moon decal above the changing table as a calming focal point.
The trick is to stick to a consistent colour palette and artistic style across all the decals. When you do this, the room feels thoughtfully designed, not just randomly decorated.
A well-designed nursery is all about creating a feeling of peace and belonging. The right decor choices, from decals to lighting, all contribute to this atmosphere. The goal is to build a comforting space where your little one can rest and grow.
If you're looking for more ways to enhance your child's space beyond just decals, you might find some great nursery wall decor ideas to help craft the perfect environment.
Creating an Interactive and Inspiring Playroom
A playroom, on the other hand, is all about energy, learning, and fun! This is your chance to be bolder with colour and scale. I love using wall decals to create distinct zones that encourage different types of play.
For example, you can instantly define a cosy reading nook by placing a large, whimsical tree decal on the wall and arranging beanbags or cushions at its base. It immediately signals that this is a special spot just for stories.
Decals can also be fantastic tools for sparking imagination and learning:
- Geometric Wonderland: Large, colourful circles, triangles, and squares can create a vibrant, modern feature wall. It looks fantastic and subtly introduces basic shapes.
- Adventure Awaits: A huge world map decal can become a centrepiece for years of learning. You can chat about different countries, mark places you've visited as a family, and dream about future travels.
- Roadway Fun: This is one of my favourites. Run a decal of a road or a train track along the skirting boards. It’s a brilliant way to encourage floor play and gives toy cars and trains their very own designated route.
Personalising the Space to Make It Theirs
This is where wall decals truly shine. Seeing their own name on the wall or a quote that resonates with your family transforms a room from just a space into their space. It’s incredibly powerful.
Custom name decals are a classic for a reason. Placed above a bed or cot, they create an immediate sense of ownership and identity. You can find fonts and colours that perfectly match the room’s existing decor, whether that’s a flowing script for a dreamy feel or a bold, blocky font for a more modern look.
Quotes also add a beautiful, personal layer. It could be a line from their favourite bedtime story, an uplifting affirmation like "Dream Big, Little One," or a family motto. This adds a level of meaning to the decor that both you and your child will cherish for years.
And don't forget, decals aren't just for walls! Small, leftover pieces or specially chosen mini-decals can add a surprising pop of personality to other things in the room. A few stars on a plain toy box, a floral flourish on a wardrobe door, or a small animal peeking out from behind a headboard can tie the whole theme together in a truly delightful way.
Keeping Decals Fresh and Removing Them Damage-Free
Right, so the decal is up on the wall and looks fantastic. What now? Your design journey isn't quite over, but the good news is that high-quality wall decals for children are incredibly low-maintenance. A little bit of care goes a long way in keeping them looking vibrant, and knowing the right removal technique is essential for protecting your walls when it’s time for a change.
Most decals are made from a durable vinyl, which makes them a doddle to clean. If you spot any sticky fingerprints or a bit of dust, a simple wipe with a soft, slightly damp cloth is all you need. Just be sure to avoid any harsh chemical cleaners or abrasive sponges – these can easily dull the finish or even start to lift the delicate edges of the design.
Safe and Simple Removal
The biggest worry for many parents, particularly if you're renting, is whether the decals will pull the paint off the wall. I get it. But with the right method, you can get them off without leaving a single trace. Your secret weapon here is something you already have at home: a standard hairdryer.
Gently heating the vinyl softens the adhesive, making it pliable and much easier to peel away cleanly. This one simple trick massively reduces the risk of taking paint with it or leaving behind a sticky residue.
- Warm it up: Pop your hairdryer on a low or medium heat setting. You'll want to hold it about 15-20 centimetres away from the edge of the decal.
- Work in sections: Move the hairdryer slowly back and forth over a small area for around 30 seconds. You're aiming for the vinyl to feel warm and slightly soft to the touch.
- Peel with care: Get your fingernail or a plastic scraper under a corner and gently lift it. The trick is to pull the decal back on itself at a 180-degree angle, keeping it almost flat against the wall as you peel.
- Go slow: Don't rush it. Continue warming and peeling in small sections. Patience really is your best friend here if you want to avoid any damage to the surface underneath.
If you’d like a more detailed walkthrough, you can learn more about how to remove a wall sticker with these expert tips.
It’s worth remembering that the success of damage-free removal also depends on the condition of your wall. If the paint was already old and flaking, or if the decal was put up before the paint had fully cured, you might see a bit of damage.
Can You Reuse Your Wall Decals?
This is a question I hear all the time, and the answer really comes down to the material. Most standard vinyl decals are designed for a single use. While you might get away with repositioning one right after you’ve first applied it, the adhesive just isn't built for multiple peel-and-stick sessions and will lose its tackiness.
That said, some fabric-based decals are specifically made to be repositionable. These are a brilliant choice if you love to redecorate often or just want something a bit more flexible. Always double-check the product description to see what you're getting before you buy.
A Few Common Questions About Wall Decals for Children
It's completely normal to have a few last-minute questions, even after you've planned everything out. To give you total peace of mind before you start peeling and sticking, we've gathered the queries we hear most often about using wall decals for children.
Getting these details sorted will help make sure your finished room isn't just beautiful, but also safe and practical for your little one.
Are They Genuinely Safe for a Nursery?
Absolutely, as long as you buy from a reputable UK brand. The most important thing to look for is decals that are clearly labelled as being made from non-toxic vinyl and using low-VOC (Volatile Organic Compound) adhesives. This is your guarantee that no harmful chemicals are being released into your child’s environment, which is always the top priority.
For extra safety, it’s also a smart move to place smaller, individual decals well out of a toddler’s reach. This stops curious little hands from peeling them off, which could create a potential choking hazard.
A good rule of thumb is to treat small decals like any other small object in a nursery. If it's small enough to be a risk, place it high enough to be out of reach until your child is older.
Will They Damage My Walls When I Take Them Down?
This is a huge relief, especially if you're renting: high-quality decals are designed to come off without a fight. The secret weapon here is a bit of gentle heat. Just wave a hairdryer over the decal for a moment to soften the adhesive, and you should find it peels away cleanly from a properly prepared wall.
Where you might run into trouble, though, is if you've applied decals to old, flaky paint or a freshly painted wall that hasn't had the full three weeks to cure properly. In those situations, a little bit of paint lift can happen.
Can I Use Them on Textured Walls?
This one really depends on how textured we're talking. Decals will always stick best to a smooth, flat surface. They can sometimes work on very light textures, like a subtle ‘orange peel’ finish, but the bond just won't be as secure.
If your walls are more heavily textured, getting the decal to stick well can be a real challenge. My best advice? If you’re unsure about your surface, always test a small, out-of-the-way piece of the decal first before you go all in. This simple step can save you a world of frustration later on.
At Quote My Wall, we offer a huge range of premium, non-toxic wall decals perfect for creating a magical space for your child. Explore our stunning collections and find the perfect design today at https://www.quotemywall.co.uk.