

Vinyl Decals Printing: A Complete UK Guide
You're halfway through ordering a decal for a shop window, nursery wall or van, and the form asks whether you want cut vinyl or printed vinyl. Then it adds more choices: matt or gloss, removable or permanent adhesive, monomeric or cast film, contour cut or kiss cut. If you've paused before pressing “request a quote”, you're not alone.
The phrase vinyl decals printing covers several different production methods. A one-colour logo cut from film isn't made in the same way as a photographic wall graphic, and a temporary indoor decal shouldn't be specified like a vehicle graphic. The right choice depends on the artwork, surface, expected lifespan, finish and installation conditions.
This guide follows the decisions a UK print shop makes, in the order they matter. By the end, you'll know how to describe your decal, prepare the right file and avoid paying for material or finishing you don't need.
Why Vinyl Decals Printing Confuses So Many UK Buyers
A small business owner in Manchester might begin with a straightforward idea: put the company name and telephone number on the front window. The order form, however, asks for a file format, vinyl type, adhesive, finish and cutting method. A homeowner ordering a nursery design faces a similar problem, especially if the same website calls one product a wall sticker and another a vinyl decal.
The confusion starts because two different products are often sold under the same everyday name. Cut vinyl is shaped from a single-colour film, while printed vinyl receives ink before the final shape is cut. Retailers may use “sticker”, “decal” and “vinyl graphic” interchangeably, even though the production route and best use can be quite different.
The market is broad, not a single craft product
Adhesive graphics sit inside a substantial UK print ecosystem. The UK self-adhesive labels market was valued at $2,378.6 million in 2023 and was projected to reach $2,811.4 million by 2028, with an implied compound annual growth rate of 3.4%, according to MarketsandMarkets' UK self-adhesive labels market overview. That category includes more than decorative decals, but it provides useful context for the scale of demand around adhesive films, labels and related print workflows.
The wider UK market also includes cross-border supply. In 2024, the UK self-adhesive printed label market consumed about 166,000 tons and was valued at roughly $2.3 billion, while domestic production stood at 157,000 tons, as reported in IndexBox's UK market overview. For a buyer, the practical point is simple: material choice, availability and finishing capacity can all affect a quote.
What you need to decide
A reliable order begins with five questions:
- What is the artwork? Simple lettering and flat logos often suit cut vinyl. Photographs, gradients and detailed illustrations generally need printed vinyl.
- Where will it go? A clean indoor wall has different requirements from a shop window, vehicle panel or outdoor sign.
- How long should it last? Temporary décor, a seasonal promotion and permanent branding shouldn't use the same specification.
- How should it look? Matt reduces reflections, gloss can make colours appear stronger, and clear film changes how the surface shows through.
- How will it arrive? A single piece may be weeded and supplied with transfer tape, while a sticker sheet may be kiss cut or supplied as separate die-cut pieces.
Once those answers are clear, the form stops looking like a test. It becomes a production brief.
What a Vinyl Decal Actually Is
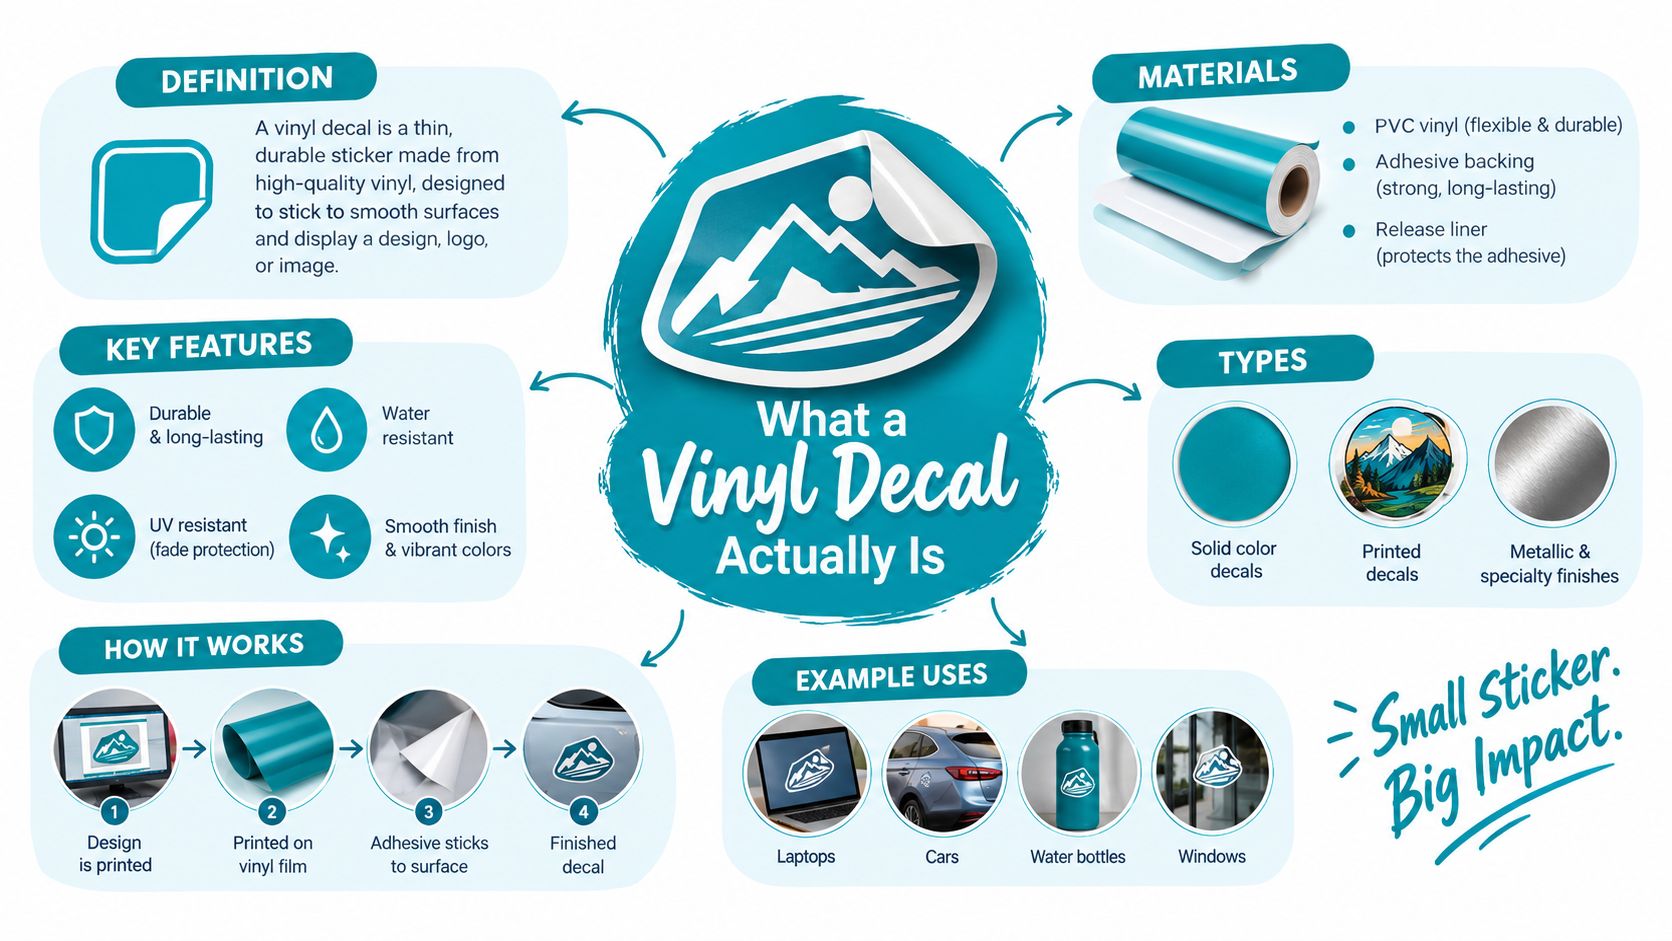
A vinyl decal is best understood as a layered adhesive graphic, not as one single sticker. Think of it as a sandwich. The top layer is the face film, the middle may contain printed ink, the underside carries pressure-sensitive adhesive, and the bottom is a silicone-coated backing paper that protects the adhesive until application.
A printed version may also receive a laminate over the ink. That transparent layer helps protect the printed surface from scratches, fading and moisture, as explained in UK guidance on installing wall decals correctly. A cut vinyl graphic has no printed image in the same sense. Its colour comes from the film itself, which is cut into letters, shapes or logos.
The four layers in practical terms
- Face film: This is the visible vinyl surface. It can be white, clear, coloured, matt, gloss or designed for a specialist surface.
- Ink or pigment: Printed vinyl receives the artwork here. Cut vinyl normally relies on the colour already built into the film.
- Adhesive: The adhesive determines how firmly the decal bonds and whether removal is intended to be clean or permanent.
- Backing paper: This keeps the adhesive covered during storage, transport and handling.
A paper sticker is usually less flexible and less resistant to moisture and abrasion than a properly specified vinyl product. A vinyl wrap is different again. It generally involves larger areas, conformability around curves and installation techniques suited to furniture, vehicles or other broad surfaces. A wall decal may use a similar family of films, but it doesn't automatically require wrap-grade material.
Don't confuse self-adhesive vinyl with heat-transfer vinyl. Self-adhesive vinyl sticks to a surface through pressure. Heat-transfer vinyl is made for garments and is applied with heat, so it belongs to a different production and application process.
Film families
UK printers commonly describe vinyl as monomeric, polymeric or cast. Monomeric film is often selected for straightforward, flat indoor work. Polymeric film offers greater stability for more demanding graphics, while cast film is the premium choice for curved or textured substrates. UK supplier guidance positions cast film as suitable for demanding installations, with reported outdoor durability of 7 to 10 years when fully laminated, compared with 5 to 7 years for polymeric vinyl and about 1 to 3 years for monomeric vinyl, as detailed by First Stop Signs Print.
For walls, the surface and adhesive matter as much as the film. Fresh paint, textured plaster, dust, silicone residue and damp can all reduce adhesion. That's why a printer should ask where the decal is going before recommending a material.
For a practical example of how wall-focused vinyl products are described, see vinyl decals for walls.
Cut Vinyl vs Printed Vinyl
The simplest distinction is this: cut vinyl gets its design from the shape of the film, while printed vinyl gets its design from ink applied to the film.
A plotter cuts cut vinyl from a roll of coloured material. The operator removes the unwanted film, a process called weeding, and may apply transfer tape so the lettering or logo can be moved to the surface in one piece. This works particularly well for shop-window lettering, boat names, simple vehicle livery and single-colour branding.
Printed vinyl begins with a printer laying down the artwork onto white or clear film. A contour cutter then follows the outer shape of the design. This route suits photographs, gradients, illustrations, detailed logos and artwork that uses several colours.
A practical comparison
| Factor | Cut Vinyl | Printed Vinyl |
|---|---|---|
| Artwork type | Lettering, simple logos and solid shapes | Photographs, gradients, illustrations and detailed branding |
| Colour | Selected from available film colours | Created by the printer from the supplied artwork |
| Surface appearance | Clean, solid film colour | Inked image, often protected with laminate |
| Small detail | Best when shapes remain easy to weed | Better for complex artwork, though very fine detail still needs testing |
| Cost per shape | Often efficient for simple designs | Depends on print coverage, cutting and finishing |
| Lead time | Can be quick when material is available | May involve printing, drying, lamination and contour cutting |
A cut graphic can be a strong choice where colour consistency and a clean, sign-written appearance matter more than photographic detail. It also avoids the visual texture of a printed image. The limitation is artwork complexity. A multicolour illustration may need several layers of film, careful alignment and more weeding, making printed vinyl the more practical option.
Printed vinyl gives you much greater visual freedom. A child's illustrated name decal, a food photograph for a café window or a full-colour promotional graphic all belong naturally to this process. Clear printed film can create a floating effect on glass, but the artwork needs enough contrast to remain visible against the background.
Choose the production route before preparing the file
Choose cut vinyl when:
- the design uses solid colours and uncomplicated shapes;
- the project needs lettering or a simple logo;
- you want a clean, sign-written finish;
- the artwork will be weeded and applied with transfer tape.
Choose printed vinyl when:
- the design includes photographs, shading or gradients;
- several colours need to appear in one continuous image;
- you need a detailed illustration or variable artwork;
- the finished shape needs contour cutting around a printed image.
The phrase “custom vinyl decal” doesn't tell a printer which route to use. Send the artwork and describe the surface, size and intended lifespan. The printer can then confirm whether the design needs cut film, printed film or a combination of both.
Materials, Inks and Finishes Explained
A decal can look perfect on a sample board and still be the wrong product for a rough wall, sunny vehicle or curved sign. UK printers therefore assess the installation first, then choose the film, adhesive, ink and protective finish as one working combination. The material that suits a shop window may behave poorly on textured plaster or a bonnet.
Start with the film
Cast vinyl is thin, stable and highly conformable. It is the usual premium choice for compound curves, vehicle panels and demanding sign work because it can follow the substrate with less tension. On textured surfaces, its flexibility helps, but the wall still needs to be sound, clean and properly prepared. A film cannot bridge loose paint or hide deep texture.
Polymeric vinyl offers a practical middle option for flatter panels and mild curves. It generally provides more stability than economy film without the cost of cast vinyl. Monomeric vinyl is intended for straightforward, flat applications where the surface and exposure are less demanding. It is more likely to shrink or move as temperature and weather place stress on the decal.
The film grades and their expected outdoor life were set out earlier. The figures in UK large-format vinyl printing guidance are material guidance, not a guarantee for every installation. Application quality, sunlight, cleaning, substrate condition and the selected laminate can all change the result.
Adhesive choice matters just as much. A permanent adhesive is suited to long-term signage, while a removable adhesive may suit temporary décor or promotional work. “Removable” describes the intended adhesive behaviour, not a promise that every painted wall will release it cleanly. Dusty masonry, uncured paint and some wall coatings can reduce adhesion or cause damage during removal.
Ink and protection work together
Printed vinyl needs an ink system matched to its intended use. A UK printer may use an eco-solvent, solvent, UV or latex process, depending on the equipment, film and required finish. Ask whether the complete ink and substrate combination is suitable for the exposure you have described, rather than choosing on the machine name alone.
Lamination places a clear protective layer over the printed face. It helps resist scratches, fading and moisture, while also adding thickness and stability. UK trade-print guidance describes 100-micron self-adhesive substrates, permanent transparent adhesive and UV-resistant inks. It also identifies 10 to 30°C as the range in which adhesion performance is typically optimised. The production guidance is available in UK vinyl wall-sticker guidance.
A laminate is not automatically required for every decal. It becomes more valuable where the print will face regular handling, road dirt, cleaning, moisture or strong light. On a sheltered indoor graphic, the printer may recommend a different finish to control cost and thickness.
Match the finish to the job
| Material choice | Ink approach | Protective finish |
|---|---|---|
| Cast vinyl for curves or demanding surfaces | Outdoor-rated printed system | Full laminate where exposure requires it |
| Polymeric vinyl for flatter panels | Outdoor-rated printed system | Protective laminate selected for the location |
| Monomeric vinyl for simple, less demanding work | Outdoor-rated printed system | Laminate chosen according to handling and weather |
| Printed vinyl for a suitable outdoor application | UV-resistant ink | Laminate for added surface protection |
The table shows why “the cheapest vinyl that lasts for years” is not a complete specification. Film grade, adhesive, ink, laminate, surface, weather and installation quality interact. A premium finish cannot correct an unsuitable substrate or poor preparation.
Matt vinyl reduces glare and can improve readability under shop lighting. Gloss vinyl gives colours a brighter, more reflective appearance and is often easier to wipe clean. An anti-graffiti laminate adds protection where repeated cleaning or handling is expected. Choose the finish for the viewing and cleaning environment, not only for how a screen mock-up appears.
Setting Up Files the Right Way
A good file gives the printer clear instructions. A poor file forces the operator to guess whether a line is artwork, a cut path or an accidental object hidden in the background.
Begin by identifying the production method. Cut vinyl needs vector artwork because the plotter must read clean paths for shapes and lettering. AI, EPS, SVG and PDF files are common choices. Printed vinyl can accept raster artwork for photographs and detailed images, but the file still needs a defined outer cut path if the decal won't be supplied as a rectangle.
Build a clean preflight
For cut artwork, convert text to outlines if the printer requests it. This prevents missing fonts and unexpected substitutions. Keep cut lines on their own layer and make sure strokes are substantial enough to survive weeding. Hairline paths, overlapping shapes and hidden objects can produce confusing results at the plotter.
For printed artwork, supply the highest-quality image available and tell the printer whether the file contains a background, transparency or a separate contour shape. If the decal is going to the edge of the final shape, allow the artwork to extend beyond the cut line. Your printer may supply a template and specify the correct bleed for its workflow, so follow that instruction rather than adding a random border.
Colour also deserves attention. Files prepared for print usually need a CMYK workflow rather than an unmanaged RGB screen file. Spot colours should be identified clearly if a brand colour matters, but the printer may need to convert them for the chosen output system. A screen cannot guarantee the exact appearance of printed ink, particularly on clear or coloured film.
Mark the contour cut
A contour cut is the line that tells the plotter where the printed decal ends. Printers commonly request a separate spot colour named something like CutContour on its own layer, or they provide a die template to follow. Don't draw a visible black outline unless that outline is meant to appear in the finished design.
A kiss cut is different. It cuts the decal face while leaving the backing sheet intact, which suits sticker sheets. A die cut separates the full piece from its backing. Tell the printer which result you want.
Use this final checklist:
- Artwork type: Vector supplied for cut shapes, suitable raster artwork supplied for printed images.
- Text: Fonts converted to outlines where required.
- Cut path: Clearly named and separated from visible artwork.
- Colour: Print colour mode and brand-colour instructions confirmed.
- Proof: Size, orientation, spelling and finish checked on the PDF proof.
- Surface: Installation material, condition and indoor or outdoor location provided.
- Finish: Matt, gloss, clear film and laminate requirements stated.
For another example of how UK buyers can think about custom printed adhesive products, see custom sticker printing in the UK.
How a UK Print Shop Produces Your Decal
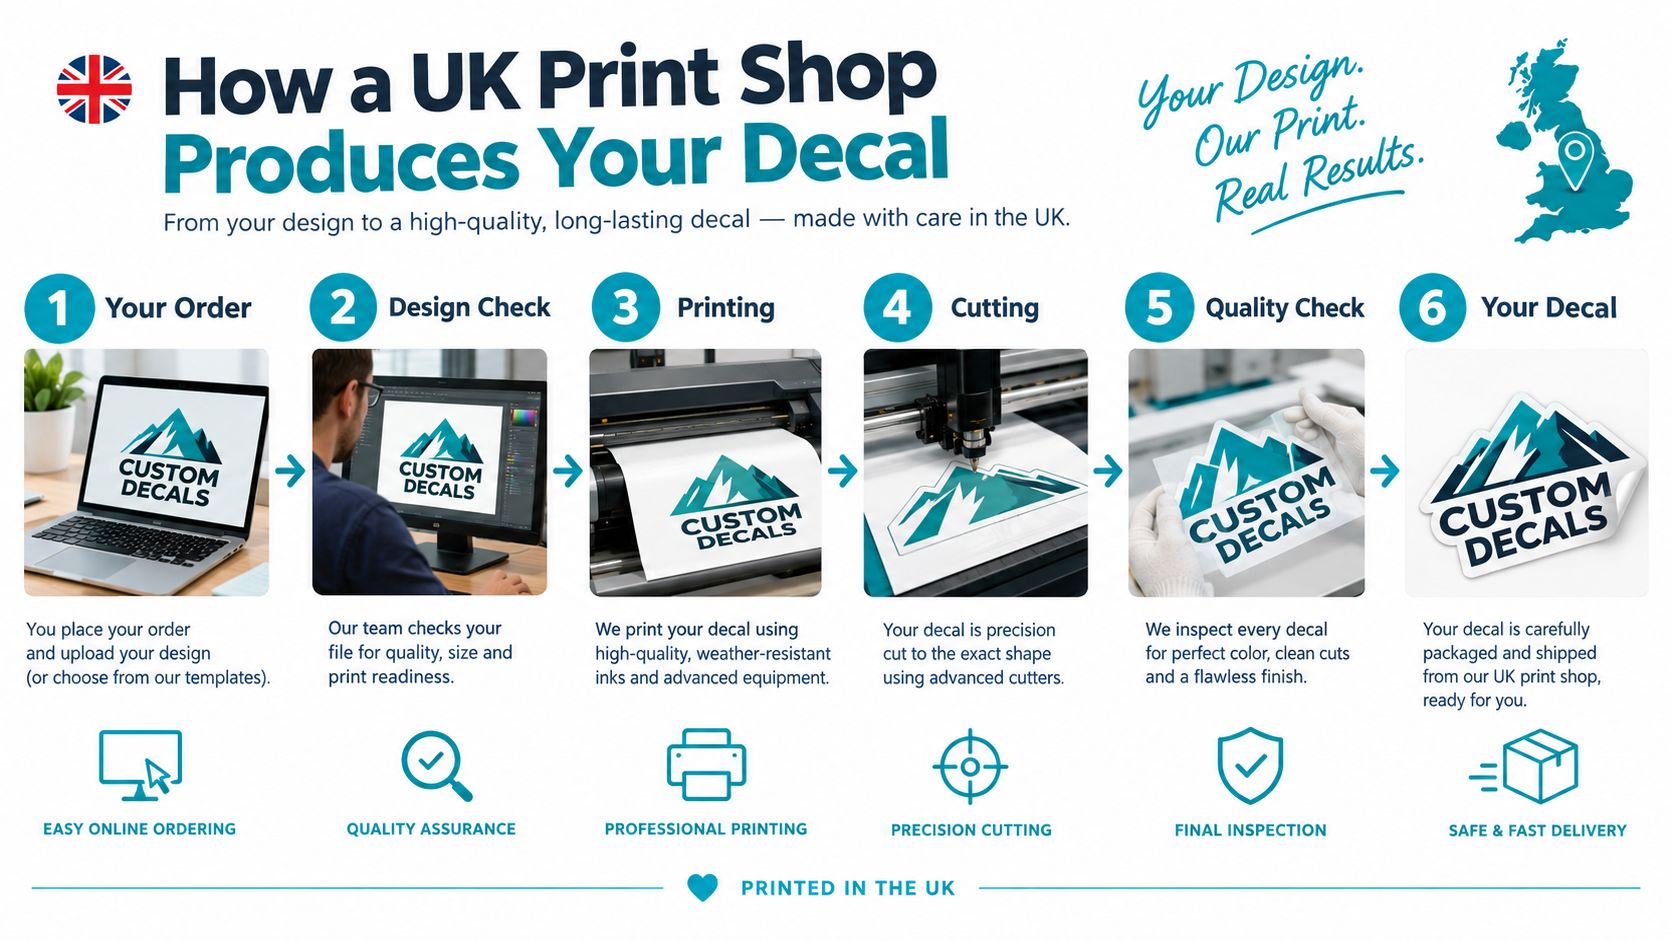
Once you approve the artwork, production follows a controlled sequence. Each stage affects the result, so the price isn't only paying for ink and a piece of film.
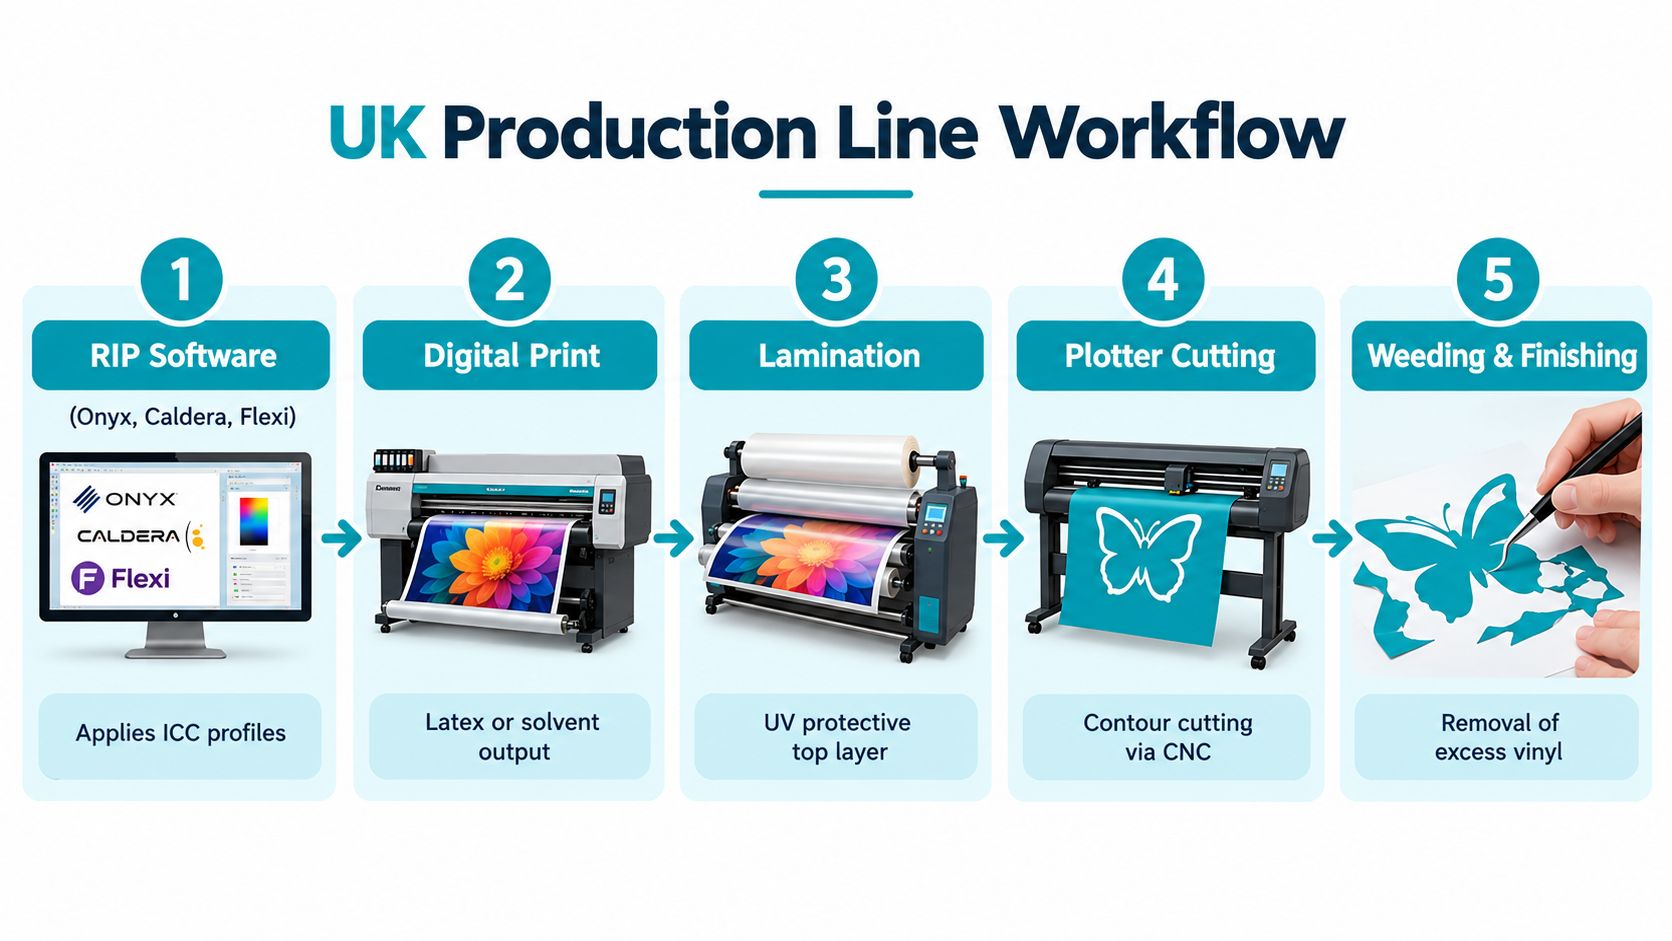
The operator first checks the file in RIP software. The RIP interprets the artwork, manages colour profiles and prepares the job for the printer. It can also arrange multiple pieces efficiently on the roll and add registration marks for later cutting.
From digital file to finished sheet
The printer then outputs the artwork onto the selected vinyl using the matched ink system. White vinyl gives colours a predictable base. Clear vinyl allows the substrate to show through, so the designer needs to consider contrast and how the decal will be viewed.
Printed material may need time for the ink and surface to stabilise before finishing. The exact handling time depends on the printer, ink and substrate. A reputable supplier will account for that in the promised lead time rather than rushing a fresh print straight into lamination or cutting.
The next stages are usually:
- Lamination: A cold or hot roll laminator applies the protective finish where specified.
- Registration: Optical sensors align the printed sheet with the contour-cut path.
- Plotter cutting: The cutter follows the path and separates the decal face from the surrounding waste.
- Weeding: The operator removes unwanted vinyl from around letters, logos or detailed shapes.
- Application tape: Multi-piece lettering may receive transfer tape so the design can be positioned accurately.
- Final finishing: The job may be kiss cut into a sheet, die cut into individual pieces or trimmed into panels.
The production line explains why two apparently similar decals can have different lead times. A simple one-colour cut graphic may need plotting and weeding only. A full-colour decal may require printing, stabilisation, lamination, registration and contour cutting.
Before installation, read the supplier's application instructions. How to apply vinyl stickers covers the practical handling involved in transferring adhesive graphics cleanly.
Pricing, Ordering and Personalisation
A UK decal quote reflects the decisions made earlier. Material grade, size, quantity, artwork complexity, cutting and finish all change the production time and the amount of film used. A small simple decal can be economical, while a large contoured graphic on cast film may involve specialist material and more finishing work.
| Choice | Budget option | Premium option | Typical price impact |
|---|---|---|---|
| Film | Monomeric vinyl for suitable flat work | Cast vinyl for demanding curves or textures | Premium film increases material cost |
| Artwork | Print-ready, simple artwork | Redrawing, separation or complex contour work | Artwork preparation adds time |
| Finish | Unlaminated matt or gloss | UV-protective, anti-graffiti or specialist laminate | Extra finishing increases cost |
| Cutting | Simple rectangle or basic shape | Detailed contour cut with weeding | Complexity increases operator time |
| Adhesive | Standard or removable option | Application-specific permanent or specialist adhesive | Special adhesive can increase material cost |
| Quantity | One-off production | Repeated batch with organised nesting | Larger batches may improve unit efficiency |
| Delivery | Standard dispatch or collection | Urgent production or specialist delivery | Shorter deadlines can carry a premium |
Give the printer a complete brief
Ask for a quote with the finished dimensions, quantity, artwork file, intended surface, indoor or outdoor location, desired lifespan and preferred finish. Say whether you want individual die-cut pieces, a kiss-cut sheet or lettering supplied on transfer tape.
Request a PDF proof before production. Check the spelling, scale, orientation, colour expectations and position of the cut line. If the decal is personalised, confirm every name, number or variable detail before approval.
Personalisation can include custom shapes, sequential numbering, individual names, multi-piece lettering and variable designs. Those features are straightforward when the file is organised, but they can add preparation and checking time when every piece differs.
Practical rule: Describe what the decal must survive, not just how you want it to look.
Tell the printer if the surface is freshly painted, textured, curved, exposed to cleaning or likely to be removed later. If you're unsure, request a material recommendation or a small test piece before committing to a larger run. Keep the approved master file and proof so a future reorder can match the original specification.
If you need made-to-order wall stickers, personalised decals or other vinyl products for a UK home or business, Quote My Wall offers vinyl wall decals and custom wall-sticker options. Visit the shop with your dimensions, artwork idea and intended surface ready, then request the finish and application format that fit your project.