
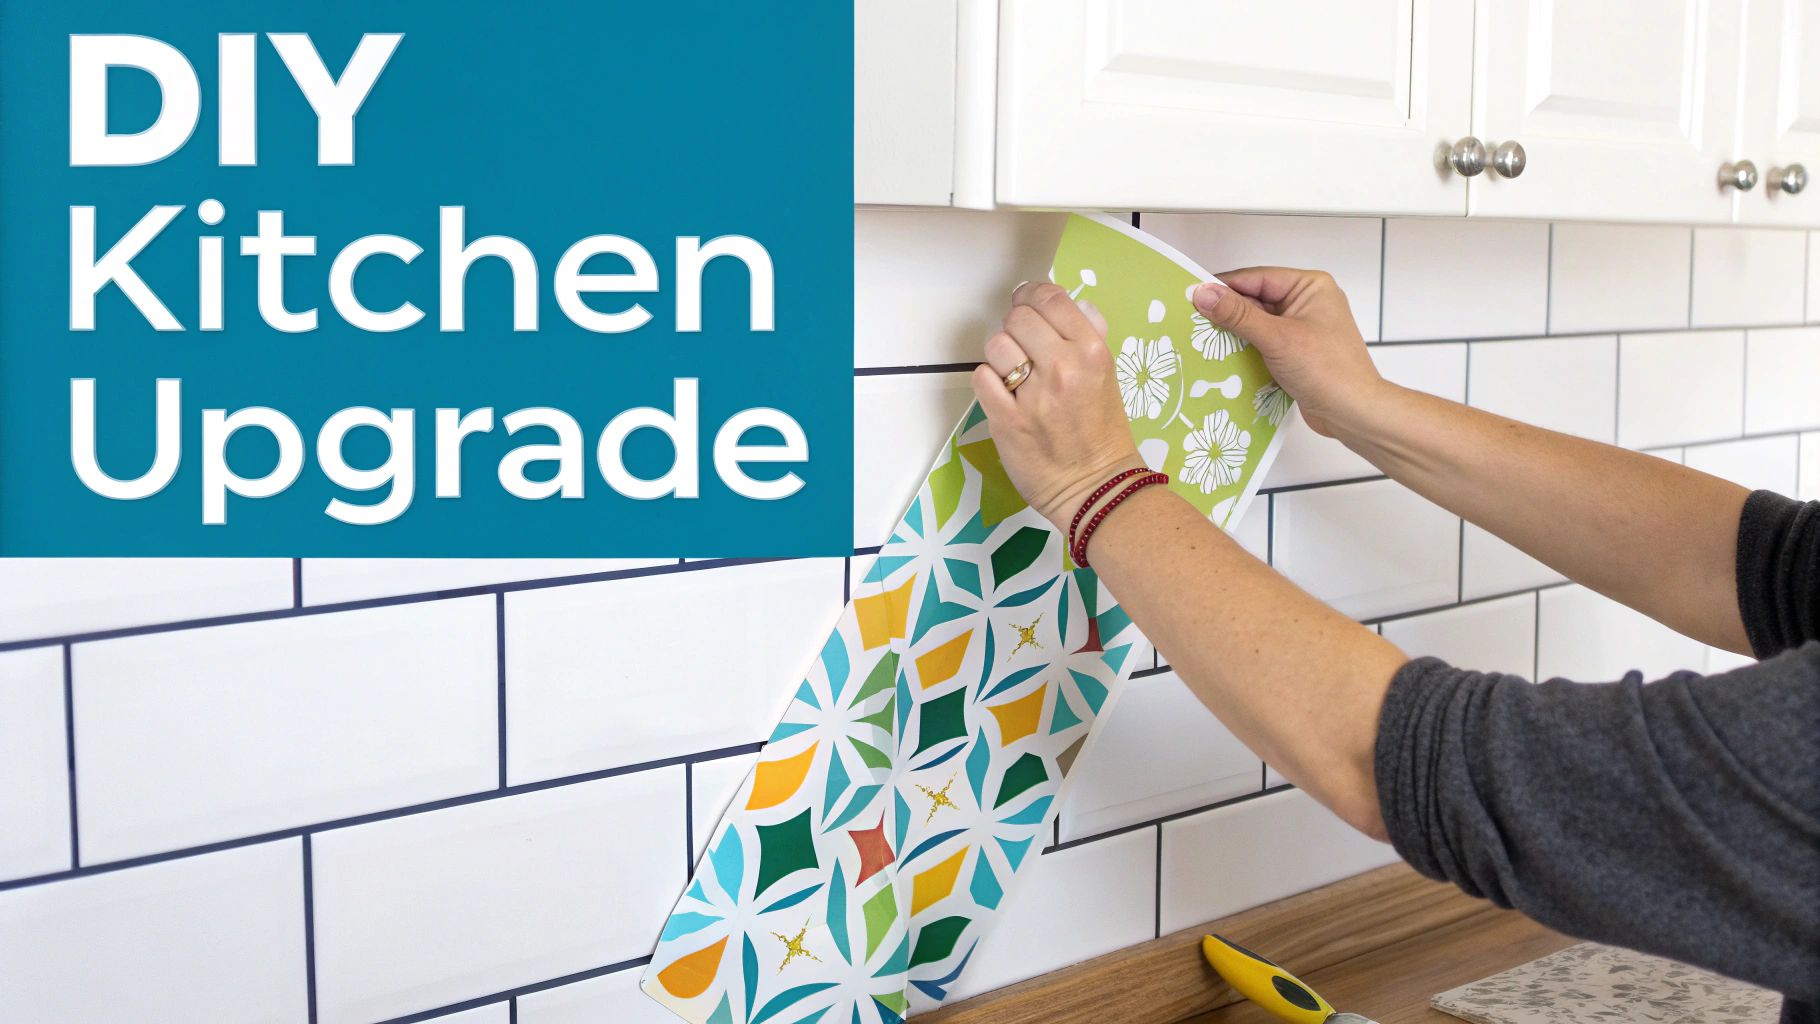
Stickers for Kitchens A DIY Guide to a Fresh UK Look
Ever wondered how you can get that high-end kitchen look without the jaw-dropping renovation price tag? It turns out the answer might be simpler than you think. Stickers for kitchens are the real game-changer, transforming UK homes one peel-and-stick sheet at a time. This is all about practical, stylish upgrades that can actually stand up to the chaos of real life.
Why Kitchen Stickers Are Your Secret DIY Weapon
Let's be honest, we all dream of a kitchen makeover, but the thought of the cost, dust, and disruption is enough to put anyone off. A full-scale renovation is a massive undertaking. This is where the simple genius of stickers for kitchens comes into play, offering a clever and seriously affordable alternative. Forget the flimsy decals of the past; modern kitchen stickers are sophisticated, durable, and designed specifically for the heart of the home.
It’s no surprise this trend is taking off with both homeowners and renters across the UK. If you're renting, it's a brilliant, commitment-free way to put your own stamp on a place without waving goodbye to your deposit. For homeowners, it's a quick and impactful fix for tired décor while you save up for the big renovation.
Durability Meets Design
The first question I always get is, "But will they last?" It’s a valid concern. The kitchen is a demanding environment, but modern vinyl materials are engineered to handle the heat, humidity, and splatters of a busy cooking space. Unlike old paper-based decals, high-quality vinyl is moisture-resistant and can be wiped clean in seconds, making it perfect for backsplashes and cabinet doors.
The real magic of kitchen stickers is their ability to deliver a massive visual punch with minimal effort. They perfectly fill that gap between a full-scale remodel and just living with what you've got.
This durability is a huge part of why they’ve become so popular. The UK's self-adhesive labels market, which includes these versatile products, was valued at roughly USD 10.11 billion in 2022 and is expected to climb to USD 12.45 billion by 2030. That's a clear sign people are looking for practical, long-lasting décor solutions. A good quality set of tile stickers can even be dishwasher-safe and last up to five years indoors, proving they are far more than just a temporary fix.
A World of Creative Possibilities
The creative freedom you get with kitchen stickers is incredible. You can get the look of expensive materials or just add a completely unique touch to your space without the hefty price tag or permanent commitment.
Here are a few ideas I've seen work wonders:
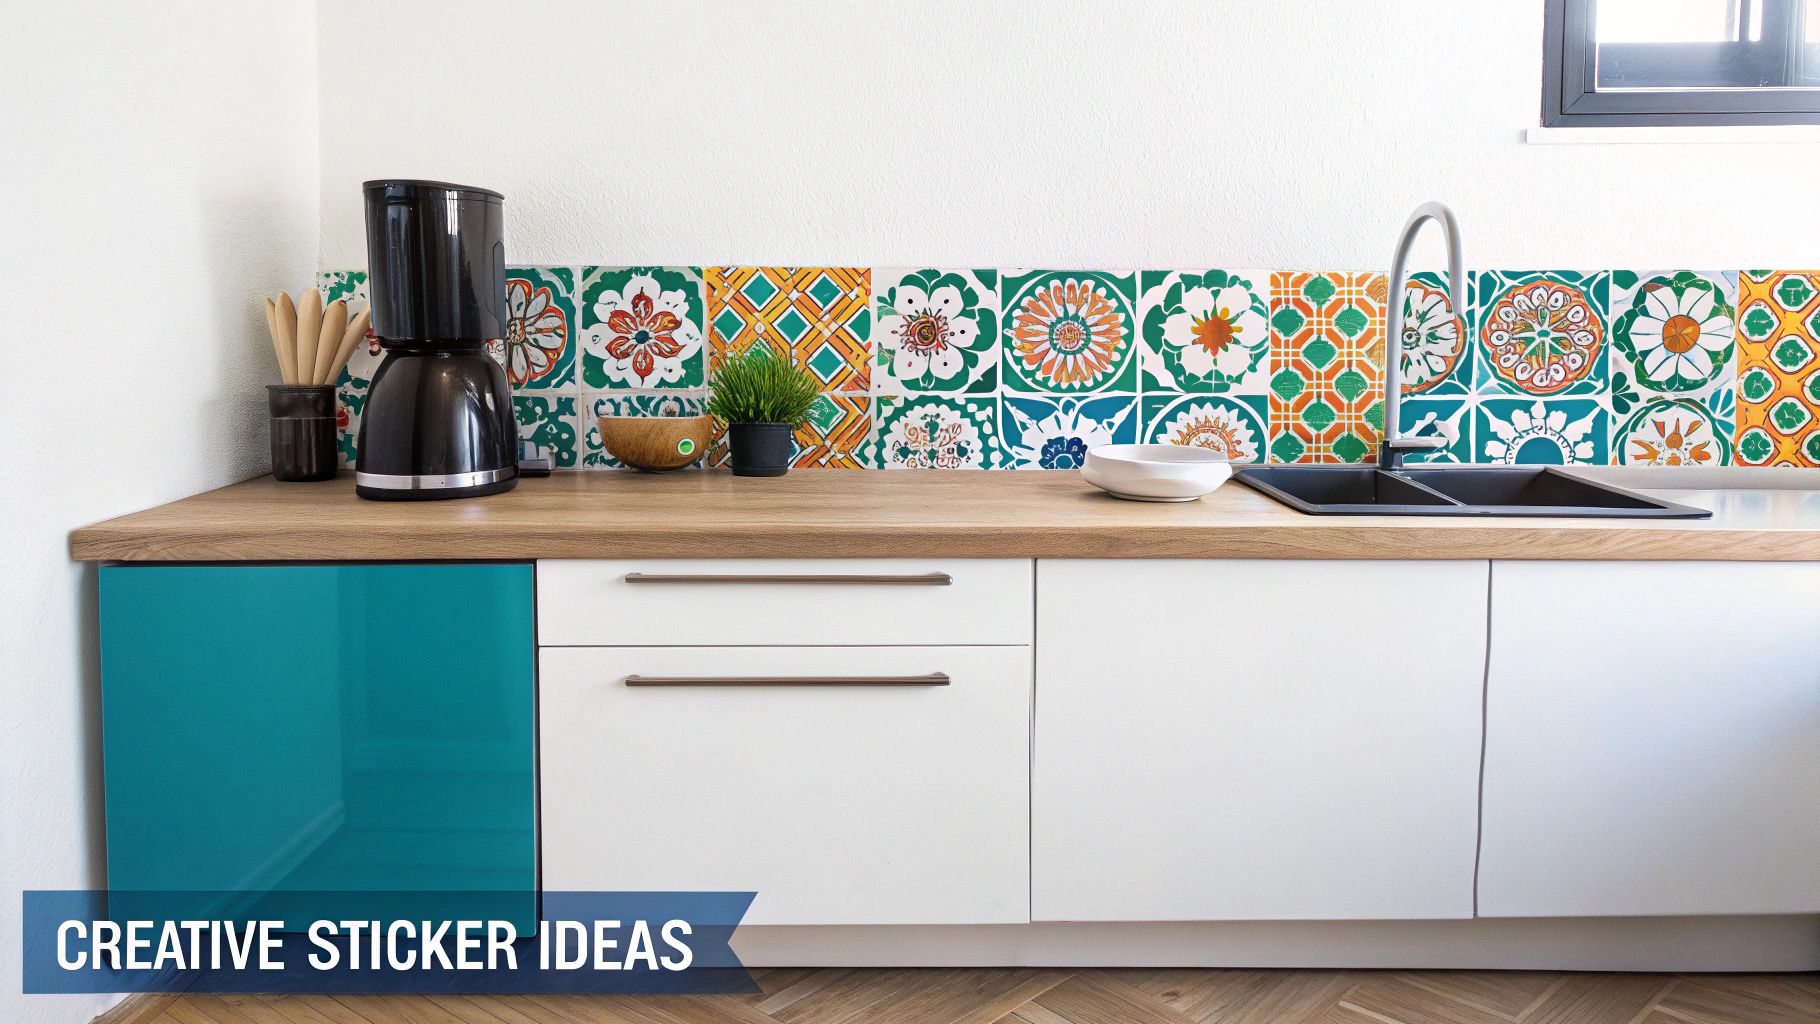
- Tile Transformations: Got dated or just plain boring tiles? Cover them with anything from intricate Moroccan patterns to sleek, modern geometric designs. The change is instant.
- Cabinet Refresh: Give tired cabinet doors a new lease of life with a solid-colour vinyl wrap. You get a contemporary, painted look without picking up a single paintbrush.
- Appliance Personalisation: Why should your fridge be boring? Add a splash of colour or a fun design to your appliances, turning a functional workhorse into a design feature.
This approach lets you play around with different styles without the stress of a long-term decision. If you're looking for more inspiration, these kitchen remodel ideas on a budget are fantastic, but kitchen stickers really stand out for being so flexible and user-friendly for any DIYer.
Choosing the Right Stickers for Your Kitchen Project
Let’s be honest, not every sticker can survive the heat, steam, and splatter of a busy kitchen. Choosing the right material is probably the single most important decision you'll make. It’s the difference between a durable, professional-looking finish and a peeling, disappointing mess a few weeks down the line.
When you start looking for stickers for kitchen use, you'll quickly see two main types: paper-based and vinyl. Paper stickers might be tempting because they're cheap, but they are completely wrong for a kitchen. They soak up moisture, stain at the first sign of a bolognese splash, and have zero defence against heat or cleaning sprays.
Premium vinyl, on the other hand, is the only way to go. It’s a type of plastic, which makes it naturally water-resistant, tough, and a breeze to clean. This is the same stuff used for professional shop signs and even vehicle wraps, so it's more than ready to handle a few kitchen spills.
Decoding Vinyl Materials and Finishes
Even within the world of vinyl, there are a few things to get your head around. The right choice really comes down to where you plan to stick it. Before you get started, it’s a great idea to get a feel for the aesthetic you’re after. You could explore various kitchen prints to spark some inspiration and nail down your style.
Once you have a design in mind, think about these practical points:
- Heat Tolerance: Planning to give that backsplash behind the hob a facelift? You absolutely must choose a vinyl specifically rated for high-heat areas. Standard vinyl will likely warp, bubble, or peel when it gets too cosy with your cooker.
- Durability and Thickness: For high-traffic spots like cabinet doors or even worktops, you'll want a thicker, more robust vinyl. Some even come with an extra laminate layer on top for superior scratch and scuff resistance.
- Adhesive Type: This one is non-negotiable for renters. A removable adhesive is designed to peel off cleanly without damaging the surface or leaving behind that awful sticky residue. If you're a homeowner looking for a more permanent fix, a permanent adhesive is your best bet.
The finish plays a huge part in the final look, too. A gloss finish gives you that sleek, modern feel and is incredibly easy to wipe down. The only downside is that it can show up every little imperfection on the surface beneath it. A matte finish, however, is brilliant at hiding minor bumps and dents and offers a more subtle, contemporary vibe.
Matching the Sticker to the Surface
The perfect sticker for your tiles probably isn't the best one for your fridge. Every surface in your kitchen has its own set of demands, so matching the material to the job is key to getting it right.
If you’re keen to see how these materials perform on specific surfaces, you might find our guide on why tile stickers are the perfect bathroom and kitchen makeover product really useful. It gives you a much deeper look into transforming tiled areas.
To help you get started, here's a quick comparison table breaking down which material works best where.
Kitchen Sticker Material Suitability
Choosing the right material ensures your kitchen stickers not only look great but also last. This table compares common vinyl types to help you match the product to your specific project needs, from decorative accents to hardworking surfaces.
| Material Type | Best For | Heat Resistance | Moisture Resistance | Durability |
|---|---|---|---|---|
| Standard Vinyl | Cabinets, fridge doors, pantry jars, decorative wall decals. | Low to Moderate | High | Good |
| Heat-Resistant Vinyl | Backsplashes behind hobs, areas near ovens. | High | High | Very Good |
| Laminated Vinyl | Worktops, high-traffic cabinet doors, drawer fronts. | Moderate | Very High | Excellent |
| Removable Vinyl | Any surface in a rental property (tiles, cabinets, walls). | Moderate | High | Good |
As you can see, a little bit of planning goes a long way. The right choice depends entirely on the demands of the specific spot you're updating.
Key Takeaway: Always, always check the product specifications. A good seller will clearly state what a sticker is designed for, including its heat tolerance, finish, and adhesive type. Never just assume a generic vinyl sticker will work everywhere.
Ultimately, taking a few minutes to select the correct stickers for kitchen surfaces will save you a world of frustration. When you match the material's properties to the demands of the location, you guarantee your DIY makeover is not only beautiful but also practical and built to last.
How to Apply Kitchen Stickers for a Flawless Finish
The real secret to a professional-looking sticker application isn't about having a surgeon's steady hand or a box full of expensive tools. It all comes down to the prep work. Honestly, getting this first stage right is the difference between a stunning, bubble-free finish and a frustrating, peeling mess. Let’s walk through the whole process, so your kitchen sticker project looks like it was done by a pro.
Getting Your Surfaces Ready
First things first: preparation is everything. Think of it like painting a room; you wouldn't just slap a new coat over a dusty, greasy wall and hope for the best. Your stickers need a perfectly clean, dry, and smooth canvas to really stick and stay put.
To get started, give the surface a proper clean with a decent grease-cutting cleaner. A simple solution of washing-up liquid and warm water often does the trick, but for tougher grime, a sugar soap solution is brilliant. Just be sure to avoid any cleaners that contain oils or waxes, as they leave a film behind that stops the adhesive from gripping properly.
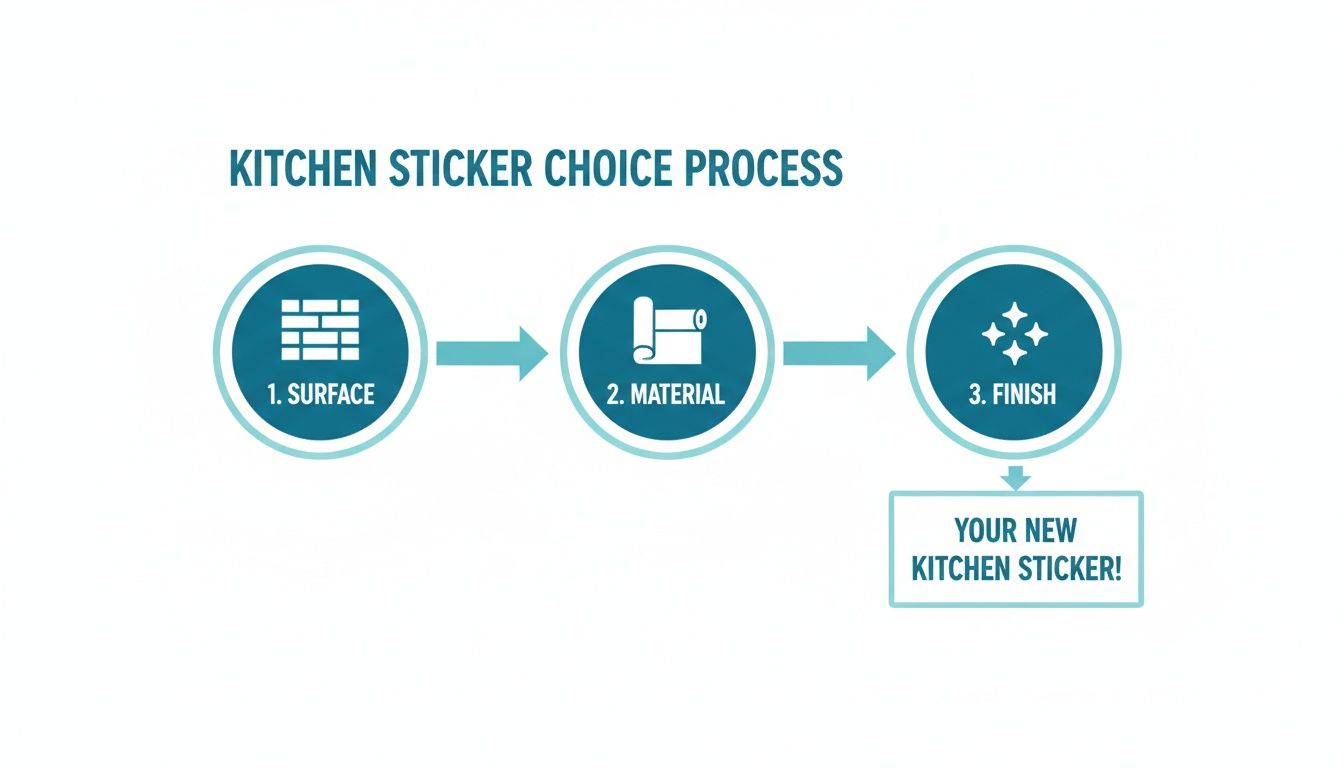
This flowchart nails the decision-making journey: start with your surface, pick the right material for the job, and then choose a finish you love. It highlights how each step logically builds on the last, setting you up for a great result.
Once it's clean, rinse the surface with plain water to get rid of any soap residue and then dry it completely with a lint-free cloth. I always recommend waiting at least an hour after drying, just to be absolutely sure all the moisture has evaporated, especially from tricky spots like grout lines between tiles.
Measuring and Cutting Like a Pro
With your surfaces prepped and ready, it’s time to measure up. Whatever you do, don't be tempted to eyeball it! Grab a tape measure for accuracy and mark your cut lines on the back of the sticker with a pencil.
Working around obstacles like plug sockets or light switches is where people often get nervous, but it’s much easier than it looks. Simply measure where the socket sits on the wall, transfer those measurements to the sticker's backing paper, and then use a craft knife or sharp scissors to cut out the shape.
A little tip from experience: always cut the hole slightly smaller than your measurement. This gives you a bit of wiggle room to get a really snug and perfect fit.
The UK's self-adhesive label industry is surprisingly robust, which is great news for DIYers. In 2024 alone, the market used a massive 166,000 tons of these products, valued at around $2.3 billion. This demand, particularly from renters who can't make permanent changes, means there’s a fantastic variety of high-quality vinyl options out there from brands like Quote My Wall, ready to protect and beautify our kitchen surfaces. You can read more about the booming UK market for self-adhesive labels on indexbox.io.
The Application Method for a Bubble-Free Finish
Right, this is the main event. The key here is to go slowly and methodically. Resist that powerful urge to rip the entire backing paper off in one go. If you do, the sticker will almost certainly fold over and stick to itself, creating an absolute nightmare to fix.
Here’s the process I always follow for a smooth finish:
- Start small: Begin by peeling back just the top few inches of the backing paper and fold it down neatly out of the way.
- Get it straight: Carefully align the top edge of the sticker with your surface or any guide marks you've made. Take your time with this bit—getting the start right is half the battle.
- Smooth it down: Using a squeegee (a credit card wrapped in a soft cloth works just as well), press the exposed sticky section onto the surface. Always work from the centre outwards to push any air towards the edges.
- Peel and smooth: Now, slowly pull more of the backing paper away with one hand while you continue smoothing the sticker down with the squeegee in the other. This steady, two-handed motion is the best way to stop bubbles from ever forming.
This technique is a lifesaver for all sorts of applications. If you're tackling a bigger job, we have a detailed guide on how to install a peel and stick tile backsplash that uses these exact same core principles.
My Go-To Tip: If a stubborn bubble does appear, don't panic and definitely don't try to peel the whole thing back. Just take a fine pin or the very tip of a craft knife and prick the centre of the bubble. That tiny hole is all you need to release the trapped air, allowing you to smooth it flat. I promise you won't even see the pinprick afterwards.
When you're covering a larger area with a pattern, like a full backsplash, making sure everything lines up is vital. Overlap each piece by just a few millimetres. This ensures you don't have any gaps and that the pattern flows seamlessly from one sheet to the next. Most good-quality tile stickers are designed with this overlap in mind. Just take your time, follow these steps, and you’ll achieve a flawless finish that can completely transform your kitchen.
Creative Ways to Use Stickers in Your Kitchen
So, you’ve got the basics down for choosing and applying kitchen stickers. That’s a great start. But let's be honest, just covering up a few tired tiles is only scratching the surface of what’s possible. The real magic happens when you stop thinking of stickers for kitchens as a quick fix and start seeing them as a powerful design tool.
This is your chance to add serious personality, create distinct zones, and get a high-end look without the high-end price tag.
Imagine faking a stunning Moroccan tile backsplash behind your hob. You can get that intricate, hand-painted look for a fraction of the cost and with none of the mess of actual tiling. This is where stickers really come into their own, letting you play with bold patterns and colours you might think twice about committing to with permanent tiles. Suddenly, you have a feature wall that instantly draws the eye.
The same idea works wonders for drab kitchen cabinets. A good quality vinyl wrap in a solid colour can completely drag a dated kitchen into the present day, often in just one afternoon. Think about transforming those old wooden units with a sleek, contemporary matte grey or a sophisticated deep navy finish—all without picking up a single paintbrush.
Defining Zones and Adding Personality
One of the cleverest tricks I've seen is using stickers to carve out different zones in a kitchen. This works especially well in open-plan spaces where you want to give different areas a bit more structure and purpose.
Take a simple bit of wall and worktop, for instance. You can turn it into a dedicated coffee station just by adding a panel of patterned tile stickers behind it or a fun decal on the wall. It’s a small touch, but it visually fences off the area and makes that morning brew feel a little more intentional and special.
You can also use stickers to inject a bit of you into what can be a very functional room. That blank wall or boring white fridge is a canvas waiting for a bit of character.
- Playful Quotes: Stick a favourite family saying or a funny food-related quote above a doorway or on the side of the freezer.
- Herbal Illustrations: Apply some botanical herb decals to your pantry jars or even on the inside of cabinet doors for a charming, hidden detail.
- Geometric Accents: A few simple shapes on a kickboard or the risers of a kitchen step stool can add an unexpected, modern pop of colour.
These are the little things that make a space feel like your own. They tell a story and stop your kitchen from looking like it came straight out of a catalogue.
Upcycling and Refreshing Old Furniture
Don't just stop at the walls and cabinets. Stickers are fantastic for upcycling and breathing new life into plain or tired furniture. That simple pine stool you've had for ages? It could become a real statement piece with a bold pattern wrapped around the seat.
Even your appliances can get a makeover. A standard stand mixer can be customised with a few vinyl strips to match your colour scheme, or a plain microwave can be jazzed up with a subtle design. It’s a brilliant, budget-friendly way to coordinate everything. If you're feeling ambitious and want to tackle worktops or the full set of cupboards, it’s worth reading up on the best vinyl wrap for kitchen cabinets to make sure you get a durable, professional-looking finish.
The real beauty of getting creative with stickers is that it’s a low-risk, high-reward game. If you try something out and decide you hate it, you just peel it off and start over. That freedom encourages a bit of design bravery you’d never have with paint or tiles.
Complementing Your Existing Kitchen Style
Because there’s such a huge variety out there, kitchen stickers can fit in with pretty much any design style, from a cosy farmhouse kitchen to an ultra-modern, minimalist space. The trick is to choose patterns, colours, and finishes that feel right for your overall theme.
Here are a few ideas to get you started:
- For a Rustic Farmhouse Look: Go for stickers that mimic distressed wood, classic gingham patterns, or simple, hand-drawn florals.
- For a Modern Minimalist Kitchen: Your best bets are solid matte colours, clean geometric patterns, or subtle metallic finishes like brushed steel or copper.
- For a Bohemian Vibe: This is your chance to embrace bold, colourful patterns. Think intricate mandalas or vibrant Moroccan-inspired mosaics to create an eclectic, layered feel.
Ultimately, using stickers for kitchen revamps is all about creative freedom. Whether you’re going big with a full backsplash or just adding a tiny personal detail to a storage jar, they offer endless ways to make your kitchen truly yours.
Keeping Your Kitchen Stickers Looking Brand New
So, you’ve put in the work—the prepping, measuring, and careful application are done, and your kitchen looks fantastic. Now, how do you keep it looking that good? The good news is that maintaining your new look is much easier than the initial setup.
With a little bit of care, your vinyl stickers will handle all the spills and splatters of a busy kitchen without a fuss. It’s all about gentle cleaning, not aggressive scrubbing.
Everyday Cleaning and Spill Management
High-quality vinyl is surprisingly tough. For daily wipe-downs, a soft microfibre cloth dampened with a bit of warm water is usually all you need. This is perfect for getting rid of fingerprints on cabinet wraps or small splashes on your new backsplash.
But what about those more stubborn kitchen messes, like a stray bolognese splatter or greasy marks? Just mix a few drops of washing-up liquid into warm water. This simple solution is strong enough to cut through grease but gentle enough that it won't damage the vinyl's finish or weaken the adhesive.
Here are a few golden rules for keeping your stickers clean:
- DO stick to soft cloths or sponges.
- DO wipe up spills as soon as they happen to stop them from staining.
- DON'T even think about using abrasive cleaners, scouring pads, or wire wool. They’ll scratch and ruin the finish in no time.
- DON'T use anything with bleach or solvents (like nail polish remover). These can discolour the vinyl or, even worse, start to dissolve it.
Follow these simple tips, and your stickers for kitchen surfaces will stay looking vibrant and fresh for years.
The Art of Damage-Free Removal
One of the best things about kitchen stickers, especially if you're renting or just love a frequent decor change, is that they aren’t a life sentence. When you're ready for a new look or need to move out, you can take them down without a trace—as long as you do it right. Forget brute force; a bit of warmth is the secret ingredient here.
The trick to removal is to soften the adhesive, not fight it. Gentle heat makes the vinyl pliable and persuades the glue to let go, which is key to leaving your surfaces underneath looking pristine.
Grab a standard hairdryer to get started. Set it to medium heat and hold it about 15-20 centimetres away from the edge of the sticker. Sweep it back and forth for about 30-45 seconds to gently warm up the vinyl and the glue underneath. You’ll feel the material become softer and more flexible.
Once it's warm, use a fingernail or a plastic scraper (a loyalty card works a treat!) to carefully lift a corner. Then, just peel the sticker back slowly and steadily. The key is to pull it back on itself at a low, flat angle, not straight out from the surface. This little technique drastically reduces the risk of pulling off paint or leaving sticky gunk behind.
If you do find a few stubborn sticky patches left over, don't panic and definitely don't start scraping. A cloth with a bit of soapy water or a dedicated adhesive remover will usually dissolve the residue without any hassle. It's a straightforward process that makes this whole DIY project a wonderfully flexible, commitment-free choice.
Got Questions About Kitchen Stickers? We've Got Answers
So, you're intrigued by the idea of a kitchen refresh with stickers, but a few questions are holding you back. That's completely normal. Let's run through some of the most common queries we hear from UK homeowners and renters, so you can get started with total confidence.
Are They Genuinely Heatproof?
This is the big one, especially when you're thinking about the area behind your hob. The short answer is: it all comes down to the material. Your standard decorative vinyl decal won't stand a chance against the heat from a cooker—it'll likely warp or peel pretty quickly.
What you need to look for are specialist stickers for kitchen backsplashes, which are specifically made from heat-resistant vinyl. These are built to handle the heat. Before you add anything to your basket, triple-check the product description for a heat-resistant rating. If it's not mentioned, play it safe and assume it's not suitable for that hot spot.
How Long Will My Kitchen Stickers Actually Last?
Durability is another major consideration. A well-made vinyl sticker from a reputable supplier isn't just a temporary fix; it's designed to last. In a normal kitchen, you can easily expect them to look great for up to five years or even longer without any fading or peeling.
A few things can influence their lifespan, though:
- Good Prep Work: A squeaky-clean, dry, and smooth surface is your best friend for a long-lasting stick.
- Location, Location, Location: Stickers right behind the sink or on a heavily used worktop will naturally face more wear and tear than one on a pantry door.
- Gentle Cleaning: Stick to soft cloths and mild, non-abrasive cleaners. Harsh chemicals are the enemy of a pristine finish.
Can I Put Them on Textured Surfaces?
This is where things get a little nuanced. For that seamless, professional look, you really want a smooth, non-porous surface. Think ceramic tiles, laminate cupboards, glass splashbacks, or even the front of your fridge.
If you've got tiles with a very light texture or a faint wood grain, a thicker, high-quality vinyl might just work. But for anything more rugged, like heavily textured plaster or deeply grained wood, it’s best to steer clear. The sticker can't get a proper grip, leaving gaps for air and moisture to creep in, which is a recipe for peeling.
My top tip? Always order a sample first. It’s a tiny cost that lets you test the adhesive on your actual surface before you commit to buying enough for the whole job.
Are They Properly Waterproof?
Yes, absolutely. High-quality vinyl stickers are designed to be waterproof, which is a massive part of what makes them so brilliant for kitchens. You won't have to panic about steam from the kettle or splashes from washing up causing them to lift.
This water resistance also makes them a doddle to clean. A quick wipe with a damp cloth is all it takes to get rid of grease and food splatters, keeping your kitchen looking fresh.
The desire for unique home touches is booming. In fact, the UK's custom printing market, which includes all those bespoke kitchen stickers, hit a value of USD 2,208.9 million in 2024 and is expected to nearly double by 2030. It just goes to show how popular creating a one-of-a-kind kitchen has become. Find out more about the custom printing market forecast on grandviewresearch.com.
Will They Wreck My Walls or Cabinets When I Take Them Off?
This is the number one concern for anyone renting. The good news is, if you've chosen a quality removable vinyl and you take them off correctly, you shouldn't have any issues with damage or sticky residue.
The secret weapon here is a hairdryer. Gently heating the sticker as you peel it away softens the adhesive, making it release cleanly. It’s a simple trick that makes a world of difference, ensuring you get your deposit back. This makes stickers for kitchen an ideal, landlord-friendly way to put your own stamp on a rented space.
Ready to bring your creative vision to life? At Quote My Wall, we offer a huge range of high-quality, durable vinyl stickers perfect for any kitchen project. From elegant tile patterns to custom designs, find the perfect match to start your transformation today.