
A Parent's Guide to Butterfly Wall Stickers for Kids' Rooms
Looking for a simple, affordable, and damage-free way to bring a little magic into your child's bedroom or playroom? Butterfly wall stickers are a fantastic solution. These self-adhesive decals can instantly create an enchanting atmosphere, turning a plain wall into a whimsical scene that sparks the imagination. Best of all, they offer a quick decorating fix without the long-term commitment of paint or wallpaper.
Creating a Magical Space with Butterfly Wall Stickers
More than just a decoration, butterfly wall stickers let you tell a story in your child's room. Their timeless charm comes from their connection to nature, growth, and transformation—powerful themes that really resonate with little ones. Whether you’re putting together a serene nursery or a vibrant playroom, these decals are an incredibly versatile and creative tool.
One of the best things about wall stickers is their flexibility. As your child grows and their interests evolve, you can easily update the room's look without the fuss and expense of a full redecoration. It’s a practical, budget-friendly choice that many parents appreciate.
Why Butterflies Are Such a Perfect Choice
There’s something universally positive about butterflies. They represent joy, freedom, and beauty, making them the perfect motif for creating a nurturing space for a child. It’s no surprise that consumer trends in the UK show that 55% of parents lean towards nature-themed décor, with butterflies often topping the list for their calming effect. You can see some beautiful examples of popular designs on platforms like Etsy.
The real fun with butterfly stickers is making the design your own. Imagine a gentle flutter of butterflies ascending from a cot, a playful trail leading to a cosy reading nook, or a colourful swarm taking flight across a feature wall. The possibilities are endless.
In this guide, we'll cover everything you need to know to bring your ideas to life. We’ll look at:
- Choosing the right materials for durability and safety.
- Creative layout ideas to get you inspired.
- A step-by-step application process for a flawless, bubble-free finish.
- Damage-free removal tips for when you’re ready for a change.
If you’re a fan of enchanted themes, you might also love our guide to fairy bedroom ideas for even more inspiration. Right then, let’s get started on creating a space your child will absolutely adore.
How to Choose the Perfect Butterfly Stickers
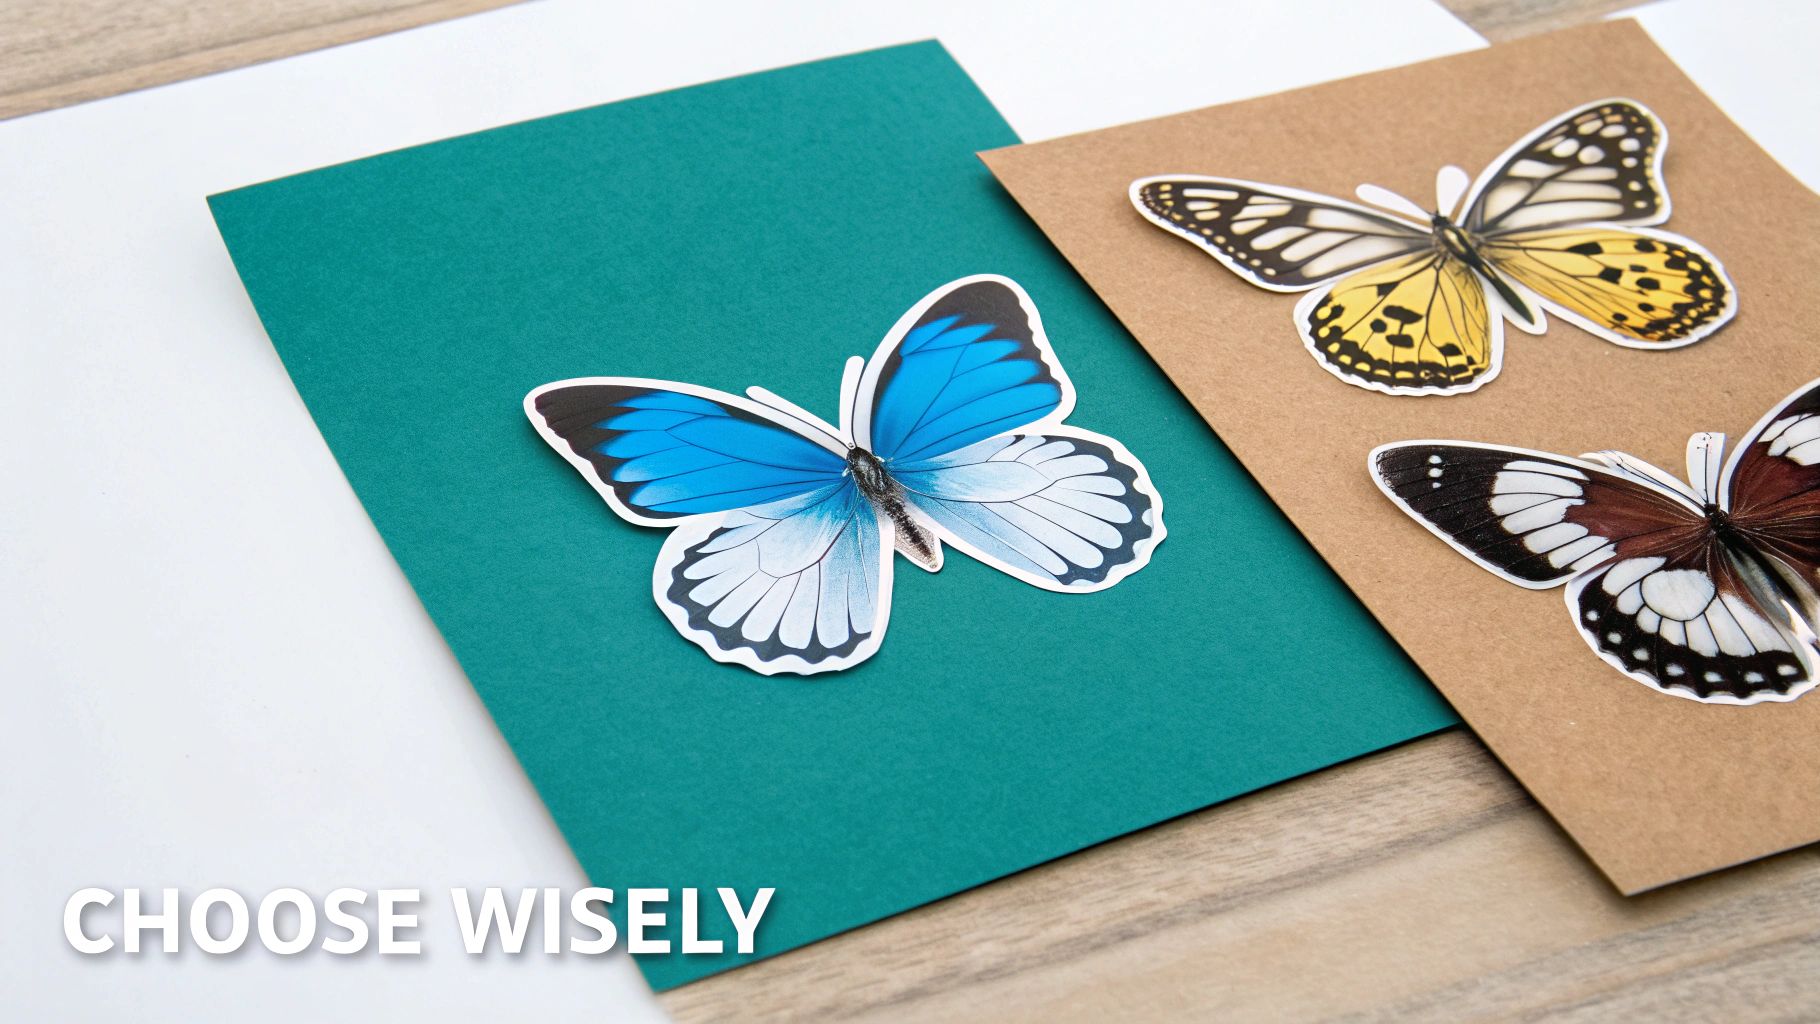
When you're picking out butterfly wall stickers for a kid's room, it's easy to get swept up in all the pretty designs. But to get it just right, it pays to think about the material, size, and style. A little thought now can save you from the disappointment of peeling corners or a look that just doesn't quite work.
The first big choice you'll face is the material. Most wall stickers are either vinyl or fabric, and they behave quite differently.
Material Matters: Vinyl vs. Fabric
Vinyl stickers are what you’ll see most often. They're a brilliant budget-friendly option, and they’re durable and super easy to wipe clean with a damp cloth – a must-have feature in any child's room! Vinyl gives you a crisp, clean finish and works beautifully on smooth, flat walls.
Fabric stickers, on the other hand, are a more premium choice. They're typically made from a woven polyester material that creates a gorgeous matte, textured look, almost like it’s been painted directly onto the wall. The best part? They are usually reusable and repositionable, which is fantastic if you're renting, like to change things up, or just want a second chance if you don't place it perfectly the first time.
My Pro Tip: If your walls have a slight texture, like an orange-peel finish, I'd always recommend going with fabric stickers. Their flexibility helps them mould to the uneven surface, so you're far less likely to see the edges lifting over time.
To make the choice a bit clearer, I've put together a simple comparison of the most common materials.
Comparing Butterfly Sticker Materials
| Material Type | Best For | Reusability | Finish | Typical Cost |
|---|---|---|---|---|
| Vinyl | Smooth, flat walls; budget-friendly projects | Usually single-use | Matte to semi-gloss | £ |
| Fabric | Slightly textured walls; repositioning | High (reusable) | Matte, woven look | ££ |
Choosing fabric often feels like a better long-term investment because of its durability and reusability, but high-quality vinyl can still look fantastic for years when applied correctly.
Safety and Style Considerations
Decorating a space for little ones means safety is always the top priority. Always check that the butterfly wall stickers for kids you buy are labelled as non-toxic, BPA-free, and phthalate-free. Good UK brands will use water-based inks, which means you won't have to worry about harsh chemical smells or nasty volatile organic compounds (VOCs) in your child’s room. If you want to dig deeper into this, it’s worth reading up on what to consider when buying nursery wall stickers.
Now for the fun part – the style! The look you choose really sets the tone for the whole room.
- Watercolour Designs: These create such a soft, dreamy feel. They're perfect for a calm nursery or a whimsical woodland theme.
- Cartoon Styles: Go for these if you want something bright, bold, and cheerful. They're brilliant for playrooms and inject an instant pop of colour.
- 3D Butterflies: These are a fantastic way to add movement and depth. The wings can often be folded up from the wall, making it look like they’re about to take flight.
You can even find some truly special designs from UK creators who focus on local wildlife. For example, some beautiful watercolour decals are inspired by the UK's native butterfly species. It’s a lovely way to add a subtle educational touch to the decor, sparking a bit of curiosity about the nature right on our doorstep.
Planning Your Butterfly Wall Design
Before you peel a single sticker off its backing, taking a few moments to plan your design can be a real game-changer. It’s this little bit of prep work that elevates a wall from just ‘nice’ to something truly special. This is your chance to play artist and decide exactly how your flutter of butterflies will bring the room to life.
Rather than just dotting them about at random, think about creating a sense of movement—a story unfolding on the wall. The aim is to create a dynamic scene that catches the eye and captures the imagination.
Creative Layout Ideas to Inspire You
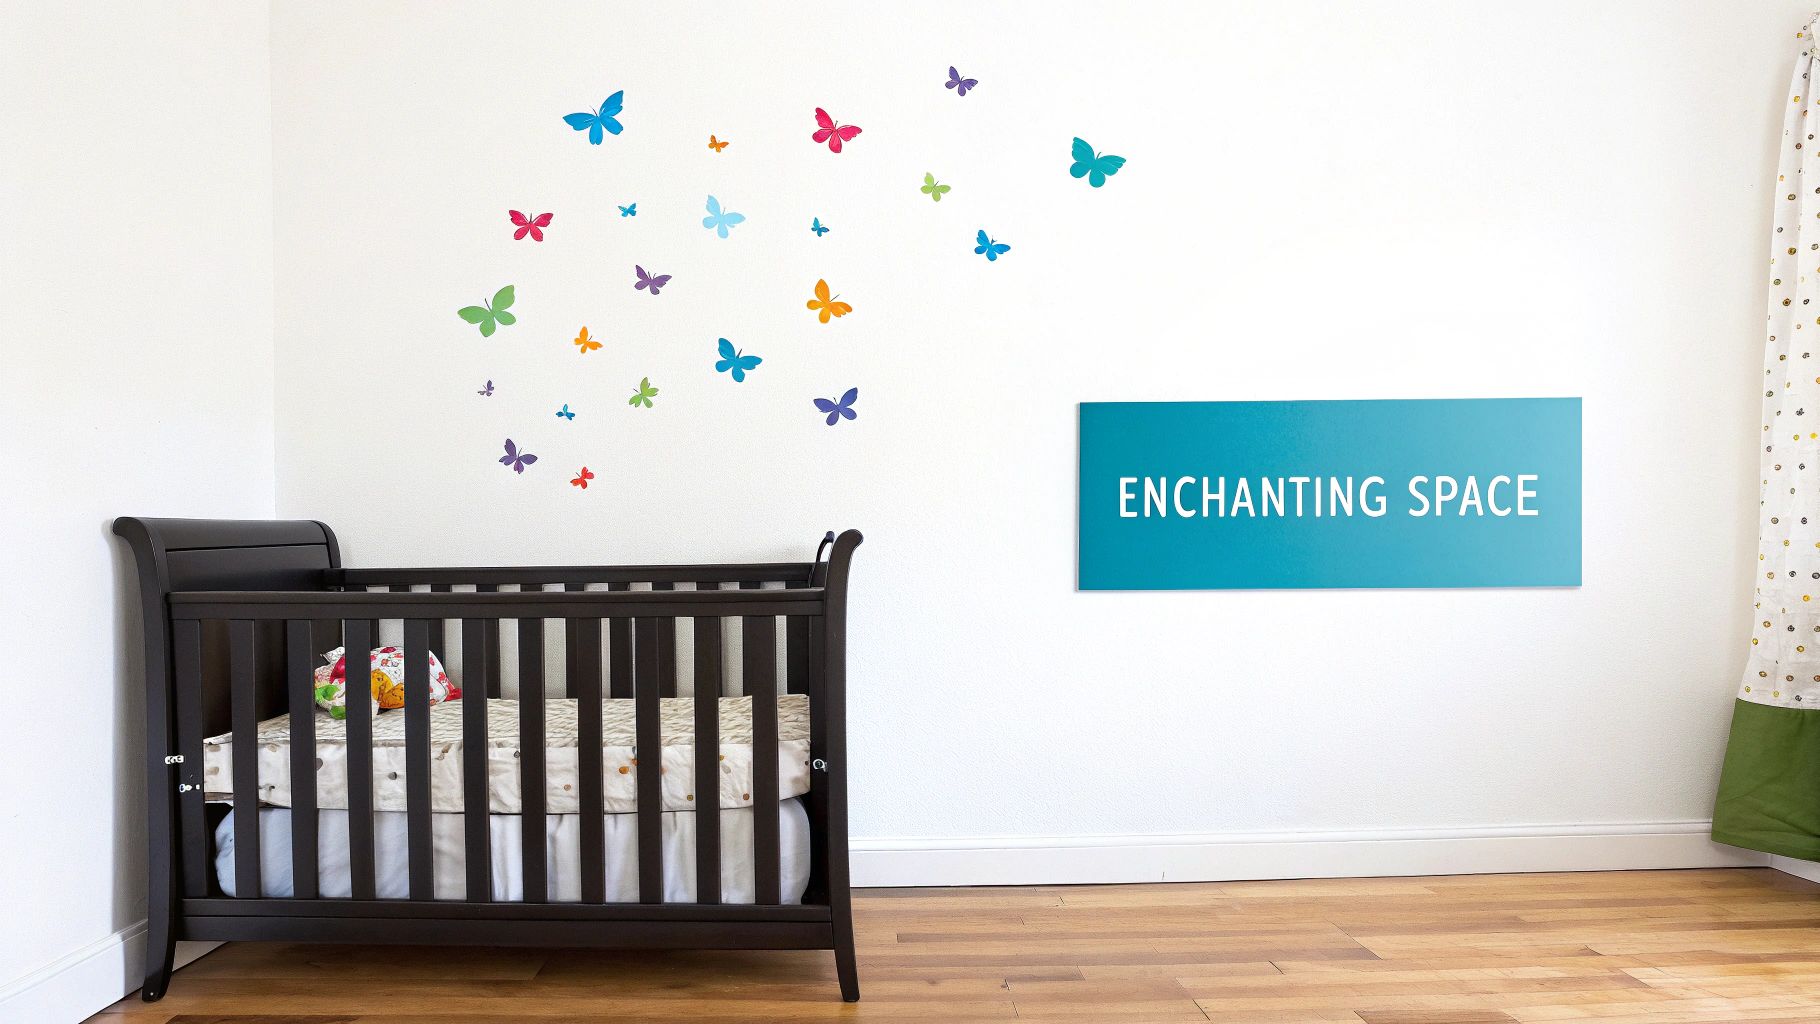
Every room has its own quirks, so have a good look at the space and the furniture you’re working with. A really popular and beautiful idea for nurseries is to create a gentle cascade of butterflies, making it look like they’re flying upwards from the cot. It’s a lovely symbol of growth and peaceful dreams.
Another charming approach is to arrange the butterfly wall stickers for kids in a whimsical trail. Imagine them fluttering from the doorway towards a window, or maybe leading the way to a cosy reading nook. This creates a wonderful flow and naturally guides your gaze around the room.
If you’re after a bold focal point, you could even arrange the butterflies into a larger shape.
- A Heart Shape: This is perfect for a feature wall filled with love, perhaps positioned above a chest of drawers or your little one's bed.
- A Swirl or Circle: You can create a beautiful, mesmerising effect with this, especially if you mix up butterflies of different sizes and colours.
- An Initial: For a wonderfully personal touch, try forming the first letter of your child’s name. It makes the space feel uniquely theirs.
Pro Tip: Don't stick them down for good straight away! I always recommend using tiny pieces of painter's tape or a bit of Blu-Tack to temporarily place your butterflies on the wall. This lets you stand back, look at the whole picture, and shift things around until the layout feels perfectly balanced—all without a single mark on your paint.
Balancing Your Design with the Room
Once you've settled on a layout idea, think about how it works with everything else in the room. The best designs feel like they belong, not like they were just stuck on as an afterthought. You could have your butterfly flight path curve gracefully around a bookshelf or frame a favourite piece of art. Little touches like this help the stickers feel like a natural part of the room's decor.
And don't forget about scale. A huge, empty wall can easily handle a big, dramatic swarm of butterflies, creating a real statement. On the other hand, a smaller, more intimate space might be better suited to a more delicate, subtle trail. The key is to find that sweet spot where the design complements the room without overwhelming it, creating a harmonious and enchanting space your child will love for years to come.
Applying and Removing Stickers Like a Pro
Right, this is the exciting part—where your ideas actually come to life on the wall. Putting up wall stickers is pretty straightforward, but a little bit of prep work is the difference between an okay job and a flawless finish that looks like it was painted by a professional.
First things first: you need a clean surface. It’s non-negotiable. Any dust or grime will stop the adhesive from getting a proper grip. Just give the wall a quick wipe-down with a soft cloth and some mild, soapy water. Then, and this is important, let it dry completely. Don't rush this bit—sticking decals on a damp wall is a sure-fire way to find them peeling at the edges later.
This handy visual breaks down the simple flow from planning to perfection.
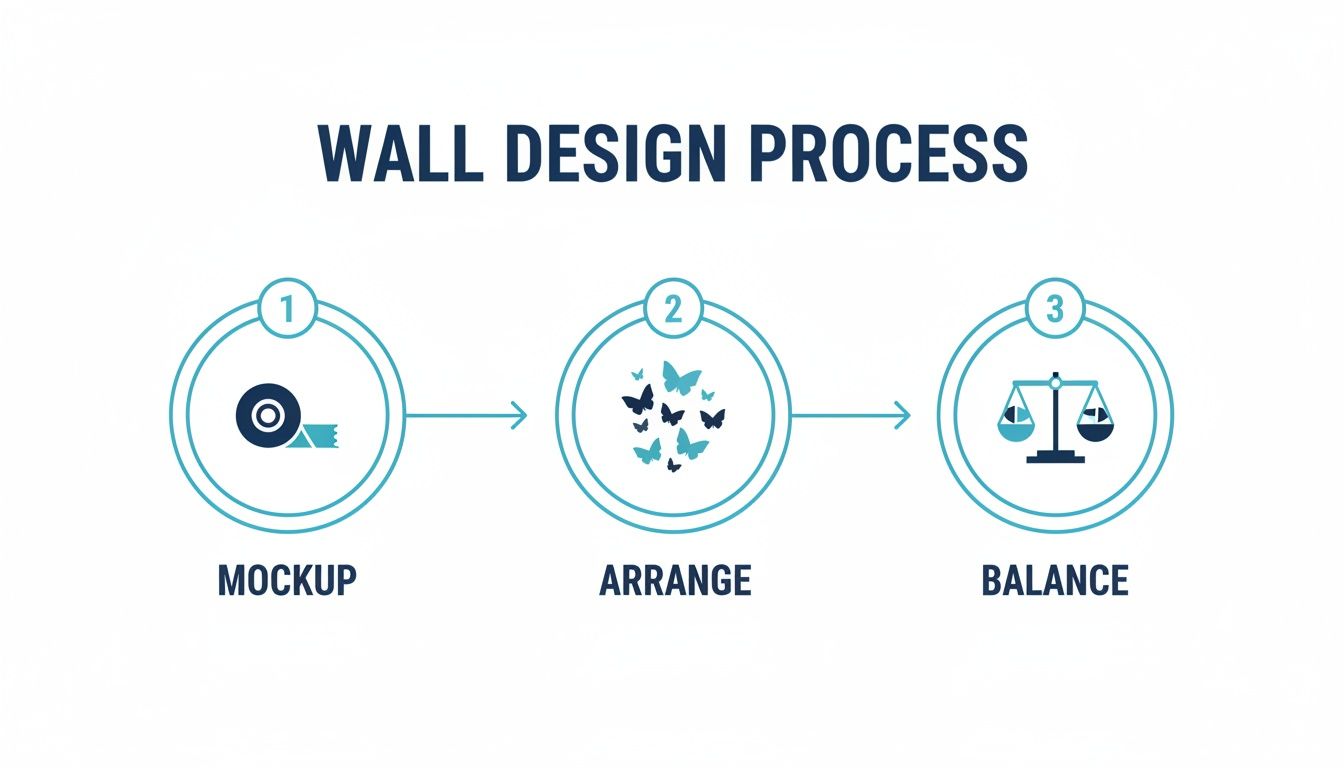
As you can see, mocking up your design first is the key to creating a balanced and beautiful final arrangement.
The Application Process
Once your wall is clean and properly dry, you're ready to get sticking. If you took my advice earlier and mapped out your design with a bit of painter's tape, this part will be a breeze.
- Peel with care. Gently lift one of the butterflies from its backing paper. Try not to touch the sticky side too much, as the natural oils on your fingers can weaken the adhesive.
- Position and press. Place the sticker on the wall, starting from one side and smoothing it across to the other. This little trick is great for pushing out any air that might try to get trapped underneath.
- Smooth it all out. Grab a squeegee, a credit card, or even just the palm of your hand and apply firm, even pressure over the whole sticker. Always work from the centre outwards to chase away any sneaky air bubbles. Pay extra attention to the edges to make sure they're sealed down tight.
This careful approach helps the stickers last for years. Here in the UK, we've seen a huge rise in demand for high-quality, reusable stickers for kids' rooms. It's fantastic to see parents choosing designs that feature native British butterfly species, adding a lovely educational touch. Many of the most popular packs are made from an ultra-thin, locally produced removable vinyl. You can see some beautiful examples of these classic British butterfly designs on stickerscape.co.uk.
Gentle Removal Without the Damage
One of the best things about wall stickers is that they're not forever. When your little one outgrows the design or you just fancy a change, taking them down should be completely stress-free, with your paintwork left perfectly intact.
The secret to damage-free removal is heat. A little bit of warmth softens the adhesive, persuading the sticker to let go of the wall without putting up a fight. Whatever you do, don't just rip a sticker off a cold wall—that's how you end up peeling off paint with it.
To get it right, just grab a hairdryer and pop it on a low heat setting. Hold it about 15-20 cm away from the sticker's edge for around 10-20 seconds. Once the vinyl feels warm and a bit more pliable, you should be able to get a fingernail under the corner to lift it.
From there, slowly peel the sticker back on itself at a shallow, 45-degree angle. Pulling it straight out puts too much strain on the paint. A low, slow peel is always the way to go. For a more detailed walkthrough, you can check out our complete guide on how to remove a wall sticker without leaving a single trace. It’s a simple technique that gives you the freedom to refresh your child’s space whenever the mood strikes.
Styling a Cohesive Butterfly-Themed Room
Butterfly wall stickers are a fantastic starting point, but the real magic begins when you weave them into a complete room theme. It’s about more than just decorating one wall; it’s about creating an immersive, enchanting space that feels truly intentional. By layering colours, textures, and thoughtful accessories, you can build a harmonious little world your child will absolutely adore.
The foundation of any great theme is always the colour palette, and your chosen butterfly stickers are the perfect guide.
If you're creating a serene nursery, think about soft watercolour butterflies in pastel shades. These pair beautifully with walls painted in gentle tones like dusty rose, mint green, or even a warm, creamy off-white. The result is a calming atmosphere, perfect for lulling a little one to sleep.
For a toddler's room or a high-energy playroom, vibrant, bold butterfly stickers practically demand a more playful colour scheme. A great trick is to pull a bright colour from one of the butterflies—like a sunny yellow or a vibrant magenta—and use it for a single feature wall. Keeping the other walls a soft neutral, like a light grey, stops the space from feeling overwhelming.
Bringing the Theme to Life
With your colours sorted, it's time to layer in the coordinating decor. This is where you make the butterfly theme feel properly integrated, rather than just something stuck on the wall. The secret is to echo the butterfly motif and your chosen palette in subtle, clever ways throughout the room.
I always recommend starting with textiles, as they instantly add softness and texture.
- Bedding: Look for a duvet cover with a delicate butterfly print, or simply one that picks up a primary colour from your palette.
- Curtains: Plain-coloured curtains that match one of the sticker hues can frame a window beautifully. For a more whimsical touch, a sheer curtain with subtle embroidered butterflies can look stunning.
- Rugs: A soft, plush rug in a complementary colour is brilliant for anchoring the room and giving them a cosy spot for playtime.
Next up, think about lighting and accessories. A lampshade with a butterfly cut-out pattern can cast gorgeous, dancing shadows on the walls when it’s switched on. You could also hang a delicate butterfly mobile over the cot or in a quiet corner, adding a bit of gentle movement to the space.
Don't be afraid to mix in other nature-inspired elements, too. Things like floral cushions or framed prints of garden scenes help build a richer, more layered world that feels more authentic.
The goal is to create a balanced look. You don't need butterflies on every single item. By repeating key colours and adding just a few carefully chosen themed accessories, you'll create a sophisticated and charming room that feels connected and complete.
For more brilliant inspiration on pulling all your ideas together, you can also explore some amazing tips to decorate a kid's room. At the end of the day, the most important thing is to create a space that feels personal and sparks joy for your little one.
Got Questions? Let’s Clear Things Up
It’s completely normal to have a few last-minute queries before you jump into a decorating project. When it comes to using butterfly wall stickers for kids, I find parents often circle back to the same practical questions about safety, longevity, and whether they'll actually work on their walls.
So, I’ve put together the most common ones I hear. Let's get these answered so you can feel totally confident before you even peel the first sticker off its backing.
Can I Use Butterfly Wall Stickers on Textured Walls?
This is probably the number one question I get asked, and the honest answer is: it depends on the texture. If you've got a wall with a very light texture, like a subtle "orange peel" finish, you're in luck. High-quality fabric stickers are brilliant for this; their flexibility helps them mould to those minor bumps much better than standard vinyl.
But for those really heavy textures—think popcorn ceilings or very rough, bumpy plaster—most stickers just won't get a proper grip. Air gets trapped underneath, and you'll find the edges start peeling away pretty quickly.
My Best Advice: Don't risk it. Before you buy a whole set, just get a single sample sticker. Pop it onto an inconspicuous bit of wall, leave it for a couple of days, and see what happens. This little test can save you a whole lot of time and disappointment down the line.
Are The Wall Stickers Safe for a Baby's Nursery?
Absolutely, as long as you choose the right ones and place them thoughtfully. Safety is non-negotiable in a nursery, so you need to look for stickers that are specifically labelled as non-toxic, BPA-free, and phthalate-free. Good UK brands will use water-based inks, which means they don’t release any nasty volatile organic compounds (VOCs) into the air.
The golden rule here is placement. Make sure every single sticker is well out of your baby's reach. This is especially true for the wall above the cot or the changing mat. While quality stickers stick fast, you never want to create a situation where a curious baby could potentially peel one off and put it in their mouth.
How Do I Clean The Wall Stickers Without Damaging Them?
Keeping those butterflies looking bright and lovely is surprisingly easy. Most premium vinyl and fabric decals are made to withstand a bit of light cleaning.
- For dust: A gentle sweep with a feather duster or a dry microfibre cloth is usually all you'll need.
- For sticky fingerprints or smudges: Grab a soft cloth, dampen it slightly with plain water, and gently wipe the mark. No scrubbing needed!
The big no-no is using chemical cleaning sprays, soaps, or anything abrasive. These harsh products can easily strip the colour, damage the design, and even break down the adhesive, causing the sticker to lift at the edges. A little TLC is all it takes.
Will Removing The Stickers Damage My Paint?
This is a huge worry, especially if you're renting! But rest assured, modern removable wall stickers are designed to come off cleanly without a trace—if you remove them correctly.
The trick is patience. Don't just grab a corner and rip it off the wall. Instead, grab a hairdryer and set it to low heat. Hold it about 15-20 cm from the sticker for 10-20 seconds to gently warm and soften the adhesive. Once it feels pliable, lift a corner and slowly peel the sticker back on itself at a flat angle. This simple technique allows the sticker to release its grip without taking any paint with it.
Ready to create an enchanting space? Find the perfect high-quality, non-toxic butterfly wall stickers for kids at Quote My Wall. Explore our huge range of beautiful designs and bring your vision to life today at https://www.quotemywall.co.uk.