

Artwork for a Nursery: A Practical UK Guide
The cot is assembled, the Moses basket is in place and the shelves are finally level. Then you step back and notice the four bare walls. The room is ready for a baby, but it doesn't yet feel finished.
That moment brings a surprising number of decisions. How large should the artwork for a nursery be? Which materials will cope with sticky fingers? How can you hang a picture safely in a compact British bedroom, particularly if you're renting? Above all, will the wall still look right when the baby becomes a toddler?
Nursery art deserves the same practical thought as a cot mattress. The right pieces can support the room's mood, make a small space feel considered and move easily into another room later. The wrong pieces can dominate the scheme, leave unnecessary holes in the wall or need replacing as soon as the babyish stage passes.
The Bare Wall Moment
A parent recently showed me a nearly finished nursery with warm paint, a compact cot and a narrow chest of drawers beneath the window. Everything functional was ready, but the walls were empty. The first instinct was to buy a matching set of cute prints, yet the room didn't have enough uninterrupted wall space for a large collection. A single calm focal print above the chest, paired with a small removable detail near the reading chair, worked far better.
That is the first useful distinction. Nursery wall art isn't a shopping category alone, it's a room-planning decision. The available wall width, the position of the cot, the natural light and the type of wall all affect what will work. In a smaller British bedroom, a large gallery wall can make the room feel crowded, while one well-proportioned piece can give the eye somewhere to rest.
UK homes also bring practical complications. A period property may have uneven plaster, a newer house may use plasterboard partitions, and a rented home may restrict drilling. Those details influence the hanging method, frame weight and whether a decal, canvas or lightweight print is the sensible choice. A useful collection of nursery wall decor ideas can help generate options, but inspiration should come after measuring the room.
Start with the wall, not the product
Stand in the doorway and identify the wall that naturally catches your eye. It may be the wall opposite the cot, the space above a changing table or the narrow section beside a book ledge. Don't automatically place art above the cot just because that wall is central. Safety and access matter more than symmetry.
Keep the child's changing needs in mind, too. A baby-themed print may look lovely beside a Moses basket but feel out of place once the room contains a toddler bed, larger books and more active play. A restrained subject such as animals, plants, scenery or simple shapes can carry the room through those changes.
Practical rule: Treat the first purchase as part of the room's architecture. Measure the wall, note what furniture will sit below it and decide how long you want the piece to stay before choosing the design.
Nursery decoration has a long history of doing more than filling a blank wall. The Victoria and Albert Museum's account of wallpapers for children describes how nursery designs moved from moral instruction towards entertainment, with subjects drawn from children's books and popular characters. That history is a useful reminder that children's rooms have always balanced adult taste with a child's developing world.
Defining Theme, Palette and Moodboard
A nursery theme works best when it gives the room direction. Choose the visual idea first, then make the colours and artwork support it. This approach keeps the wall coherent now and leaves enough flexibility for the room to change as your baby grows into a pre-schooler.
Choose one anchor theme
Start with a subject that can stretch beyond the newborn stage. Botanicals, woodland animals, gentle geometric shapes, maps and simple scenery usually age more gracefully than a character-led scheme. These themes can suit a cot, toddler bed and later play space without making the room feel stuck in one age bracket.
A nautical room can work well when the artwork features shells, boats, waves or sea creatures, rather than relying on a literal cartoon treatment. Review these nautical nursery colour and decor tips before committing to an under-the-sea direction, especially if the rest of your home has a quieter style.
Leave some visual space for the child's interests to develop. A wall covered with branded characters gives you little room to add a drawing, found object or new favourite animal later. A restrained theme gives those personal additions somewhere to belong.
Build the palette from the room
Pick two main colours and one accent, using the room's existing materials as your starting point. Bedding, curtains, the cot finish and the floor provide more dependable references than an art print found online. For more guidance on matching artwork to a UK scheme, see our guide to nursery wall art UK.
Natural light changes how each colour reads. Cool daylight can make blue-grey paint feel sharper, while a shaded room may benefit from warmer cream, clay or olive notes. Check paint samples beside the skirting board and fabrics, rather than judging them on a phone screen.
Make a small test board
A moodboard can stay practical. Pin together:
- Fabric swatches: Include bedding, curtains or a blanket that will remain in the room.
- Paint chips: Add the wall colour and the nearest floor or wood tone.
- Print thumbnails: Use three to five possible artworks, rather than an entire online collection.
- Material samples: Add a frame finish, canvas texture or decal colour if you are considering mixed formats.
Leave the board above the changing table for a week. Remove anything that feels too loud, too pale or too tied to the baby stage. One stronger focal print can keep a calm room visually engaging. Guidance on choosing nursery wall art also highlights the value of clear forms and contrast for young babies.
A soft palette can still work. Give it at least one readable visual feature, such as defined leaves on a muted botanical print or a darker outline around a neutral animal illustration. That balance supports a calm adult space while giving the child shapes to notice.
Sizing, Scale and Placement Rules
The most attractive print can look awkward if it is too small for the furniture below it. Scale matters even more in a nursery because storage, cots and chairs already take up much of the available visual space.
A practical starting point is to centre artwork on the furniture beneath it rather than on the entire wall. Above a chest or changing table, leave enough breathing room for the furniture to be used safely. Above a cot, avoid anything with a projecting frame or a loose component. A flush, securely fixed surface is safer than a heavy object that could be pulled or knocked.
For a general hanging line, adult eye level is often too high for a child's room. Place the artwork where a child can benefit from seeing it without being able to grab it. The final position should account for the furniture height, the child's future standing reach and the frame's fixing method.
Use proportion before precision
A single hero piece should have enough presence to anchor the furniture below it. A pair works when the two prints share either their visual weight, their frame finish or a clear relationship in subject. A salon wall needs more restraint than most parents expect. Use one repeated element, such as identical mounts or a consistent margin, so the arrangement reads as one composition.
The practical guide to a 10 x 8 frame is useful when comparing common frame proportions, but don't let a standard size dictate the layout. A narrow wall may need a portrait format, while a broad low chest may suit a wide print.
| Wall width | Hero print size | Pair print size | Salon wall set |
|---|---|---|---|
| Narrow wall beside furniture | One portrait or compact landscape piece | Two small matching prints | A very small, carefully spaced group |
| Medium wall above a chest | One piece with clear visual weight | Two related prints with equal margins | A small arrangement with one dominant print |
| Broad uninterrupted wall | One larger focal piece | Two medium prints with generous spacing | A balanced group using mixed but related sizes |
Let the room decide
Tape paper rectangles to the wall before ordering. Stand in the doorway, sit in the nursing chair and check the view from the cot. This catches the two mistakes I see most often: a small print floating above large furniture and a collection that competes with shelving.
A nursery wall should feel composed, not filled. Empty space around the artwork is part of the design, especially in a compact room where visual clutter accumulates quickly.
Choosing the Right Format for Your Walls
Vinyl decals, framed prints and canvases solve different problems. Choosing one format for each wall is usually more successful than buying a matching set and forcing every surface to behave the same way.
| Format | Durability | Safety if pulled down | Typical UK cost | Renter-friendly | Best used for |
|---|---|---|---|---|---|
| Vinyl decal | Can mark, lift or show edge wear depending on the wall and adhesive | Lightweight, but edges may invite picking | Low | Usually the easiest to remove, test first | A small accent, name or simple motif |
| Framed print | Reusable and easy to move between rooms | Depends on frame weight, glazing and fixing | Moderate to high | Good with suitable removable fixings | A lasting focal piece |
| Canvas | Resists minor wall imperfections and has no glass face | Relatively light, but still needs a secure fixing | Moderate to high | Often suitable, subject to the wall finish | A large, soft-edged statement |
Vinyl decals
Decals are useful when you want a low-commitment detail or need to avoid drilling. They suit a rental bedroom particularly well when the wall is smooth, clean and properly tested first. They aren't always the best long-term choice for a main feature. Edges can lift, colours may age unevenly and a decal removed during a house move rarely looks as fresh when reapplied.
Use a decal for a name, a small constellation or a group of leaves, rather than covering the wall with a complex scene. Keep it away from areas where a toddler can repeatedly pick at the edge.
Framed prints
Framed artwork looks more grown-up and can move to a hallway, landing or spare room later. It offers the greatest flexibility for changing the print while keeping the frame, but it demands accurate measuring and appropriate fixings. Glass also adds weight and creates a breakage concern, so lightweight glazing or a non-glazed mount may be preferable in a child's room.
Avoid materials with a strong chemical smell, poorly finished edges or uncertain construction. I also avoid acrylic faces that have already started to craze and unsealed MDF frames where the finish appears unstable.
Canvas and mixed schemes
Canvas hides minor wall imperfections and creates a softer finish than a hard frame. It can sit lower without the same sharp edge, although it still isn't a substitute for proper fixing. A practical combination might be one framed print above the chest, a small canvas near the reading chair and a removable decal on an otherwise empty wall.
The aim is not uniformity. Choose the format according to the wall, the tenancy and the child's access to it.
Installing Artwork Safely in a Nursery
The safest design is the one that stays attached when a curious toddler tests it. Installation starts with the wall construction, not the hanging hook.
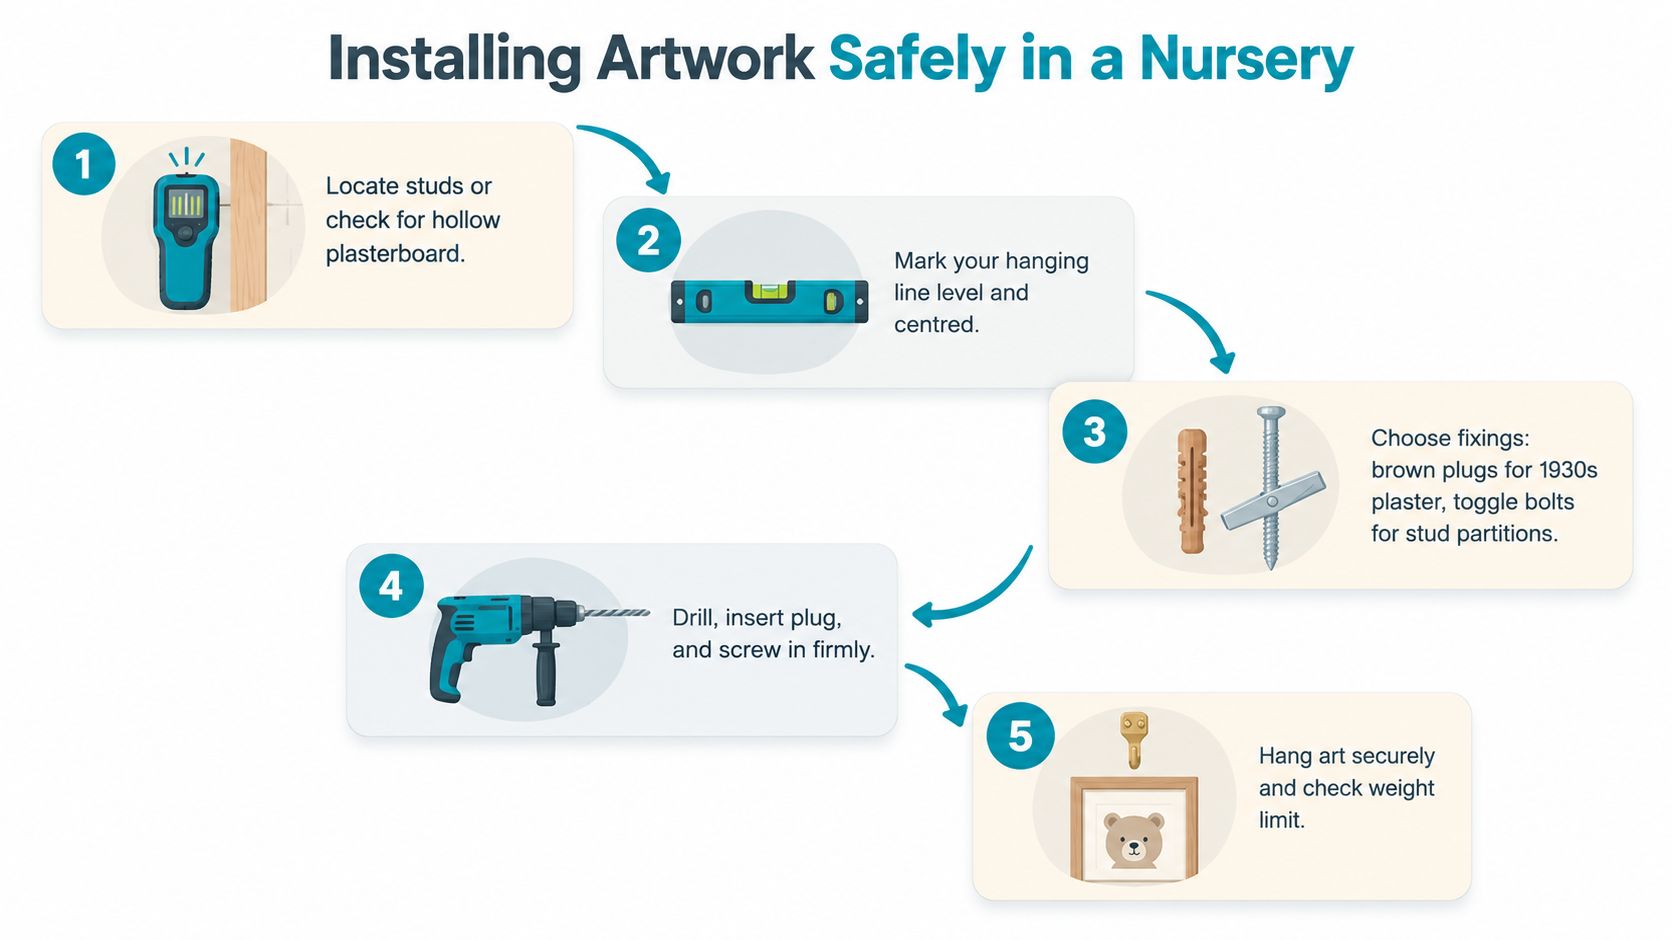
A calm installation sequence
- Find the structure. Use a stud detector, tap the surface to identify hollow plasterboard and inspect for a solid fixing point. Older plaster can crumble around an unsuitable plug, while a stud partition may need a fixing designed for its cavity.
- Mark the position. Measure from the furniture, not just from the ceiling. Mark the centre line in pencil and use a spirit level before making a hole. If you're hanging a pair, mark both outer edges so the spacing remains intentional.
- Match the fixing to the load. A picture hook may suit a light print on sound plaster. Command strips or 3M hooks can help with lightweight pieces on a compatible, clean surface, but follow the manufacturer's weight and surface instructions. Heavier frames need a suitable wall plug, screw or stud fixing.
- Secure the hardware. On solid masonry, use the appropriate drill and plug. On plasterboard, choose a fixing made for hollow walls or fix directly into a stud. A picture rail can be a useful rental-friendly solution where the property already has one.
- Check the finished piece. Confirm that the frame sits flat, the hanger is closed and no cord or wire creates a loop. Avoid placing glass where a child could reach it, and keep the lowest edge beyond a standing toddler's grasp.
For more detail on alignment and accurate marking, use this guide to how to hang a picture perfectly before you start.
Keep a spirit level, pencil, tape measure, drill, suitable bit and stud detector together in a small tray. If you rent, check the tenancy agreement first. Removable strips, lightweight canvas, existing picture rails and freestanding ledges can reduce wall damage, but every adhesive product needs a surface test in an inconspicuous place.
Finish with a simple tug, wait and recheck. Pull gently at the lower edge, leave the piece in place while you tidy the tools, then inspect the fixing again. That small pause can reveal a slipping hook before the first night-time cot wake-up.
Making Artwork Last Beyond the Baby Years
The most economical nursery wall isn't always the cheapest wall at the till. A design that only makes sense beside a Moses basket can become disposable as soon as the room changes. A calmer print with a good frame can move from nursery to hallway, playroom or bedroom without looking like leftover baby décor.
This approach also reflects how families now decorate children's rooms. UK nursery spending remains substantial, with Next UK's survey data on nursery decoration reporting an average initial furnishing and decorating spend of £853, followed by an average of £900 every two years as rooms are redecorated. The same source reports that 68% of parents consider nursery décor important, while Houzz UK data identifies themed rooms, inspirational or educational décor, animal subjects and nature themes as popular choices.
The lesson isn't to spend without limits. It is to spend deliberately on the elements that will stay.
Four tests for lasting artwork
- Can the subject grow up? Animals, outdoor scenes, botanical studies and abstract shapes usually have more staying power than an infant-specific slogan.
- Does the palette belong to the home? Sage, terracotta, mushroom, olive and warm neutrals can work in a nursery and later in a child's room.
- Would the frame work elsewhere? A simple wood, black, white or natural finish is easier to relocate than a highly themed shape.
- Will a pre-school child still accept it? Look for detail that a young child can discover without making the piece look juvenile to an adult.
A nursery is a child's first room, but it doesn't need to announce “baby” on every wall.
One or two playful pieces still have a place. A bright animal decal above a book basket, a personalised name detail or a small alphabet print can add character without determining the entire scheme. The difference is intention. Use those pieces as accents, not as the only artwork the room can support.
A long-term wall plan also reduces clutter. Rather than adding another print whenever the room feels unfinished, leave space around the main piece and allow the child's own drawings, cards or treasures to become part of the room later.
Your Nursery Wall Plan and Product Picks
A tired parent should be able to make the main decisions without opening dozens of inspiration boards. Write the answers down before buying anything.
- Lock the theme. Choose one flexible direction, such as botanicals, animals, outdoor scenes or simple geometry.
- Record the palette. Note the two main colours and one accent already present in the room.
- Measure the wall. Write down the usable width, furniture width and the position of sockets, shelving and doors.
- Choose the format mix. Decide whether the room needs one framed hero print, a pair, a canvas, a decal or a restrained combination.
- Source the fixings. Match the hardware to the wall and artwork weight, then test the planned position with paper templates.
- Set the installation date. Finish painting, allow the wall to settle and hang the artwork before the cot becomes difficult to move.
Personal details can work beautifully when they have a clear place in the composition. If you prefer a faith-led room, compare the tone and length of the wording with the rest of the scheme using these curated bible verses for nursery walls from Little Venture Co. Keep the lettering visually quiet if the main wall already contains a strong illustration.
For a made-to-measure option, consider Quote My Wall for nursery prints that can be selected to suit the planned size and overall design. Use the measurements from the wall first, then choose a format and finish that fit the room rather than buying a generic set and hoping it works.
Visit Quote My Wall to explore nursery prints and wall décor that can be matched to your room's theme, proportions and installation plan. Choose the design only after you've measured the wall, checked the fixing method and decided whether the artwork needs to last beyond the baby years.