
A Guide to Installing Stick On Tile Backsplash Kitchen Style
A stick-on tile backsplash is one of the smartest, most budget-friendly ways to get a high-end kitchen look without the dust, mess, and expense of a traditional tiler. These clever self-adhesive tiles, usually made from vinyl or a gel-like material, have a simple peel-and-stick application that can genuinely transform a tired kitchen in just a few hours.
Your Instant Kitchen Upgrade Awaits
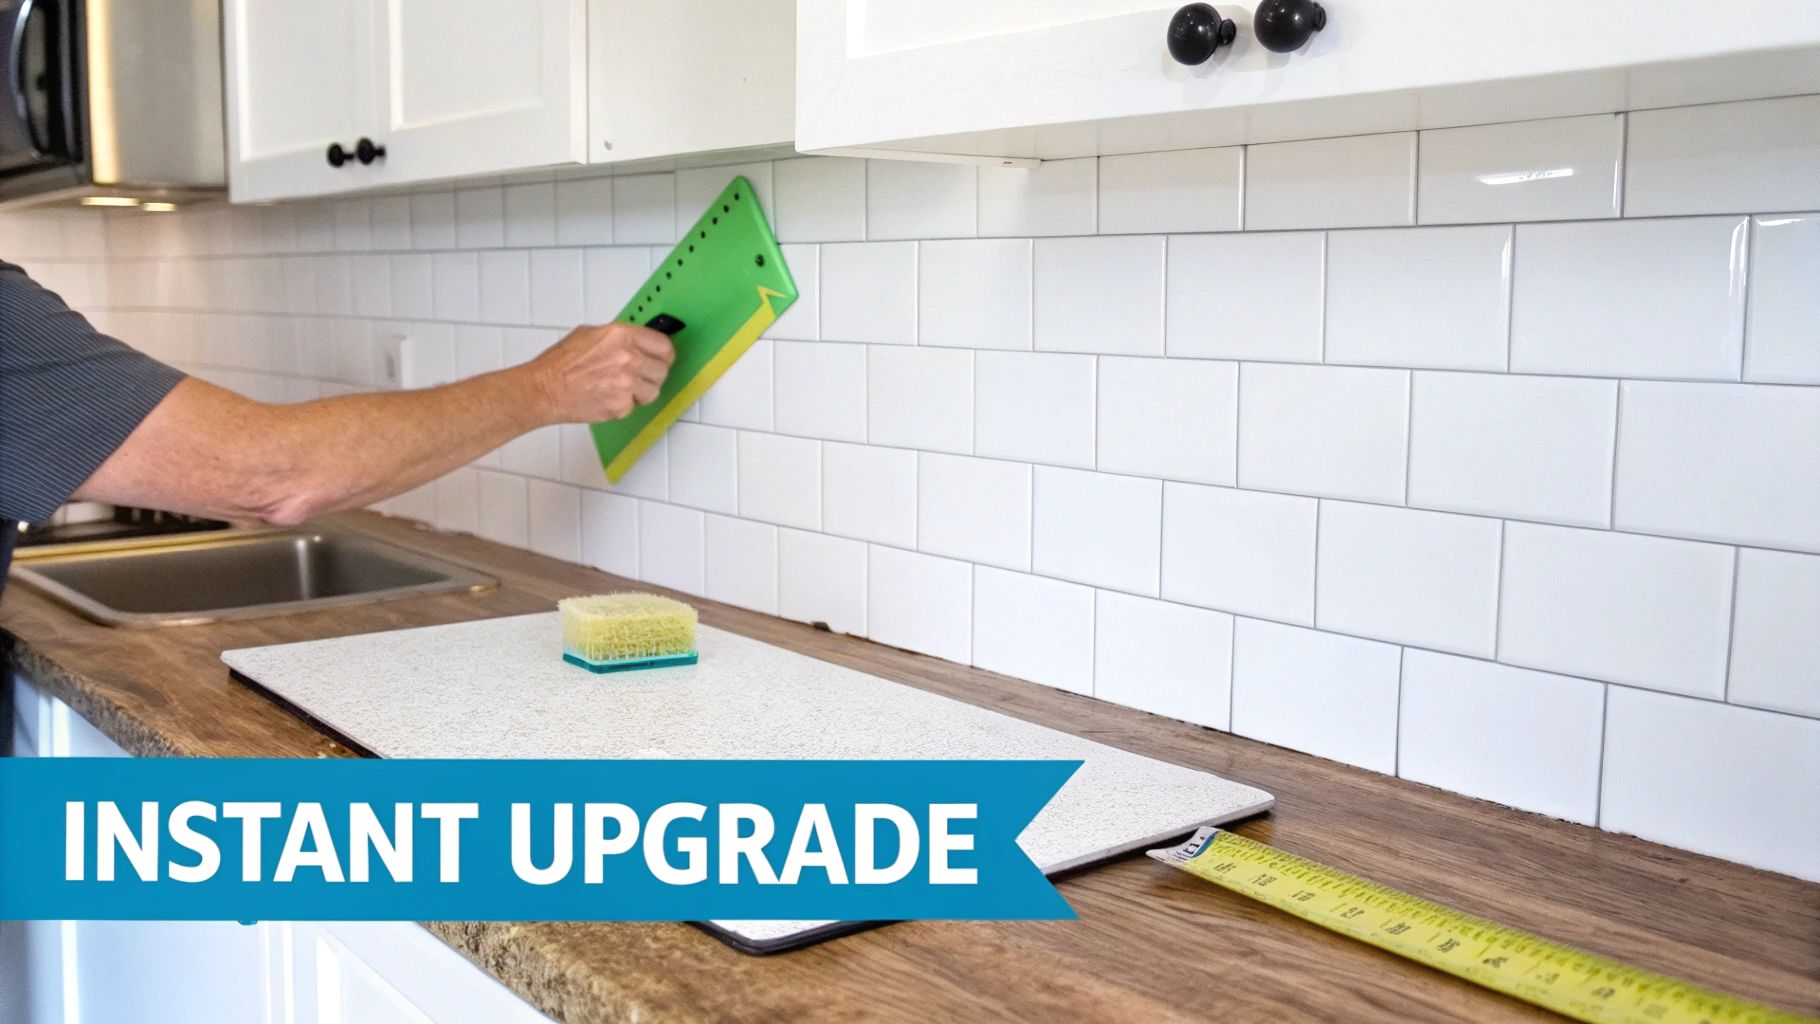
Are you tired of looking at a bland kitchen wall but can't face the upheaval of a full-on renovation? A stick-on tile backsplash is the modern, no-fuss answer for busy homeowners and savvy renters. This isn't just a fleeting trend; it's a seriously practical way to make a big visual impact with very little effort.
The beauty of this project is that it gives you the classic look of ceramic, glass, or stone tiles, but you won't need to touch any grout, mortar, or specialist tools. It’s a complete game-changer for anyone wanting to inject a bit of personality into their space, and do it quickly and affordably.
Why Choose a Stick-On Backsplash?
The draw of a peel-and-stick solution is about more than just simplicity. For most people, it's about finally getting a custom look that reflects their personal style. You can explore the many benefits of using tile stickers in your home to see just how versatile they are.
Here are a few of the main perks:
- Cost-Effective: They are dramatically cheaper than hiring a professional tiler, saving you hundreds of pounds on labour and materials alone.
- Time-Saving Installation: You can get most projects done in a single afternoon. It’s all about that instant gratification.
- Renter-Friendly: Many options are designed to be removable, letting you upgrade your rental kitchen without worrying about your deposit.
- Endless Style Options: Whether you love the classic subway look or intricate mosaics, there's a design out there for every taste.
The classic tiled look has an enduring appeal in kitchen design. Even with sleek slab backsplashes gaining ground, a recent study found traditional tiles still make up a huge 38% of choices in UK kitchen renovations. This really shows how much we love that tiled aesthetic, which stick-on versions replicate so well.
A Modern Take on a Classic Look
Tiles have a long history in British kitchens. They started out as purely functional, waterproof surfaces back in the 1950s and evolved into decorative focal points by the 1990s. The stick-on tile backsplash trend is the next step in that evolution, blending timeless style with the convenience we all crave today.
In fact, the 2025 Houzz Kitchen Trends Study highlighted that homeowners continue to prioritise both looks and practicality—a balance these products strike perfectly. You can discover more insights from the Houzz kitchen trends report to see what's shaping modern kitchen design.
How To Choose the Right Stick On Tiles
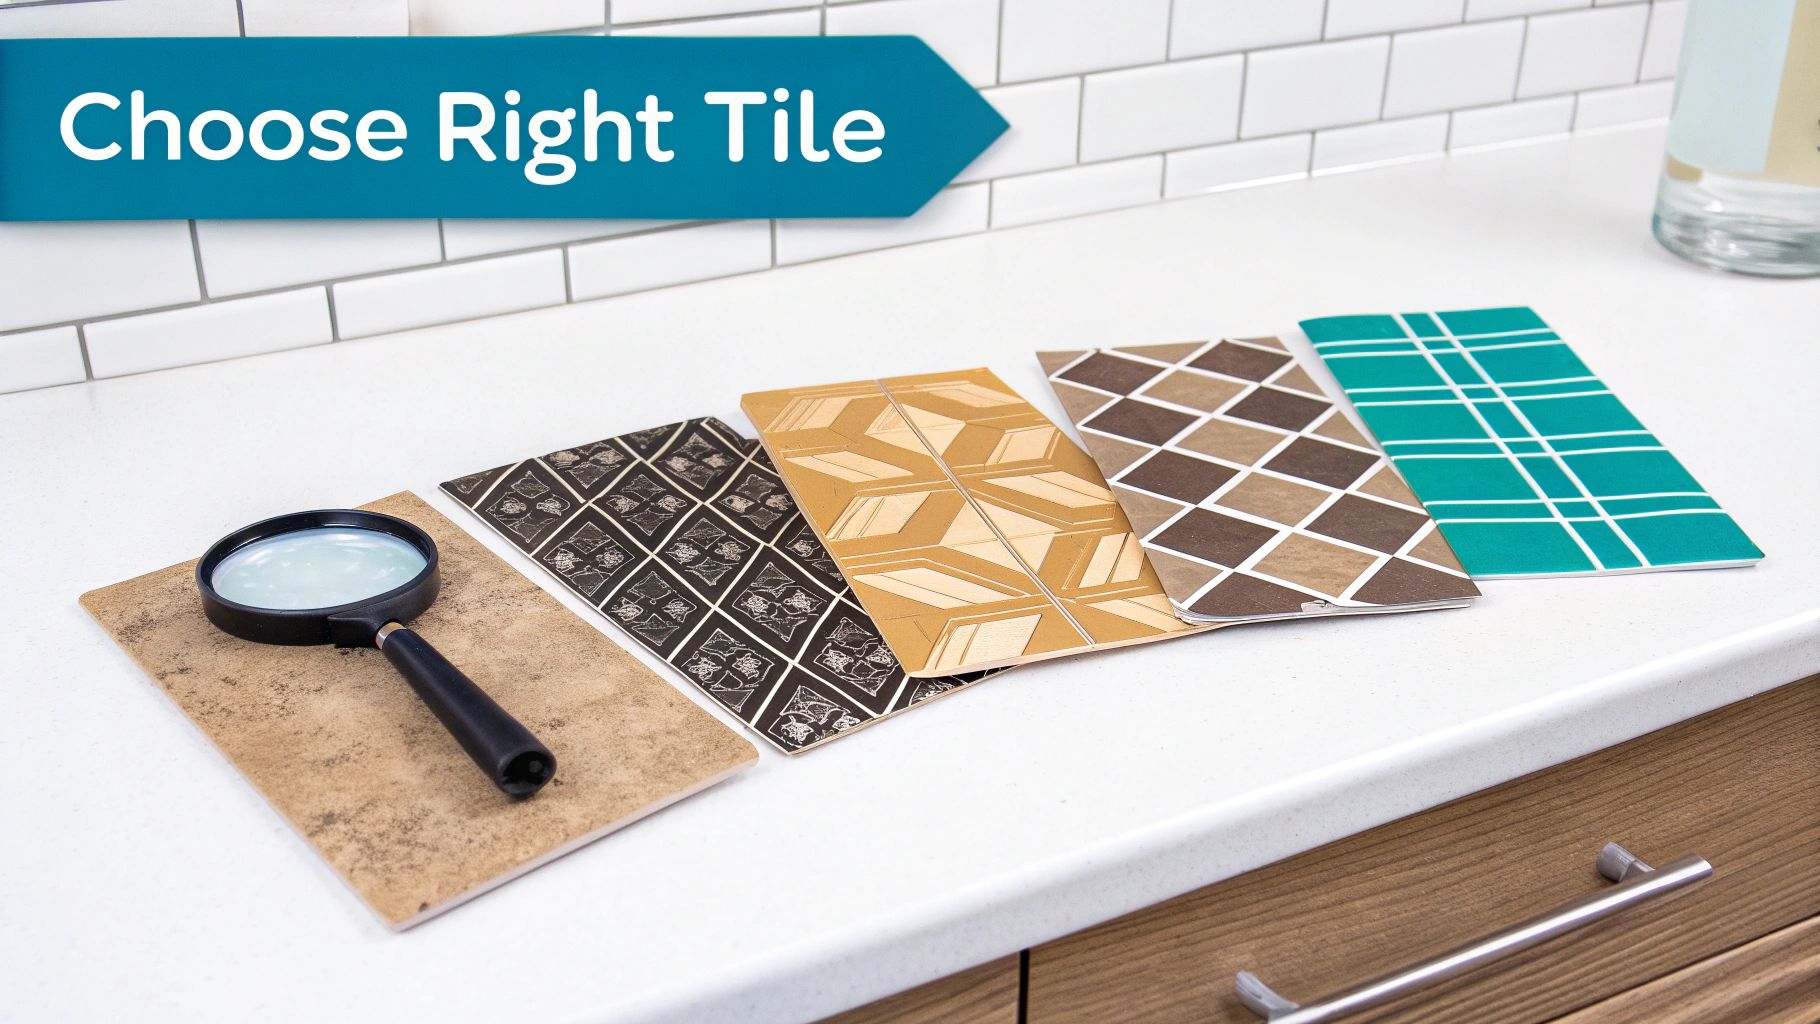
The secret to a stunning stick-on tile backsplash begins long before you peel off the first backing. Honestly, choosing the right product is the most important part of the whole project. Not all self-adhesive tiles are created equal, and the material you pick directly impacts how your new backsplash looks, feels, and stands up to the daily chaos of a busy kitchen.
To get a feel for what’s out there, it helps to start by understanding general kitchen backsplash tile options. This gives you a bit of context and helps you see exactly where stick-on versions really shine. In the end, your choice will boil down to the material, the style you love, and a little bit of simple maths.
Comparing Tile Materials
Jump online and you'll see a dizzying array of options, but most stick-on tiles fall into a few main categories. Each one has its own personality and is suited for different kitchen styles and demands.
- Vinyl Tiles: These are definitely the most common and budget-friendly choice out there. They’re lightweight, incredibly easy to cut, and come in a massive range of colours and patterns. Modern vinyl often has a surprisingly convincing textured finish that mimics real ceramic.
- Gel-Topped 3D Tiles: You'll often see these called 3D or epoxy tiles. They have a clear, resinous layer over the design that gives them a glossy, glass-like depth you can actually feel. They're fantastic for faking the look of those pricey mosaic tiles.
- Metal Tiles: Usually made from a thin layer of brushed aluminium or stainless steel, these give off a sleek, contemporary vibe. They are very durable and heat-resistant, which makes them a solid choice for the wall behind your hob.
When you get your samples in hand, don't just look at them—really feel them. Check the thickness and how rigid they are. A thicker, more substantial tile usually means better quality and will do a much better job of hiding any minor lumps and bumps on your wall.
Stick-On Tile Material Comparison
To help you narrow down the options, here’s a quick look at how the most popular materials stack up against each other. Consider what you need most—is it heat resistance behind the hob, or an easy-to-clean surface for a family kitchen?
| Material Type | Best For | Heat Resistance | Cleaning & Maintenance | Average Cost per sq. metre |
|---|---|---|---|---|
| Vinyl (PVC) | Budget-friendly makeovers; wide style variety. | Low to Moderate (not for direct heat). | Very easy; wipe with a damp cloth. | £15 - £30 |
| Gel/Epoxy (3D) | Mimicking glass or ceramic mosaics. | Moderate; keep away from open flames. | Easy; non-abrasive cleaners only. | £25 - £45 |
| Metal | Modern, industrial look; behind hobs. | High; often made of aluminium. | Easy; use stainless steel cleaner. | £40 - £70+ |
| Stone/Composite | A more realistic, high-end look. | Varies; check manufacturer specs. | May require specific cleaners. | £50 - £80+ |
Ultimately, the best material is the one that fits your kitchen's daily life, your aesthetic, and your budget.
Matching Style and Calculating Quantity
Once you've landed on a material, the fun part begins: matching the style to your kitchen. A classic white subway tile can make a small, dark space feel instantly brighter. On the other hand, a bold, geometric pattern can become a stunning focal point in an otherwise simple kitchen.
Hold your samples up against your cabinets, worktops, and even your kettle. See how they look in the morning light versus your evening spotlights. For a bit of extra inspiration, you can find great ideas for the perfect bathroom or kitchen makeover to see how different styles come to life.
Pro Tip: Always, always order at least 10% extra than you think you need. This little buffer is an absolute lifesaver for covering cutting mistakes, navigating tricky corners, or replacing a damaged tile in the future.
To work out how many tiles to buy, just measure the height and width of your backsplash area in centimetres. Multiply those two numbers to get the total area. Then, simply divide that by the area of a single tile sheet to see how many you'll need to order.
Getting Your Walls Ready for a Perfect Finish
Let me tell you, the real secret to a stick-on tile backsplash that looks professionally done and actually stays put is all in the prep work. It's just like painting: the final result is 90% preparation and only 10% sticking the tiles on. If you rush this part, you're practically asking for peeling corners and annoying bumps down the line. Let's make sure we get it right from the start.
Your biggest enemy here is everyday kitchen grime. Even if your walls look perfectly clean, a thin, almost invisible film of cooking oil builds up over time and will stop anything from sticking properly. So, before you do anything else, the entire area needs a really good clean.
A simple sugar soap solution or a decent degreasing spray works wonders. Just wipe it all down, go over it again with a clean, damp cloth to rinse, and then let it dry completely. And I mean completely – give it at least a few hours.
What Kind of Wall Are You Working With?
Not all walls are ideal for peel-and-stick tiles. What you’re looking for is a canvas that’s smooth, non-porous, and in good nick.
Here’s a quick look at the most common kitchen wall surfaces:
- Painted Drywall (Plasterboard): This is pretty much perfect, as long as the paint isn't flaking off and has a satin or gloss finish. If you really want to guarantee a solid grip, putting on a fresh coat of primer is a brilliant move.
- Existing Ceramic Tiles: Good news! You can often go straight over the top of old tiles. The trick is to get them squeaky clean and, most importantly, fill in the grout lines. You need a totally flat surface. Our guide on how to cover kitchen tiles dives into this with some great tips.
- Wallpaper: This is a firm no. The adhesive on the tiles can soak into the paper, making it bubble and peel right off the wall – taking your lovely new backsplash with it. If you've got wallpaper, learning how to remove old wallpaper easily is your essential first job.
- Textured or Bare Plaster: These surfaces are just too rough and porous for the tile adhesive to get a proper hold. They’ll need to be sanded down until they’re smooth and then sealed with a quality primer before you even think about tiling.
Your Prep Toolkit
Getting all your gear together before you start is a massive time-saver and cuts down on the frustration. You don't need a huge amount of stuff, but having these bits and pieces ready will make the whole process much smoother.
- Degreasing Cleaner: Sugar soap or a specialised kitchen degreaser.
- Microfibre Cloths: Have at least two – one for cleaning, one for rinsing.
- Fine-Grit Sandpaper: Essential for smoothing out any little lumps or bumps.
- Spatula or Scraper: You'll need this for applying filler.
- All-Purpose Filler: For creating that perfectly smooth surface.
- Primer: A good quality primer is non-negotiable, especially for porous or freshly plastered walls.
Take a moment to fill any little nail holes or dents with a bit of filler. Once it's dry, give it a light sand until it’s totally flush with the wall. Honestly, it’s these tiny details that separate a job that looks a bit 'DIY' from one that looks seamless.
Once your wall is clean, smooth, and bone dry (and primed, if you needed to), you’re finally ready for the fun part. This careful prep work is what guarantees your new stick-on backsplash will grip tight and look fantastic for years to come.
Installing Your Tiles Like a Professional
Right, this is the part you've been waiting for. Forget those tiny, confusing instruction leaflets that come in the box. Think of this section as having a seasoned DIYer right there with you, guiding your hand. The goal is to get a finish so clean and seamless that your friends will be asking for your tiler's number.
Your First Move: The All-Important Guideline
The very first thing you do is the most important. Seriously. It sets the stage for the entire project. We need to establish a perfectly straight, level guideline for your first row of tiles. Whatever you do, don't just follow your worktop – they're almost never perfectly level.
Grab a spirit level and a pencil. Find the lowest point of your worktop and measure up from there to where you want the bottom of your backsplash to begin. Make a small mark. Now, use your spirit level to draw a faint, perfectly horizontal line across the entire length of the wall, starting from that first mark. This is your foundation.
This single line guarantees that your entire stick on tile backsplash kitchen project will be dead straight, even if your house has a few quirky angles of its own. It's a simple step that makes all the difference between looking 'DIY' and looking 'done right'.
Making Precise Cuts for Tricky Areas
Inevitably, you'll come up against obstacles like electrical sockets, light switches, or window sills. This is where people often get a bit nervous, but there's a straightforward technique that gives you a perfect cut every time.
The key is the "score and snap" method. For most vinyl or gel tiles, you don't need a saw. A sharp utility knife and a sturdy straight edge are your best friends here.
Let's walk through a common scenario – cutting around a socket:
- Measure Twice: Get your tape measure out and find exactly where the socket box will fall on the tile you're about to place. I always measure from two different edges of the tile to be absolutely certain.
- Mark the Back: Flip the tile over and transfer these measurements onto the back with a pencil. Use your straight edge to draw the lines for the cutout.
- Score the Lines: Place the tile on a cutting mat or even just a piece of scrap cardboard to protect your work surface. Pressing firmly, run your utility knife along the marked lines. You’ll probably need to go over each line two or three times. Remember, you're not trying to cut right through, just create a deep groove.
- Snap It: Once scored, you can carefully bend the tile along the line until it snaps cleanly. For the inside corners of a cutout, a little diagonal score can help the piece pop right out.
My Top Tip for Clean Edges: Always use a fresh, sharp blade in your utility knife. A dull blade is the number one reason for tearing the tile's surface and getting jagged, unprofessional-looking edges. Change your blade more often than you think you need to.
Achieving That Seamless Look
The final piece of the puzzle is getting the tiles on the wall so the seams practically disappear. It all comes down to interlocking them correctly and applying good, consistent pressure.
This simple wall preparation workflow is the foundation for a flawless installation.
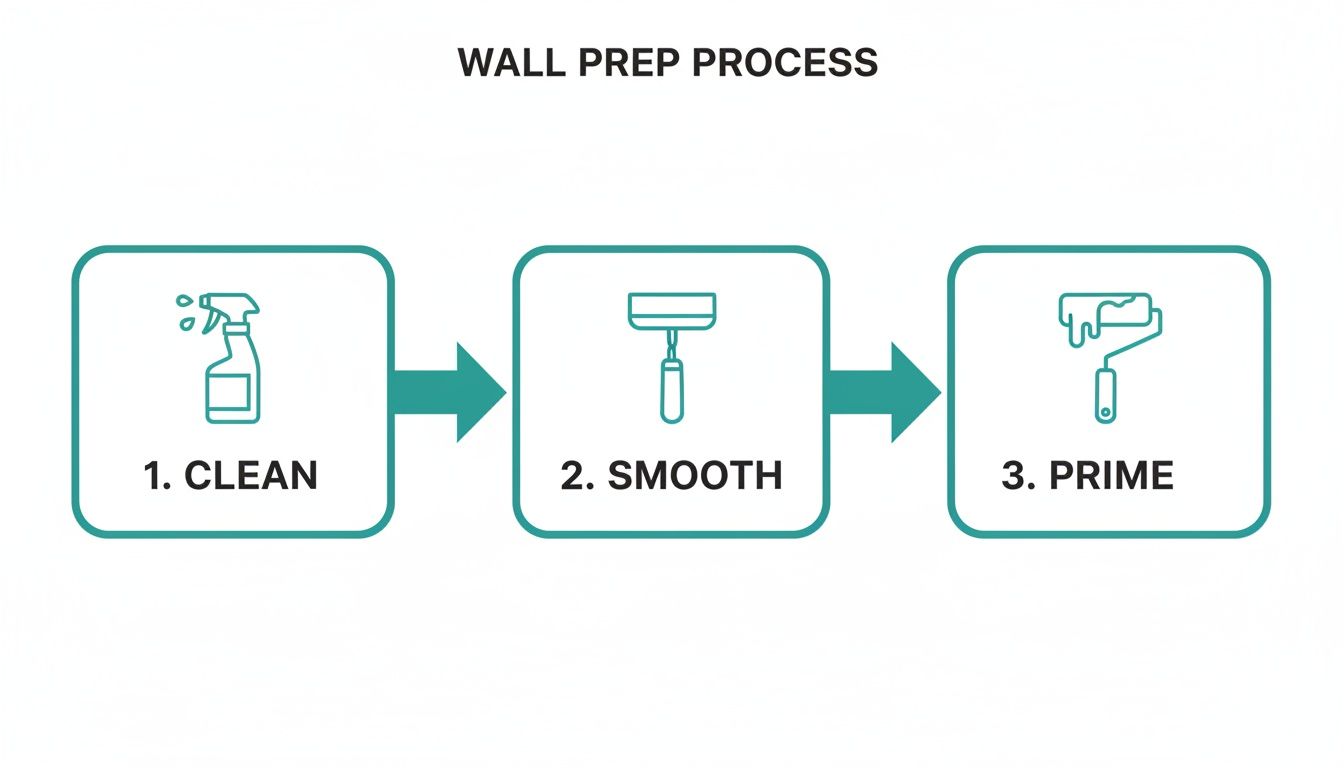
This visual shows the non-negotiable steps of cleaning, smoothing, and priming your wall to ensure the best possible adhesion for your tiles.
Start at one end of your level guideline. Peel back only the top few centimetres of the backing paper, and align the tile perfectly with your line. Smooth it down from the top, peeling away the rest of the backing as you go. This little trick helps prevent large air bubbles from getting trapped underneath.
Most stick-on tile sheets are designed with an overlapping edge to interlock with the next one. Pay close attention to this. You need to overlap them exactly as the manufacturer intended to create that continuous pattern and hide the joins.
Once a tile is in place, go over the entire surface with a plastic smoother (a wallpaper smoother works great) or even a credit card wrapped in a soft cloth. Apply firm, even pressure, working from the centre outwards. This pushes out any small air bubbles and ensures the adhesive makes full contact with the wall – a crucial step for long-term durability. By focusing on these real-world techniques, your final result will be something you're genuinely proud to show off.
The Finishing Touches and Keeping It Fresh
Your tiles are up, and the kitchen already feels like a new room. Brilliant! But we're not quite done yet. A few final, simple steps will elevate your project from a good DIY job to one that looks genuinely professional. This is where we lock in all your hard work and make sure that new backsplash can handle the realities of kitchen life.
The single most important finishing touch is running a bead of silicone caulk along the bottom edge where your tiles meet the worktop. It’s a small detail that does a massive job. It creates a watertight seal, stopping splashes and spills from getting behind your cabinets, and it gives you a sharp, clean line that just completes the whole look.
How to Caulk Like a Pro
Getting that perfect, neat line of caulk can feel a bit daunting, I know. But there’s a classic decorator’s trick that makes it foolproof. Grab some painter’s tape and mask off a guide—one strip on the worktop and another on the tile, leaving a gap of about 3-5mm between them. Squeeze in the caulk, then run a wet finger or a cheap caulk finishing tool along the bead to smooth it out. The real magic is when you peel the tape off immediately. You’re left with a perfectly straight, clean line. Job done.
That waterproof seal is non-negotiable, especially around the sink. A properly caulked edge is what stops moisture from seeping behind the tiles, which is the number one reason adhesives fail and corners start peeling over time. Whatever you do, don't skip this step.
Keeping Your Stick-On Backsplash Looking Like New
Honestly, one of the best things about a modern stick on tile backsplash kitchen is how ridiculously easy it is to look after. For day-to-day cleaning, a soft cloth and a gentle, non-abrasive cleaner are all you’ll ever need. Most of the time, a bit of warm water with a squirt of washing-up liquid is perfect for wiping away grease and food splashes.
To keep it looking its best for the long haul, there are just a couple of things to avoid:
- Harsh Chemicals: Stay away from bleach-based sprays, abrasive scouring powders, or cleaners containing ammonia. They can dull the shine or even discolour the surface of the tiles.
- Rough Sponges: Ditch the scouring pads and steel wool. They can easily create tiny scratches, especially on vinyl or gel-topped tiles. A microfibre cloth is your best friend here.
- Too Much Water: The surface is waterproof, sure, but you don't want to absolutely drench the seams when cleaning. A damp cloth works much better than a soaking wet one.
If you ever spot a corner starting to lift—it can happen, especially near a kettle or toaster—it’s an easy fix. Just warm the tile gently with a hairdryer for 15-20 seconds to reactivate the adhesive, then press it firmly back against the wall. If you need a bit more staying power, you can sneak a tiny dab of spray adhesive behind the corner for a stronger grip.
Your Stick-On Backsplash Questions Answered
It's completely normal to have a few questions before you jump into a project like this, even one that seems so straightforward. A little bit of knowledge beforehand can make all the difference between a good result and a fantastic one. Let’s walk through the most common things people ask when considering a stick-on backsplash.
We'll clear up the big ones: using them behind the hob, what to do about existing tiles, and if they're actually as renter-friendly as they claim to be.
Are Stick-On Tiles Safe to Use Behind a Hob?
This is the big one, and for good reason. The short answer is yes, but you absolutely have to pay attention to the details. Most quality vinyl or gel peel-and-stick tiles are made to be heat-resistant, but it's crucial to remember that heat-resistant isn't the same as heat-proof. Before you even think about buying, check the manufacturer's specs for the exact temperature rating.
For electric and induction hobs, you're usually in the clear. The key is maintaining a safe distance. Make sure there’s a gap of at least 20-25cm (8-10 inches) between the back of the hob and the tiled wall. This buffer zone is enough to prevent the intense, direct heat from weakening the adhesive or damaging the tile's finish.
Gas hobs are a different beast altogether because of their open flames. For these, I strongly recommend installing a protective panel—often called a hob splashback—made of stainless steel or tempered glass. This panel sits directly behind the cooker, taking the brunt of the heat. You can then continue your stick-on tiles around it for a seamless, integrated look. It’s the safest way to get the style you want without any risk.
Can I Put Stick-On Tiles Directly Over My Old Kitchen Tiles?
You bet! This is one of the main reasons people love them—it saves a massive amount of time and mess. You can stick them right on top of old ceramic or porcelain tiles, provided the surface is in good shape. But, as with any decorating project, proper prep is non-negotiable.
The one thing you can't ignore is the grout lines. First, give the old tiles a thorough degreasing. Then, you need to fill in those grout lines completely with a suitable filler. Let it dry, then sand it down until the entire surface is perfectly flat and smooth.
Sticking new tiles over deep grout lines is a recipe for a bad finish. The indentations will show through, and worse, the adhesive won't get the full, flat contact it needs to grip properly. This is the number one reason tiles start to peel at the corners. Don't skip this step!
How Easy Is It to Remove Stick-On Tiles? Are They Actually Renter-Friendly?
Most modern peel-and-stick tiles are designed to be removed, which makes them a fantastic option for renters who want to add some personality to their kitchen without saying goodbye to their security deposit. The removal process is surprisingly simple.
Grab a hairdryer and gently warm the surface of a tile on a low or medium setting. This softens up the adhesive, making it much easier to peel away from the wall. I find it’s best to start at a corner and pull down slowly and carefully. This really minimises the risk of pulling any paint off with it.
If you’re left with any sticky residue, a bit of citrus-based cleaner or a dedicated adhesive remover usually does the trick. While they are incredibly renter-friendly, it’s always a good idea to test one tile in a less visible area first, just for peace of mind.
Ready to give your kitchen a simple, stylish upgrade? Quote My Wall has a huge range of high-quality designs to get you started. Find the perfect look for your home at https://www.quotemywall.co.uk.