

Labels on Clothing for Washing: A Practical UK Guide
82% of UK consumers find clothing care labels and their symbols useful, and 90% say they feel knowledgeable about clothing care. That tells you two things straight away. Wash labels still matter, and if your clothes keep coming back faded, shrunk or unidentified, the problem usually isn't the label. It's how you're using it.
You open the school uniform pile and there they are. Three jumpers, one pair of PE bottoms, and no name on any of them. One will disappear into lost property, one will come home on the wrong child, and one will sit in a care-home laundry basket with nobody quite sure whose it is. The fix isn't complicated, but it does require you to treat care labels and name labels as one system, not two separate jobs.
Only solve half the problem: either read the wash symbols and forget to label the garment, or slap on a personalised sticker and never check whether the fabric, cycle and drying method will strip it off. This guide fixes both sides properly.
Why Two Kinds of Labels Have to Work Together
The missing-jumper problem starts long before anything reaches lost property. It starts when a parent buys new uniform, cuts off packaging, washes everything in a rush, and assumes a name label will sort itself out later. It won't.
Every piece of clothing has two labels with two jobs. The first is the manufacturer's care label sewn inside the garment. That label tells you how the fabric can be washed, dried, ironed or professionally cleaned. The second is the label you add yourself so the item comes back to the right child or resident.
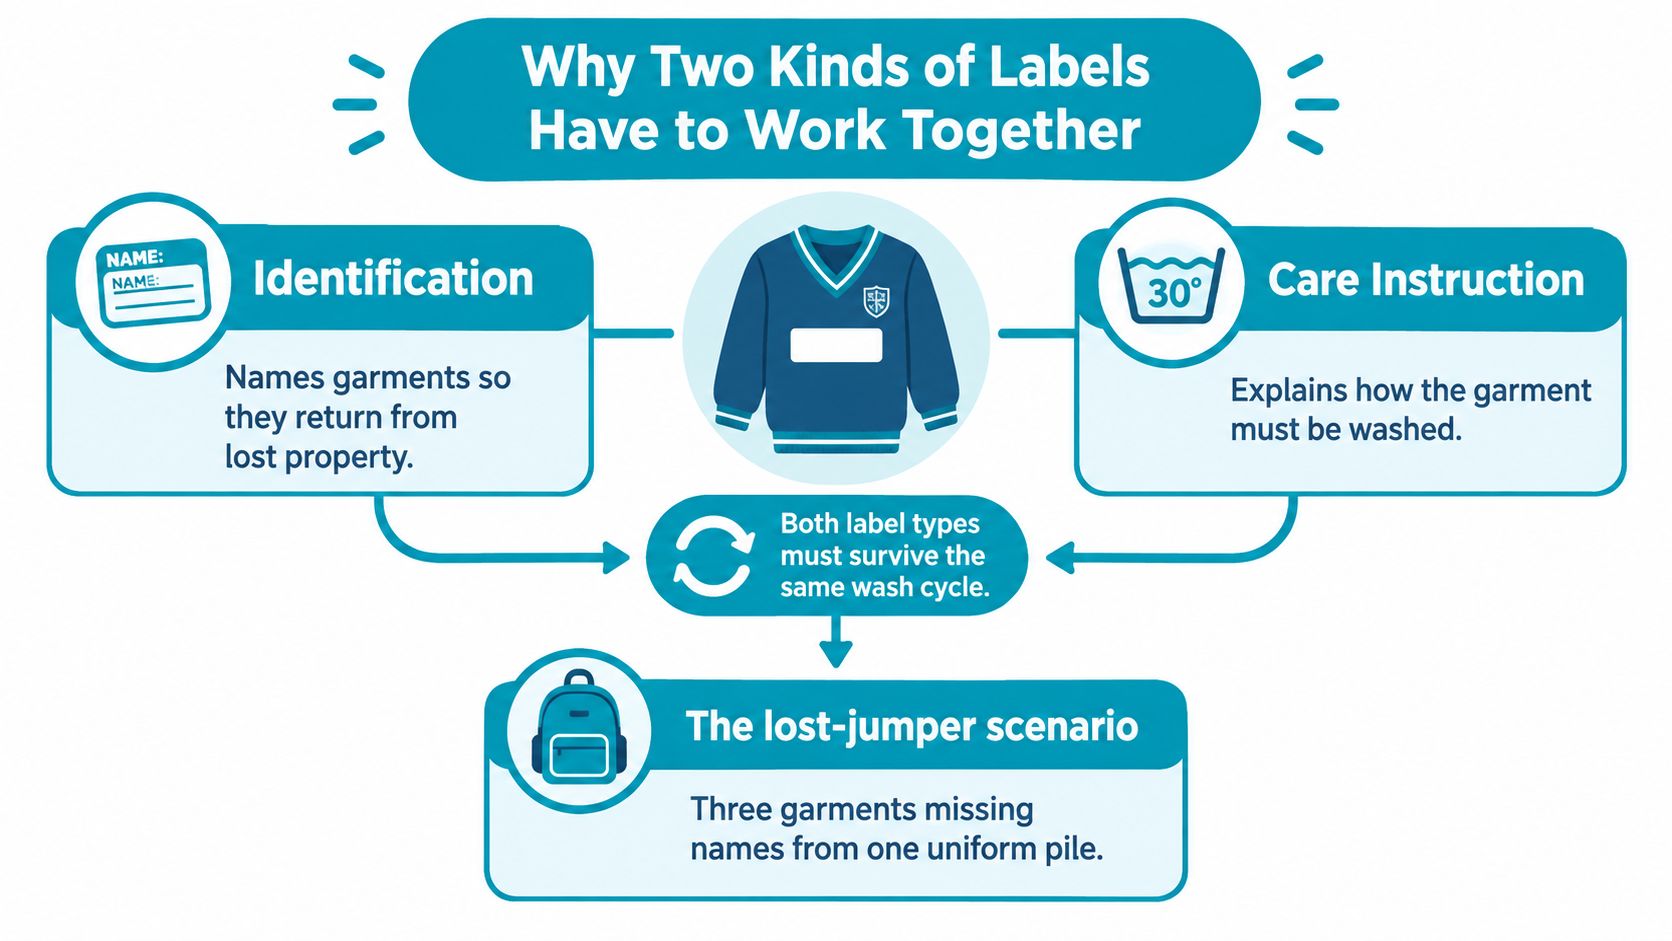
If either one fails, you get a predictable mess. Ignore the care label and you risk shrinking a blazer, warping sports kit or wrecking a knit cardigan. Ignore the name label and you've got perfectly washed clothing that nobody can return.
The school and care-home reality
In real life, labels on clothing for washing aren't academic. They're practical. A school jumper has to survive muddy cuffs, quick weekday washes, tumble drying when you're behind, and repeated sorting in and out of bags. Care-home clothing has it even harder. It gets washed often, handled by several people, and mixed in with similar garments that all look the same.
Practical rule: If the garment needs washing often, the care label and the name label must be chosen and treated as a pair.
That link matters because care labels in the UK aren't random shop additions. Modern UK wash-care labelling goes back to 1966, when the first standardised symbol-based system was created, then expanded in 1976, added a dryer symbol in 1980, changed again in 1986, and was reordered in 2005 to wash, bleach, dry, iron, dry clean, as outlined in this history of UK care labelling. These symbols have had decades to become consistent. Your own added label needs to work within that system.
What actually works
For most households, the sensible approach is simple:
- Read the sewn-in care label first. That tells you the limits.
- Apply the name label to the right surface. Smooth care tags usually hold better than fuzzy fabric.
- Wash to the garment's limit, not your mood. If the tub says 30°C, don't decide 60°C feels cleaner.
- Dry with some restraint. Labels often fail in the dryer before they fail in the wash.
That combination is what stops clothes becoming either damaged or anonymous.
Reading the Five UK Care Symbols Without Guesswork
You don't need to overcomplicate wash symbols. You don't need to memorise laundry hieroglyphics. You just need to read them in the correct order and stop guessing.
UK care labels follow the internationally used ISO 3758:2023 symbol system, and the order matters: wash, bleach, dry, iron, then professional cleaning, as noted by GINETEX on ISO 3758:2023. Read them left to right and you'll make fewer stupid mistakes.
Start with the wash tub
The wash tub is the one that matters first because it sets the limit for the whole wash.
For UK care labels, the number inside the tub is the maximum wash temperature in °C, not a suggestion. A single underline means reduced agitation, and a double underline means a very mild cycle, according to CleanCalcs' guide to laundry symbols.
The number in the tub is a ceiling, not a target. That's where people go wrong.
If you want a plain method that works every time, use this:
- Find the tub symbol.
- Read the number or dots as the top safe temperature.
- Check for underlines to judge how gentle the cycle needs to be.
- Look for a hand or a cross before you throw it in.
If you want another practical breakdown to compare against your own laundry routine, ChoirBuy's step-by-step instructions are useful because they walk through the symbols in plain English rather than pretending everyone already knows them.
The full five-symbol cheat sheet
| Symbol | What It Shows | Plain-English Meaning |
|---|---|---|
| Wash tub | Temperature, hand, cross, underlines | Machine wash up to the stated maximum, or hand wash only, or don't wash |
| Triangle | Bleaching instruction | Bleach allowed if plain triangle; avoid if crossed out |
| Square | Drying instruction | Tells you whether to line dry, drip dry, lay flat, or tumble dry |
| Iron | Ironing heat | Dots show heat level. Fewer dots means lower heat |
| Circle | Professional cleaning | Dry cleaning or other professional textile cleaning guidance |
The symbols people misread most
The square catches people out. A square on its own is about drying. Add a circle inside it and that's tumble drying. Add lines inside it and you're looking at line dry, drip dry or flat dry instructions instead.
The iron is more straightforward. Dots mean heat level. Low dots for delicate fabrics, more dots for fabrics that can take hotter ironing.
The crossed-out symbol means exactly what you think it means. Don't do that thing. Don't reinterpret it because you're in a hurry.
The cupboard-door version
Tape these habits inside the laundry cupboard if you need to:
- 30°C or 40°C first: Common for everyday clothing.
- 60°C with care: Better kept for durable cotton or linen items that can take it.
- Underlines matter: Same temperature, different mechanical stress.
- Don't stop at the tub: Washing safe doesn't mean tumble-dry safe.
That's enough to stop most avoidable damage.
Stick-On, Iron-On or Sew-In Which Name Label Actually Lasts
Most families don't need a philosophical debate about labels. They need to know what survives ordinary laundry without eating up their Sunday.
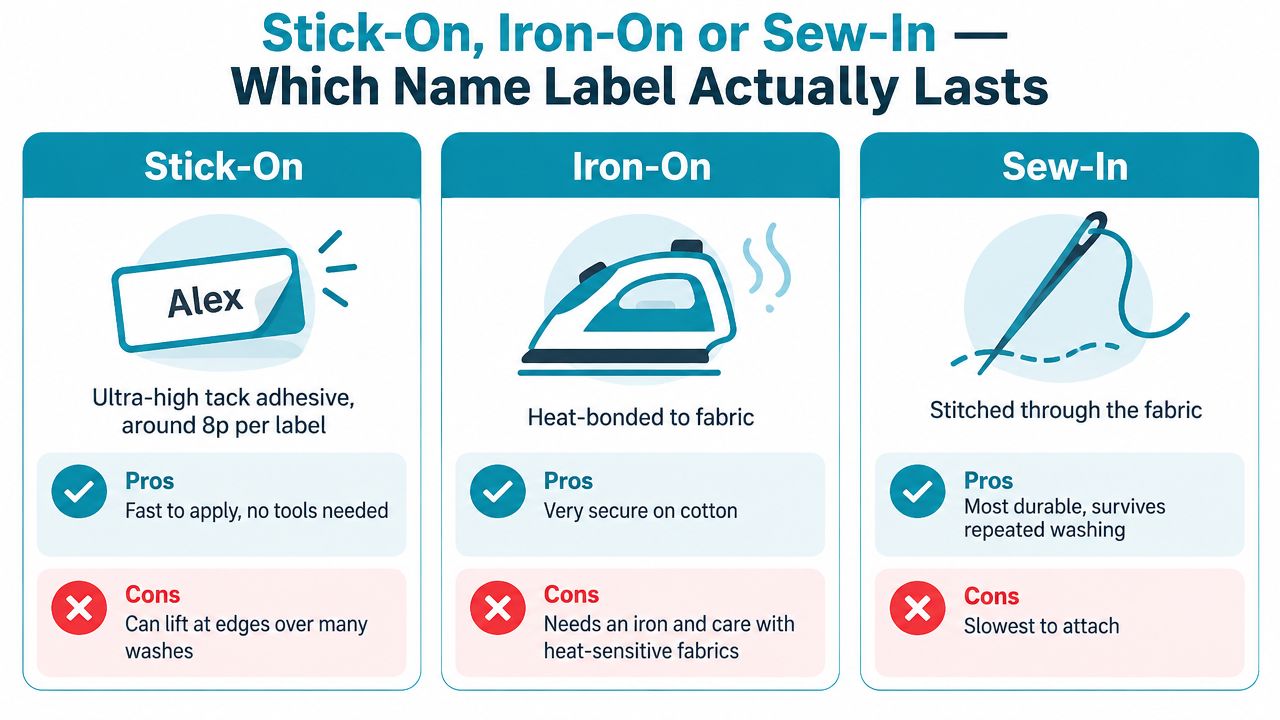
The three usual options are stick-on, iron-on and sew-in. Each has a place. None is perfect. The trick is matching the label to the garment and the wash routine, not pretending one format solves everything.
What I'd use for each job
Stick-on labels are the practical choice for school uniform, everyday cardigans, polo shirts, PE kit and most care-home daywear. They go on quickly, don't need tools, and work best when applied to the care tag or another smooth internal label rather than directly onto soft fabric.
Iron-on labels suit items that don't have a usable tag, or clothes that need a stronger bond than a sticker can give. They're slower. You need heat, a flat surface and a bit of patience. They also aren't ideal for every fabric.
Sew-in labels are still the hardiest option for garments that take a battering. If something gets repeatedly washed at higher heat or handled roughly in institutional laundry, stitching wins. The downside is obvious. Someone has to sew them all in.
The trade-offs that matter
| Label type | Main strength | Main drawback | Best use |
|---|---|---|---|
| Stick-on | Fast application | Can fail if applied badly or overheated | School uniform, light daily use, quick term prep |
| Iron-on | Strong bond on suitable fabric | Needs heat and more effort | Tagless items, occasional tougher use |
| Sew-in | Highest physical security | Slow and fiddly | High-stress laundry, long-term garments |
Parents usually overvalue theoretical durability and undervalue speed. If you have twenty-odd items to mark before Monday, a label you apply beats a "better" one that stays in the packet.
One straightforward option in this category is Quote My Wall's clothes name labels, which are designed for garment labelling and fit the usual school-and-care-home use case of applying a name label to an internal care tag. That's the right surface for this type of product.
If you're labelling standard school uniform, stick-on is usually the sensible answer. If you're labelling heavily laundered specialist items, don't be stubborn. Move up to iron-on or sew-in.
A lot of label failures blamed on the product are really application failures or wash-routine failures. That's why the next part matters.
How to Apply Stick-On Labels So They Survive Every Wash
Most stick-on labels fail because people rush the job. They peel one off, slap it onto a fluffy bit of cotton, throw the garment in the wash that evening, then act surprised when it curls at the edge. That's not a product test. That's sabotage.
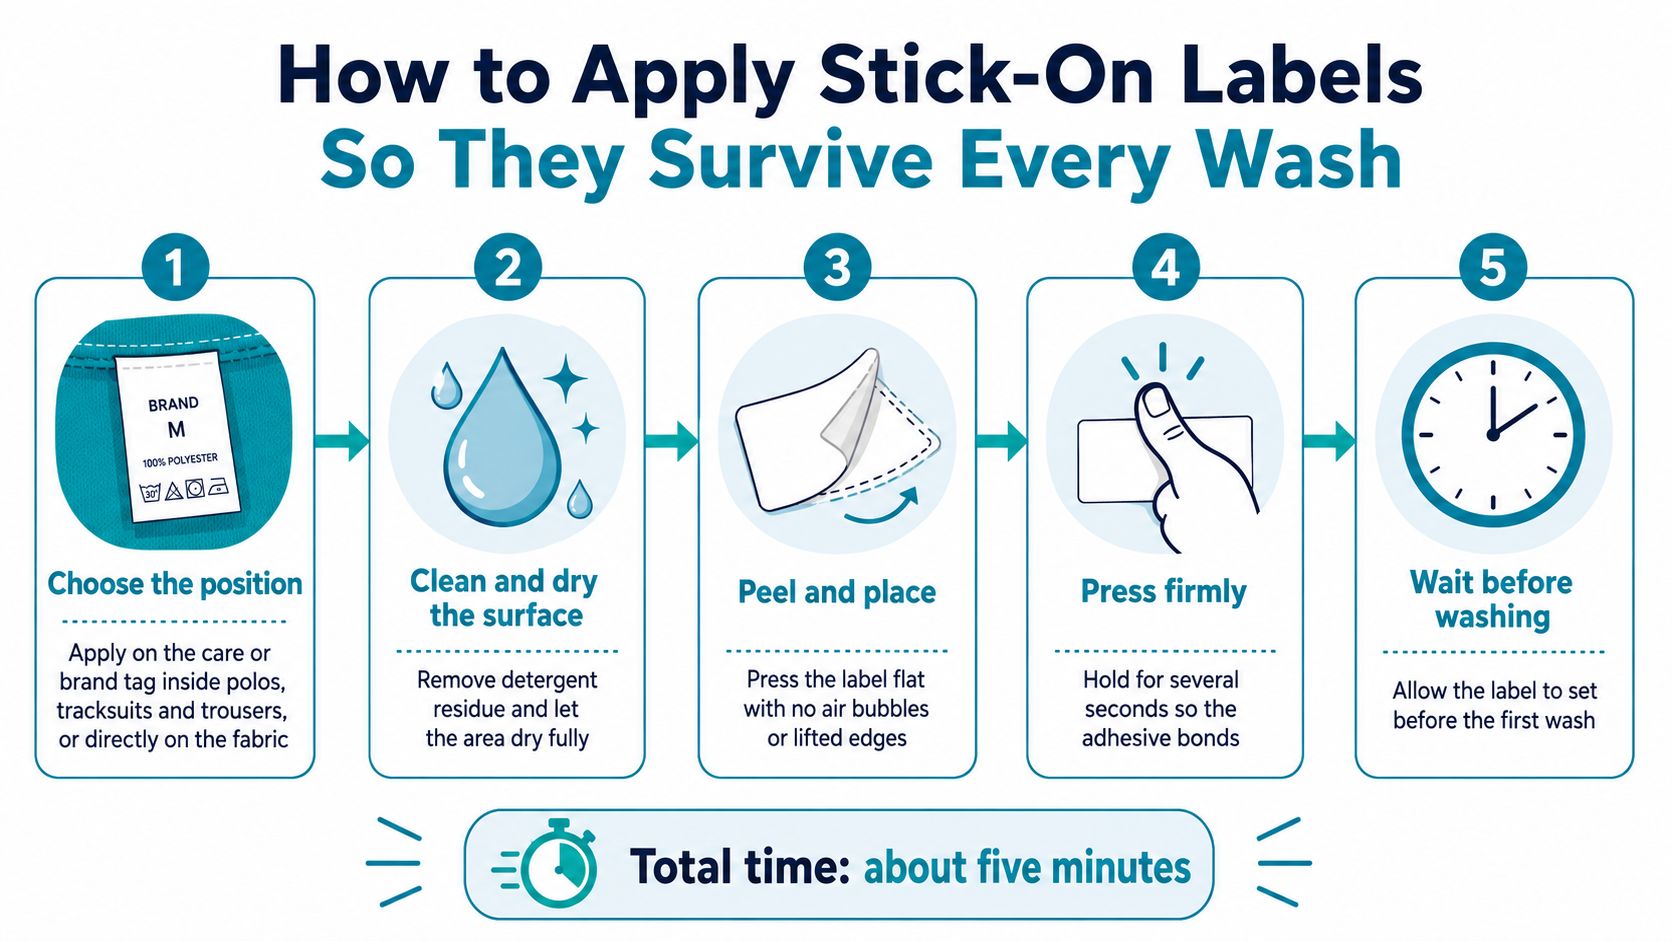
Application needs a short routine. Five minutes now saves you relabelling half a term's uniform later.
The method that holds up
- Pick the right spot. Use the sewn-in care label or brand tag inside polos, trousers, jumpers and tracksuits. If there isn't one, use a smooth inner area such as collar tape or a printed internal patch.
- Clean the surface. Detergent residue, softener and skin oils all interfere with adhesion. Wipe the target area and let it dry fully.
- Peel and place carefully. Get it straight first time. Constant lifting and repositioning weakens the bond.
- Press firmly from the centre out. You want full contact, no bubbles, no lifted corners.
- Leave it alone before washing. Adhesive needs time to settle.
A lot of washable name labels are meant for tag application, not random fabric. That's worth respecting. Quote My Wall's stick-on clothing labels guidance reflects the standard good practice here: apply to a dry label area and leave it before the first wash.
Placement that saves hassle
Not every garment gives you an obvious place to put the label, so use some common sense.
- Polos and shirts: Inside neck tag or side seam care label.
- Trousers and skirts: Waistband care tag.
- Socks: Use the cuff area if you must, but expect socks to be the hardest category.
- School ties: Underside near the narrow end, where it won't show.
- Nightwear: Behind the size tag or side seam label.
- Care-home clothing: Inside care tag where staff can find it quickly without handling the garment too much.
What people get wrong
The usual mistakes are boringly predictable:
- Applying onto damp fabric
- Sticking onto textured knit instead of the care tag
- Washing too soon
- Using very high heat drying straight away
Leave labelled clothes to rest before the first wash. Rushing that first cycle is one of the easiest ways to ruin a perfectly decent label.
If you do the job properly once, you won't spend the rest of the term replacing corners and squinting at faded names.
Washing and Drying Habits That Protect Both Labels
If your laundry routine is chaotic, your labels won't save you. Washing habits matter just as much as label choice.
The biggest mistake is treating every labelled garment like a towel. School uniform, sports kit, knitwear and care-home personal clothing all need a bit more thought than a hot mixed load.
Sort by the label, not just the colour
The sensible order is this: sort by what the care label allows, then split lights and darks if needed. ISO-based guidance used in the UK treats the wash symbol as a maximum limit, and operational advice is to sort by label first, then choose temperature and cycle severity from the tub icon, as explained in the ISO 3758:2023 note from GINETEX. That matters because a washable item may still need a gentler cycle than the rest of the load.
For day-to-day family laundry, I keep it plain:
- Everyday synthetics and mixed uniform: lower-temperature wash if the label allows it
- Delicates or underlined wash symbols: gentler cycle
- Heavily soiled durable items: hotter wash only if the care label permits it
If you run a small branded club, school team or event kit alongside family washing, the same principle applies to printed caps and accessories too. If you're sourcing garments for customisation, it's worth checking practical stock options such as find blank caps for business logos so the item itself suits repeated care before you ever add names or prints.
Drying is where labels often lose the fight
The wash doesn't always kill the label. The dryer often does.
High heat can curl corners, harden adhesive and make printed names harder to read over time. That's why lower-heat drying, or air drying when practical, gives both the garment and the applied name label a better chance.
For machine-washable personalised tags, this is the sort of routine that helps them last: moderate washing, gentler drying, and no unnecessary abuse. Quote My Wall's machine washable labels advice sits in that same common-sense lane.
A better default for busy households
- Choose the mildest cycle that still cleans the garment
- Keep smaller items in a mesh bag
- Avoid turning the dryer into a blast furnace
- Read the full care strip, not just the wash tub
That last point matters because a garment that can be washed may still need careful drying or ironing. People ruin good labels by reading only half the instructions.
Troubleshooting the Four Name-Label Problems Parents Actually Get
Most label complaints boil down to four repeat offenders. Peeling corners. Faded names. Labels failing in harder laundry conditions. Skin irritation. None of these needs drama. They need the right fix.
The quick diagnosis table
| Problem | Likely Cause | Specific Fix |
|---|---|---|
| Peeling corners | Applied to the wrong surface, or washed too soon | Remove it, clean the care tag, reapply to a smooth label area, then leave it before washing |
| Faded print | Harsh washing or drying habits | Lower the drying heat, avoid unnecessarily aggressive products, and place labels where friction is lower |
| Failure in care-home laundry | Garment is going through rougher institutional processes than the label setup can handle | Use the sewn-in care tag position where possible, and move to iron-on or sew-in for the hardest-use items |
| Skin reaction or discomfort | Label placed against skin-sensitive area, or user is sensitive to the label material | Put the label on the care tag rather than directly against skin, and test on a couple of garments first |
Problem one and two are usually user error
Peeling corners rarely happen out of nowhere. Usually the label was stuck onto fluffy fabric, onto a tag coated with residue, or washed before the adhesive had settled. Reapplication fixes most of it, provided you move the label to a better surface.
Fading is often blamed on bad printing, but heavy tumble drying, repeated friction and rough chemical treatment can wear anything down. If the name matters, place it where it doesn't get rubbed every time the child changes for PE.
Most "bad labels" are badly matched labels. The surface, wash routine and drying heat decide a lot.
Care-home laundry needs stricter judgement
Public advice often gets too simplistic. A wash icon is useful, but it isn't the whole truth. UK apparel guidance leaves room for nuance because fabric blend, decoration and finish can make a garment more fragile than the simplified wash icon suggests, as discussed in the UK and EU apparel testing manual.
That's exactly why some resident clothing that looks machine washable still performs badly in rough laundry. Sequins, prints, elastane panels, brushed finishes and delicate knit structures can all change what "safe enough" looks like in practice.
When to stop forcing stick-ons
Be realistic.
- School polos and standard jumpers: stick-on usually fine
- Knitwear with delicate inner surfaces: take more care with placement
- Special fabrics or direct-to-skin items: test first
- Heavy-use care-home garments: consider stepping up to iron-on or sew-in
If a label type keeps failing on a certain category, don't keep repeating the same mistake. Change method.
A Simple Routine for Labelling a Whole School Term's Worth of Clothes
The easiest way to get this right is to stop treating it as a last-minute panic job. Labelling works best as a short household routine, done when the clothes arrive, not when the school gates are already in sight.
Set aside one quiet stretch on a Sunday afternoon. Wash nothing yet. Start with clean, dry garments laid out by category: polos, jumpers, trousers, PE kit, socks, coats, hats, gloves.
The routine that keeps order
Work in this order:
- Check the care label first. Separate anything that needs gentler treatment.
- Pick the label position. Use the care tag or another smooth inside patch.
- Apply one name label properly. Don't double up unless there's a real reason.
- Group the finished items together. Keep them aside rather than throwing them straight into the laundry basket.
- Wait before first wash. Give the labels time to settle.
That routine does two useful things at once. It stops you miswashing something delicate, and it stops brand-new clothing entering circulation unnamed.
The one habit worth adopting this week
Label clothes the day new uniform comes home, not the night before term starts.
That's the habit that prevents most lost-property nonsense. You're calmer, the garments are dry, and you haven't got one eye on packed lunches while trying to peel twenty tiny stickers apart.
One more point matters here. Consumers clearly still use care labels. 82% of UK consumers say clothing care labels and symbols are useful, and 90% say they feel knowledgeable about clothing care, according to UKFT's report on UK consumer care-label behaviour. So don't ignore the sewn-in label just because you're adding your own. Use both.
If you want your term's clothing to stay readable, washable and returnable, that's the system. Read the garment's label. Add the name label properly. Wash within the limit. Dry with a bit of restraint. Repeat.
If you want a straightforward option for school uniform or care-home wardrobes, Quote My Wall offers washable stick-on clothing labels designed for garments and care tags. They're the sort of practical solution that fits the routine in this guide, especially if you want to label a batch of clothes quickly without dragging out an iron or needle tin.