

Kitchen Tile Stickers Waterproof: A UK Guide 2026
You've lived with the same cream tiled splashback for years. It's sound, but it makes the kitchen look dated, and the quote for removing it, replastering and fitting a new finish runs into four figures. Peel-and-stick tile stickers look like the obvious shortcut. Then the sensible questions appear: will “waterproof” survive kettle steam, sink splashes and greasy wipe-downs, and can you remove the stickers later without upsetting a landlord?
The short answer is yes, in the right zone and with the right preparation. The important qualification is that waterproof isn't the same as kitchen-proof. The printed face may repel water, but exposed seams, cut edges and corners are where moisture gets behind the overlay. This guide takes the practical view, so you can decide whether stickers suit your splashback, or whether you should hire a kitchen tiler for a more permanent solution. For broader decorating ideas, Quote My Wall's guide to tile stickers is also a useful starting point.
Why UK Kitchens Are Turning to Waterproof Tile Stickers
Kettle steam, oven heat and greasy wipe-downs quickly expose a weak splashback finish. A tired tiled splashback does not always need ripping out, though. If the grout is stable, the tiles are firmly bonded and the surface is reasonably flat, a well-made vinyl overlay can update colour and pattern without rubble, dust or a week of disruption. It suits a kitchen where the cabinets and worktops remain perfectly usable.
The approach also matches current UK renovation choices. The 2025 Houzz UK Kitchen Trends Study recorded tile in 38% of splashback choices, while slab splashbacks were chosen by 62% of homeowners, so tile remains a meaningful finish rather than an outdated leftover (Houzz UK kitchen trends coverage). Existing tiled areas give stickers a practical job: they cover dated colour while preserving a sound installation.
Protect the perimeter, not just the printed face
Water gathers around taps, steam condenses behind kettles, oil settles near the hob and cleaning cloths catch the perimeter repeatedly. An exposed edge can let moisture beneath the sticker even while its face still looks clean. Oven heat also makes poor adhesion more obvious, particularly beside a hob or cooker.
Judge the product by its construction and fitting instructions, not the waterproof headline. A sealed perimeter or carefully applied silicone can matter more than an attractive pattern printed on thin film. Edge sealing is sensible beside a sink, tap or heavily used hob. It is usually overkill on a dry wall away from direct splashes, provided the surface is sound and the sticker is fitted neatly.
Practical rule: Waterproofing belongs to the installed system, not the printed surface alone.
The financial case is strongest for a cosmetic refresh, not structural repair. The same study reported that median kitchen renovation spend rose 34%, from £13,000 in 2024 to £17,500 in 2025. Stickers cannot replace damaged tiles, failed grout or poor backing, but they offer a lower-commitment change when a full renovation is difficult to justify.
For renters, removal matters as much as appearance. Follow the manufacturer's removal guidance, warm the adhesive gently and test an inconspicuous area first. If the splashback needs rebuilding rather than disguising, hire a kitchen tiler. For decorating context, this guide to tile sticker benefits is a useful reference.
What Waterproof Kitchen Tile Stickers Actually Are
A tile sticker is a layered covering designed to refresh an existing tile without removing it. The visible face is printed vinyl, beneath it is pressure-sensitive adhesive, and a backing liner protects that adhesive until installation. Products come as individual squares or repeatable sheets, so they can follow an existing tile grid.
Each layer has a separate role. The vinyl face supplies the pattern and wipeable finish. The adhesive bonds the overlay to a clean, smooth tile. The liner keeps that adhesive free from dust and fingerprints while you position the sticker.
That construction makes the underlying surface more important than the word “waterproof” on a product listing. Stickers suit the hard, moisture-tolerant finishes already common in UK kitchens. Ceramic or porcelain tile appeared in 25% of kitchen flooring choices in the 2024 Houzz UK Kitchen Trends Report, showing how familiar these surfaces are in British homes. Apply stickers to stable, smooth tiles, not loose, cracked or heavily textured ones.
Water-resistant isn't fully waterproof
A water-resistant sticker can handle occasional splashes and humid air. It may suit a wall beside a cupboard, but it does not stop water travelling behind the overlay. Kettle steam, greasy wipe-downs and regular splashing test the edges, joins and cut-outs rather than the printed centre.
The face can repel water while an exposed perimeter leaves the adhesive vulnerable. A protected installation needs the sticker to cover the tile face fully, with vulnerable edges closed where moisture reaches them.
Check the product information for:
- A sealed edge or clear-film border, especially for splashback areas.
- Instructions for silicone around exposed perimeters, rather than a general waterproof claim.
- Full coverage across the tile face, with no bare adhesive gaps.
- Specific guidance for heat, cleaning and moisture, including use near a hob or oven.
- A suitable substrate requirement, because movement or texture can undermine adhesion.
Edge sealing is sensible beside a sink, tap or frequently used hob. It is usually overkill on a dry wall away from direct splashes, provided the surface is sound and the sticker is fitted neatly. Follow the manufacturer's instructions and use silicone only where the kitchen's moisture exposure justifies it.
UK retail guidance distinguishes water-resistant vinyl from products intended for persistent moisture, and recommends perimeter silicone where exposure is higher (UK self-adhesive vinyl tile guidance). If a listing explains the pattern but says nothing about edge treatment, treat the product as splash-tolerant, not watertight.
Tile Stickers Versus Paint, Tiles and Other Coverings
There isn't one universally correct splashback finish. The best choice depends on whether you value quick installation, permanence, heat tolerance or easy removal. Tile stickers are strongest when the existing tiles are sound and the main problem is dated appearance. They're weakest where naked flame, intense radiant heat or constant soaking will test the adhesive.
| Option | Typical UK cost | Install time | Renter-friendly | Heat/splash rating |
|---|---|---|---|---|
| Tile stickers | Lower-commitment cosmetic option | Fast DIY installation | Usually the most reversible, subject to adhesive and substrate | Good for splash zones when edges are protected, limited in high heat |
| Tile paint | Lower material commitment | Requires cleaning, preparation and drying between stages | Variable, often less reversible than stickers | Depends heavily on the paint system and surface preparation |
| Traditional ceramic tiling | Higher labour and material commitment | Longer installation with cutting, grouting and curing | Poor for most renters | Strong when correctly specified and installed |
| PVC wall panels | Moderate to higher material commitment | Relatively quick, but corners and joins need planning | Limited reversibility | Good moisture performance, with heat limits that must be checked |
| Acrylic splashback | Higher upfront commitment | Usually measured and professionally fitted | Poor | Strong splash protection, but cooker compatibility must be confirmed |
Where stickers earn their place
Stickers avoid tile removal, grout mixing and specialist cutting. A careful DIYer needs patience, a sharp craft knife, a metal ruler and a way to press out air bubbles. That's a very different project from cutting ceramic around sockets or levelling a new wall before retiling.
They also suit renters because the visual change can be limited to the existing tiled surface. That doesn't guarantee a deposit-safe result. Older tiles may have porous glaze, loose grout or residues that interact with adhesive, so always test an inconspicuous area and check the tenancy agreement before covering a large splashback.
Where the alternatives win
Paint can be useful when the grout lines are awkward or the tile pattern itself is the problem, but it's still a coating rather than a new surface layer. Traditional ceramic tile remains the better choice for a permanent renovation, especially where you need strong heat and moisture performance and are already changing the worktops or units.
PVC panels and acrylic sheets offer broader continuous coverage, which reduces the number of joints. That can be valuable behind a sink, although both require careful detailing around corners, sockets and the cooker. My recommendation is simple: choose stickers for a controlled cosmetic refresh, not as a shortcut around a demanding installation problem.
How to Choose the Right Waterproof Vinyl
Start with the specification, not the pattern. A cheap sheet may look excellent on a product photograph, but it can be too thin to disguise grout lines, too weak around cut-outs or too lightly bonded for a greasy splashback. Thickness, finish and adhesive type all affect the result.
UK listings commonly describe vinyl thickness in the region of 0.1mm to 0.3mm, but thickness alone doesn't guarantee durability. A thicker film may feel more substantial, while a thinner, well-engineered product can still perform neatly on a smooth surface. Ask what the manufacturer recommends for tiled splashbacks and whether the product is intended for repeated wiping.
Choose the finish for the mess you actually make
Gloss vinyl reflects light and is straightforward to wipe, but it can make fingerprints, grease haze and uneven tile texture more obvious. Matte finishes hide small smears better and often look more like painted or honed tile, although they can show the texture of the surface underneath.
Adhesive tack needs equal attention. Low-tack removable acrylic adhesive is more suitable when future removal matters, while a high-tack permanent system may grip better but create greater risk when lifted from older glaze or grout. Neither is automatically superior. Match the adhesive to your tenancy, the tile condition and the expected service period.
Look for an opaque backing if you're covering a strong existing colour. Check whether the design is printed with a protective film, whether the product has guidance for sunlight near a window, and whether the seller explains food-contact limitations. “Food-safe inks” is reassuring product information, but it doesn't turn the sticker into a chopping board or worktop surface.
A useful shopping checklist is:
- Surface: Smooth, firm, clean and free from loose grout.
- Construction: Clear sealed edge or explicit silicone-sealing instructions.
- Finish: Matte for disguising smears, gloss for easy wipe-downs.
- Adhesive: Removable if you rent, stronger tack if the installation is intended to stay.
- Performance: Written water and heat guidance, not just the word waterproof.
- Layout: Enough material for mistakes and patterned alignment.
- Cut-outs: Confirm you can trim safely around sockets and corners.
If your design requires new cable or pipe openings, plan the work before applying the stickers. For technical work on tiles, follow a proper step by step tile drilling guide rather than trying to force a socket plate or fitting through a finished overlay.
Installing Tile Stickers in a Real UK Kitchen
Preparation decides whether the overlay looks fitted or merely stuck on. Remove grease with a suitable kitchen degreaser, rinse away residue and let the tiles dry completely. Pay special attention to the grout, tile edges and the area behind the kettle, where invisible cooking film can stop adhesive bonding properly.
If the tiles are glossy, lightly scuffing the glaze can improve grip, but do it carefully and evenly. Don't apply stickers over loose tiles, crumbling grout, silicone residue or damp masonry. Repair those faults first.
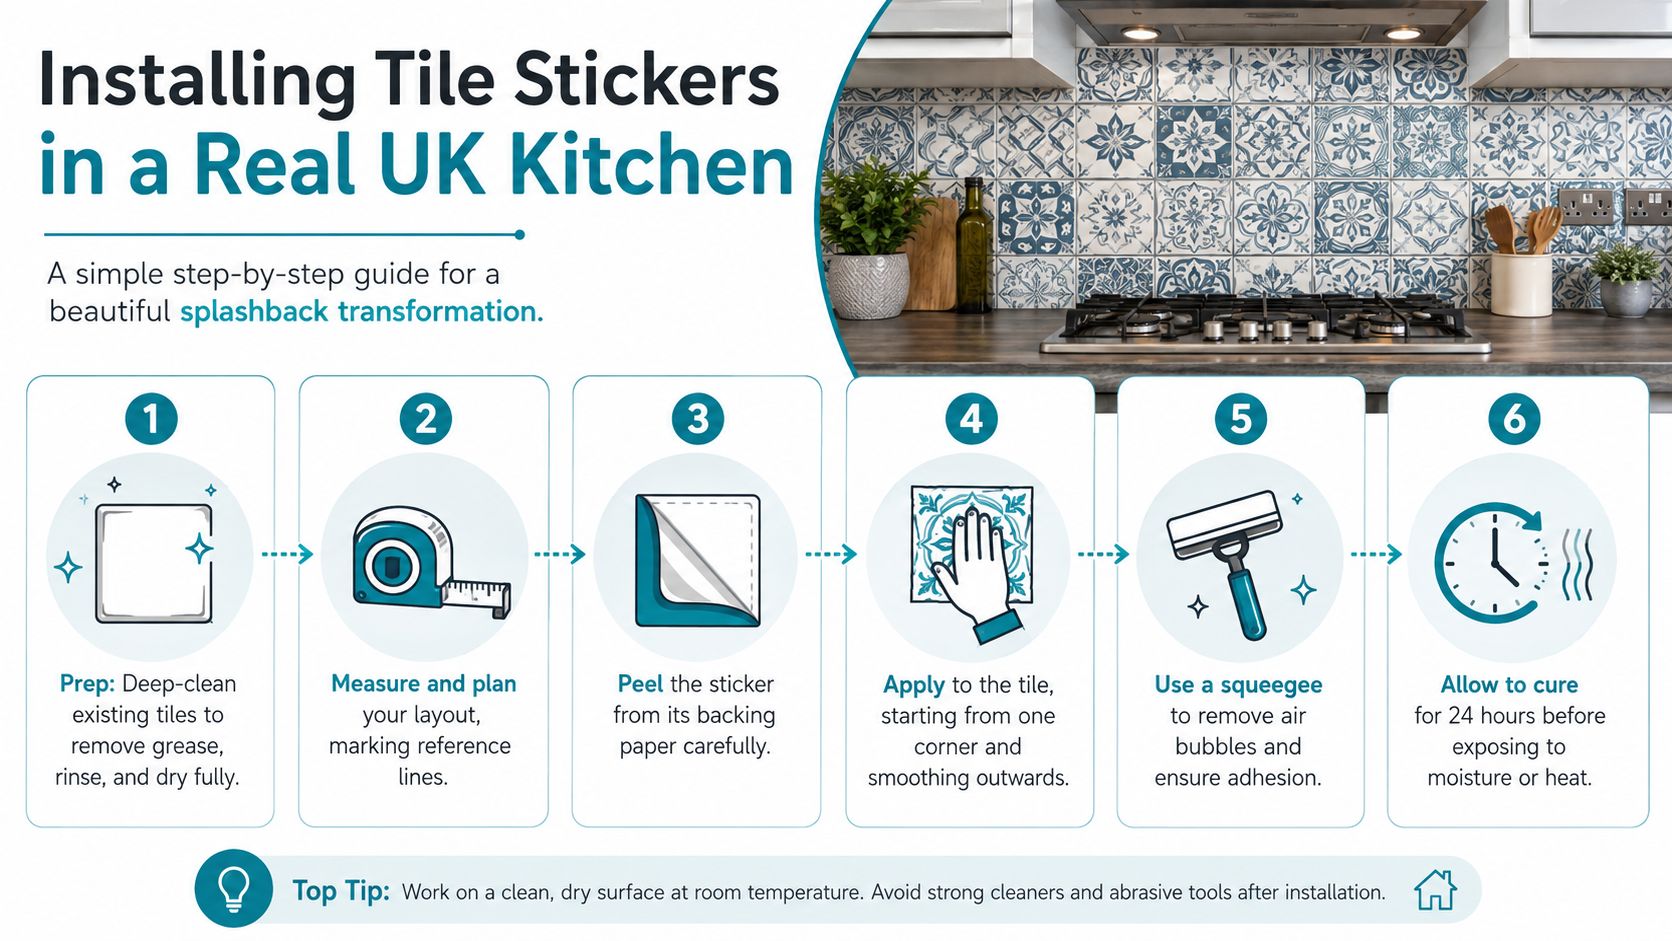
Follow a controlled fitting sequence
- Dry-lay the design. Measure the splashback and place the stickers without removing their liners. Check the pattern at corners, above the worktop and beside sockets.
- Mark reference lines. Use a level or straightedge to establish a reliable starting line. Don't assume the worktop or existing grout is perfectly level.
- Cut before peeling where possible. A sharp craft knife and metal ruler give cleaner results than scissors for straight edges. Turn off the electrical supply before working around sockets, and never cover removable faceplates.
- Peel gradually. Expose a small section of adhesive, align the first corner, then smooth outwards. Pulling off the entire backing at once makes repositioning harder.
- Press firmly. Use a squeegee, soft roller or clean plastic card to push out trapped air. Work from the centre towards the edges and pay attention to grout recesses.
- Allow the adhesive to settle. Keep the area dry and avoid heat exposure during the manufacturer's stated curing period.
For a more general DIY approach to removable surfaces, this tile sticker and vinyl wrap guide covers the same principle of careful preparation and gradual application.
Seal only where the kitchen demands it
Silicone is essential behind the sink, around taps, inside corners and along exposed cut edges. It's also sensible around socket cut-outs where splashes could travel behind the sticker. Use a neat, compatible clear silicone bead and smooth it before it skins.
Sealing is often overkill on a low-splash wall away from the sink and cooking area, particularly where the sticker has a factory-sealed perimeter. Don't seal every edge blindly. A poor silicone line looks untidy and can make later removal more difficult. Seal the routes water is most likely to use.
Where in the Kitchen Waterproof Stickers Hold Up Best
UK kitchens test wall coverings in distinct ways, so assess each zone rather than treating the whole room alike. Kettle steam, oven heat, greasy wipe-downs and water at the worktop junction create different demands. A sticker that performs well beside a cupboard may fail beside a hob because the exposure changes.
Sink and tap zone
The sink area can work well when the tiles are sound and the vulnerable edges are sealed. Direct splashes, standing water where the wall meets the worktop and repeated wiping around taps are the main risks. Run a neat bead along the lower and side perimeters, and cover any cut edge behind the sink.
Dry the surface fully after installation before regular splashing starts. Water trapped against a lifted corner will work underneath the sticker, and the adhesive will not recover from poor contact.
Kettle and steam zone
Repeated steam and condensation test seams even without direct splashing. Choose a product with clear heat and moisture guidance, point the kettle spout away from the wall where possible, and seal the upper or side edges if condensation regularly lands there.
Use this zone to find kitchen tile inspiration, but assess appearance separately from performance. A repeating pattern may look right while the finish remains unsuitable behind a steaming appliance.
Hob and cooker zone
The area directly behind the hob carries the highest risk. Grease, hot vapour, cleaning products and radiant heat arrive together, so ordinary peel-and-stick vinyl can lift or discolour quickly. I would not use it behind a gas hob unless the product instructions specifically permit that placement and a suitable heat shield or separate splashback protects the wall.
A stainless-steel panel, glass panel or properly specified permanent splashback is safer directly behind intense cooking heat. Stickers can still suit the wider cooking area when they remain away from direct heat and their edges are protected.
Silicone sealing is required where water can travel behind the sticker, including behind the sink, around taps, in internal corners and around exposed cut edges. It is usually overkill on a low-splash wall away from the sink and cooking area, especially with a factory-sealed perimeter. Seal the likely water routes, not every edge. A thick or untidy bead complicates later removal.
Bathrooms demand a different standard. An adhesive decorative surface is not a substitute for tanking or a specified wet-area waterproofing system. For bathroom applications, follow this guide to waterproof bathroom tile stickers, then check the product's stated limits for moisture, heat and installation location.
Care, Cleaning and Removal for Renters and Owners
A sticker lasts longest when cleaning stays gentle. Use a soft cloth with warm water and a small amount of washing-up liquid, then dry the surface rather than leaving moisture sitting at the joints. Avoid scouring pads, solvent cleaners and bleach-heavy sprays, which can cloud the printed face or attack the adhesive.
Grease deserves prompt attention. Leaving a film to build up encourages more aggressive scrubbing later, and that's when a cloth can catch a vulnerable edge. Wipe from the centre of the sticker towards the seam instead of dragging repeatedly across the perimeter.
Watch for early warning signs:
- A pale line at the edge: The adhesive may be losing contact.
- A raised corner: Moisture or cleaning friction may be getting underneath.
- A bubble near a cut-out: The sticker may not have bonded around the socket or corner.
- A soft or cloudy seam: Water may be entering behind the surface.
If one square fails, patching it is usually neater than disturbing the whole run. Remove the damaged piece carefully, clean and dry the exposed tile, then fit a replacement with the pattern aligned. Keep spare pieces from the original batch because colours and print alignment can vary between production runs.
Removing stickers without unnecessary damage
Renters should test removal before covering a large area. Warm one corner with a hairdryer on its lowest setting, keep the airflow moving and lift slowly with a plastic scraper. Pulling sharply can remove glaze, grout or paint from a weak substrate.
Residue is more likely on old, porous or poorly sealed tile surfaces. A mild adhesive remover may help, but test it first and avoid metal blades. England's renter segment is significant, with renters representing 19% of households, or 4.6 million households, according to the latest ONS tenure release (ONS tenure information). Reversibility is therefore a practical requirement, not a decorative extra.
For a well-installed, sealed-edge sticker used in a suitable zone, plan around a realistic two-to-five-year service life rather than assuming it will remain perfect indefinitely. Heat, steam, cleaning frequency and edge quality will determine where it lands in that range.
Quick Do's and Don'ts Before You Buy
If you need a decision in two minutes, use this list.
Do:
- Choose protected edges. Buy a product with a sealed perimeter, or one the manufacturer explicitly says can be sealed with silicone.
- Prepare the tiles properly. Degrease, rinse, dry and repair loose grout before fitting. Adhesive can't rescue a dirty or unstable surface.
- Match the finish to the room. Choose gloss for easy wiping or matte for a calmer look that disguises light smearing.
- Plan around heat. Treat the sink, kettle and hob as different exposure zones.
- Keep spare pieces. A matching replacement makes a local repair far easier.
Don't:
- Skip sealing behind the sink. That's where water has the clearest opportunity to reach a cut edge or lower seam.
- Fit ordinary stickers directly behind a gas hob. Use the product's heat instructions, and favour a separate protective splashback in the hottest area.
- Call a sticker tanking. In a wet room or shower, it cannot replace a proper waterproofing system.
- Assume removable means risk-free. Test the adhesive on an older glaze before committing to the entire wall.
- Over-clean the surface. Abrasive pads and harsh solvents can damage the face film and perimeter.
My view is straightforward. Waterproof kitchen tile stickers are excellent for controlled cosmetic updates, especially on sound splashback tiles, but edge sealing and heat discipline decide whether the result lasts. Quote My Wall offers peel-and-stick, wipeable tile sticker options for kitchen and bathroom surfaces, so it's a sensible place to compare designs alongside the technical details before ordering.
If your existing splashback is sound and you want a faster, lower-commitment refresh, browse the kitchen tile sticker designs at Quote My Wall. Check the water, heat and edge-sealing guidance before you buy, then order enough material to cover your layout and keep a spare for future repairs.