
A Practical Guide to Child Room Wall Stickers
Want to give your child's room a magical makeover without the hassle and commitment of paint or wallpaper? Wall stickers are a brilliant, budget-friendly way to do just that. They're incredibly versatile, a breeze to apply, and best of all, simple to remove. This makes them perfect for kids whose passions change with the seasons and for families living in rented homes.
Bringing Your Child's Room to Life with Wall Stickers
Welcome to your complete guide for turning your child’s room into a space they’ll absolutely adore. This is more than just a peel-and-stick job; it's about making smart choices that are safe for your little one and kind to your walls. We’ll walk you through everything, from picking the right materials that work with your paint finish to planning a layout that can grow right alongside them.
Whether you're a homeowner looking to create a lasting theme or a renter who needs a temporary, damage-free fix, you'll find practical, real-world advice here.
The New Way to Decorate Kids' Rooms
Gone are the days of being locked into a single theme for a decade. The beauty of modern decor is its flexibility, giving parents the freedom to create dynamic, personalised spaces for their children. This shift is a huge part of the UK's home décor market, which recently saw revenues hit a massive US$4.18 billion. It just goes to show how much British families value personalising their homes, especially when it comes to creating fun and inspiring rooms for the kids.
For so many of us, wall stickers are the perfect answer. They deliver a huge visual punch without the cost or permanence of traditional decorating.
This makes them a go-to for:
- Renters who are often restricted to damage-free decorating.
- Parents who know today's dinosaur obsession might be tomorrow's deep-space adventure.
- Budget-savvy families after a high-impact room refresh that doesn't break the bank.
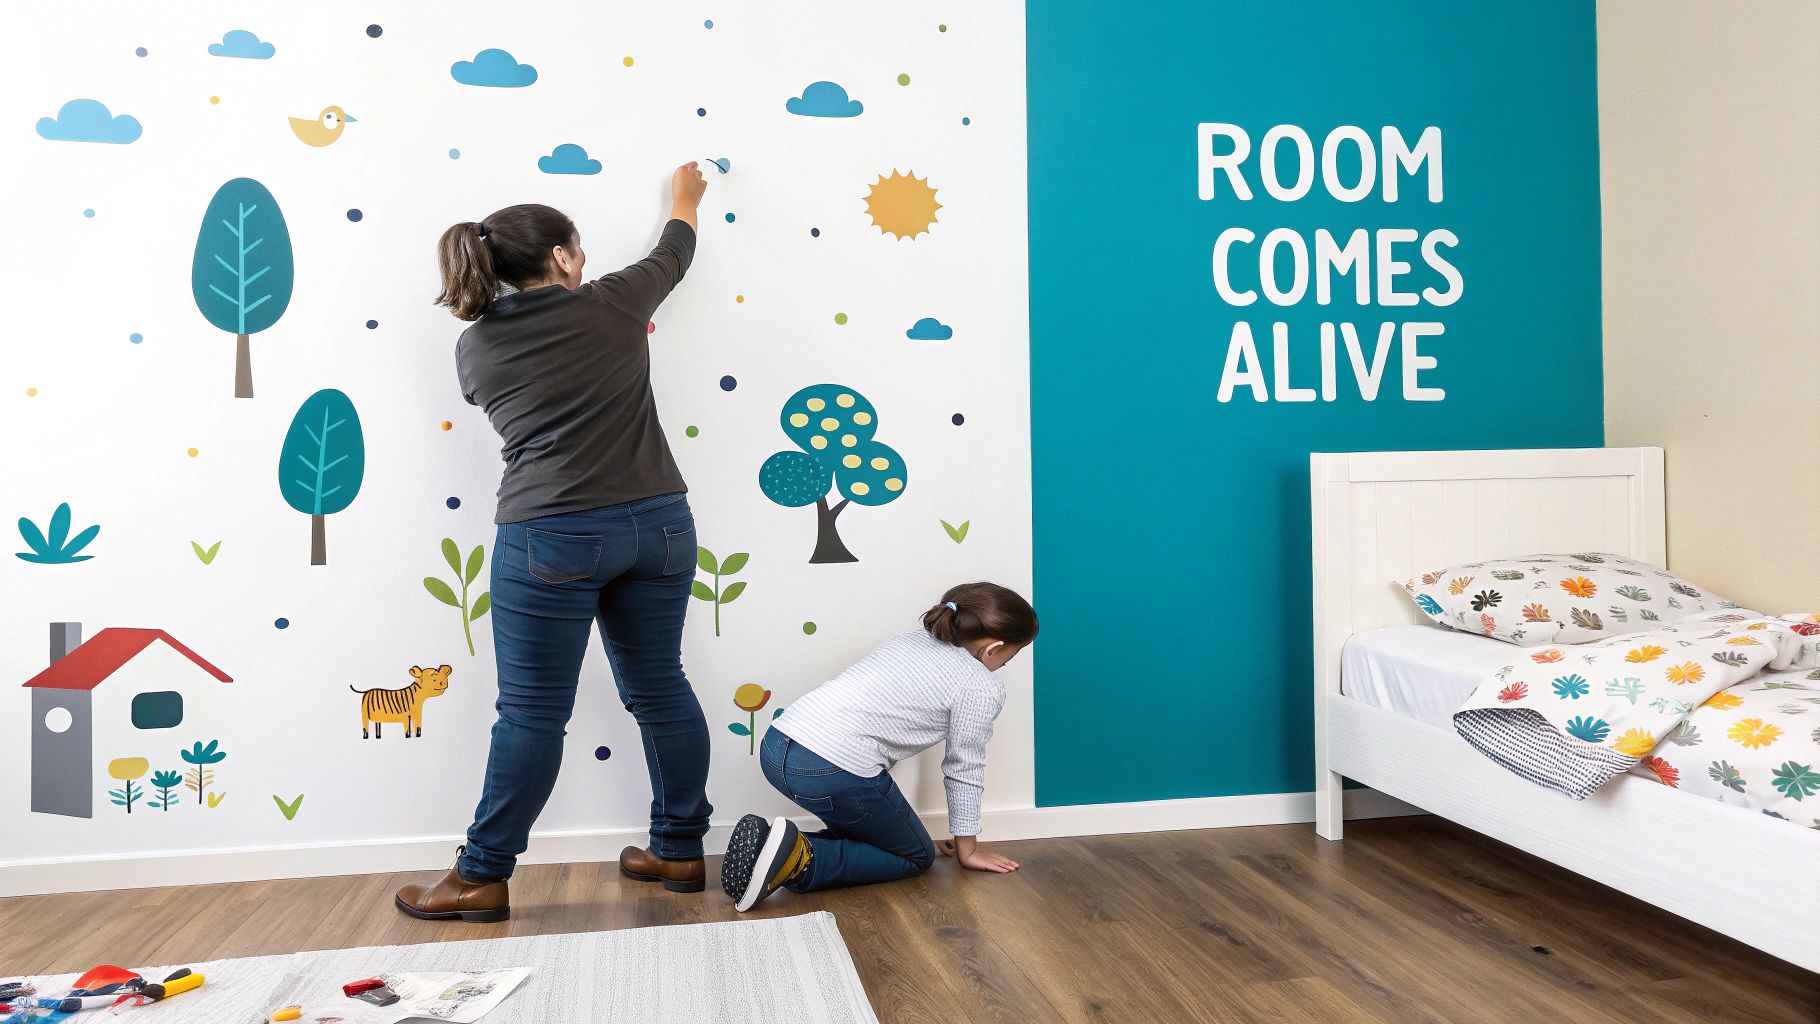
The real magic of children's wall stickers lies in their power to tell a story. In just one afternoon, you can create a whimsical forest, a bustling city, or a calm underwater world. It’s not just about decorating; it’s about sparking their imagination.
More Than Just Peeling and Sticking
This guide is designed to take you beyond the basics. We’ll get into the nitty-gritty of prepping your walls, share simple tricks for a bubble-free finish, and offer up some creative ideas to make their space truly their own. For an even closer look at what’s possible, you might find our thoughts on decorating with https://www.quotemywall.co.uk/blogs/news/childrens-wall-stickers-time-to-decorate helpful for a bit of inspiration.
At the end of the day, these stickers are tools for your creativity. For broader advice on creating a complete and cohesive space, check out this fantastic guide on decorating a nursery for your baby. With a bit of smart planning and a dash of imagination, you can design a room that’s not only beautiful but a true reflection of your child's wonderful personality.
Choosing the Perfect Stickers for Your Child's Room
Finding the right child room wall stickers is about more than just picking a cute design. I’ve learned over the years that it’s the practical details—the material, the safety, the scale—that really make a choice work in the long run. Thinking about these things from the get-go will save you a world of headaches later on.
So, let's start with materials. You’ll mostly come across two main types: vinyl and fabric. Vinyl is the classic choice; it’s tough, easy to clean, and looks fantastic on perfectly smooth walls. Fabric stickers, however, are a bit different. They usually have a beautiful matt finish, feel more premium, and are incredibly forgiving on walls that aren't perfectly flat. They're also often easier to peel off and reposition if you make a mistake.
Prioritising Safety and Sticker Materials
When you're decorating a nursery or a room for a little one, safety has to be your top concern. Always check the label for terms like non-toxic, VOC-free (Volatile Organic Compounds), and phthalate-free. Good UK suppliers will proudly state that they use water-based inks and eco-friendly materials, giving you peace of mind.
This isn't just a niche concern anymore. The global children's wall sticker market was valued at around USD 1.2 billion in 2023, and it's set to keep growing. This boom is driven by parents like us who are more aware of potential health risks and are demanding safer products.
My go-to rule for nurseries is simple: avoid placing any small, peelable stickers low down where a curious baby in a cot or playpen can reach them. It’s much safer to use larger, single-piece decals higher up the wall to eliminate any choking risk.
Matching Themes and Scale to the Space
The right theme can turn a simple bedroom into a proper wonderland. For toddlers, think about whimsical animals, soft pastel shapes, or gentle nature scenes to create a calm, nurturing space. As they get a bit older, you can shift to themes that spark their curiosity, like a world map, a fun alphabet set, or even a solar system on the ceiling.
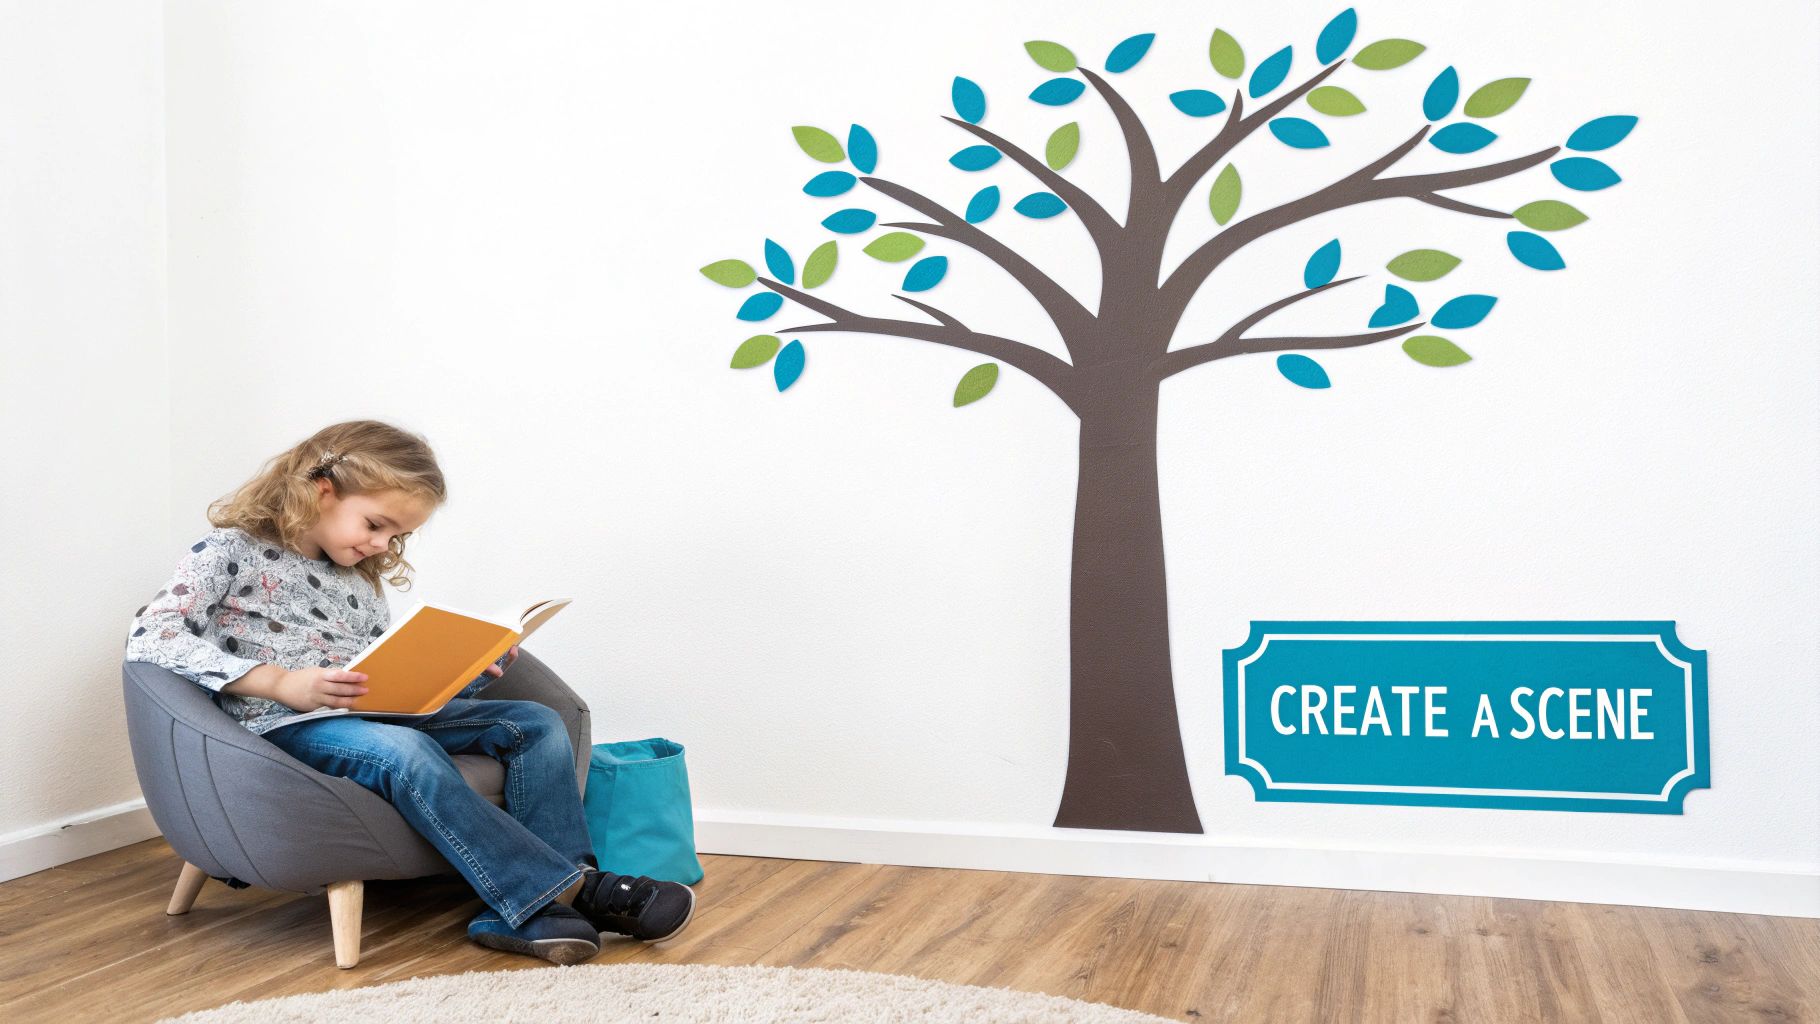
Getting the scale right is just as crucial as the theme itself. A single, large mural can become an incredible focal point without making a small room feel cluttered. Imagine a floor-to-ceiling tree decal in a corner to create a magical reading nook—it instantly defines the space.
On the other hand, a scattering of smaller decals can add playful little touches around the room. You could have a trail of dinosaur footprints leading from the door to the bed, or a constellation of glow-in-the-dark stars twinkling above them. This approach is really flexible and lets you adapt the decor as their tastes change. For a little more creative fuel, check out our guide on kids' wall sticker ideas and selection tips.
Right, let's get those walls ready. The secret to making wall stickers look like they were painted on—smooth, bubble-free, and perfectly flat—isn't some special application trick. It all comes down to the prep work you do beforehand.
Honestly, a few minutes of prep will save you a world of frustration later and ensure your new décor stays put for years.
Give the Wall a Gentle Clean
First things first, walls get surprisingly grimy. Even if they look clean, they’re usually covered in a thin, invisible layer of dust, grime, and household oils. This is the number one enemy of a wall sticker's adhesive, causing those annoying peeling corners and air pockets.
You don’t need any fancy cleaning products. Just mix a bit of mild soap with warm water, dampen a soft cloth, and give the area a good wipe down. Don't scrub or soak the wall; a gentle clean is all it takes.
Now for the hard part: waiting. The wall needs to be bone dry before you even think about peeling the backing off a sticker. I always tell people to wait a full 24 hours to be safe. Applying a decal to a wall that’s even slightly damp will trap moisture underneath, and the sticker simply won't stick properly.
The Fresh Paint Waiting Game
This is the mistake I see people make time and time again. If you’ve just painted the room, you need to be patient. I mean really patient. Paint that feels dry to the touch is not the same as paint that has fully cured. Curing is the chemical process where the paint hardens and properly bonds to the surface beneath.
Most household paints, like latex or acrylic, need at least three to four weeks to cure completely. Slap a sticker on too soon, and when you eventually decide to remove it, you'll probably pull a big chunk of that lovely new paint right off with it.
Tackling Textured Walls
Got bumpy or textured walls? Don't worry, you can still get a great result. While wall stickers love a perfectly smooth surface, they can work beautifully on light textures, like the common "orange peel" finish. You just have to give the adhesive a bit of extra help.
Once you've applied the sticker, grab something soft but firm—a tennis ball is perfect for this, but a dry sponge works too. Firmly rub the ball over the entire surface of the sticker, paying special attention to the edges. This simple trick helps mould the vinyl into all the little nooks and crannies of the wall texture, creating a much stronger bond and a finish that looks seamless.
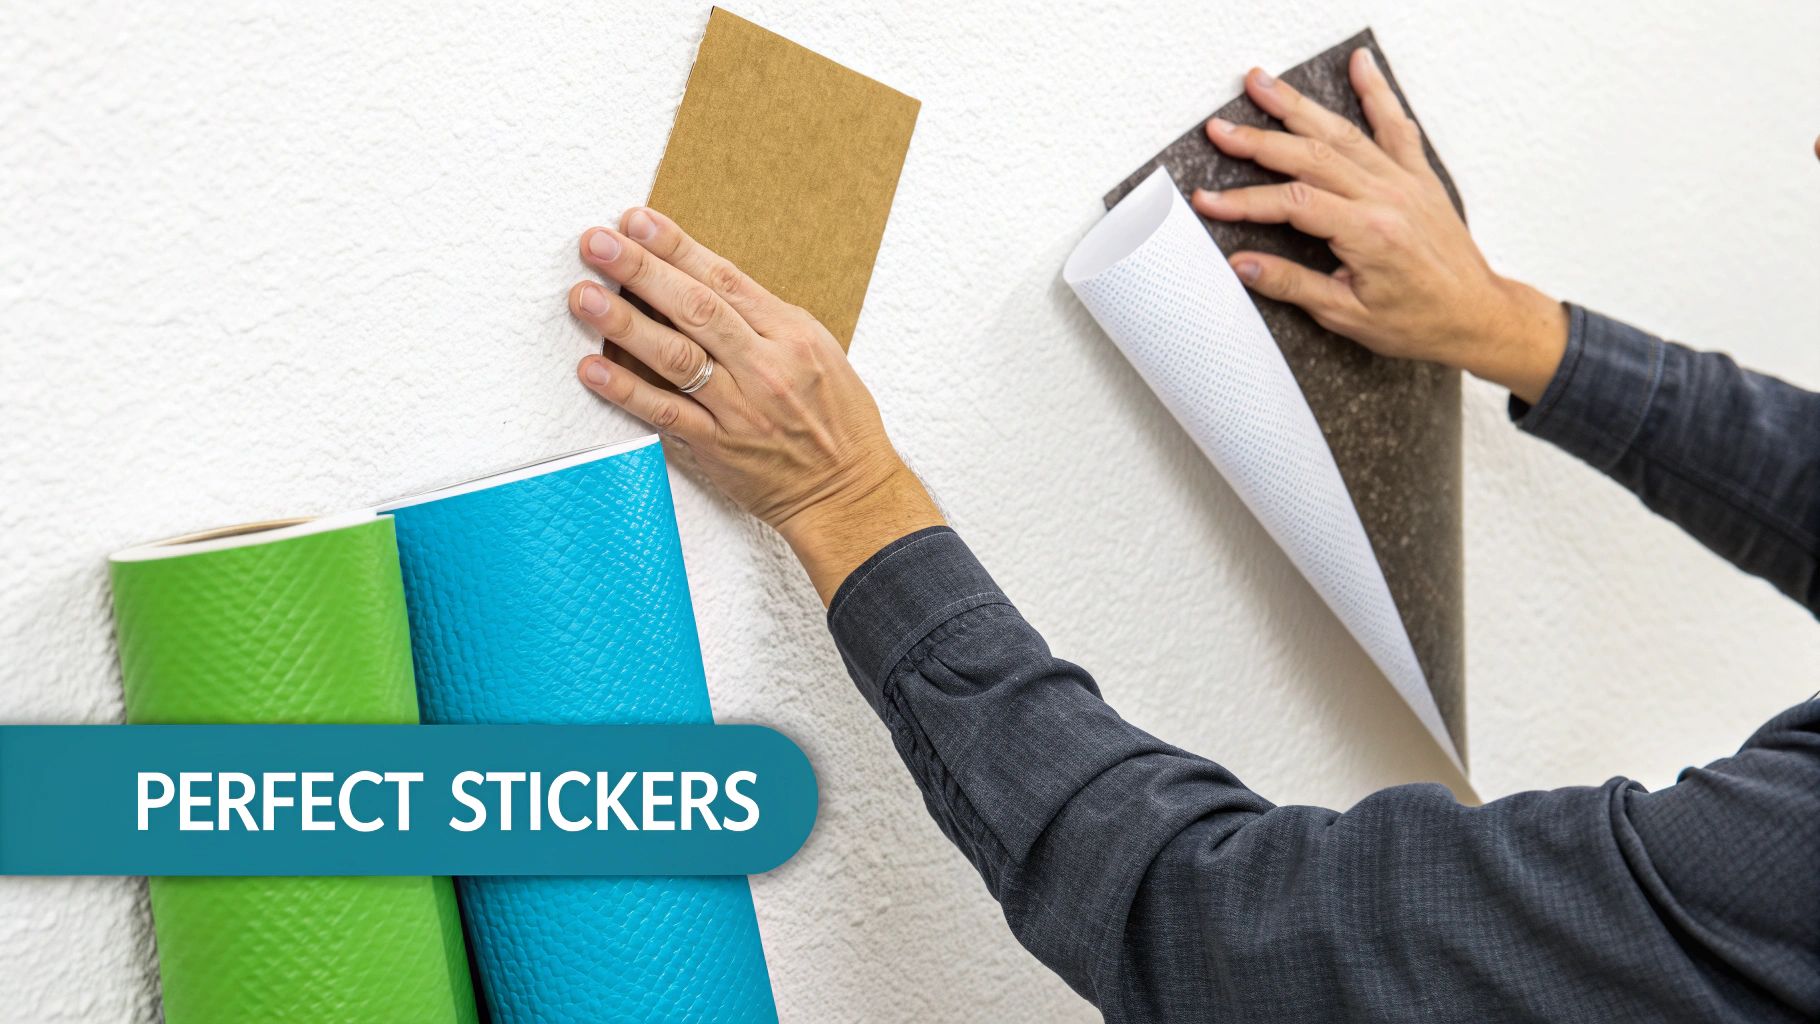
Application and Removal Without the Stress
Right, your walls are prepped and ready to go. Now for the fun bit – actually getting those stickers up and making the room look amazing. Applying your child room wall stickers should be an exciting moment, not a source of stress. With a couple of simple tricks, you can get that smooth, professional finish that looks like it's been painted on.
Don't worry, you won't need a fancy toolkit. A squeegee is perfect if you have one, but honestly, a credit card or even a dry cloth wrapped around a book works just as well. All you need is a firm, flat edge to gently press out any pesky air pockets as you apply the sticker.
This quick infographic lays out the simple wall prep process that sets you up for success.
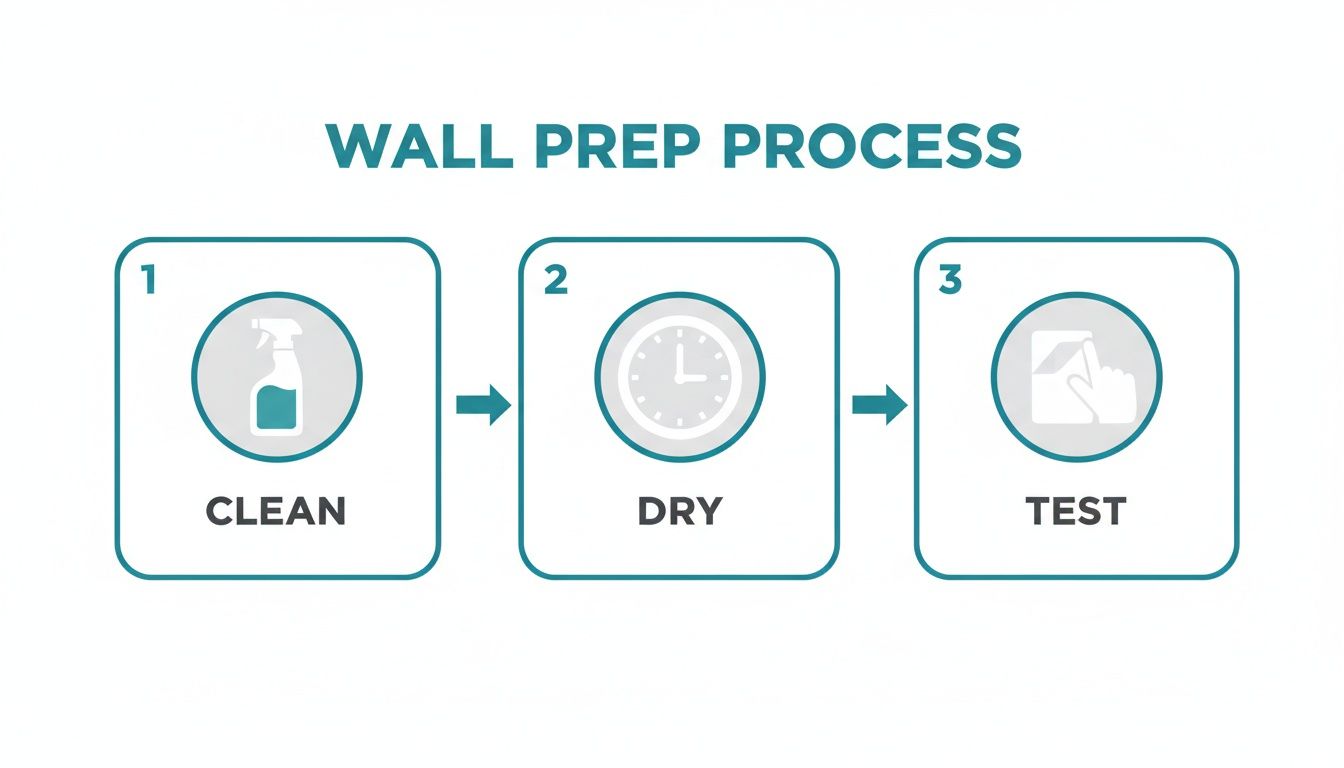
Stick to this 'clean, dry, test' approach, and you’ll have a flawless finish that lasts.
The Hinge Method for Perfect Placement
If you're working with a larger decal, the 'hinge method' is an absolute lifesaver. It takes all the guesswork out of lining things up and helps you avoid that heart-sinking moment when you realise your sticker is crooked or creased.
Here’s the breakdown:
- Position and Tape: Figure out exactly where you want the sticker, then run a strip of masking tape along the top edge to hold it in place. This tape is your 'hinge'.
- Peel the Top Half: Now, flip the sticker up towards the ceiling and carefully peel the backing paper away from the top half, stopping around the middle. You can snip off this loose piece of backing paper.
- Smooth It Down: Gently lower the sticker back against the wall. Using your squeegee or credit card, start smoothing from the centre outwards, pushing any air towards the top and side edges.
- Finish the Job: Once the top half is securely on the wall, you can remove the masking tape hinge. Then, just peel away the rest of the backing paper as you smooth down the bottom half of the sticker.
This little technique gives you so much more control, especially with bigger designs, and means you can probably manage it without needing a second pair of hands. The key is to work slowly and methodically – you'll stop bubbles from ever forming in the first place.
Damage-Free Removal When It's Time for a Change
One of the best things about wall stickers is that they're not a life sentence for your decor. When you’re moving out or your little one decides they’re too old for jungle animals, taking them down should be just as easy as putting them up.
The secret to a clean removal is a bit of gentle heat. Just trying to rip a sticker off a cold wall can sometimes pull off paint or leave behind a sticky mess. A little warmth makes all the difference.
All you need is a hairdryer on a low or medium setting. Gently warm the edges of the sticker for about 20-30 seconds, keeping the hairdryer a few inches away from the surface. You'll notice the vinyl starts to feel a bit softer. Then, you can get a fingernail under one of the corners and peel the sticker back on itself at a sharp angle.
If you want a more detailed guide, we've got a complete walkthrough on how to remove a wall sticker without damaging your walls.
Creative Design Ideas That Tell a Story
Clever placement is what transforms child room wall stickers from just decorations into the heart of a room’s story. Don't just look for a blank space to fill. Think about how the stickers can play with the room's features to tell a tale that captures your child's imagination day after day.
The secret is to see the entire room as your canvas. Imagine a cheerful parade of safari animals marching just above the skirting board, or a delicate trail of fairy footprints leading from the doorway to a treasure-filled toy box. It’s these thoughtful little details that build a truly immersive world.
Using Stickers to Create Room Zones
One of my favourite ways to use wall stickers is for 'zoning' – defining specific areas within a single room. It’s a brilliant technique for adding a sense of structure and purpose, making the space feel more organised and intentional without putting up walls.
For instance, you can instantly craft a cosy reading nook by placing a large, branching tree decal in a corner, its leaves sheltering a comfy armchair. For a high-energy play zone, you could frame the area with bold, colourful geometric shapes, signalling that this is the spot for fun and games.
A great trick for a shared bedroom is using different sticker themes to give each child their own patch. One side might be a dreamy skyscape with clouds and stars, while the other features a vibrant superhero cityscape. You create personal zones without needing a physical divider.
This trend of using adaptable décor is a huge part of why the global wall décor market is expected to hit USD 103.4 billion by 2034. Parents are increasingly drawn to designs that support their child's mood and development, making these themed sticker zones a really popular choice.
Making the Most of Your Room's Shape
The right design can also work wonders on a room's perceived size and shape. Don't let awkward dimensions stifle your creativity—use stickers to your advantage!
-
Got Low Ceilings? Think vertical. Tall designs like towering trees, space-bound rockets, or whimsical hot air balloons draw the eye upward, creating an illusion of height and making the room feel more spacious.
-
Working with a Small Room? Go big on one wall. Instead of scattering lots of little stickers, commit to a single, impactful feature wall. A large mural or a focused pattern adds incredible depth without making the space feel cluttered.
-
Decorating a Large Room? Use stickers to anchor the furniture. A mountain range behind the headboard or a cityscape behind a desk connects the furniture to the walls, making the whole room feel more cohesive and intentionally designed.
If you really want to define a space or highlight a theme, learning how to create a perfectly balanced accent wall can take your design to the next level. By thinking like an interior designer, you turn simple stickers into a powerful storytelling tool.
Common Questions About Kids Wall Stickers
Even with all the best ideas and tips, a few questions are probably still floating around in your head. That's perfectly normal. Let’s clear up some of the most common queries I hear about child room wall stickers, so you can get decorating with total confidence.
Think of this as your go-to troubleshooting guide. Once we get these worries out of the way, you can dive into the really fun part: creating a space your little one will absolutely adore.
Will Wall Stickers Work on Any Type of Paint?
This is a big one, and the honest answer is: not always. Most vinyl wall stickers perform best on smooth walls painted with a satin or semi-gloss finish. These paints give the adhesive just the right surface to grab onto.
Matt paints, on the other hand, can be a bit of a challenge. Their surface is more porous, which can weaken the bond. You also need to watch out for those modern 'wipe-clean' or 'stain-resistant' paints. They often contain additives like silicone or Teflon designed to repel grime, but unfortunately, they repel sticker adhesive just as effectively.
My best piece of advice? Always, always test a small, hidden spot first. Grab a small piece of the sticker—most packs come with a tester, or you can just trim a bit from the edge—and stick it behind a door or a big piece of furniture. Leave it for 24 hours. If it’s still stuck fast, you’re good to go.
Are Wall Stickers Safe for a Baby's Nursery?
Absolutely, provided you choose the right ones. When it comes to a nursery, safety is everything. It's crucial to look for stickers clearly labelled as non-toxic, VOC-free, and phthalate-free. Good UK brands are very upfront about this and use water-based inks and eco-friendly materials.
Where you place them is just as important. To eliminate any potential choking hazards, make sure you don't place small, individual stickers anywhere a baby could reach from their cot or main play area. For nurseries, I always recommend sticking to larger, single-piece decals. Placed higher up the wall, they create a beautiful, enchanting scene that’s well out of reach of curious little hands.
How Do I Prevent Bubbles in Large Wall Stickers?
A bit of patience and the right technique are your secret weapons here. Trapped air is what causes those annoying bubbles, but it's completely avoidable. First off, make sure your wall is spotlessly clean and bone dry.
When you’re tackling a large decal, the 'hinge method' we talked about earlier is a total game-changer. It lets you apply the sticker in controlled, manageable sections. By smoothing it from the centre outwards, you're actively pushing the air away as you go.
But what if a rogue bubble appears anyway? Don't panic.
- The first thing to try is gently peeling that section of the sticker back and re-applying it, smoothing it down much more slowly this time.
- For a tiny, stubborn bubble, you can take a pin and make a minuscule prick right in the centre. Then, just use your finger to gently press the trapped air out through the tiny hole.
Ready to turn your child's room into a truly magical space? Explore the huge range of high-quality, non-toxic designs at Quote My Wall. You're sure to find the perfect theme to spark their imagination today.