
Black and White Bathroom Wallpaper Guide
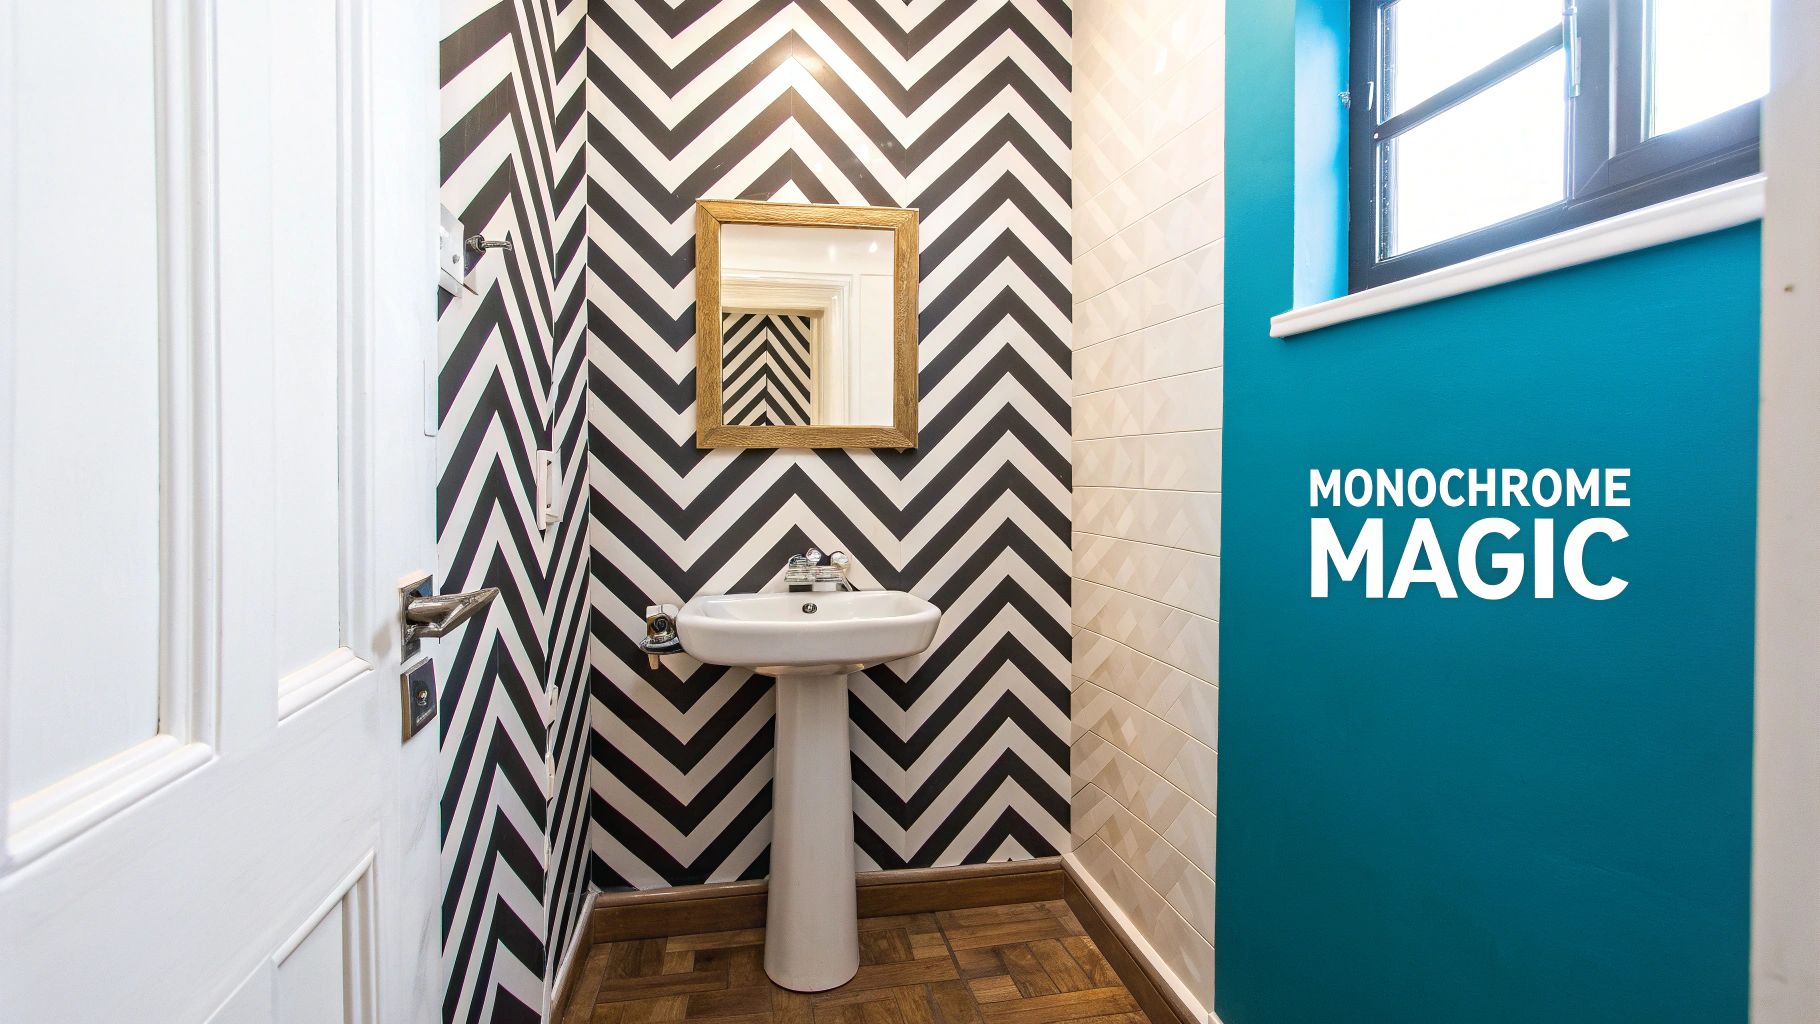
There's a reason black and white bathroom wallpaper is a design classic. It’s a choice that delivers instant drama and elegance, turning even the most functional space into something special. This simple colour palette has an incredible knack for fitting into almost any style you can imagine, from sharp, modern minimalism to the glamour of Art Deco. It's the secret weapon for adding character and depth to bathrooms, big or small.
Why We Still Love Monochrome Wallpaper
The appeal of black and white is simple yet powerful. It's a combination that offers crisp contrast and a sense of sophistication without ever feeling too busy. In a bathroom, the effect can be truly transformative. A bold, graphic monochrome print can turn a tiny cloakroom into a design statement, while a more delicate pattern can bring texture and life to a larger family bathroom without making it feel cramped.
This isn't just a fleeting trend; it's a reflection of how we approach our homes. The growing love for both monochrome and patterned wallpapers has been a huge driver in the UK wallpaper market, which was valued at a whopping USD 107.8 million in 2023. With experts predicting an annual growth of 5.3% between 2024 and 2030, it’s clear homeowners are getting braver with pattern. You can dive into the full wallpaper market analysis over on Grand View Research.
The Beauty of Versatility
Perhaps the greatest strength of black and white wallpaper is just how adaptable it is. Think of it as the perfect neutral canvas that you can push in any direction you like.
- For a timeless, classic look: Imagine a sophisticated damask or toile pattern paired with gleaming chrome taps and touches of marble.
- For a contemporary, modern edge: Go for a sharp geometric or abstract print, complemented by matte black fixtures and clean, simple cabinetry.
- For something more playful: A whimsical botanical or animal print can be a lot of fun, especially when you bring in pops of bright colour through towels and accessories.
Black and white wallpaper sets a strong, stylish foundation. It lets other elements in the room—like vibrant towels or metallic finishes—really sing, all while keeping the overall look cohesive and pulled-together.
This flexibility makes it a fantastic choice whether you own your home or you're renting. And with today's brilliant peel-and-stick wallpapers, getting this high-end look has never been easier or less of a commitment.
Selecting The Right Wallpaper For Your Bathroom
It’s easy to get swept away by a beautiful pattern, but when it comes to choosing a black and white bathroom wallpaper, we need to think beyond aesthetics. Bathrooms are hardworking spaces. They deal with steam, splashes, and constant humidity, so your wallpaper has to be up to the job. If you prioritise practicality from the start, you'll ensure your design looks fantastic for years to come.
This is where the material you choose makes all the difference. Look for labels like "scrubbable" or "extra washable" – these aren't just buzzwords. They're your guarantee that the wallpaper can handle a good wipe-down without falling apart.
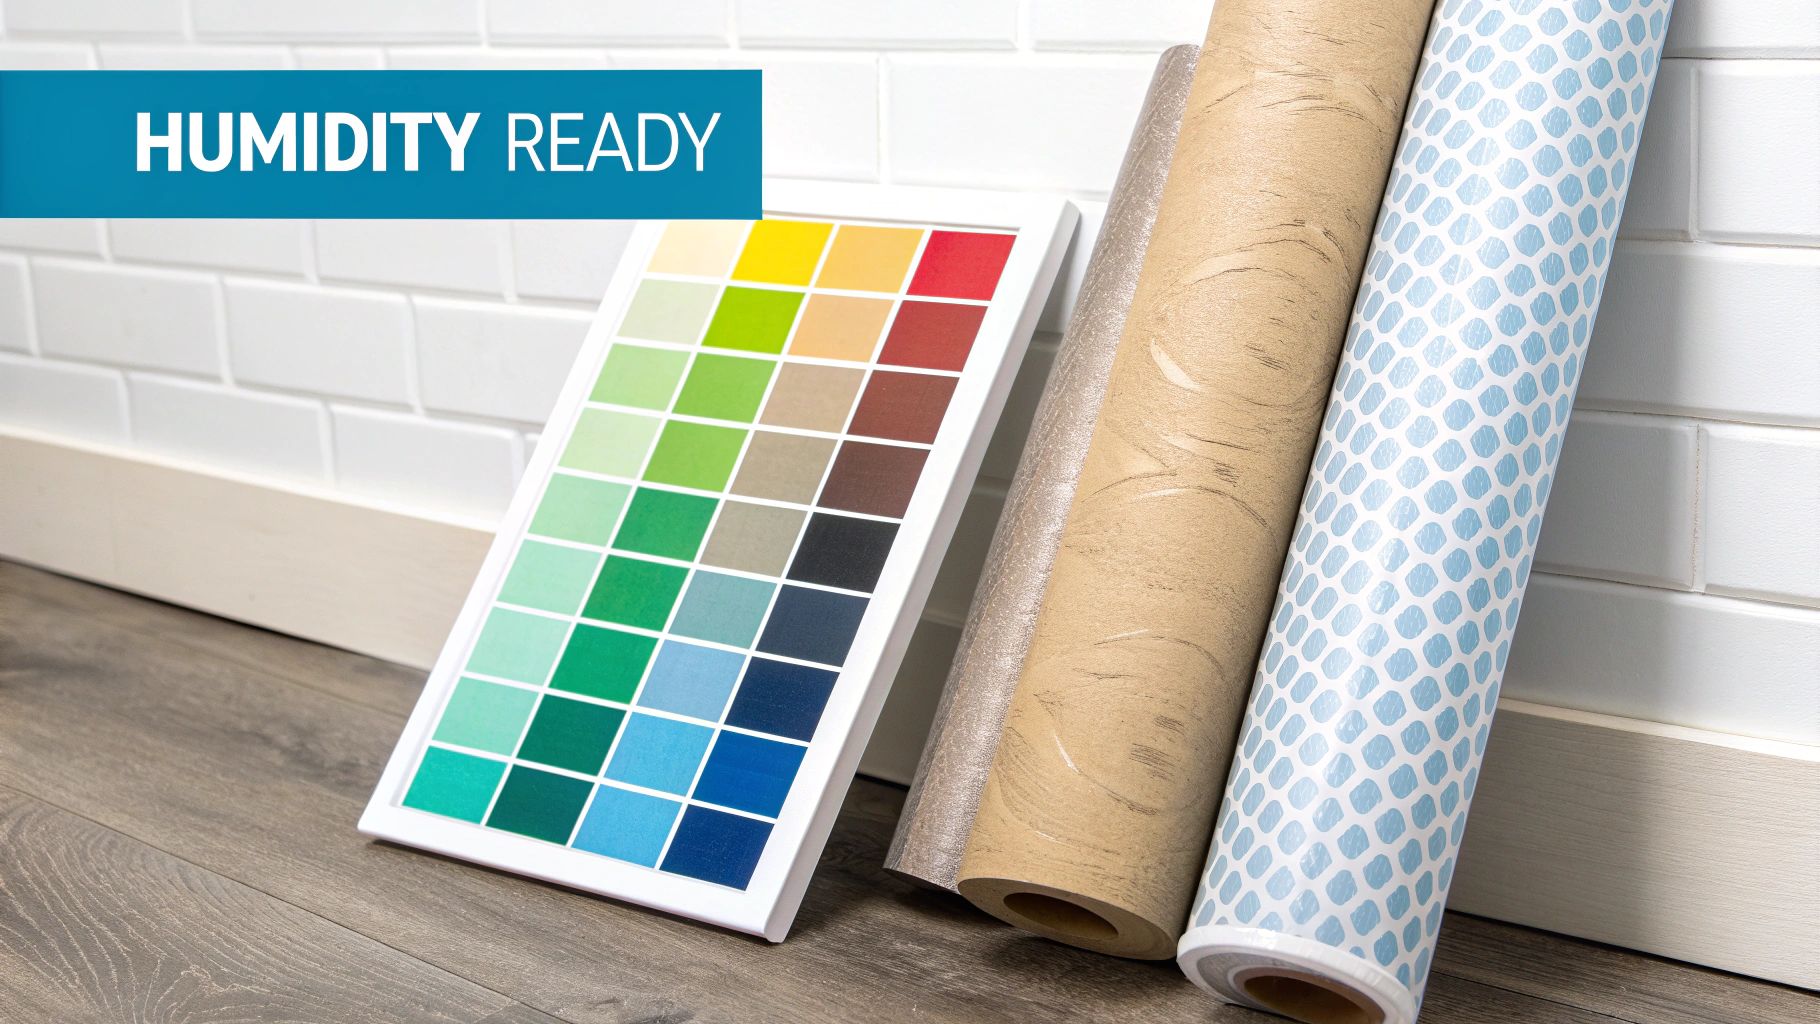
The Best Materials For A Humid Space
When it comes to bathrooms, vinyl is king. Hands down, it’s the best choice because it's non-porous and built to shrug off moisture. You don't have to take my word for it; the numbers speak for themselves. In 2024, vinyl-based options command a massive 36.22% of the UK wallpaper market's revenue. Homeowners trust it for a reason, especially in tricky rooms like bathrooms and kitchens.
Vinyl isn't your only option, though. A couple of other great contenders include:
- Vinyl-Coated Paper: This is a clever hybrid – a standard paper wallpaper with a protective vinyl coating on the surface. It gives you good water resistance at a more budget-friendly price point than solid vinyl.
- Peel-and-Stick Vinyl: A game-changer for renters or anyone who likes to change their decor often. Most modern peel-and-stick wallpapers are vinyl-based, making them surprisingly durable and water-resistant. We've put together a full guide on using peel-and-stick wallpaper in a bathroom if you're curious.
A Quick Word of Warning: Steer clear of traditional non-woven or standard paper wallpapers in a bathroom with a shower or bath. They act like a sponge, soaking up moisture which can lead to peeling, bubbling, and even mildew. They might be okay for a small, well-ventilated cloakroom, but it’s a risk.
To help you visualise the options, here's a quick comparison of the materials you'll likely encounter.
Comparing Bathroom Wallpaper Materials
| Material Type | Moisture Resistance | Durability & Scrubbability | Best For |
|---|---|---|---|
| Solid Vinyl | Excellent | Excellent | High-traffic, high-moisture bathrooms. Withstands direct splashes and frequent cleaning. |
| Vinyl-Coated | Good | Good | Family bathrooms with good ventilation. Offers a balance of cost and performance. |
| Peel-and-Stick | Good to Excellent | Good | Renter-friendly updates, accent walls, and DIY projects. Look for vinyl-based options. |
| Non-Woven/Paper | Poor | Poor | Not recommended for bathrooms with a bath or shower. Strictly for powder rooms only. |
Choosing the right material ensures your wallpaper can handle the unique challenges of a bathroom environment, giving you peace of mind alongside great style.
Pattern Scale And Finish Matter
The scale of your black and white pattern can completely change the vibe of your bathroom. A big, bold geometric print in a larger bathroom makes a confident statement. In a smaller cloakroom, however, that same pattern might feel overwhelming. A smaller, more delicate design could add just the right amount of texture without shrinking the space.
The finish of the wallpaper is also a crucial decision, affecting both the look and how easy it is to keep clean.
- Matte Finish: Gives a very sophisticated, contemporary feel. Just be aware that it can be a bit more prone to scuffs and might require a gentler touch when cleaning.
- Satin or Sheen Finish: This finish has a slight lustre that bounces light around, which is brilliant for making a room feel brighter and a little bigger. Plus, it’s generally more forgiving of splashes and easier to wipe down.
- Textured Finish: Great for adding physical depth and can be a lifesaver for hiding minor lumps and bumps on the wall. Just make sure it's a vinyl-based texture that won’t trap moisture in its crevices.
If your wallpaper project is part of a larger makeover, it can be helpful to get a sense of the entire process. Consulting with professional bathroom renovation services can give you a clearer picture of what a full-scale project involves. By carefully weighing up the material, pattern, and finish, you're not just decorating – you're making a smart, stylish investment in your home.
Getting Your Walls Ready for a Flawless Finish
Let me tell you a secret from years of doing this: a professional-looking wallpaper job is 90% preparation and only 10% hanging the paper. It's the groundwork that makes all the difference, especially in a tricky space like a bathroom. Skipping these prep steps is the single biggest reason wallpaper fails, peels, or just looks plain bad. So, let’s get it right from the start.
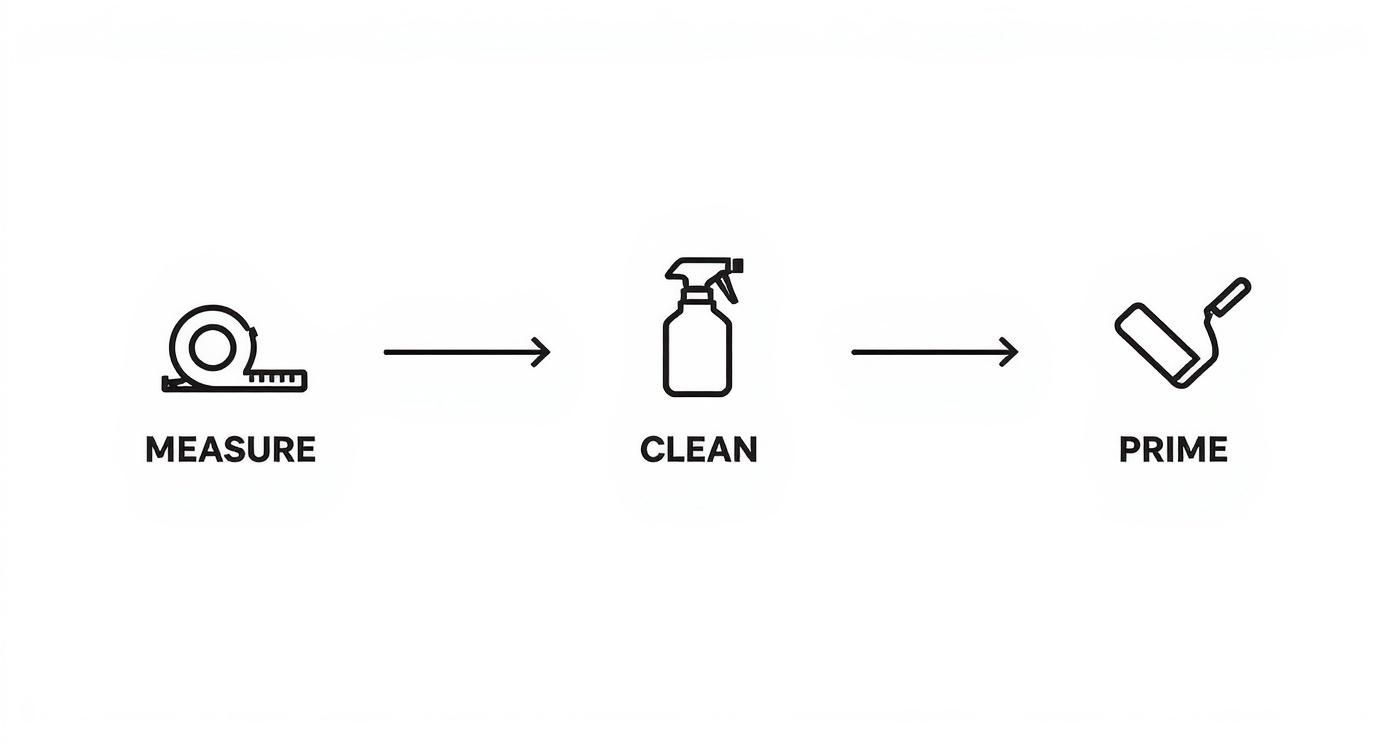
First Things First: Measure, Then Measure Again
Before you fall in love with a roll of wallpaper, you need to know exactly how much you need. Grab a tape measure and get the height and width of each wall you're covering. Multiply those two numbers together for each wall's square metre total, then add them all up.
But wait, there's one more crucial step – the pattern repeat. Look for this number on the wallpaper’s specifications; it’s the vertical distance before the pattern begins again. To account for trimming and lining up the design perfectly, you absolutely must add at least 10% extra to your total. Trust me, having a bit left over is a lifesaver compared to running out just before you're finished.
Creating the Perfect Canvas
Once your wallpaper is on its way, it’s time to turn your attention to the walls. Over the years, bathroom walls collect an invisible film of soap scum, steam residue, and toiletries. This grime is the enemy of good adhesion.
The best tool for the job isn't fancy; it's a simple bucket of warm water and some sugar soap. Give every wall a good, thorough wash with a sponge. Afterwards, rinse with a cloth and clean water to remove any soapiness, and then let everything dry completely. You'll be amazed at the difference this one deep clean makes.
Next, run your hand over the walls. Feel for any imperfections.
- Fill the Flaws: Got any small cracks, old nail holes, or little dings? A bit of good-quality filler will sort those out.
- Sand it Smooth: Once the filler is completely dry, give the patched areas a light sanding. You want them to be perfectly flush with the rest of the wall.
- Wipe Away the Dust: After sanding, grab a slightly damp cloth and wipe down the walls one last time to get rid of any dust.
Your aim here is a surface that's as smooth and clean as you can possibly get it. Even a tiny little bump can look like a mountain under fresh wallpaper, so spending an extra 20 minutes here is time well spent.
The One Step You Cannot Skip: Priming
If you take away just one piece of advice, let it be this: prime your bathroom walls. In a room that’s constantly dealing with steam and humidity, unprimed plasterboard or paint will just suck up moisture, causing your wallpaper adhesive to let go and the paper to bubble or peel. It’s a disaster waiting to happen.
A specific, moisture-resistant wallpaper primer is your best friend here. It does two vital jobs. First, it creates a protective barrier that stops the wall from absorbing the wallpaper paste, which means you get a much stronger, more reliable bond. Second, it seals the wall, stopping future condensation from creeping in behind the paper and causing damage down the line.
Apply one even coat of an acrylic primer made for high-humidity areas like bathrooms. Check the tin for the recommended curing time – it’s usually around 24 hours, but don't rush it. This single step is the best insurance policy you can get for a beautiful, long-lasting finish that can handle everything a bathroom throws at it. As a bonus, it also makes the wallpaper much easier to remove when you fancy a change in a few years
Your Practical Guide to Hanging Wallpaper
Right, with your walls prepped and ready, it’s time for the exciting bit – bringing that black and white bathroom vision to life. Hanging wallpaper can feel a little intimidating, but trust me, a methodical approach and a few insider tricks are all you need for a finish that looks genuinely professional. Don't aim for perfection straight out of the gate; just focus on getting each step right.
Before you even think about cutting or pasting, you need to decide where to start. A classic rookie mistake is starting in the most obvious corner. Instead, I always recommend beginning somewhere less conspicuous, like behind the door or in a small alcove. This gives you a chance to find your groove before you tackle the main, eye-level walls.
Getting The First Strip Perfectly Straight
The first piece of wallpaper you hang is by far the most important. It's the foundation that every other strip will align with. You have to remember that walls, especially in older properties, are almost never perfectly straight. If you just follow the corner, your pattern will slowly but surely start to slant. To get around this, you need to create your own perfectly vertical line using a plumb line or a good spirit level.
It’s simple enough. Just hold your plumb line near the ceiling in your starting corner, let the weight hang still, and pencil a few marks down the wall along the string. Join these dots with a long ruler, and there you have it – a guaranteed true vertical to guide your first strip. Always align the edge of your paper with this line, never with the corner of the wall itself.
This quick visual shows the essential prep work that sets you up for success.
Nailing this prep means your wallpaper has the best possible surface to stick to, which saves you from the headache of peeling or bubbling down the line.
Applying and Smoothing Your Wallpaper
Whether you're going old-school with paste-the-wall paper or using a modern peel-and-stick design, the basic technique is the same. For peel-and-stick, just peel back the top few inches of the backing paper, press the wallpaper against the wall along your plumb line, and slowly work your way down.
As you go, use a wallpaper smoothing tool to firmly press the paper to the wall. The key is to work from the centre outwards, methodically pushing any trapped air bubbles towards the edges. The boom in peel-and-stick black and white bathroom wallpaper has really opened up this kind of project to DIY-ers. For a deeper dive, there's a great guide on how self-adhesive wallpaper can transform your home that’s worth a read.
Don’t panic if a stubborn air bubble shows up after the paper has dried. It happens. A little tool of the trade is a wallpaper syringe. It lets you inject a tiny bit of adhesive right into the bubble so you can smooth it flat without leaving a trace.
This easier, more forgiving approach has really struck a chord here in the UK. We've always loved a bold black and white design, but concerns about tricky installation or longevity used to put people off. The new generation of peel-and-stick papers has changed the game, giving more of us the confidence to experiment with monochrome patterns.
Mastering Seams and Tricky Cuts
The real craft of wallpapering is in the details – getting those seams invisible and cutting neatly around obstacles. When you hang your second strip, gently butt its edge right up against the first, taking your time to align the pattern perfectly. You want to avoid overlapping the edges at all costs, as it creates a ridge you’ll always notice.
When you hit an obstacle like a window, sink, or light switch, here’s what to do:
- Hang the wallpaper strip right over the top of the fitting.
- Use your smoothing tool to gently press the paper into the edges and corners around the object.
- With a sharp knife, make small ‘relief’ cuts from the centre of the obstacle out towards its corners. This helps the paper lie flat.
- Finally, trim away the excess paper with a craft knife for a clean, tight finish.
My best advice? Use a fresh, sharp blade for every few cuts. A dull blade will snag and tear the paper, ruining the look. A crisp trim along the ceiling and skirting board is the final touch that makes the whole job look sharp and polished.
Styling and Accessorising Your New Space
Right, the wallpaper is up and looking fantastic. Now for the really fun part: bringing the whole room to life. Think of your new black and white walls as the perfect, dramatic backdrop. Everything else you add—from the taps to the towels—will pop against it.
A great place to start is with the hardware. The finish you choose for your taps, towel rails, and light fittings can completely shift the mood of the room. Each option tells a different story.
- Warm Brass or Gold: This choice instantly adds a touch of glamour and warmth, which is a lovely contrast to the sharp black and white. It’s a brilliant way to get that luxe, boutique hotel vibe.
- Matte Black: If you're after a bold, contemporary feel, matte black is the way to go. It almost blends into the wallpaper's pattern, creating a seamless and ultra-modern look.
- Polished Chrome: You can't go wrong with classic chrome. It’s clean, crisp, and incredibly versatile, working with just about any style you can think of. It helps keep the space feeling bright and open.
Infusing Colour and Personality
While a pure monochrome scheme is undeniably chic, a splash of colour is what gives a space its soul. Your wallpaper is already providing plenty of pattern, so you can afford to be bold with solid blocks of a single, vibrant hue.
Textiles are your best friend here. Towels, a bathmat, or a shower curtain are easy, low-commitment ways to experiment. Picture how a stack of emerald green towels would bring a sophisticated, luxurious feel. Or maybe a dash of mustard yellow to make the room feel warm and energetic. Even a simple potted fern on a shelf adds a welcome dose of natural colour.
A quick tip from experience: don't just think about colour, think about texture. A fluffy towel against a smooth ceramic soap dispenser and a woven basket for storage creates layers of interest that stop the design from feeling one-dimensional.
And this idea isn't just for fabrics. If you've got some tired tiles that now look a bit drab next to your new wallpaper, you don't have to rip them out. Using tile stickers for a bathroom makeover is a clever way to introduce a complementary colour or pattern without a huge effort.
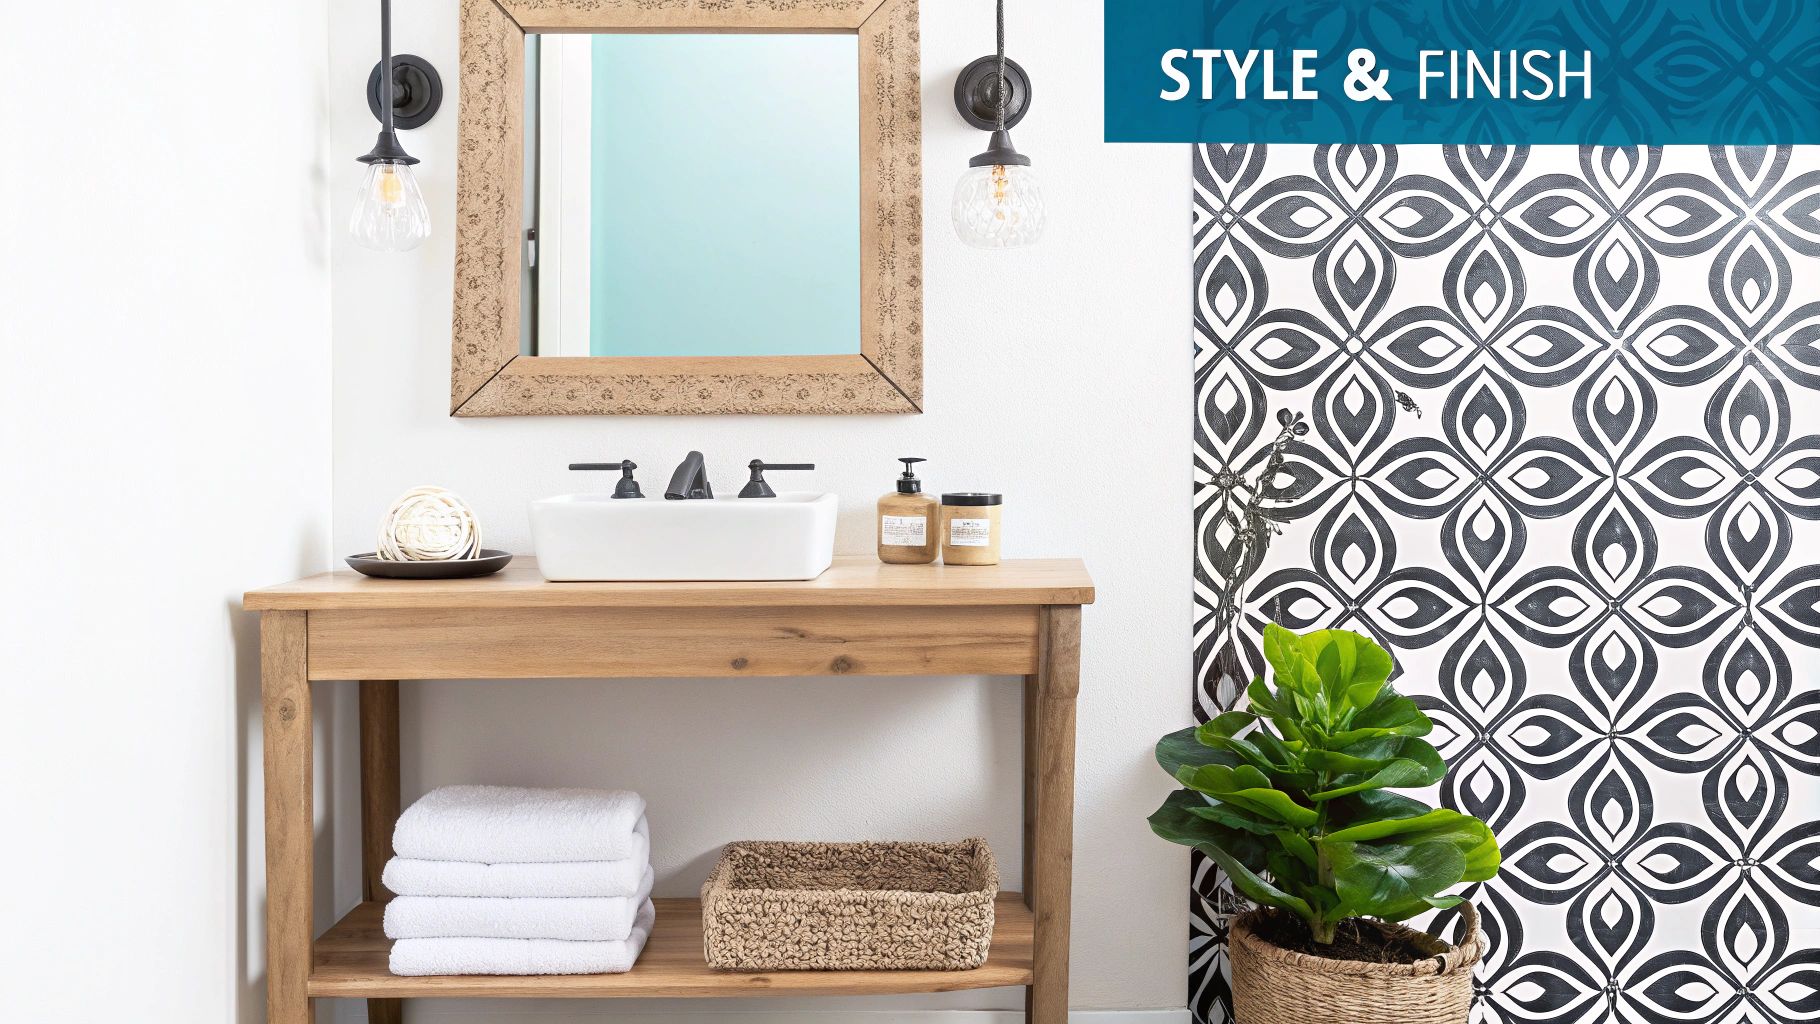
Final Touches for Style and Function
The last few bits and pieces are about marrying style with everyday practicality. A mirror, for example, is more than just functional. A large, well-placed mirror will bounce light around, making even a small bathroom feel bigger and brighter. A simple frameless one keeps things sleek, whereas a vintage-style or round mirror can become a focal point in its own right.
Lighting makes a huge difference, too. A central ceiling light is a must, but adding a pair of wall sconces by the mirror creates a much softer, more flattering light for your morning routine. Try to match their finish to your taps for a really cohesive, thought-through feel.
Finally, think about storage. Floating shelves are perfect for displaying a few nice things—candles, a diffuser, a small plant. For all the less-pretty essentials, a couple of stylish baskets will keep them neatly tucked away. It’s these thoughtful finishing touches that will take your bathroom from simply wallpapered to beautifully designed and perfectly functional.
Your Top Wallpaper Questions, Answered
Embarking on a wallpaper project, especially in a tricky space like a bathroom, always brings up a few questions. That's completely normal. Let's tackle some of the most common queries I hear from people planning to use black and white wallpaper in their bathroom.
Can I Really Use Wallpaper in a Bathroom with a Shower?
You absolutely can, but it’s all about smart placement and choosing the right product. The number one rule is to keep it out of the direct line of fire from the shower spray. So, no wallpaper inside the shower enclosure or right around the bath where it will get constantly soaked.
For the rest of the room, you'll want a heavy-duty, scrubbable vinyl wallpaper. These are specifically made to stand up to the high humidity and occasional splashes that are just a part of bathroom life. Don't forget about ventilation, either—a good extractor fan is your wallpaper's best friend. It pulls most of the steam out of the air before it can even think about settling on your walls.
A Pro Tip: For extra peace of mind, especially on walls behind a sink or toilet, you can seal the wallpaper with a coat of clear decorator's varnish. I always recommend a "dead flat" matte finish, which will protect the surface and seams from moisture without adding any shine.
What's the Best Way to Clean Bathroom Wallpaper?
First things first, always give the manufacturer's care instructions a quick read. But for the majority of modern vinyl papers, cleaning is a breeze.
- For Scrubbable or Washable Vinyl: All you need is a soft sponge and a bit of mild, soapy water. A gentle wipe is usually enough to lift off any marks or toothpaste splatters.
- For "Wipeable" Papers: These are a bit more delicate. Just use a slightly damp cloth with no soap at all, and be careful not to rub too aggressively.
- What to Avoid: Steer clear of any harsh chemical cleaners, bleach, or anything abrasive like a scouring pad. They will ruin the finish and pattern.
It's always a good habit to test your cleaning method on a leftover scrap or an inconspicuous spot, like behind the bathroom door, just to be safe.
How Do I Get Peel-and-Stick Wallpaper Off Again?
This is the beauty of peel-and-stick, isn't it? It’s designed to be a temporary, damage-free solution, which makes it perfect for renters or anyone who likes to switch up their style every few years.
When it's time for a change, start at a top corner and slowly pull the wallpaper down and away from the wall. I find pulling at a sharp, 45-degree angle works best. If you hit a stubborn spot, a little bit of low heat from a hairdryer will soften the adhesive and help it release cleanly. Quality brands are formulated to peel away without leaving a sticky mess behind.
Can I Just Wallpaper Over My Textured Walls?
While you technically can, I would strongly advise against it if you're after a professional-looking result. Any lumps and bumps on the wall, even subtle ones, will telegraph right through the paper. It just never looks right.
Even more importantly, the texture creates tiny air gaps and reduces the surface area the adhesive can grip onto. This dramatically increases the chances of your wallpaper bubbling, peeling at the seams, or failing altogether. For a flawless finish that lasts, you really need to start with a smooth wall. The proper way to do it is to have the wall skim-coated with a thin layer of plaster, sanded smooth, and then sealed with a good quality wallpaper primer. It's an extra step, but it’s the secret to a perfect job.
Ready to find the perfect monochrome pattern for your space? Explore the huge range of high-quality vinyl designs at Quote My Wall and start your bathroom transformation today. Visit us at https://www.quotemywall.co.uk to see our full collection.