

Bathroom Tile Vinyl Stickers: A Complete UK Guide
You've found the bathroom you've been putting off. The beige tiles are sound, but the colour feels dated, the grout has lost its appeal, and a full retile looks far too disruptive for a room used every day. Bathroom tile vinyl stickers can create a convincing visual change without demolition, but only when you match the material to the amount of water that reaches the surface.
That distinction matters in British bathrooms. A wall behind the door behaves very differently from the area beside a shower, and a splashback above a basin has different demands from a wet-room floor. UK shoppers can already find tile stickers listed across 15 supermarkets, with consumer ratings tracked across those retailers, which indicates that the category has broad retail distribution rather than existing only as a niche DIY product. (UK tile sticker listings and ratings)
What Bathroom Tile Vinyl Stickers Can and Cannot Do
A homeowner might compare a modest weekend refresh with the cost and disruption of stripping out a bathroom and starting again. Stickers can make tired ceramic look cleaner, more deliberate and more current, particularly with marble, terrazzo, checkerboard or stone-effect finishes. They won't, however, turn a failing bathroom into a watertight one.
I use a simple moisture-exposure map before recommending any bathroom tile vinyl stickers.
The four zones that decide the result
Dry zones include the wall behind the door, the area above a towel rail and sections well away from the basin or bath. These are the easiest locations because the vinyl mainly faces condensation and ordinary cleaning. Properly prepared glazed tiles usually give the most dependable result here.
Splash zones sit around the basin, beside the bath rim and behind taps. These areas receive droplets, wiping and occasional pooling, so the sticker edges need careful fitting and sealing where a cut edge meets a sanitary fitting. A splashback can work well, but careless cleaning or an unsealed lower edge can still let water migrate underneath.
Near-shower walls receive steam and stray spray. They're more demanding than a basin wall, even when the showerhead doesn't point directly at the sticker. Good-quality stickers may handle splashes and steam, but UK interiors guidance warns against direct-flow shower areas and shower floors because constant saturation is a different condition from occasional moisture. (Bathroom tile sticker use by moisture exposure)
Direct-water zones, including the inside of a shower cubicle and a wet-room floor, are where I'd normally say no. Stickers aren't a substitute for sound tanking, waterproof wall panels or correctly installed tile work. They won't repair crumbling grout, conceal rising damp or compensate for a failed waterproofing system.
Practical rule: If water lands there every time someone showers, choose a proper waterproof wall or floor system instead of relying on decorative adhesive vinyl.
Formats and finishes compared
| Format | Strengths | Weaknesses | Sensible location |
|---|---|---|---|
| Standard paper-back vinyl | Light, easy to cut and widely available | Less forgiving of heavy moisture and deep grout | Dry walls and light splash areas |
| Thicker PVC | More substantial and easier to wipe | Can be less flexible around awkward details | Basin splashbacks and sound tiled walls |
| Textured grout-line panels | Creates a more tile-like visual surface | Deep texture can expose uneven backgrounds | Feature walls with shallow, stable joints |
| Clear protective overlays | Adds a sacrificial wipeable layer | Can emphasise bubbles and edge defects | Selected splash areas, only when compatible with the print |
Product descriptions vary, so check whether a listing says water-resistant or genuinely waterproof. Those terms shouldn't be treated as interchangeable. Independent UK bathroom trade guidance presents wall panels as a long-lasting alternative to traditional tiling, with one supplier describing PVC bathroom wall panels as 100% waterproof and suitable as an alternative to ceramic tiles. (UK bathroom wall panel guidance) That doesn't automatically make a decorative sticker equivalent to a panel.
Matte and satin finishes usually look more convincing than high gloss under bathroom spotlights. Gloss catches every ripple, trapped bubble and uneven grout line, while matte and stone-effect surfaces disguise minor imperfections. If you're working over dated tiles, a restrained stone or softly patterned finish often looks less like contact paper than a sharply reflective faux marble.
For design direction beyond quick makeovers, browse these timeless bathroom tile design ideas for your home and consider how the pattern will sit alongside brassware, paint and flooring. Quote My Wall also publishes guidance on tile stickers for bathroom and kitchen makeovers, which can help you compare the visual approach before ordering.
Choose the format by exposure, not by the photograph on the product page. Dry wall means appearance can lead. Splash zone means adhesion and edge treatment lead. Direct water means bathroom tile vinyl stickers are the wrong system.
Tools and Surface Preparation Before You Start
Adhesive vinyl doesn't fail because the pattern is difficult. It fails because the surface is greasy, damp, uneven or poorly planned. Gather the kit before opening the first sheet.
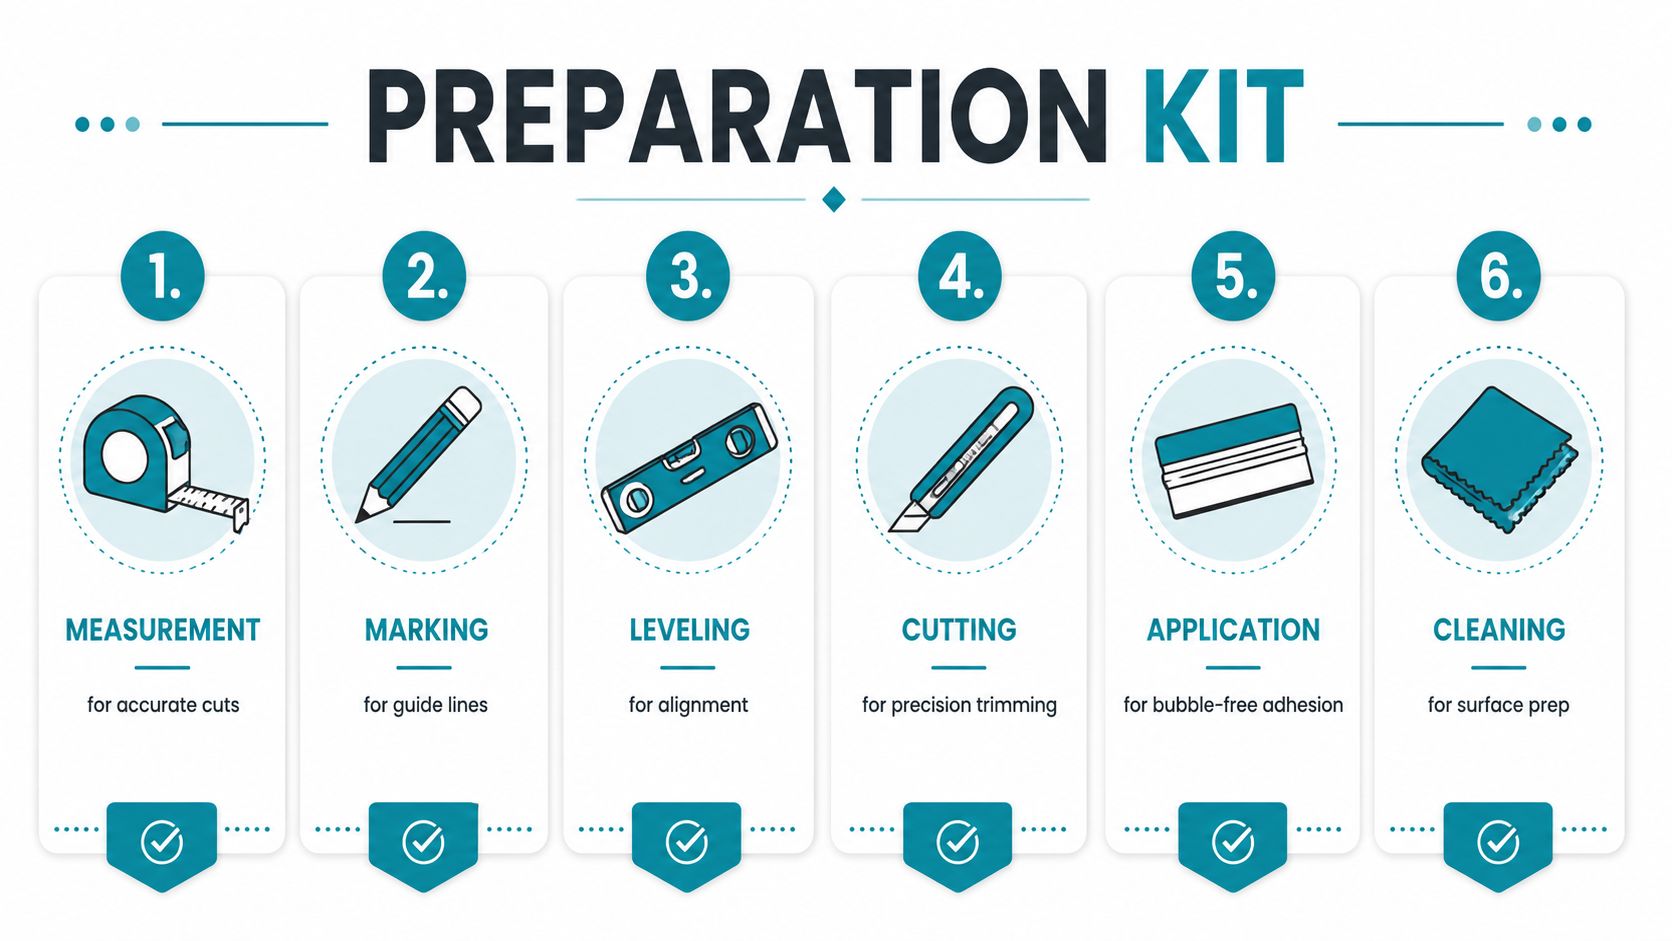
A tape measure gives you tile and wall dimensions, while a pencil marks cut lines without leaving a permanent mark on the face. A long spirit level keeps a repeated pattern from drifting across the wall. Use a sharp craft knife with snap-off blades for clean cuts, and replace the blade as soon as it starts dragging.
A felt-edged applicator or soft squeegee presses the vinyl down without scratching the print. Keep a microfibre cloth for cleaning and drying, sugar soap for removing bathroom residue, isopropyl alcohol for final degreasing, a fine-grout sanding pad for reducing glossy surfaces and a hairdryer for gentle warming during fitting and repairs.
Prepare the substrate in sequence
- Clean with sugar soap. Remove soap film, body oils and general bathroom residue. Rinse thoroughly, because cleaner left behind can interfere with the adhesive.
- Degrease with isopropyl alcohol. Work in small areas and allow the surface to flash off completely.
- Reduce excessive gloss. Lightly abrade glossy ceramic where the product instructions allow it. You're creating a little more mechanical grip, not trying to remove the glaze.
- Repair the background. Fill missing or blown grout and flatten raised sections. Vinyl follows the surface beneath it, so it won't hide a deep joint or loose fragment.
- Dry the room and substrate. UK installation guidance recommends acclimating vinyl in the room for at least 24 hours before fitting because temperature and humidity changes can affect bond quality and dimensional stability. (UK vinyl installation guidance)
Don't fit in a cold bathroom straight after a night without heating. Follow the product's temperature instructions, warm the room steadily and avoid adding steam before the adhesive has bonded.
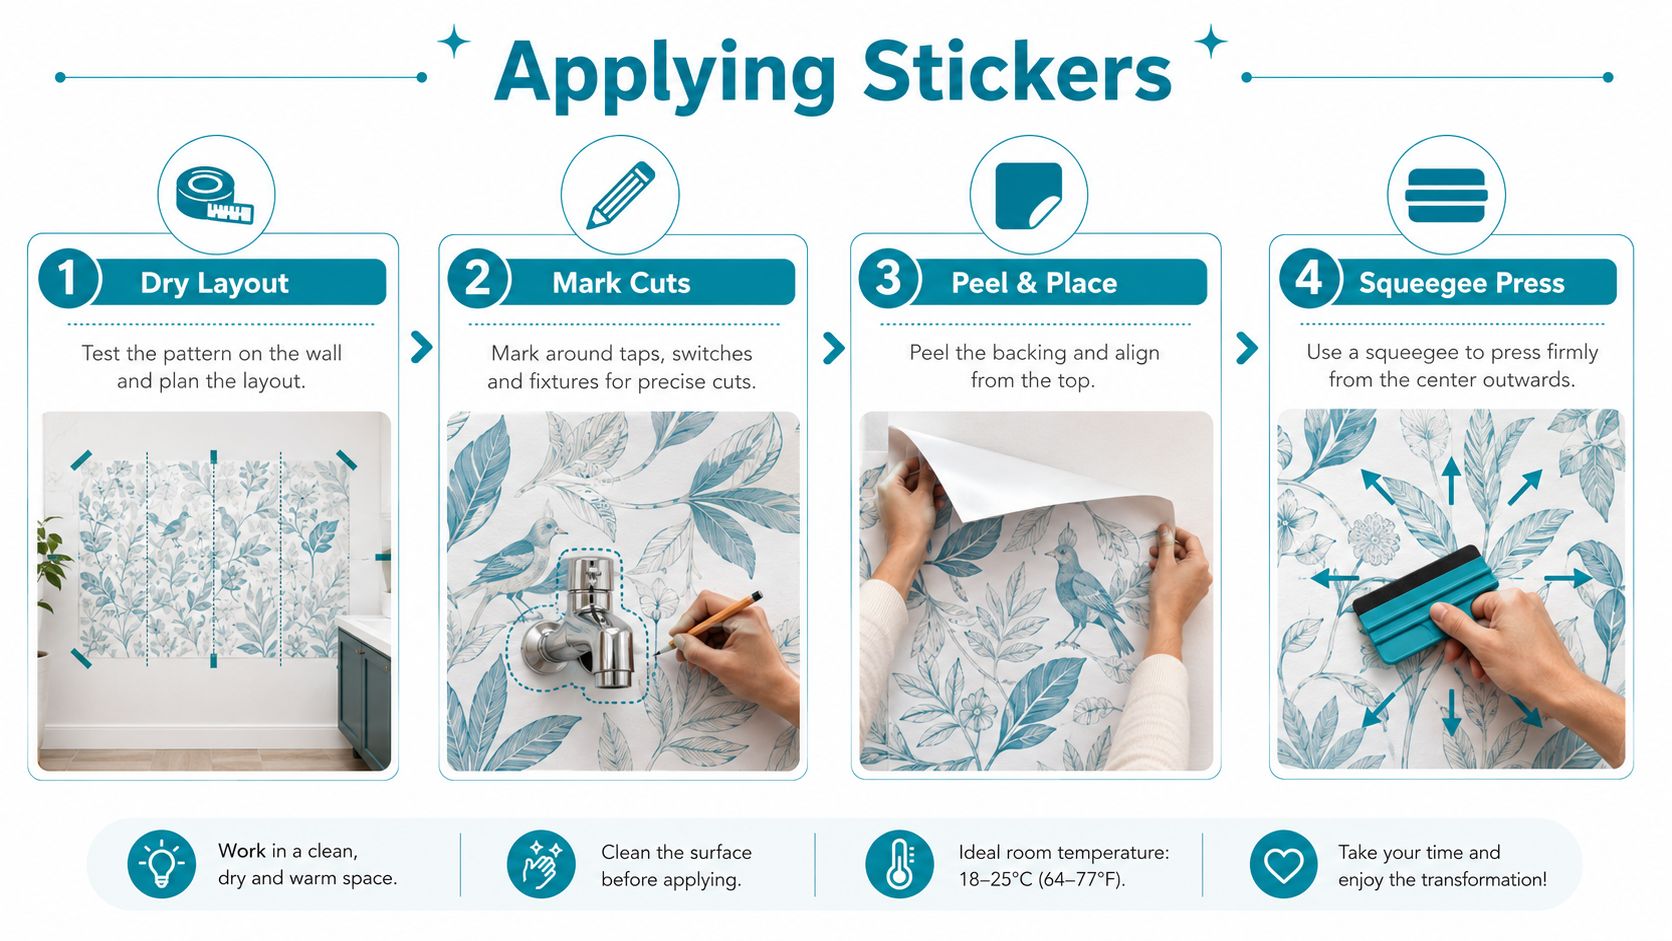
Before peeling anything, tape the sheets or individual stickers loosely in position. Check the pattern at corners, around taps, beside shaver sockets and at the final tile. This dry layout catches mismatches while you can still move everything.
Applying Stickers Without Bubbles or Lifted Edges
Start with the layout, not the backing paper. Tape each sticker flat against the wall and check that the pattern aligns with the grout lines and neighbouring panels. Mark awkward cuts around taps, sockets, tile edges and reveals before adhesive becomes involved.
Use a hinge method. Fold or tape the top edge so the sticker can pivot, then peel back only 5 to 10 cm of backing. Align the exposed top corner with your guide line or grout joint, press that short strip into place and check the level before committing further.
Pull the backing down slowly. As you work, hold the vinyl away from the wall and use a felt-edged squeegee at roughly a 45-degree angle, moving from the centre towards the sides. Short, controlled strokes are safer than forcing the whole sheet down at once.
Cut corners with the finished edge in mind
At an internal corner, allow the piece to overlap before making a second, clean cut. At an external corner, trim carefully and leave a small relief gap rather than forcing the vinyl to fold sharply. Where the design wraps around a reveal, keep the return minimal so the edge doesn't become a handle that catches during cleaning.
Uneven grout lines need patience. Warm the vinyl gently with a hairdryer so it becomes more flexible, then press it into shallow dips. Don't use heat to rescue a filthy or wet surface. Heat improves conformity, but it can't replace preparation.
A small bubble can often be corrected with firm pressure towards the nearest edge. If it remains trapped, prick it with a fine pin and press the air towards that opening. Never slash the bubble with a blade, because the cut will grow and collect moisture.
An edge that looks milky, curls slightly or feels less firmly attached has lost contact. Warm it briefly, press it flat with a clean cloth and hold it until it cools. For readers who want more general confidence with wall coverings, this step-by-step wallpaper hanging tutorial is useful for understanding alignment, smoothing and careful trimming.
Sealing and Waterproofing the High-Risk Zones
Sealant is a finishing measure, not a rescue treatment. It can protect a correctly bonded cut edge from water wicking underneath, but it won't make a sticker suitable for the inside of a shower enclosure.
The lower edge beside a bath, tray or basin is the main risk point because water can sit there. Use 100% sanitary silicone, preferably mould-resistant, and choose a neutral-cure product where the vinyl is printed. Apply a neat, thin bead after the sticker has fully bonded, then allow the sealant to cure before exposing it to water.
The bath splash line needs more attention than a wall behind a towel rail. Around a basin or toilet base, a clear silicone fillet can protect a cut edge, but don't seal the top edge of a sticker in a way that traps moisture behind it. On a floor, seal carefully around the pedestal and toilet base while leaving the main field ungrouted.
| Zone | Seal Bottom Edge | Seal Top Edge | Seal Cut Edges |
|---|---|---|---|
| Dry wall | Usually unnecessary | Leave open | Seal only where exposed |
| Basin splashback | Usually yes at the worktop or basin junction | Normally leave open | Seal around tap and pipe cuts |
| Bath edge | Yes, with sanitary silicone | Leave open | Seal every cut meeting the bath |
| Direct shower enclosure | Don't rely on stickers | Not a solution | Use a proper waterproof system instead |
| Bathroom floor | Seal around fixtures | Not applicable | Seal around pedestal and toilet base |
UK flooring guidance identifies perimeter and fixture sealing as a common bathroom failure point, and technical adhesive guidance used in the UK distinguishes moisture-tolerant systems rated to very high subfloor humidity from standard systems with lower limits. Some products are rated to 99% RH, while standard systems are typically limited to around 75% RH, so concrete and screed should be moisture-tested before flooring work. (UK bathroom vinyl flooring and moisture guidance)
For design-led mosaic effects, compare the visual options in this bathroom mosaic tile sticker guide, then apply the same moisture rules. A decorative finish still needs a sound, dry substrate and protected exposed edges.
Cleaning and Day-to-Day Maintenance
The safest routine is gentle and consistent. After a shower or bath, wipe standing water from the stickers and grout lines with a soft microfibre cloth. This matters most along the lower edges, where water can remain in contact with the adhesive.
For weekly cleaning, spray a pH-neutral product onto the cloth rather than directly onto the sticker. That keeps liquid away from seams and reduces the chance of cleaner creeping under a lifting edge. Use light pressure, rinse the cloth often and dry the surface afterwards.
Products that shorten the life of the finish
Bleach, vinegar, abrasive creams and citrus-based descalers can attack printed surfaces or weaken adhesive at exposed edges. Steam mops and abrasive pads are especially unsuitable because heat, moisture and friction can work together along seams.
A bathroom extractor should run after bathing or showering, and leaving the door open helps the room dry. The exact ventilation arrangement depends on the room and fan, but the principle is simple. Less persistent damp means less stress on the adhesive.
Look for small warnings rather than waiting for a dramatic peel. A faint line of discolouration along a grout joint, slight tackiness, a milky edge or a corner that catches your cloth all indicate that moisture or cleaning fluid has started to reach the bond.
Don't scrub a lifting edge harder. Dry it, warm it gently and press it back while the adhesive is still recoverable.
If the print has already faded, the edge has collected grime or the vinyl has split, reheating won't restore the material. Replace that panel instead of sealing over a visible failure.
Removing, Repairing and Replacing Stickers
Removal should be planned before installation, especially in a rented home. Fully cured ceramic and sound glazed tile usually provide the safest starting point, while unsealed plaster, eggshell paint and cheap laminate can lose their surface during removal.
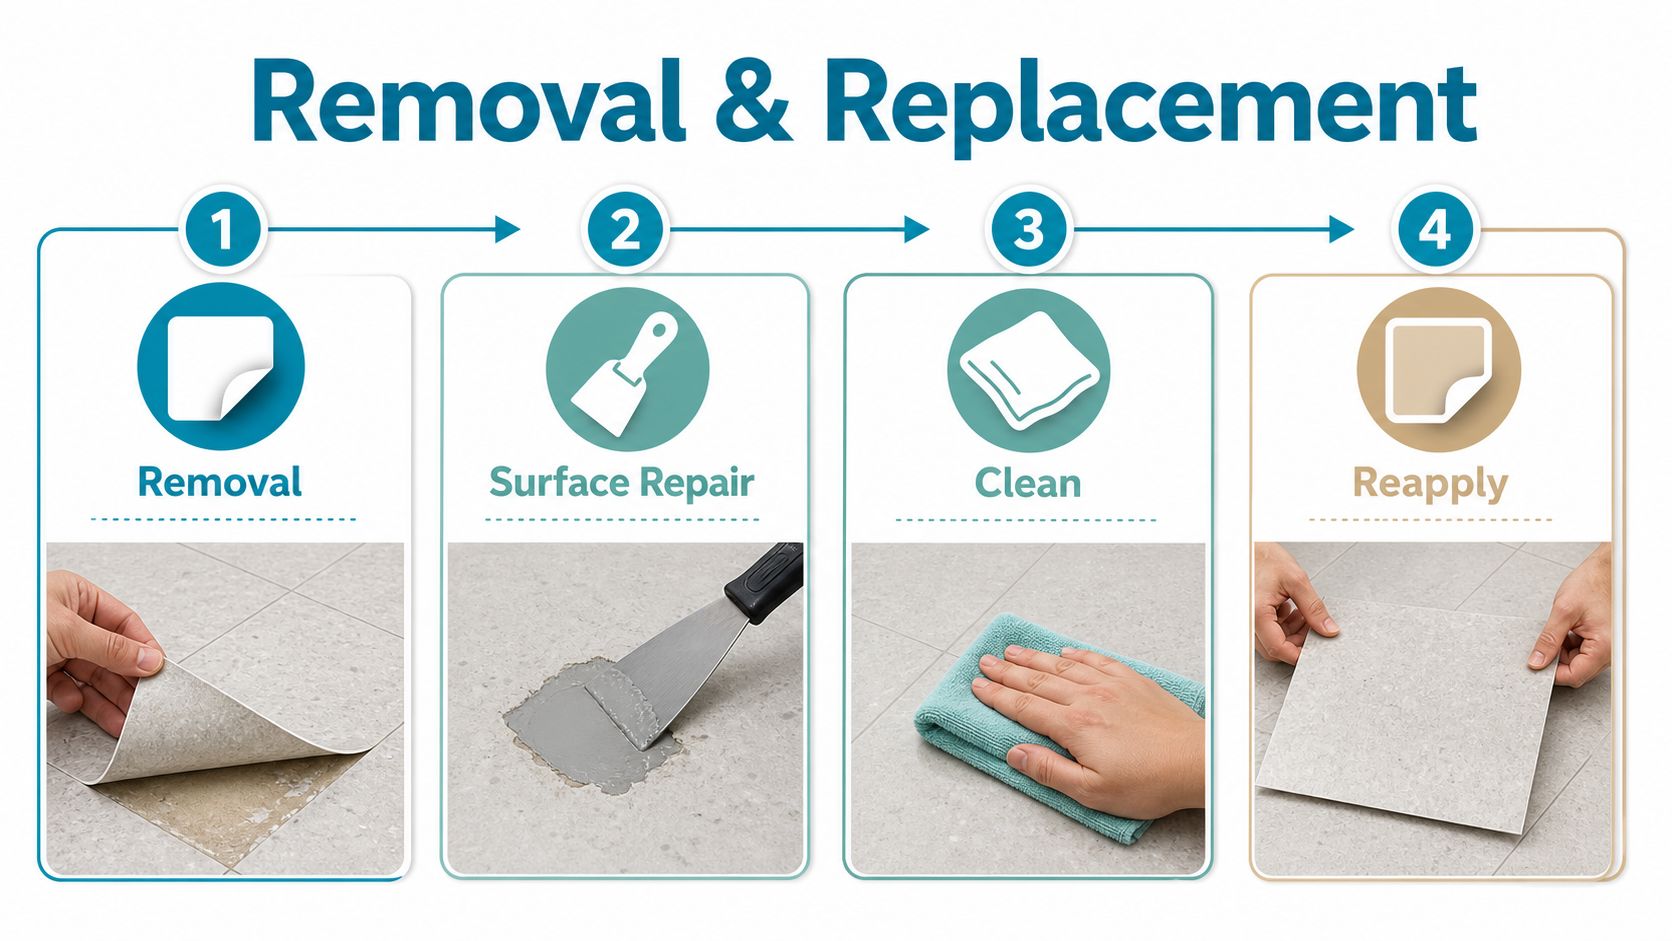
Warm each panel with a hairdryer on medium heat for 30 to 60 seconds, keeping the airflow moving. Lift a corner with a fingernail or plastic scraper, then pull the sticker back at a low angle rather than away from the wall. A low angle puts less stress on the substrate.
If adhesive remains, test a small amount of isopropyl alcohol or a dedicated citrus adhesive remover on an offcut first. Never assume a solvent safe for the vinyl is safe for painted plaster or old grout. Work slowly, and stop if the paint film begins to soften.
Treat repairs as part of the original job
Keep spare offcuts flat between sheets of baking paper, labelled with the room, position and purchase details. Matching becomes easier when you retain the exact material, and replacement batches can vary subtly in colour or print.
For a patch, clean and dry the damaged area, warm the replacement piece so it flexes and align the pattern before pressing it down. A tiny repair is less noticeable when the cut follows a grout line or a design boundary rather than crossing a prominent motif.
The lifecycle is also a landlord issue. Photograph the original wall and tiles before installation, keep the product information and tell the landlord what you intend to change. At the end of the tenancy, remove the stickers carefully and repair any substrate damage rather than assuming “removable” means damage-free in every bathroom.
For a related decorative option, see these bathroom tile transfers, then check the care and removal instructions for the exact product.
Final Checklist and Common Pitfalls to Avoid
A successful installation comes from making the moisture decision before choosing the pattern. Bathroom tile vinyl stickers suit dry walls and controlled splash areas when the substrate is sound, clean and flat. They shouldn't be used inside direct shower spray zones or as a replacement for failed waterproofing.
Keep this checklist with the spare material:
- Map exposure first: Classify every wall as dry, splash, near-shower or direct-water.
- Prepare the substrate: Clean, degrease, lightly abrade where appropriate and repair damaged grout.
- Prime correctly: Prime bare plaster or MDF before applying adhesive vinyl.
- Plan the layout: Dry-fit patterned sheets around corners, taps and sockets.
- Seal the right edges: Protect bath, basin and fixture cut edges with compatible sanitary silicone.
- Avoid trapped moisture: Don't seal a top edge in a way that closes damp behind the sticker.
- Keep repairs possible: Store a spare square decimetre of each design flat for future patching.
Seven mistakes that cause preventable failures
- Skipping degreasing. Soap film can leave a surface that feels clean but still rejects adhesive.
- Applying over silicone. Vinyl needs a stable, clean surface, not a flexible bead beneath it.
- Fitting cold material to a cold wall. Poor temperature conditions can reduce initial tack.
- Rushing patterned alignment. A small error at the first sheet becomes obvious at the final corner.
- Ignoring grout depth. Deep or damaged joints can show through and stress the vinyl.
- Using abrasive cleaners. Scrubbing can damage the print and catch exposed edges.
- Leaving splash-zone edges open. Water finds the smallest gap beside a bath or basin.
The difference between peeling corners and a tidy, lasting refresh is rarely the sticker alone. It's the combination of moisture mapping, substrate preparation, careful application, controlled cleaning and sensible sealing. Follow those rules and you'll know exactly where bathroom tile vinyl stickers earn their place, and where a proper waterproof renovation is the safer investment.
For a practical way to compare bathroom and kitchen designs, visit Quote My Wall, which offers peel-and-stick vinyl tile stickers alongside other vinyl décor products. Choose a design for a dry or controlled splash area, then check its care instructions and plan the surface preparation before ordering.