

Bathroom Tile Stickers Black: The Complete UK Guide
Bathroom tile stickers can deliver a convincing black-tile refresh at a fraction of a full refit, but they're best used on clean, dry splashback tiles rather than inside a constantly soaked shower. In the right zone, expect a decorative finish that can last around 1 to 3 years for budget products and about 5 years when correctly applied, rather than a permanent waterproofing system.
Black tile stickers have become a popular answer for the familiar UK bathroom problem: dated ceramic, tired grout and a renovation quote that feels disproportionate to the size of the room. They give renters and homeowners a way to change the visual direction without removing sound tiles, and black can hide an old pattern more effectively than a pale film.
That doesn't mean every peel-and-stick product is suitable for every wall. Adhesive quality, tile condition, humidity, cleaning habits and water exposure all decide whether the result looks professionally fitted or starts lifting at the corners. Bathrooms are also a serious commitment for many households. The Bathroom Manufacturers Association, citing the 2024 Houzz & Home Study, reports that bathrooms made up 29% of interior-room renovation projects, with median bathroom spending reaching £7,300 in 2023. It also records an average of 8.6 months to plan and about 3 months to build a bathroom renovation.
This guide focuses on the practical details that matter on site: selecting the right vinyl, preparing glazed tiles, applying decals without bubbles, sealing suitable edges, styling black finishes in small and large rooms, and maintaining the surface without attacking the adhesive.
Why Black Tile Stickers Are the Bathroom Update UK Homeowners Actually Want
A black tile sticker works because it changes the room's strongest visual feature without requiring a full demolition. A dated cream splashback can become a matt black field, a geometric pattern or a darker stone effect while the existing ceramic remains underneath. In a rental, that can be a more sensible intervention than removing tiles you don't own. In a family bathroom, it can postpone a disruptive refit while you save for a permanent finish.
The UK market is particularly suited to this kind of targeted update. Many bathrooms are compact, which makes a small area of vinyl capable of changing the entire impression of the room. Novema Research's UK bathroom data puts around 40% of renovated bathrooms below 5 square metres and 80% below 10 square metres. A compact room also means less material to buy and fewer difficult cuts around a suite.
Practical rule: Treat black tile stickers as decorative surfacing, not as a substitute for tanking, tiling or shower waterproofing.
What the finish can and can't do
Good stickers can disguise a dated pattern, unify mismatched tiles and create a sharper backdrop for brass, chrome or timber accessories. They won't correct loose tiles, damp behind grout, uneven ceramic or failing silicone. Vinyl follows the surface beneath it, so every ridge and loose edge eventually becomes visible.
The same applies to lifespan. Premium stickers installed on a clean, dry, non-porous splashback can give useful service, while cheap material in a constantly wet enclosure may peel quickly. Steam and repeated wetting attack the adhesive at the edges first, particularly where a sticker bridges a grout joint or has been stretched around a corner.
For visual direction, Modern Bathrooms' black tile ideas are useful for comparing dark layouts, patterns and accessory combinations before you order. Use those references as a design starting point, then assess your own bathroom carefully. A cloakroom basin wall is a much safer application than the wall directly behind a power shower.
Choosing the Right Vinyl, Finish and Size
The word “vinyl” covers several constructions, and the cheapest roll isn't automatically the right buy for a humid bathroom. Calendered vinyl is commonly used for straightforward flat applications and can be perfectly workable on sound tiles, though it may be less forgiving when asked to conform around awkward edges. Polymeric vinyl offers more flexibility for general decorative work. Cast vinyl is thinner and more conformable, making it the strongest choice where a premium finish and complex shaping matter.
In practice, the surface and installation zone often matter more than the label. A high-quality product applied to greasy, damp tiles still fails. A suitable mid-range decal on a dry splashback can outperform an expensive film used inside a shower enclosure.
Pick the finish around the room's light
Matt black gives the most architectural appearance and is good at reducing reflections on a feature wall. It can, however, show pale soap residue clearly. Gloss black reflects light and can make a small room feel brighter, but it also reveals bubbles, dust and imperfect tile alignment. Satin is usually the easiest compromise for a lived-in bathroom.
Textured stone, terrazzo and geometric prints add variation when a plain black wall would feel too heavy. They also break up minor marks better than a completely uniform dark field.
| Finish | Look | Best for | Durability | Price |
|---|---|---|---|---|
| Matt black | Flat, modern and low-reflection | Feature walls and cloakroom splashbacks | Depends heavily on edge protection and cleaning | Usually accessible |
| Satin black | Soft sheen with moderate reflection | Family bathrooms and basin areas | A practical balance for regular use | Mid-range |
| Gloss black | Reflective and crisp | Bright rooms and small accents | Shows surface faults, so prep is critical | Varies by material |
| Stone or terrazzo | Printed texture and visual variation | Larger walls or patterned updates | Print quality and laminate affect service life | Often higher |
Measure the tile, not just the wall
Measure from the actual tile edges and check whether the product is designed to cover each tile individually or bridge several tiles. A sticker that spans a recessed grout line may sag into the joint, trap air or lift when the wall flexes with heat and moisture. One that's too small leaves a bright ceramic border that makes the pattern look accidental.
Dry-lay the sheets before peeling anything. Check the repeat around taps, basin backs, windows and outside corners. If the design has a printed grout line, align it with the existing reveal. If it doesn't, decide whether you want the original grout to remain visible or whether the layout needs a border or trim to look intentional.
Prepping Bathroom Tiles So Stickers Actually Bond
Most failed bathroom tile-sticker jobs aren't caused by the decal. They fail because the tile was cleaned quickly, dried poorly or covered over a problem that should have been repaired first. Soap film, limescale and body-oil residue create a release layer between the adhesive and the ceramic.
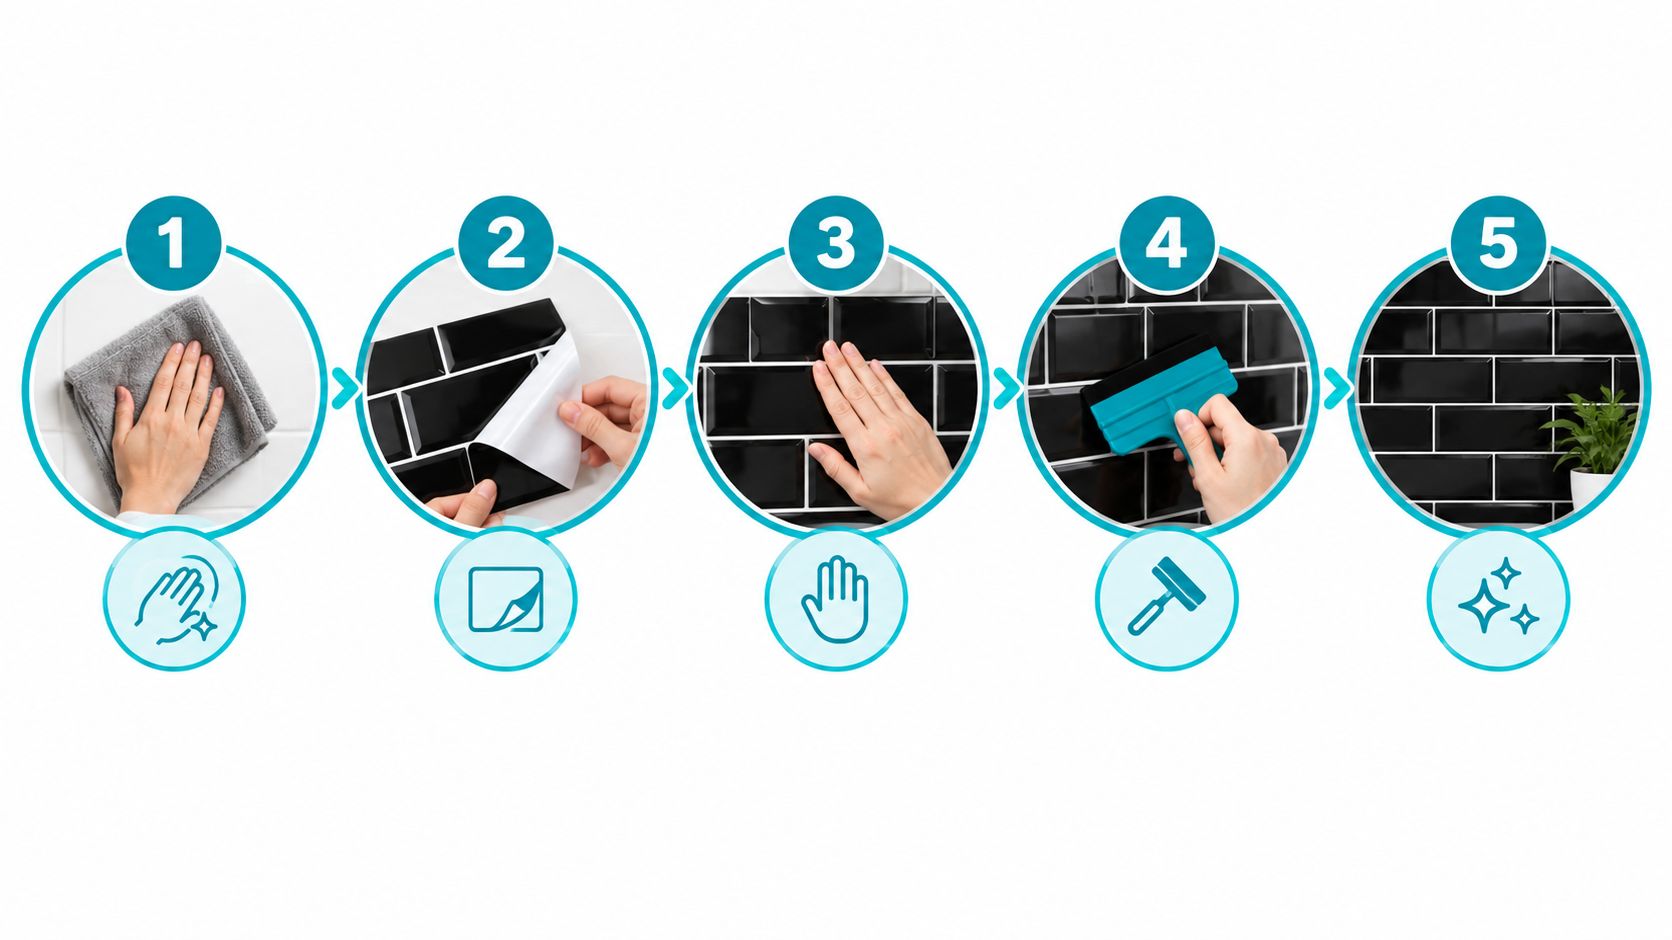
Start with a sugar-soap wash and a non-abrasive pad. Work around the grout lines, basin sides and the lower edge of the splashback, where product residue collects. Wipe away the cleaner rather than allowing it to dry on the surface. Follow with isopropyl alcohol or methylated spirit on a lint-free cloth to remove the remaining grease, then allow the tiles to dry completely.
Inspect before you degrease
Cut away old silicone around baths, basins and worktops. Don't place vinyl over silicone. It has a flexible, low-energy surface that gives the adhesive little dependable grip, and the joint will remain a weak point even if the sticker looks smooth on installation day.
Check each tile for movement, hollow spots, loose grout and hairline cracks. Repair or replace defective areas before covering them. Lightly textured tiles may need careful smoothing, but don't sand a sound glazed face aggressively and create a dusty surface. If the tile is heavily textured, a sticker may never achieve the continuous contact needed for a clean finish.
A primer can help on difficult, low-energy surfaces, but it isn't a cure for damp or contamination. Use a product such as 3M 94 only when the vinyl manufacturer's guidance supports it, and test a discreet area first. Primers can make later removal more difficult, which matters in a rental.
Independent UK guidance on using tile stickers also stresses the same fundamentals: the surface must be smooth, clean, degreased and fully dry. Don't apply after a shower and hope the room will dry around the decal. Ventilate the bathroom, stop ordinary use during preparation and wait until the tile itself is dry, not merely the air.
Applying Black Tile Stickers Without Bubbles or Peeling
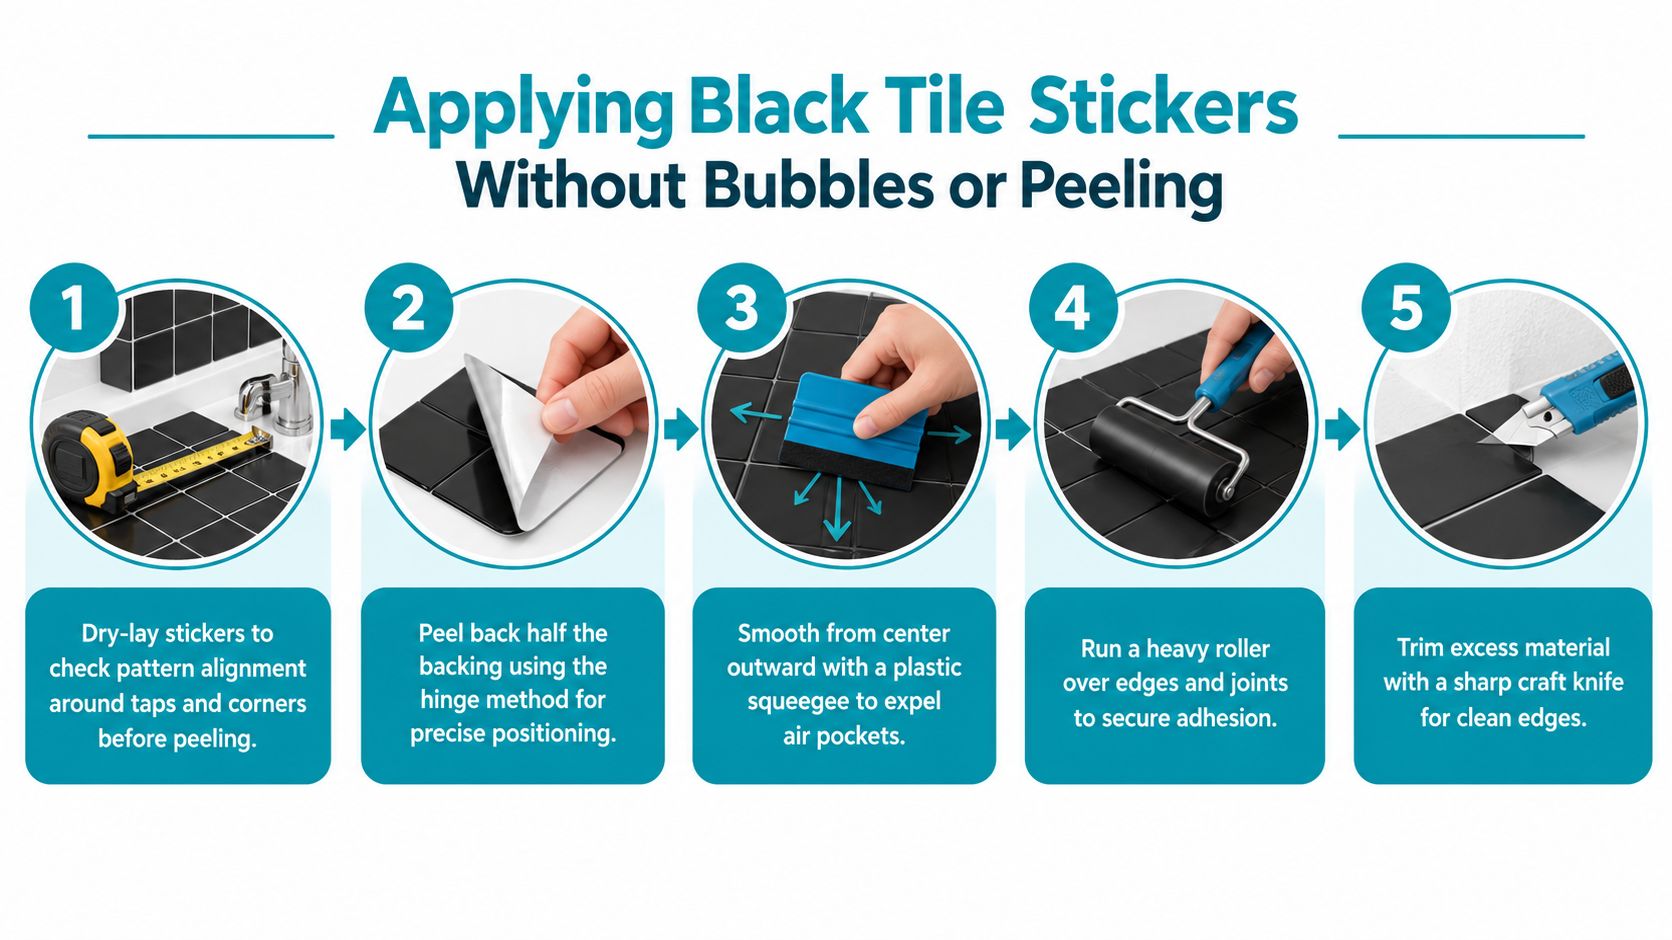
Begin with a dry lay. Put the stickers against the wall without removing the backing and check the pattern against the basin, taps, corners and the existing tile datums. A layout that looks centred on the wall can look crooked once it reaches a window reveal or the side of a mirror.
The hinge method gives better control than peeling the whole backing away. Fold or tape the sticker temporarily in position, peel back roughly a third of the liner and tack the exposed leading edge to the tile. Keep the material relaxed. Stretching vinyl to make a short piece reach an edge creates tension that later pulls the corners back.
Use a felt-edged squeegee, plastic card or similar smooth tool. Work from the centre towards the edges at a shallow angle, pushing air ahead of the tool rather than trapping it beneath the film. Peel more backing gradually as each section lies flat.
Keep the pattern on the tile
For individual tile decals, align the sticker with the ceramic rather than with a nearby wall that may not be square. For rectangular layouts, keep the printed joints consistent and avoid allowing one sheet to drift across successive rows. If the product is intended to overlap, follow its stated overlap direction and keep the repeat uniform. Random overlaps are particularly visible in black because the contrast at the joints is strong.
Press the perimeter firmly, especially at grout-line crossings and along the lower edge. A small roller helps secure joints without forcing marks into the face. Run the tool around taps and other penetrations before trimming.
This guide to applying vinyl stickers is useful for reinforcing the basic squeegee and positioning technique, but bathroom tile work needs extra attention around moisture points.
Fix problems while they are still small
A trapped bubble usually needs a pin-prick with a fine needle, followed by gentle pressure towards the hole. Don't slash the vinyl with a blade. A cut creates a visible tear and gives moisture a direct route under the film.
For a lifted corner, remove dust and residue with isopropyl alcohol, let the area dry and press the edge back down. If the adhesive has collected dirt or the vinyl has permanently curled, replacement is more reliable than repeatedly forcing it flat. A hairdryer on a low setting can make a suitable film more pliable around an outside corner, but keep it moving and don't overheat the adhesive.
Avoid applying in a cold room, stretching the material or ignoring the original reveal lines. Those shortcuts are responsible for many of the bubbles and edge lifts blamed on the product itself.
Waterproofing and Sealing for Humid UK Bathrooms
The safe way to assess a black tile sticker is by water exposure, not by the room name. A basin splashback receives occasional droplets and can be dried. A shower enclosure receives direct spray, steam and repeated heat cycling. Those are different conditions, and the same sticker shouldn't be expected to perform equally in both.
Splashbacks behind basins and around baths can be suitable when the tile is sound, the application is accurate and exposed edges are protected. Directly inside a shower enclosure, on a shower floor or beneath a power shower, the risk is much higher. UK editorial guidance makes the same distinction and warns against continuously soaked areas, while also noting that extra sealing may be needed when stickers are used on floors. For broader context on the difference between decorative coverings and proper wet-area protection, see this guide to shower waterproofing over tiles.
| Bathroom zone | Suitability | Sealing method | Expected lifespan |
|---|---|---|---|
| Basin splashback | Suitable when the surface is dry and sound | Seal exposed lower and side edges | Budget products may last 1 to 3 years, with correctly applied premium products around 5 years |
| Bath-side splash zone | Possible with careful drying and edge protection | Mould-resistant clear silicone at vulnerable edges | Varies with splash and ventilation |
| Dry feature wall | Suitable | Usually no face coating, protect exposed edges | Can outlast a wet splashback |
| Shower enclosure | Not recommended | Sealing cannot turn a decorative decal into a wet-room system | May fail prematurely |
| Shower floor | Generally unsuitable | A finish would require more than ordinary edge sealing | Not a dependable application |
Use a clear, mould-resistant silicone along the bottom course or exposed perimeter where water could sit. Apply it to the edge, not across the face of the vinyl. A film of silicone over the decal can look cloudy, collect dirt and make future replacement difficult. Choose a sealant compatible with the sticker and provide adequate ventilation during curing. Solvent-based products can be aggressive, so water-based options may be more appropriate where the manufacturer allows them.
Black hides some limescale staining better than white, but soap residue remains obvious. A regular wipe keeps the finish looking deliberate and gives you an early view of any lifting.
The bathroom tile sticker waterproofing guidance is worth checking against the product you buy, because “water-resistant” should never be read as “suitable for constant immersion”.
Styling Ideas for Small and Large Bathrooms
A small UK cloakroom benefits from restraint. Covering every wall in glossy black can make the room feel enclosed, particularly when the only light comes from a borrowed window or ceiling fitting. A matt black run behind the basin, finished at a clear horizontal line, gives the room a designed feature without turning every surface into a reflection.
One effective arrangement is a half-height black splashback with a slim metallic trim above it. Brass warms the contrast, brushed nickel keeps the scheme cooler and chrome works when the existing taps and waste are already bright. Another option is a full black back wall behind the basin, with pale painted walls on the sides. The dark wall then acts as a backdrop rather than a tunnel.

Give larger rooms a visual anchor
In a larger family bathroom, a dark geometric print can define the wall behind a freestanding basin or bath while pale plaster keeps the rest of the room open. A black herringbone effect can ground a floor area visually, but only use it where the product is intended for that exposure and where the floor is flat, dry and properly protected.
Warm wood, woven storage and off-white paint stop black vinyl becoming a flat block. A mirror works best opposite a dark wall when you want it to bounce light back into the room. Mounted directly on the black surface, it can still look good, but the wall won't contribute as much reflected brightness.
Small finishing decisions separate a planned installation from an applied film. Align the sticker pattern with the basin centreline, keep cuts symmetrical around taps and use a matching black grout pen only where the existing grout is sound and the pen is suitable for bathroom use. Matching black silicone at a perimeter joint can reinforce the visual intention, but it shouldn't conceal damp or failed sealant underneath.
For more layout references, bathroom tile sticker ideas can help you compare restrained splashbacks with bolder full-wall treatments. Choose one dominant black area, then let the sanitaryware and accessories provide the contrast.
Maintenance Routine That Protects Your Home
Black tile stickers stay presentable when cleaning is gentle and consistent. Use a soft microfibre cloth with a pH-neutral bathroom cleaner, then wipe with clean water and dry the surface. Avoid abrasive pads, aggressive bleach products and harsh solvents unless the sticker manufacturer specifically approves them. Those products can dull the print, weaken the laminate or attack a newly sealed edge.
After a shower, improve ventilation and remove standing droplets from the splashback. You don't need to polish the room every time someone washes, but water left along the lower edge gives moisture more opportunity to work into a weak joint. Pay particular attention to the lines where the sticker meets grout, silicone, the basin or a worktop.
A routine that catches failure early
- Weekly wipe: Clean soap residue and dry the face with a soft cloth rather than scrubbing.
- Monthly edge check: Run a fingertip along corners and grout-line crossings. Look for a soft edge, whitening beneath the film or a small blister.
- Quarterly seal inspection: Check the lower splashback bead and the joints around the basin or bath. Re-seal a clean, dry exposed edge before water reaches the adhesive.
- Replace damaged sections: A torn decal, permanently curled corner or widespread bubbling usually needs replacement, not another layer of glue.
- Keep sharp tools away: Razors, pumice products and abrasive cleaning pads can score the face and create a point for peeling to start.

A black finish is forgiving visually, but it isn't maintenance-free. Soap marks can make matt vinyl look patchy, and a lifted edge can collect grime before the problem is obvious from across the room. If the same corner repeatedly fails, investigate the tile, silicone joint or water exposure rather than repeatedly pressing it down.
Quote My Wall offers peel-and-stick, wipeable tile-sticker designs for bathroom and kitchen updates, including black patterned options. Visit Quote My Wall to compare designs and plan a black tile application around the surfaces your bathroom can realistically support.