
A DIY Guide to Iron On Clothing Decals
Ready to give your wardrobe a personal touch? Iron on clothing decals, which you might also know as heat transfer vinyl (HTV), are a brilliant way to get creative with your clothes. I'm going to walk you through the entire process, showing you how simple it is to get professional-looking results right from your own home.
Your Guide to Custom Clothing with Iron On Decals

Forget settling for off-the-rack fashion. We're diving into the world of DIY customisation that lets you make your clothes truly your own. Whether you're making branded gear for your business, fun t-shirts for a family holiday, or just want to spice up a plain old jacket, iron on decals are a straightforward and seriously effective solution.
The whole process is much less intimidating than it sounds and really just boils down to a few key stages. We’ll cover everything from picking the right materials for your project to getting the application just right so your designs last for ages.
Why Customisation is More Popular Than Ever
Let's face it, people are tired of mass-produced clothes. There’s a huge trend towards unique items that express who we are, and customisation is at the heart of it. People want pieces that tell a story. You can read more about this shift in our article on the power of personalization in modern shopping. It’s not just a fad; it’s a fundamental change in how we think about fashion.
The numbers back this up, too. The UK’s decorated apparel market, which is exactly what we're talking about, was worth around USD 1,338.8 million in 2023. That figure is expected to jump to an estimated USD 3,138.2 million by 2030. That's a massive demand for personalised clothing!
By the time you're done with this guide, you’ll have the know-how to turn any plain garment into something special. Getting the technique right is the key to making sure your creations not only look great but also hold up to plenty of wear and washing.
For another excellent walkthrough of the entire process, from prep to aftercare, check out this expert guide on How to Iron Transfer for Flawless Custom Designs. It's a great resource, especially if you're just starting out.
Matching Decals and Fabrics for Best Results
The real secret to a durable, professional-looking design isn’t just in the application; it all begins with making a great match between your decal and your garment. It’s a bit like cooking – the best technique won’t save a dish if you start with the wrong ingredients. The very same principle applies to iron on clothing decals.
Getting this combination right from the start is what ensures your design not only looks fantastic but also holds up against wear and tear. After all, not all fabrics are created equal when it comes to handling heat and adhesives.
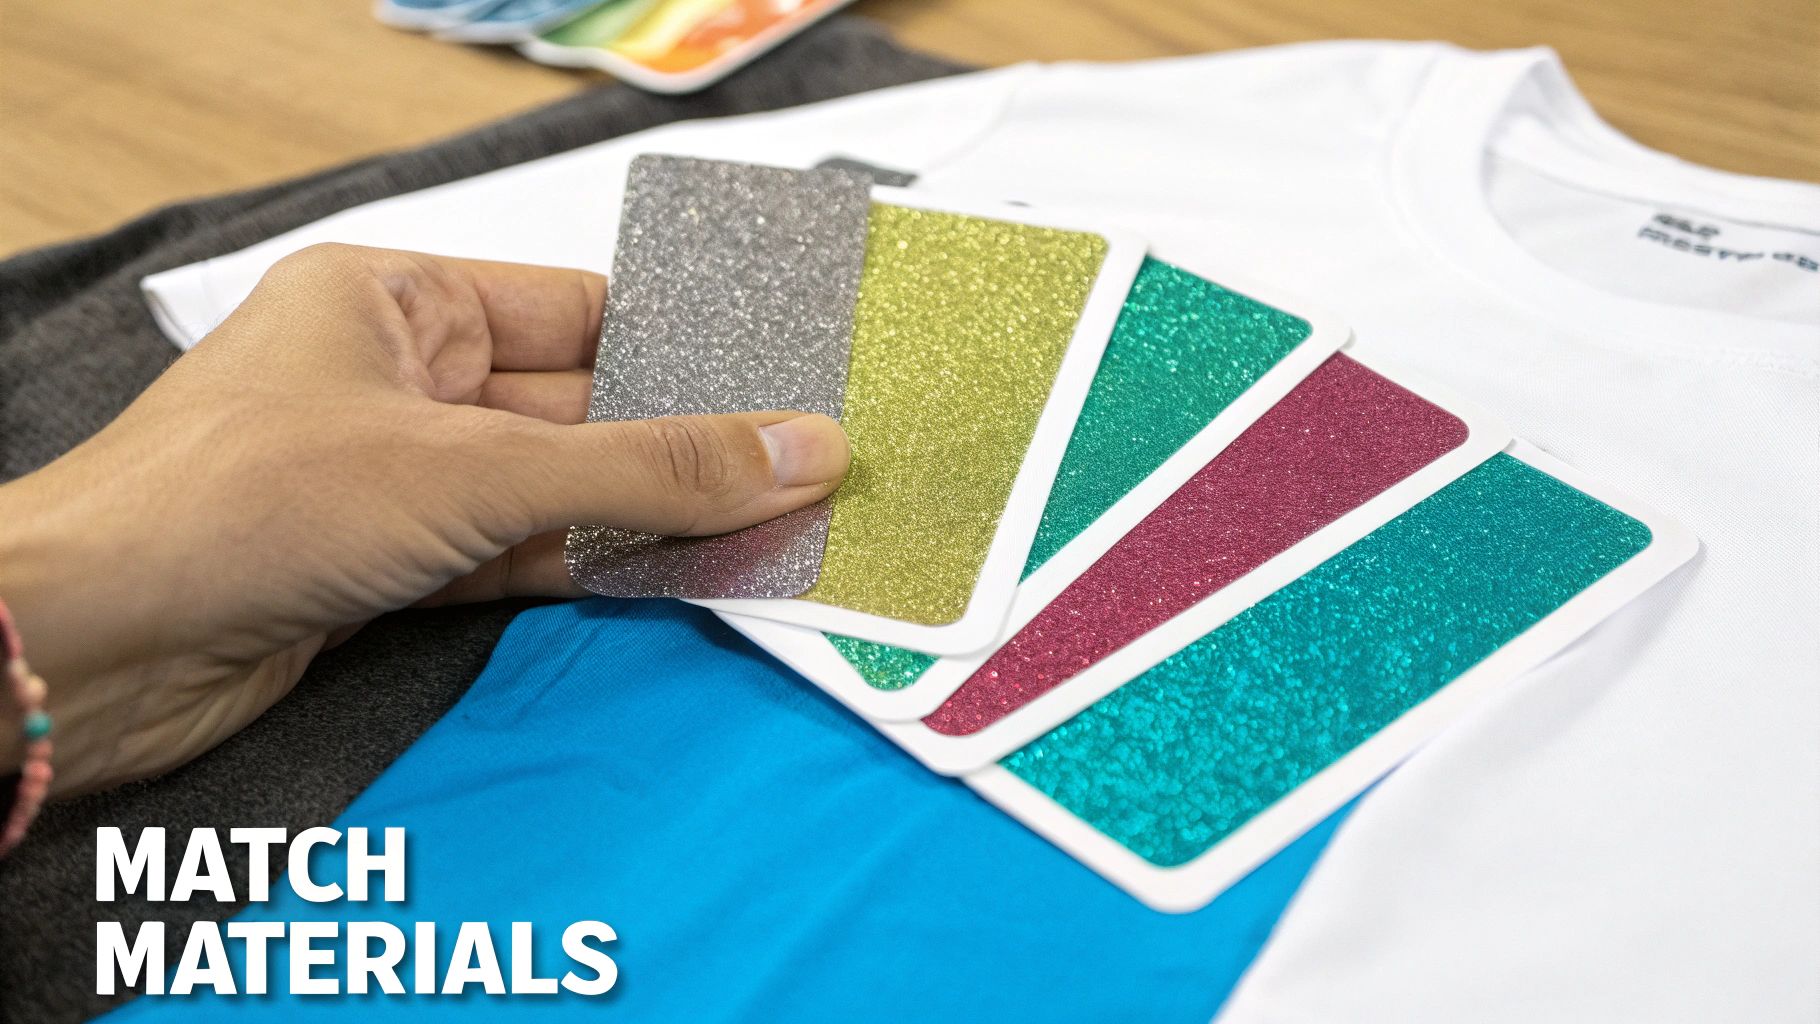
Getting to Know Your Decals
The world of iron on decals is surprisingly diverse, and the type you choose will completely change the final look and feel of your project.
- Classic Matte & Glossy Vinyl: These are the reliable workhorses of the decal world. They give you a smooth, clean finish that’s perfect for text, logos, and solid shapes. Matte vinyl offers a modern, flat look, while glossy has a subtle, eye-catching shine.
- Glitter & Holographic Vinyl: If you want your design to truly pop, these are the way to go. Glitter vinyl contains real glitter flakes for maximum sparkle, whereas holographic vinyl creates a stunning effect by shifting in colour as the light hits it.
- Flock Vinyl: This one has a wonderfully soft, fuzzy, suede-like texture. It adds a premium, tactile dimension to designs and is absolutely brilliant for creating a retro feel on jumpers or jackets.
The surge in popularity of sportswear and athleisure in the UK has created a huge demand for customisation options that are both durable and flexible. This has put iron on decals right at the centre of modern apparel design. The good news is that technological advances have made it easier than ever to achieve high-quality results at home.
Picking the Right Fabric
Just as important as the decal itself is the fabric you're applying it to. Some materials are perfect partners for heat transfer, while others are a recipe for disappointment.
For the best and most reliable results, you can't go wrong with these fabrics:
- 100% Cotton: This is the gold standard. It handles heat incredibly well, and its natural fibres give the decal's adhesive an excellent surface to grip onto.
- Polyester: Another great choice, especially common in sportswear. Just be a little more mindful of your heat setting, as very high temperatures can scorch polyester fibres.
- Poly-Cotton Blends: These blends offer the best of both worlds – the soft breathability of cotton and the tough durability of polyester. They are exceptionally reliable for almost any decal application.
To make this even simpler, here's a quick reference table to help you pair the right decal with the right fabric.
Decal Material and Fabric Compatibility Chart
| Decal Type | Best For Fabric Types | Application Feel | Best Use Case Example |
|---|---|---|---|
| Classic Vinyl | Cotton, Polyester, Poly-Cotton | Smooth, flexible layer on top of fabric. | Custom t-shirts with bold text or logos. |
| Glitter Vinyl | Cotton, Poly-Cotton | Slightly textured, very sparkly finish. | A dazzling design on a canvas tote bag. |
| Flock Vinyl | Cotton, Poly-Cotton, Canvas | Soft, raised, suede-like texture. | Adding a vintage-style logo to a sweatshirt. |
This chart should give you a solid starting point for your projects, ensuring your finished product feels just as good as it looks.
A critical piece of advice I can't stress enough: always pre-wash your garment! Skipping this step can lead to disaster. Fabrics, especially cotton, often shrink during their first wash, which will cause your perfectly applied decal to wrinkle, crack, and peel off.
On the other hand, there are certain materials you should steer clear of. Fabrics like nylon and rayon are very sensitive to heat and can easily melt or scorch under an iron. Heavily textured materials, such as ribbed knits or waffle fabrics, also pose a challenge because the adhesive can't make full, even contact with the surface, leading to a weak bond.
For a deeper dive into material selection, especially for practical items like school uniforms or care home clothing, check out our guide on choosing the right material for name labels.
Getting Your Workspace Ready
Before you jump into applying your iron on clothing decals, a little bit of prep work in your workspace can make all the difference. Honestly, taking five minutes to get organised now will save you from a world of frustration later and is the secret to getting that professional, clean finish. It’s not about having a fancy setup, but about creating a stable, efficient space.
First things first, let's talk about your surface. Your standard, wobbly ironing board isn't going to cut it here. It's just too padded and unstable to give you the solid foundation you need for the decal's adhesive to really grip the fabric fibres.
Instead, find yourself a sturdy, flat, and heat-resistant surface. A solid wooden dining table or even a kitchen counter will do the job perfectly. Just pop a folded towel or a proper pressing mat on top. This solid base is what lets you apply that firm, even pressure needed for a decal that’ll last wash after wash.
Your Toolkit Essentials
You don’t need a mountain of gear, but having these key items handy will stop you from running around mid-project.
- Your Heat Source: This is either going to be a regular household iron or a heat press. If you're using an iron, make absolutely sure the steam function is off. Go ahead and empty all the water out, too. Steam is moisture, and moisture is the number one enemy of a good, strong bond.
- A Pressing Cloth: Never press directly onto the decal’s shiny plastic carrier sheet. A thin bit of cotton fabric, a sheet of parchment paper, or a Teflon sheet acts as a protective barrier. It’ll save both your garment and the decal from scorching under the direct heat.
- A Ruler or Measuring Tape: Trust me, just eyeballing the placement rarely works out. A simple ruler is your best mate for getting things perfectly centred and straight, making your final piece look polished.
Here’s a pro tip that many people skip: always pre-press the area on the garment where you plan to place the decal. Just a quick 5-10 second iron over the spot works wonders. It zaps any lingering moisture and smooths out stubborn creases, giving you a perfect canvas for the decal to adhere to.
Nailing the Placement
With your space all set up, it's time to get the positioning spot on. A wonky design can throw off the whole look of a garment, no matter how cool the decal is. For t-shirts, I’ve got a simple trick that ensures your iron on clothing decals are perfectly centred every time.
Fold the shirt in half vertically, making sure to line up the shoulder seams precisely. Give it a light press down the fold to create a temporary centre crease. When you unfold it, you’ll have a faint but perfect guideline right down the middle. To find the vertical centre, you can do the same thing horizontally, folding the shirt just below the armpits.
Now, use those creases to guide your decal into the perfect spot. This little bit of prep takes less than a minute but makes your design look intentional and professional, not like a last-minute accident. Right, with your workspace sorted and garment prepped, you're ready for the main event.
Mastering the Heat Application Process
This is the moment your design truly comes to life. Getting a great result with iron on clothing decals all comes down to a simple but crucial formula: the right temperature, the right amount of time, and the right amount of pressure. Nail this trio, and you'll end up with a design that looks like it was professionally printed.
These principles hold true whether you're using a standard household iron or a dedicated heat press. Consistency is what you're aiming for. A classic mistake I see people make with a household iron is leaving the steam function on. Steam is the absolute enemy of the decal's adhesive, so always make sure your iron is completely dry.
The infographic below breaks down the essential workflow for a flawless application, from prep to the final press.
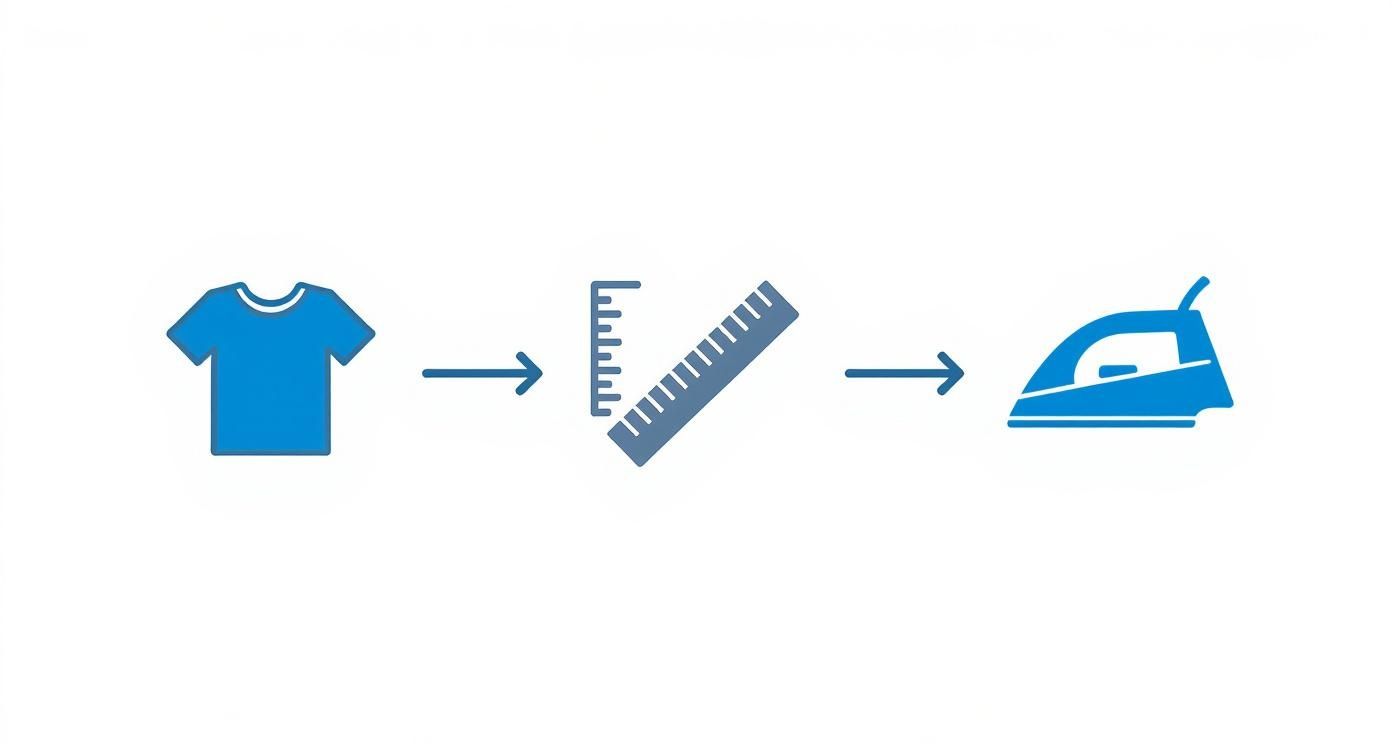
As you can see, a successful application is a methodical process, not a rush job. Every little step, from prepping the garment to carefully centring the decal, builds the foundation for that final press.
The Secrets to a Perfect Press
When you're ready to apply heat, don't slide the iron around like you're getting creases out of a shirt. Instead, press down firmly on one section of the design for the recommended time (usually 15-30 seconds). Then, lift the iron completely and move to the next section, overlapping just a little. This technique ensures the entire decal gets consistent heat and pressure.
Using a protective layer between your iron and the decal is non-negotiable.
- Parchment Paper: A fantastic, readily available option that protects your fabric from scorching.
- Teflon Sheet: This is a reusable sheet that gives you excellent heat distribution and stops anything from sticking to your iron's plate.
These simple tools are your best defence against the dreaded shiny marks that direct heat can leave on certain fabrics, keeping your finished piece looking clean and professional.
One of the most critical details is understanding whether your decal is a 'warm peel' or a 'cool peel'. This simply tells you when to remove the clear plastic carrier sheet. Peeling at the wrong temperature can completely ruin the design, so always, always check the instructions that came with your iron on clothing decals.
From Hobby to Industry Standard
The technology behind these simple applications has a surprisingly rich history. Here in the UK, iron-on labels started gaining serious commercial traction back in the 1960s, largely thanks to big steps forward in thermoplastic adhesive technology. This innovation made customising garments much faster and more durable than ever before. You can read more about the evolution of iron-on clothing labels and how it connects to the UK's textile legacy.
Warm Peel vs Cool Peel Explained
Knowing the difference between these peel types is absolutely essential for getting a smooth, clean finish.
| Peel Type | When to Peel | What Happens If You Get It Wrong |
|---|---|---|
| Warm Peel | Peel the carrier sheet while the design is still warm to the touch. | Peeling too late (when it's cold) can cause the decal to stick to the carrier sheet instead of the fabric. |
| Cool Peel | Wait until the design has cooled down completely before peeling. | Peeling too soon (while it's still warm) can stretch, warp, or lift the vinyl right off the garment. |
It's a small detail, but it can make or break your project. Always check the instructions that came with your specific decal material. Getting this final step right is the secret to truly mastering the application process.
Looking After Your Custom Garments
You’ve done the creative bit and your custom garment looks fantastic. Great job! But now comes the important part: making sure it stays that way. A little bit of aftercare is all it takes to keep your design looking fresh and prevent the vinyl from peeling or cracking after a few washes.
The golden rule here is to give it some time. You need to wait at least 24 hours before that first wash. I know it's tempting to wear it straight away, but this waiting period is non-negotiable. It gives the heat-activated adhesive the time it needs to fully cure and properly bond to the fabric. Rushing this step is the single biggest reason I see designs fail.
The Right Way to Wash and Dry
When laundry day rolls around, the first thing to do is turn the garment inside out. This is a simple trick, but it's incredibly effective. It creates a protective barrier, stopping the decal from rubbing against other items in the wash or the inside of the machine.
For the best, long-lasting results, stick to these guidelines:
- Go gentle: Always opt for a gentle wash cycle with cool or lukewarm water. Hot water is the enemy of iron-on vinyl as it can soften the adhesive and lead to lifting edges.
- Mild detergent only: Stick to a standard, mild detergent. Steer clear of bleach and fabric softeners, as the harsh chemicals can slowly eat away at the adhesive, causing the design to degrade over time.
When it comes to drying, air drying is your best friend. Hang it on a line or lay it flat. Tumble dryers, especially on hot settings, are the number one culprit for ruining custom clothing. The intense heat can cause the decal to crack and peel off completely. If you absolutely have to use a dryer, make sure it’s on the lowest heat setting possible, or a 'tumble dry cool' cycle.
Following these straightforward care instructions will keep your projects looking as brilliant as the day you made them. If you're curious about what makes some materials more durable than others, we dive into the science behind machine washable labels in another one of our guides.
Tackling Common Decal Woes
Even with the best preparation, you might run into a few hiccups with your iron-on clothing decals. It happens to all of us. The good news is that most common problems are surprisingly simple to fix once you know what to look for. Think of it as part of the learning curve – a little troubleshooting now will make you a pro in no time.
One of the most common headaches is seeing a decal start to lift at the edges. This can happen right after you’ve pressed it or, more frustratingly, after its first trip through the wash. This is almost always a classic case of not enough heat, not enough pressure, or not enough time. The adhesive just didn't get the chance to properly melt and grab onto the fabric fibres.
What to Do About Lifting Edges
If you spot an edge that isn't sticking down, don't panic. The fix is usually quick and easy.
Just grab your protective sheet (parchment paper works great), lay it back over the design, and press that specific area again. Be sure to apply firm, even pressure for an extra 10-15 seconds, focusing your heat right on those stubborn edges.
A word of advice from experience: let the garment cool down completely before you even think about checking the bond again. The adhesive needs that cooling time to fully set. Peeking while it's still warm can actually pull the decal up and make things worse.
Why Is My Decal Cracking?
Seeing your beautiful design crack or peel after washing is another frequent frustration. This usually comes down to one of two culprits:
- The garment was stretched while you were applying the decal, which is a common issue with stretchy fabrics like jersey or spandex.
- The aftercare rules weren't followed to the letter.
Always wait at least 24 hours before that first wash. When you do wash it, turn the garment inside out, use a cool cycle, and steer clear of high-heat tumble dryers. A little care goes a long way in keeping your custom designs looking sharp.
Got Questions About Iron On Decals? We've Got Answers
Stepping into the world of custom clothing with iron on decals is exciting, but it's natural to have a few questions before you fire up the iron. Getting the little details right is what separates a homemade-looking job from a truly professional finish.
We've pulled together the most common queries we hear from beginners and seasoned crafters alike. Think of this as your go-to cheat sheet for getting brilliant results every time.
How Can I Be Sure a Decal is an Iron-On Type?
This is a classic and important question. The quickest way to know for sure is to simply flip the decal or patch over. An iron-on will have a noticeable film on the back—it often looks a bit shiny or cloudy.
If you run your finger over it, this heat-activated adhesive usually feels smooth, maybe even slightly waxy. A standard sew-on patch, on the other hand, will just have the same fabric or thread texture as the front.
Will an Iron On Decal Stick to Any Fabric?
It's tempting to think you can stick a decal on anything, but for a bond that lasts, the fabric choice is crucial. You need a material that can take the heat without any drama.
- Your Safest Bets: You really can't go wrong with cotton, denim, and poly-cotton blends. These fabrics are tough enough to handle the heat, and their weave gives the adhesive something solid to grab onto.
- Proceed with Caution: Pure polyester can be a bit tricky. It's doable, but you'll need to use a lower heat setting and be careful not to scorch or melt the delicate fibres.
- Fabrics to Avoid: I'd steer clear of materials like nylon, silk, leather, and most waterproof fabrics. The high heat needed for the decal can easily ruin them, or the adhesive just won’t stick properly to the surface.
Here's a pro tip: always check the garment's care label first. If you see that little iron symbol with a cross through it ("Do Not Iron"), that's your cue to find a different customisation method for that item.
Are Iron On Decals Permanent, or Can They Be Removed?
Good news—they aren't completely permanent. You can remove them, but it takes a bit of patience. The trick is to essentially reverse the application process.
You’ll need to use your iron to gently warm the decal back up, which re-melts the adhesive and makes it pliable again. Once it’s soft, you can usually start peeling a corner away with a pair of tweezers. Just be prepared that it might leave a faint sticky residue behind, which you can typically clean up with a fabric-safe adhesive remover.
Ready to turn your creative ideas into reality? At Quote My Wall, we have a fantastic range of high-quality, durable iron-on solutions and decorative vinyls that are perfect for any project you can dream up. Give your wardrobe and home a unique touch with our easy-to-use products today! Find your next inspiration at https://www.quotemywall.co.uk.